How to Create Instagram Reels in Bulk

In this tutorial, you'll learn how to efficiently generate Instagram Reels in bulk using a spreadsheet as basis.
A big part of Instagram marketing is to post frequently and consistently. This is very time-consuming, so many wonder: can it be made more efficient? There is, and the answer is automation. Instead of creating each video individually, it is possible to create dozens of videos in one go – enough to cover your social media content for an entire month.
The solution lies in video templates. By creating a reusable template for your posts, you can automate Instagram video production with just a spreadsheet. Let's take a step-by-step look at the process.
The video above is an example of an automated Instagram Reel generated using this method. But this is just a starting point – by using the template designer, you can customize your posts to suit your exact needs.
⚙ Automation tip: Want to fully automate your Instagram Reels? This tutorial shows you how to create videos using a spreadsheet. Another option is to use Zapier and Make.com if you're looking for a truly hands-free approach. Be sure to check out our step-by-step turorials: Automate Instagram Reels with Zapier and Automate Instagram Reels with Make.com.
How to batch-create Instagram Reels?
To create Instagram Reels in bulk, we need a video generation platform like Creatomate. We start by creating a template, which serves as the design for all the videos. In this template, we specify which elements – such as text, images, colors, and more – we want to customize so that each video has its own unique content.
Once the design is ready, we create a corresponding feed where we add the content for each video. Then, we can convert the entire spreadsheet into videos – whether it's just a few or hundreds. Finally, we download the videos, and you're free to use them however you wish.
In the end, the bulk generation process looks something like this:
Let's dive in!
💡 AI tip: In this tutorial, we'll cover the simplest method of video automation, where we provide the video content ourselves. Another approach is to use generative AI, which has recently become very good at creating video content.
Generative AI has lots of possibilities: from producing simple text, like riddles and facts, to creating full video scripts for voiceovers, image prompts, and even captions for social media posts.
If you'd like to explore how generative AI can be combined with video automation, check out one of the tutorials below:
👉 How to Create AI-Generated Videos in Bulk
👉 How to Automatically Convert Text to Video using AI and Make.com
👉 How to use AI to Automate Videos for Shorts, Stories, and Reels with Zapier
👉 TikTok Automation: How to Create TikTok Videos using AI
👉 How to Automate YouTube Shorts with AI-Generated Videos
1. Create a Reel template
Log in to your Creatomate account or sign up for free if you don't already have one.
To design your video, go to the Templates page and click New. This will open a gallery of pre-made templates. For this tutorial, we'll use the Storytelling Video template from the Social Media category. But feel free to choose a different template or start from scratch. Since Instagram Reels require a 9:16 vertical format, make sure that this option is selected. Then, click Create Template to open it in the editor:
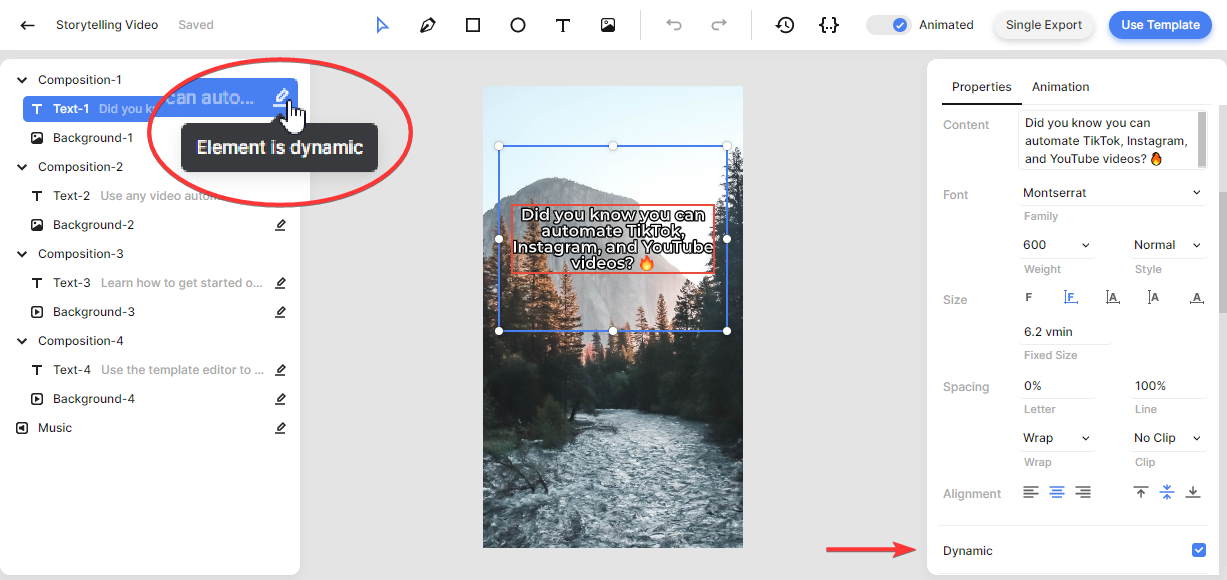
Let's take a quick look at our video design and how it fits into automation plans. In the left panel, you'll find the elements that make up our template. This template consists of four compositions, each containing a Text and a Background element. A Music track also plays throughout the entire video.
One important thing you should know is that elements can be marked as dynamic. In our design, all four text elements, the background visuals, and the music track are dynamic. This means they act as placeholders, allowing you to swap them for different content for each Instagram Reel:

You can fully customize the template in any way you want. To keep things simple, we won't go into all the details here, but you can refer to this quick guide if you want learn more about how the editor works. There's no need to make all your edits right now – you can always come back later to refine your design.
Once you're happy with your video design, let's create a spreadsheet for it.
2. Set up a bulk generation spreadsheet
Click the Use Template button in the top-right corner of the template editor. Next, select the Spreadsheet to Video option, be sure the Create new feed option is selected, and click Continue:
Creatomate has now created a video generation spreadsheet, also known as a feed. This spreadsheet is specifically set up for our Storytelling Video template. As you can see, the columns correspond to the dynamic elements in our template: Music, Background-1, Text-1, Background-2, Text-2, and so on.
When we enter data into the feed, each row will be turned into a new video. Let's click Add Row and enter the following example data. You can either download the images first or paste the URLs directly into the feed (as long as they point to a publicly accessible file):
- Text-1 -> A better night's sleep is just a few steps away 😴
- Background 1 -> https://cdn.creatomate.com/demo/better-sleep-1.jpg
- Text-2 -> Wind down before bed with activities like reading, taking a warm bath, or practicing relaxation techniques.
- Background 2 -> https://cdn.creatomate.com/demo/better-sleep-2.jpg
- Text-3 -> Go to bed and wake up at the same time every day, even on weekends, to regulate your body's internal clock.
- Background 3 -> https://cdn.creatomate.com/demo/better-sleep-3.jpg
- Text-4 -> Stay active during the day, but avoid intense workouts close to bedtime for better sleep quality.
- Background 4 -> https://cdn.creatomate.com/demo/better-sleep-4.jpg
- Leave the Music column empty. The audio file from the template will be used for the video.
When done, click Save:

You'll notice the status has changed from “Unsaved Row” to “No Render”. This means your data is saved, but the video itself has not been generated yet.
Before moving on to the next step, where we'll generate the actual videos, add as much data as you need. You can do this manually, as we did in our example, or import a CSV file if you already have the content prepared using the Import Data button.
For example, you could import a product list, a Google Sheets document, or even a file generated by ChatGPT. If you're interested in creating AI-generated videos in bulk, I've also written tutorials on how to do this. You'll learn how to use ChatGPT to write content for a fact video, as well as how it generates entire scripts for videos with AI voiceovers, animated subtitles, and visuals.
In the next step, I'll show you how to generate the videos.
3. Batch-create the Reels
On the right, you'll see a preview of each video. As you click through the rows, the text and images will update accordingly. To generate a specific video, simply click the Create render button below the preview:
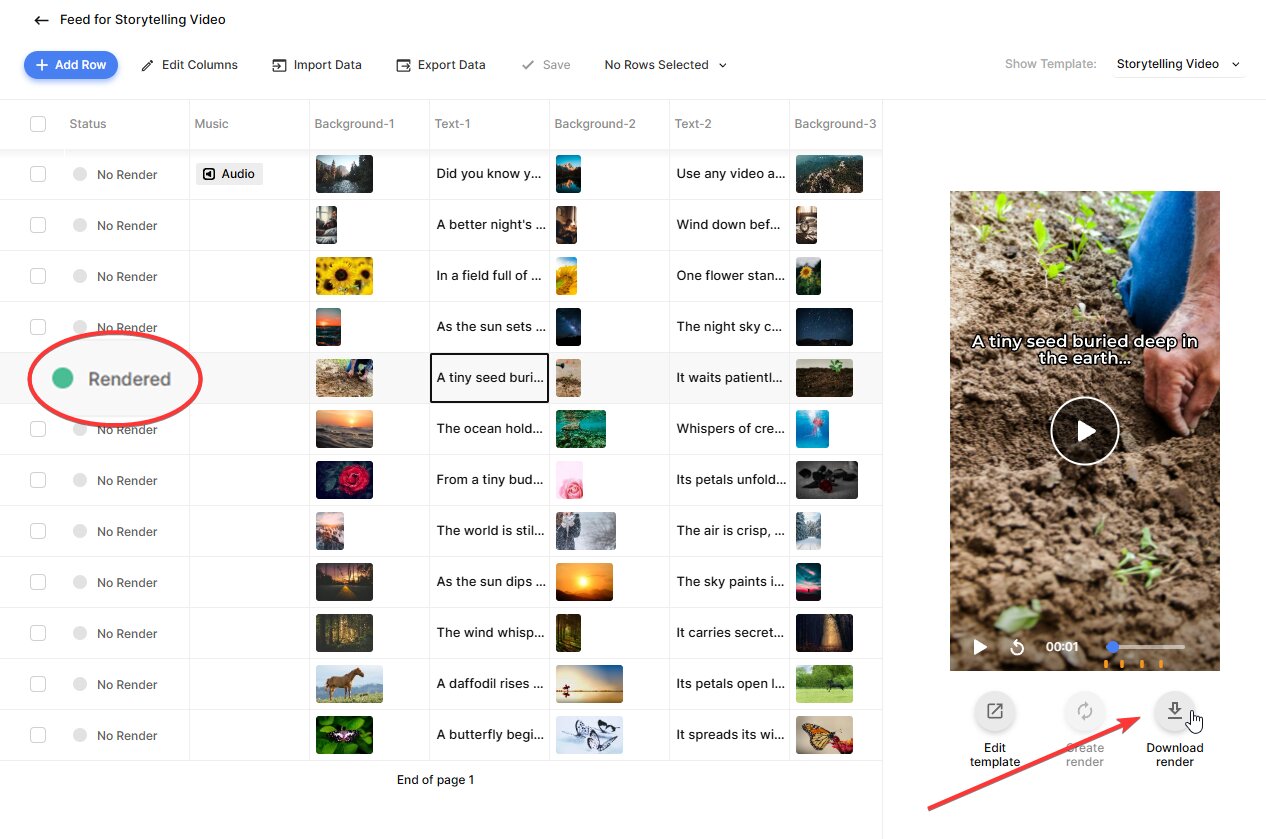
The status for that row will change from “No Render” to “Rendering”. Once it updates to “Rendered”, your video is ready. To download it, click the Download render button below the preview. The video will then open in a new tab:

Now that you know how to create a single video, let's move on to creating multiple videos at once. Select the rows you want, then click N Rows Selected. After that, click Create Renders:
You can create as many renders as you need. In the next step, I'll show you how to access them.
4. Download the videos
Just like we created multiple videos at once, we can also download them in bulk. Here's how.
Select the rows for the videos you want to download. Next, click N Rows Selected and choose Download Renders. Select a column to use as the file name (e.g., Text-1) and click Download. This will download a ZIP file with the rendered videos to your device:
The videos are now yours to use however you wish.
Tip: Alternatively, you can export the entire feed using the Export Data button, including the text and image columns. This will provide you with links to the videos instead of the actual MP4 files.
Next steps for automated Instagram Reels
And that's how you can create Instagram Reels – or any other type of video – in bulk! Pretty efficient, right? Best of all, it's surprisingly easy to do. You don't need to be a professional designer or a tech expert. Just pick a template (customize it if you like) and add your video content to a spreadsheet.
I hope you found this tutorial helpful and that it makes video creation a little easier. If you're up for it, why not create all your content for the entire month in advance?
That said, sometimes bulk generation isn't quite enough. There are situations where you might want the entire process to be fully automated – not just creating the videos, but also posting them directly to your channel. Good news: it's totally doable!
You can easily connect Creatomate to a no-code automation platform like Zapier or Make.com. These tools let you set up workflows that automatically trigger video creation – whether at scheduled times or in response to specific events, such as adding a new row in Google Sheets or Airtable. You can even automate the posting process too! Here's how:
👉 How to Automatically Create Instagram Posts using Zapier
👉 Automatically Create & Post Instagram Reels using Make.com
👉 TikTok Automation: How to Create TikTok Videos using AI
👉 How to Automate YouTube Shorts with AI-Generated Videos
