How to Create Videos with AI Voice Overs using Zapier

In this no-code tutorial, you'll learn how to automatically generate AI voiceover videos using ElevenLabs' text-to-speech API, Creatomate, and Zapier.
The right voiceover can really make a video stand out, especially for social media, instructional, and personalized videos. The question is, if you wanted to mass-produce voiceover videos, would you also need an army of voice actors? The answer is no, not even a single person.
Similarly to what generative AI did with writing (ChatGPT, Gemini, etc.) and images (DALL·E, Midjourney, etc.), it has greatly improved the quality of text-to-speech. In fact, AI voiceovers have gotten so good that they're hard to distinguish from real actors.
In today's tutorial, we'll show you how to auto-generate voiceover videos for YouTube, TikTok, and Instagram. We found ElevenLabs to be one of the leading APIs for generating voiceovers, followed by OpenAI. This is why we'll use ElevenLab's API and integrate it through Creatomate and Zapier. The process applies to any kind of video, so if you have a different use case, keep reading!
The video above is just one example of what can be generated. This is a video you see a lot on social media; it's short, interesting, yet easy to automate. The video has auto-generated subtitles so it can be watched without sound – a must for social media videos. Plus, the animated captions keep viewers engaged throughout the video.
This is all made possible using Creatomate's template editor. It's basically just a beginner-friendly video editor for automation. This makes this approach highly customizable. Every aspect of the video can be changed, from the scenes to the animations to the style. This tutorial will focus on the automation part, but I recommend that you try the template editor afterwards. Everything runs in the cloud, so there's no need to download anything – just create an account and try it out.
Prerequisites
Zapier supports over 7,000 app integrations, which gives you a lot of options when it comes to automating your workflow. To keep it simple, I'll walk you through setting up a basic workflow and you can customize it from there.
Here's what we'll need:
- Creatomate: to create a template and generate videos. Sign up for free.
- ElevenLabs: to generate AI voice overs.
- Zapier: to set up the automated workflow.
- Any app for further processing: such as YouTube, Instagram, or TikTok for social media posting, Google Drive for storage, or email for sharing.
As you probably know, Zapier is incredibly flexible. Combining any of the thousands of apps lets you automate pretty much everything. For instance, say you want to summarize an article or webpage, Zapier's ChatGPT integration will help you out. DALL·E can generate background images for videos. And in case you prefer not to use generative AI, Zapier allows you to connect with a stock library such as Pexels.com.
I have compiled a few tutorials if you want to learn more:
👉 How to use AI to Automate Videos for Shorts, Stories, and Reels
👉 Use ChatGPT to Auto-Create Social Media Content with Zapier
👉 How to Turn Text Into Videos Using AI and Zapier
👉 How to Automatically Turn Blogs and Articles Into Videos using AI
👉 How to Use AI Images from DALL·E to Create Videos with Zapier
👉 How to Use Stock Videos and Photos from Pexels with Zapier
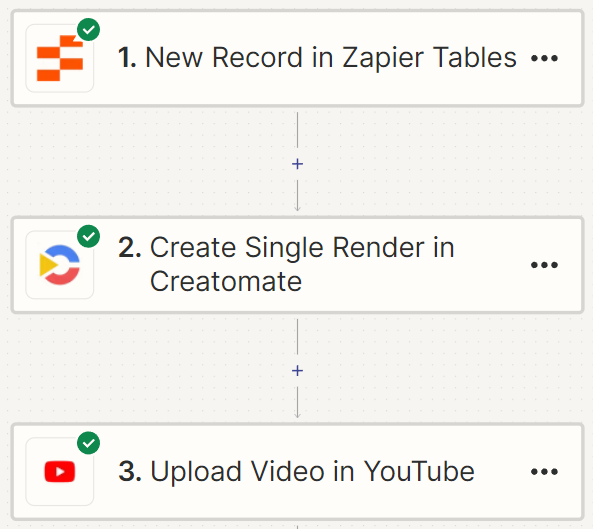
How to auto-generate voiceover videos using Zapier?
To generate a voiceover video using AI, you'll need an ElevenLabs and Creatomate account. ElevenLabs is an API that generates speech through text-to-speech. You'll need Creatomate to put everything together and produce the videos. Its editor lets you create your own video templates, complete with dynamic scenes, AI content, and subtitles.
The process is further automated by Zapier. This gives you the freedom to integrate any other app into the automation workflow. In this tutorial, I will demonstrate this using a Zapier Table and the YouTube Shorts integration. When the Zap is published, it will automatically generate a voiceover video based on content from Zapier Table and post it to YouTube. It's as simple as this:
Let's get started!
1. Choose an AI voice and get your API key in ElevenLabs
Sign up for ElevenLabs or log in if you already have an account. To create an account, go to ElevenLabs.io, and click the Sign up button in the top right corner.
ElevenLabs provides several options for creating AI voice overs. To simplify this tutorial, we'll use an existing voice from their library. But if you prefer, you can also design a voice or clone your own voice.
Note: Another option is to choose a pre-made voice directly in the template editor, which we’ll cover in the next step. You can listen to a sample under Speech Synthesis in your ElevenLabs dashboard.
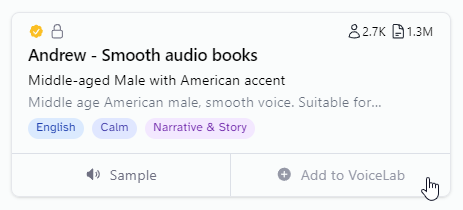
Let's click Voices in your sidebar, then go to Library:

From the Voice Library, choose a voice you want to use for your voice over, then click the Add button:
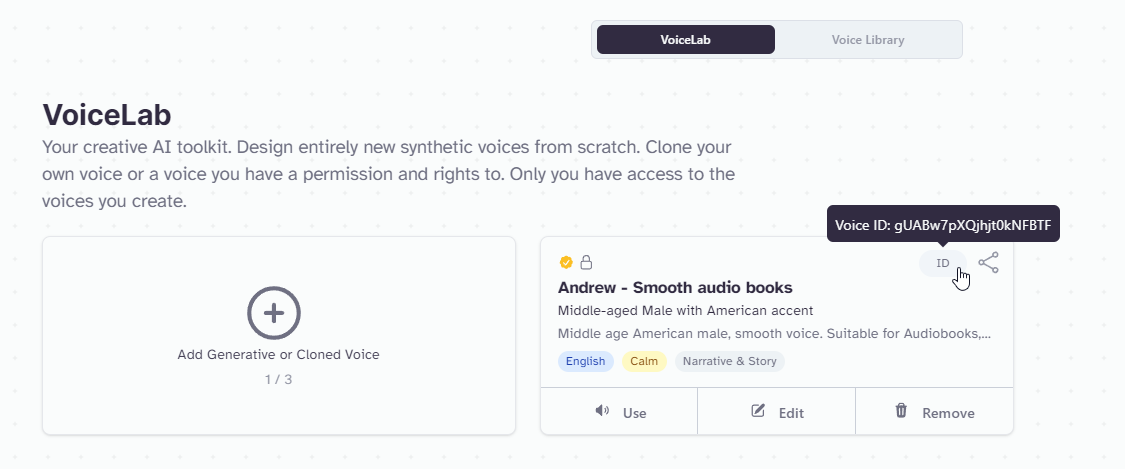
To use this voice, you’ll need to reference its unique ID. Go to the "My Voices" page and open the Community tab to find the added voice. To copy the voice ID, click View and then the ID button. You don’t need to do this right now – I just want you to know where to find it when you need it (click the screenshot to view it in full screen):
There’s just one more step to complete in ElevenLabs before we can move forward. To connect Creatomate with ElevenLabs, you’ll need an API key. To create one, click My Account in the bottom left corner, then select API Keys:

Now that you've chosen a voice and created an API key, let’s move on to Creatomate.
2. Create a video template in Creatomate
Log in to your Creatomate account or create a free account if you haven't already.
First, let's connect to our ElevenLabs account. To do so, click ... on the left, then choose Project Settings. Within the Integration section, toggle the switch to enable ElevenLabs. You'll then be prompted to enter your API key. Once you're done, click Confirm, and close the Project Settings menu:
Your ElevenLabs account is now connected to Creatomate. Next, we'll create a video template.
Navigate to the Templates page, and click the New button. For the purpose of this tutorial, go to the Voice Overs category, and click the Short-Form Voice Over template. Select the 9:16 Vertical size, then click Create Template to open it in the editor:
The video editor might seem intimidating at first. No worries, it's pretty easy to get started.
If you're familiar with video editing, most of this will be familiar to you. Because Creatomate's editor is built for video automation, it works slightly differently. The editor doesn't confine you to specific designs; just about any type of video can be automated. This provides you with a lot of freedom to implement your own custom ideas. Even the templates themselves are open source JSON that can be generated through automation.
Let's focus on this voiceover template. As you can see, there are 4 compositions, each corresponding to a scene in the video. Each composition includes a voiceover, subtitle, and image element. As you play with the template in the editor, you'll see that the voiceovers and subtitles haven't yet been generated. This is because they are just placeholders; the actual voiceover and subtitles are generated in your automation Zap. If it doesn't make sense yet – in the next few steps, you'll see what I mean.
The template is almost ready to use; the only thing left to do is specify the voice you selected in the previous step. Let me demonstrate this with Voiceover-1, and then you can decide if you want to do the same for the other voiceover elements.
On the left side panel, select the Voiceover-1 element. Then, navigate to the properties panel on the right, where you'll find the Audio property. This is where you can customize the voice over. The Provider is already set to ElevenLabs. The Model setting lets you choose between four different text-to-speech models. It's best to stick with Multilingual v2, as it has great speech synthesizing and works with a lot of languages.
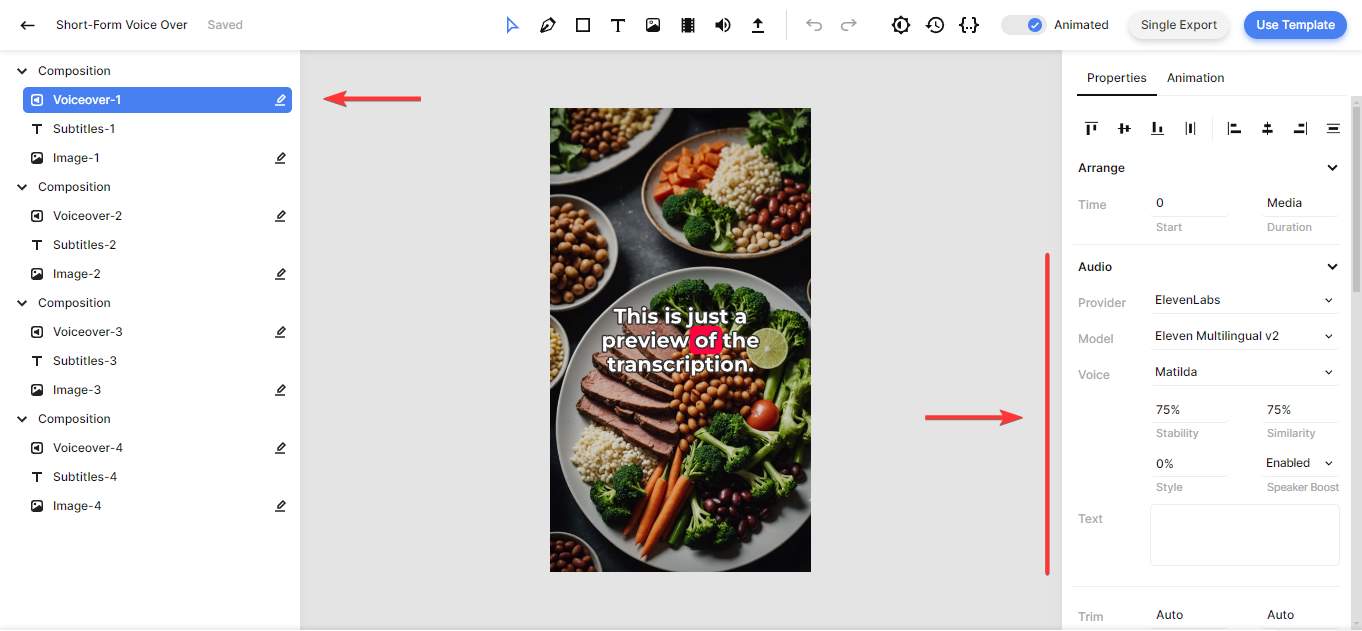
For the Voice, Matilda is the default; a premade voice from ElevenLabs. But what if you want a custom voice? To do this, click on Matilda, scroll up, and select Custom Voice. Paste the voice ID from your ElevenLabs dashboard, and click OK:
You also can adjust the Stability, Similarity, Style, and Speaker Boost. This is a set of AI parameters you can adjust to fine-tune the voiceover generated by ElevenLabs. For instance, the Stability parameter controls the amount of emotion and randomness in the voice. I recommend leaving them the way they are unless there is a good reason for changing them; the default settings are perfect for most purposes. You can read more about each setting in ElevenLabs' Voice Settings documentation.
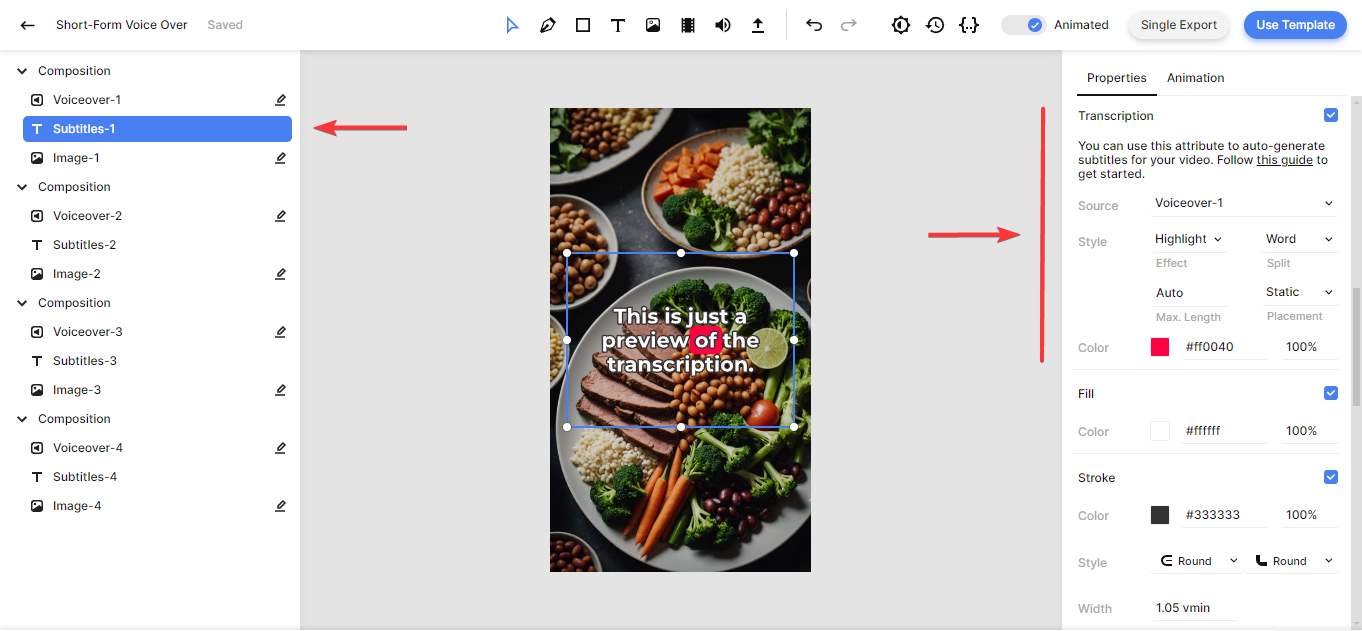
To complete the template setup, let's also take a look at the subtitle and image elements.
From the left side panel, click on the Subtitles-1 element. In the properties panel on the right, scroll down until you find the Transcription property. Here you can customize the subtitles. As you can see, the Source points to the Voiceover-1 element. This tells Creatomate to generate subtitles based on the voice over.
Last but not least, there's the Style, Color, Fill, and Stroke properties allowing you to further customize the look and feel of the subtitles.
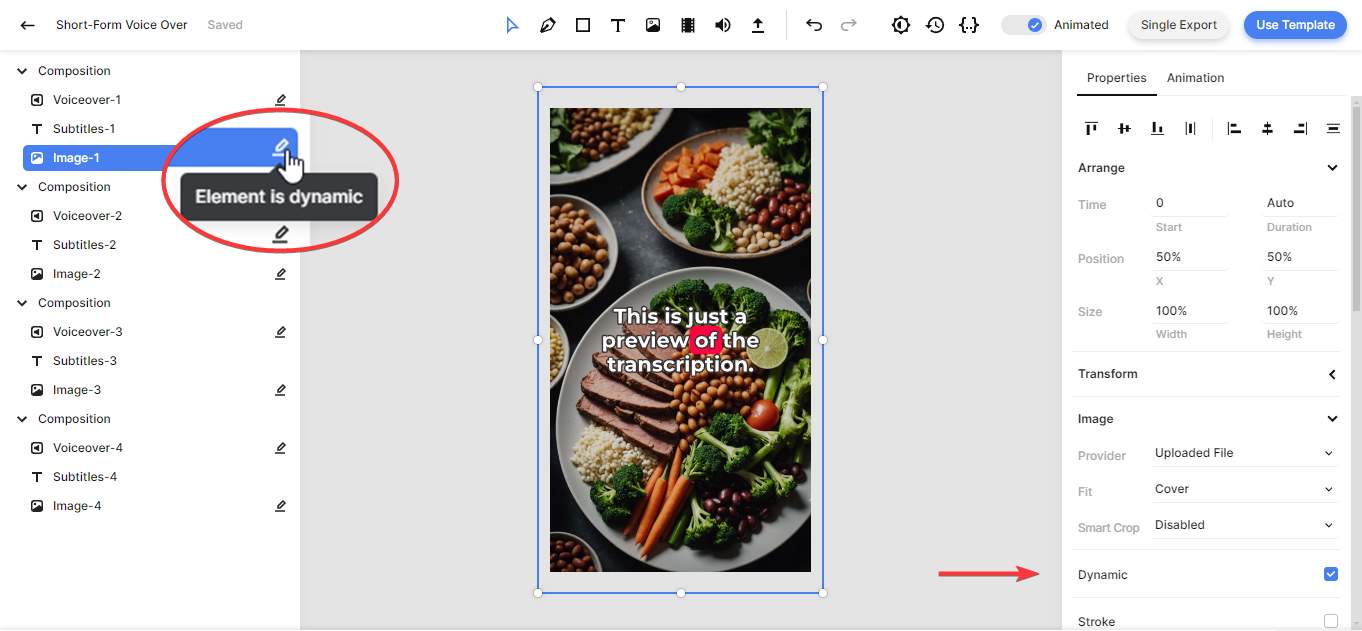
Before we get to Zapier, let's take a final look at the image element. Just like all the voice over elements, it is a Dynamic element. This essentially means that you will be able to replace it in Zapier. We'll see how that works in the next step; setting up the automation workflow.
This tutorial doesn't cover generative AI, but you can automate the entire video's content using an AI such as ChatGPT, DALL·E, or Stable Diffusion. To get an AI-generated visual, select an image element and change the Provider from Uploaded File to OpenAI. This lets you provide a text-to-image prompt instead of a URL. For this to work, you need to connect your Creatomate account to OpenAI. You can learn more about using AI content in video templates by following this tutorial:
👉 How to use AI to Automate Videos for Shorts, Stories, and Reels
3. Set up a Zapier trigger
Now that ElevenLabs and Creatomate are set up, we’re ready to automate voiceover video creation. To do this, we’ll need a way to pull data from an app into our template. In this tutorial, we’ll simply create a Zapier Table for this purpose, but feel free to use a different trigger. For example, you can explore tutorials on using Airtable or Google Sheets as alternative data sources.
Log in to your Zapier account or sign up for free if you haven't already. Once logged in, navigate to the Tables page. Click the Start blank button, enter a table name, and hit Create table:

Once in the table editor, set up the following columns;
- 6 text fields: Title, Description, Text-1, Text-2, Text-3, and Text-4;
- 4 link fields: Image-1, Image-2, Image-3, and Image-4.
Click the screenshot below to see how the Zapier Table should look like:

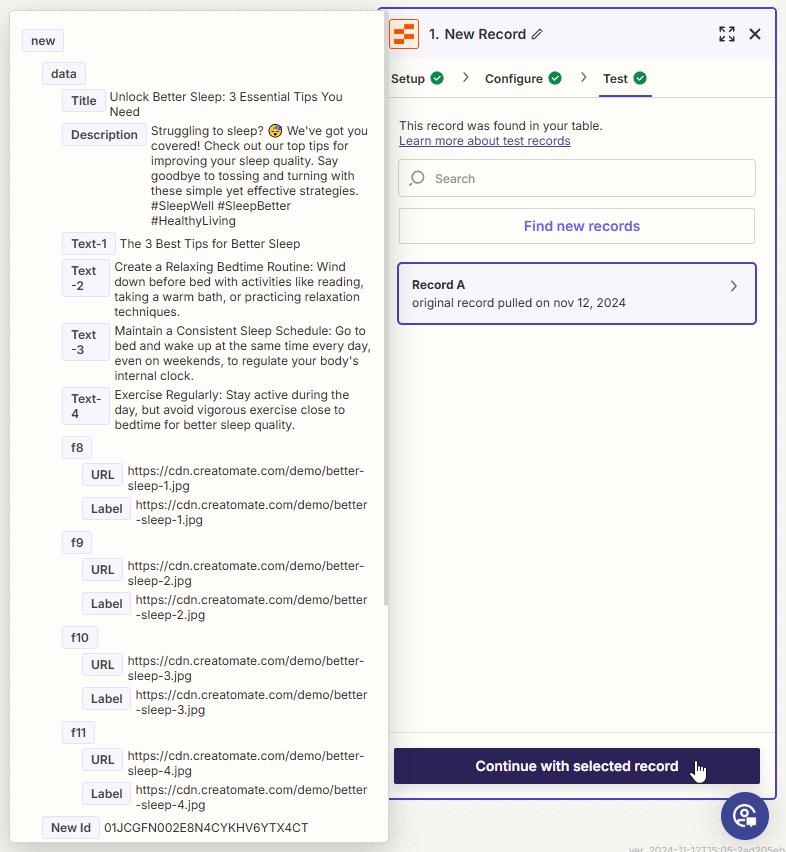
Next, insert a new record into the table. Let's use the following AI-generated content:
- Title -> Unlock Better Sleep: 3 Essential Tips You Need
- Description -> Struggling to sleep? 😴 We've got you covered! Check out our top tips for improving your sleep quality. Say goodbye to tossing and turning with these simple yet effective strategies. #SleepWell #SleepBetter #HealthyLiving
- Text-1 -> The 3 Best Tips for Better Sleep
- Text-2 -> Create a Relaxing Bedtime Routine: Wind down before bed with activities like reading, taking a warm bath, or practicing relaxation techniques.
- Text-3 -> Maintain a Consistent Sleep Schedule: Go to bed and wake up at the same time every day, even on weekends, to regulate your body's internal clock.
- Text-4 -> Exercise Regularly: Stay active during the day, but avoid vigorous exercise close to bedtime for better sleep quality.
- Image-1 -> https://cdn.creatomate.com/demo/better-sleep-1.jpg
- Image-2 -> https://cdn.creatomate.com/demo/better-sleep-2.jpg
- Image-3 -> https://cdn.creatomate.com/demo/better-sleep-3.jpg
- Image-4 -> https://cdn.creatomate.com/demo/better-sleep-4.jpg
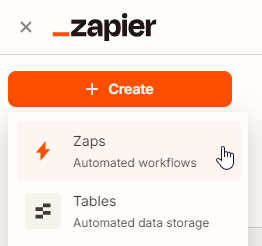
Once your table is set up, go back to your Zapier dashboard, click Create, and select Zaps:
Once in the workflow editor, click the Trigger block, search for and choose the Zapier Tables app, and select the New Record trigger event. Then click Continue.
To configure the trigger, select the table you've just created:
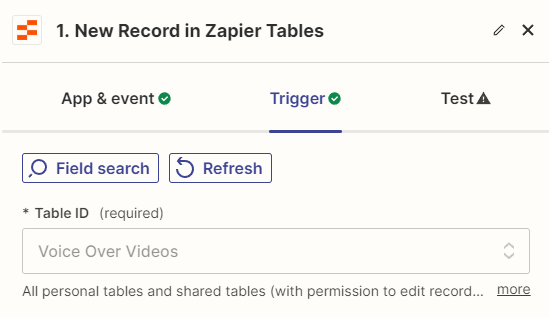
Then, click Continue.
Click Test trigger to make sure Zapier can find our sample record. When the test is successful, click Continue with selected record, and move on to the next step:
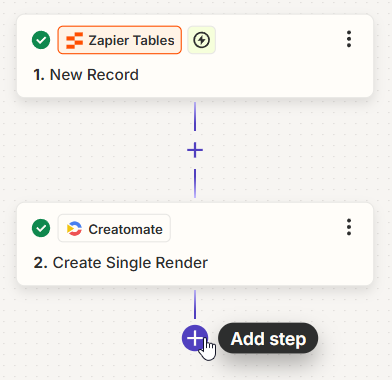
4. Generate the video
Search for the Creatomate app, and select the Create Single Render action event. Continue by selecting your account or signing in with your project's API key, which you can find under Project Settings in your Creatomate dashboard:
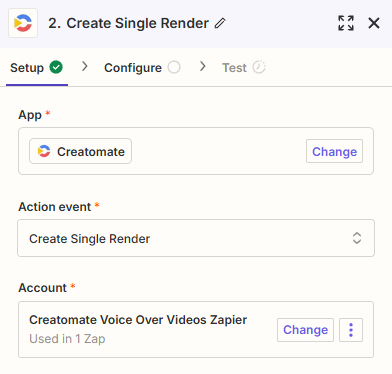
Then, click Continue.
To set up the action, select the Short-Form Voice Over template first:
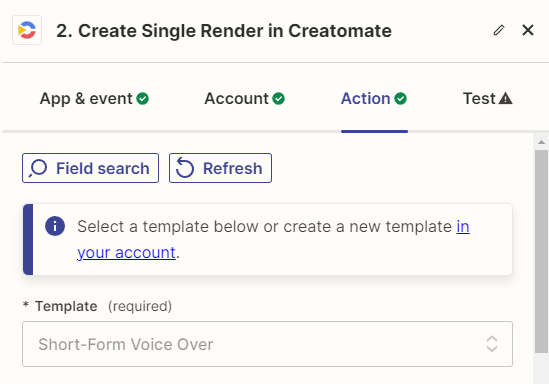
Zapier will then automatically detect the dynamic elements and list them under Modifications.
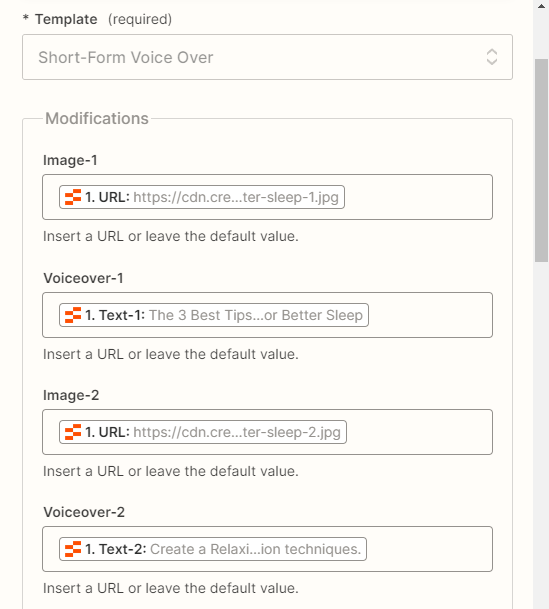
Now, let's map the video script and the background images to the template as follows:
- Set Image-1 to Zapier Tables -> URL (ending at 1.jpg)
- Set Voiceover-1 to Zapier Tables -> Text-1
- Set Image-2 to Zapier Tables -> URL (ending at 2.jpg)
- Set Voiceover-2 to Zapier Tables -> Text-2
- Set Image-3 to Zapier Tables -> URL (ending at 3.jpg)
- Set Voiceover-3 to Zapier Tables -> Text-3
- Set Image-4 to Zapier Tables -> URL (ending at 4.jpg)
- Set Voiceover-4 to Zapier Tables -> Text-4
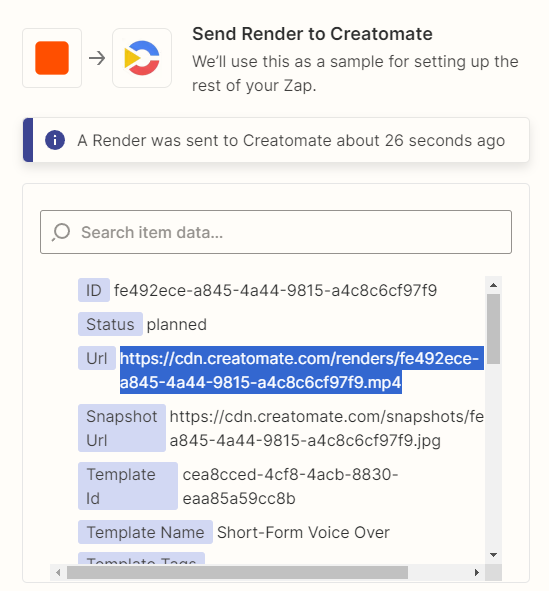
When done, click Continue. We are now ready to run a test and send a request to Creatomate. Under Test in Zapier's Creatomate module, click Test step. Zapier will now call the Creatomate API and send the image and voiceover data to the selected template. With this data, Creatomate will automatically generate the voiceover by using ElevenLabs, create the subtitles, and render the final MP4 file.
The video can take a few minutes to complete. So wait a minute, then go to the video URL. When you get a "Not Found" page, it means the video is still being worked on. Keep in mind that this only is the case while testing your Zap. As soon as your workflow is activated and running automatically, Zapier waits for the video to complete before executing the next Zap action.
After a successful test, let's proceed to the final step.
5. Process the video
At this point, we've successfully generated a voiceover video. To wrap up this tutorial, I'm uploading it as a YouTube Short. But feel free to use any app that works for you. We also have tutorials on how to post videos on Instagram, TikTok, and Facebook. Alternatively, you can send it via email, or place it back in your Zapier Table.
Click + to add another step to your Zap:
Search for and select the YouTube app, and choose the Upload Video action event. Continue by selecting your account or signing in first:
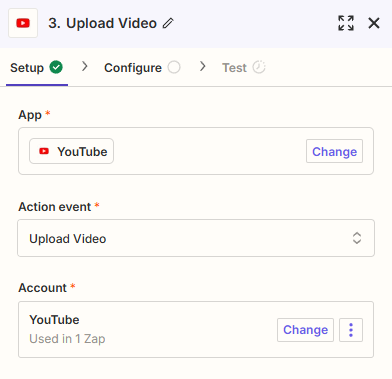
Then, click Continue.
To set up the action, fill out at least the required fields:
- Set Title to Zapier Tables -> Title
- Set Description to Zapier Tables -> Description
- Set Video to Creatomate -> Url
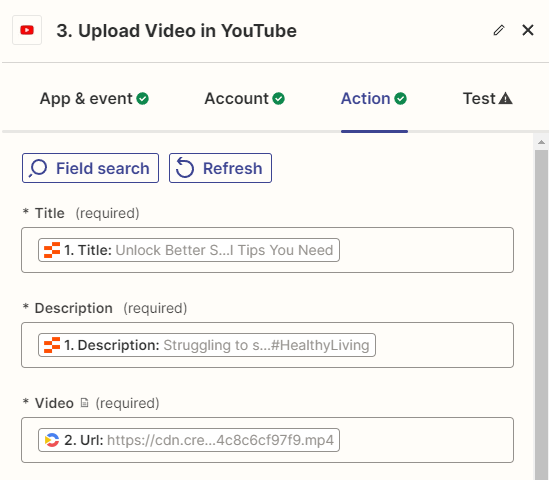
The rest of the options can be set however you like. Then, click Continue.
Finally, click Test step to make sure Zapier passes the right data. As this is just a test, no video will be uploaded to your YouTube channel.
If you're happy with your workflow, click Publish to activate it.
Congratulations! You have set up a Zapier workflow that generates videos by itself thanks to the power of video automation.
Next steps for video automation with AI
You made it to the end of this article! While this is a good foundation for automating voiceover videos, it is only the tip of the iceberg when it comes to video automation. You can do so much more with Creatomate besides generating voiceovers with subtitles. We've put together a huge number of tutorials on how to produce any kind of social media and marketing video, with and without generative AI. You can find them on our blog page.
As mentioned throughout this guide, we've simplified things a bit by pulling data from a Zapier Table. If you want to give generative AI a go, why not take a look at some of our other tutorials on AI video generation? A great AI platform to pair with Creatomate is OpenAI. It is well supported by Zapier, so implementing it should be straightforward. Take a look at our tutorials on ChatGPT, GPT-3, and DALL·E to learn more. We also have a tutorial about fully generated AI videos, which you can find here.
You might also like these tutorials


Start automating today
Start with a full-featured trial with 50 credits, no credit card required.
Get started for free →