How to Automatically Convert Text to Video using AI and Make.com

Learn how to build an automated text-to-video generator that turns a video topic into AI-powered shorts, complete with voiceovers, images, and subtitles.
Using the right tools and approach, AI can be incredibly powerful in terms of content creation; whether it is writing an article, generating images, or automating. In this tutorial, we'll explore what AI can do when it comes to automating video.
I'll show you how to set up a workflow in Make.com, a no-code automation platform, to produce faceless shorts for YouTube, TikTok, and Instagram using multiple AI tools. The automation will create videos like the one shown below, complete with AI-generated background images, voiceovers, and animated subtitles – even the narrative itself is generated by AI. With this workflow in place, all you'll need to do is input a video topic, such as "the beginning of life," and it will produce a ready-to-share video for social media.
Thinking of a different type of video? No problem! Creatomate comes with an online template editor that lets you create any video design you have in mind.
Prerequisites
Here are the tools we'll use:
- Creatomate: to create a design and generate videos;
- Make.com: to set up an automated workflow;
- ChatGPT: to generate a script for the videos;
- DALL·E: to generate visuals for the videos;
- ElevenLabs: to generate voiceovers for the videos;
- Any app to further process the videos: such as YouTube, TikTok or Instagram for social media posting, Outlook for emailing, OneDrive for storing, etc.
How to use AI to automatically turn text into videos?
First, we'll set up accounts for the AI tools we'll be using: ElevenLabs, ChatGPT, and DALL·E. Next, we'll create a video template in Creatomate, which will serve as the design for our AI-generated shorts.
After that, we'll move on to Make.com to set up an automated workflow. To keep things simple, I'll demonstrate how to use a basic trigger to input a video topic, but you can choose any app that fits your needs. We'll then configure an action for ChatGPT to generate a story, image prompts, and a title and description for social media. The output needs to be reformatted before Creatomate can use it to create a video. Once the video is ready, we'll download it and post it as a YouTube Short (or on any other platform you prefer).

Let's get started!
1. Set up ElevenLabs for AI voiceovers
While there are many text-to-speech tools available, ElevenLabs stands out as one of the most advanced AI voice generators. It produces exceptional audio quality that is close to real human voices, including different accents, emotions, and styles.
ElevenLabs also offers multiple options for creating AI voiceovers, including custom voice design and voice cloning. For simplicity, this tutorial will demonstrate how to use a voice from their library. If you prefer, you can also choose a pre-made voice, which we will cover later.
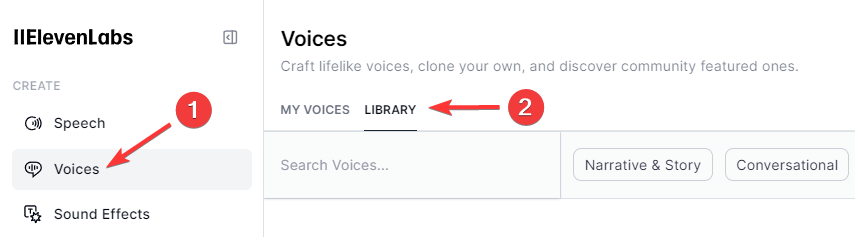
First, sign up for an ElevenLabs account or log in if you already have one. Then, navigate to the Voices page and go to the Library section:
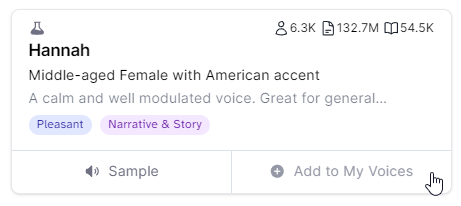
Here, you can select the voice you want for your voiceover. To add a voice to your account, simply click Add:
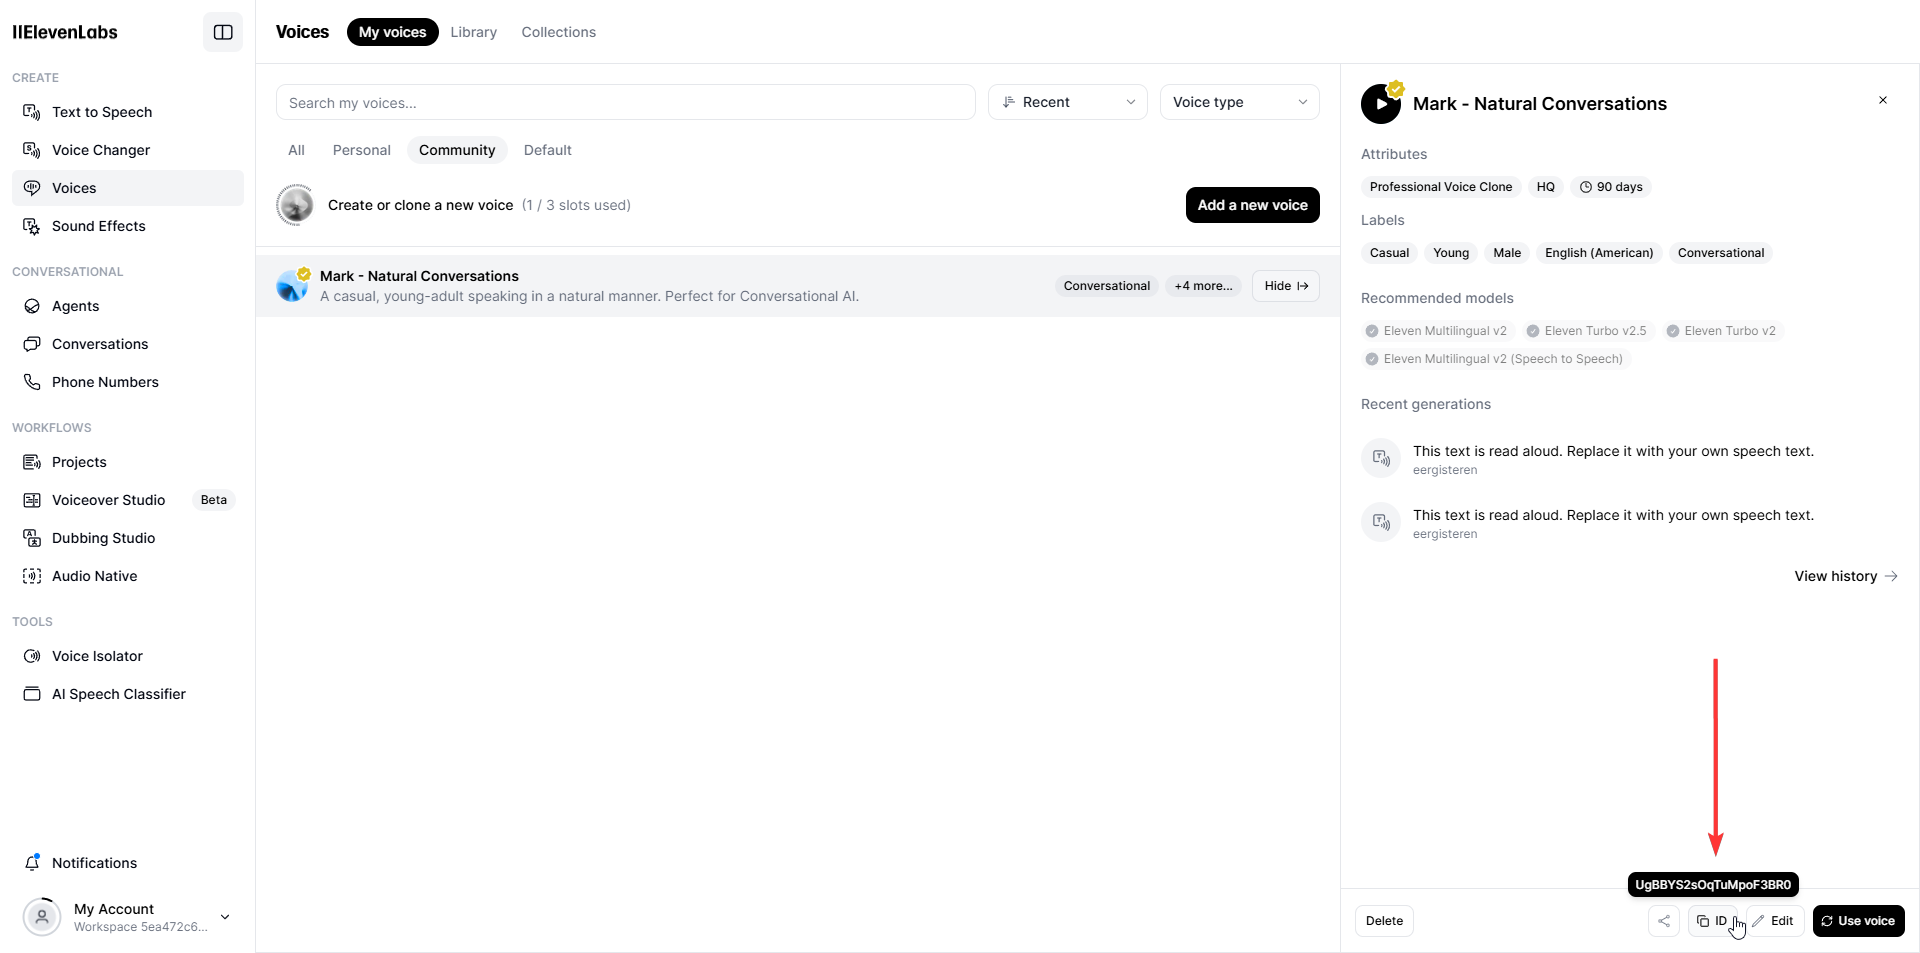
Go back to the "My Voices" page. Under the Community section, you'll see the voice you added. You will need the voice's ID later in this tutorial. Click the ID button and save it for future reference:
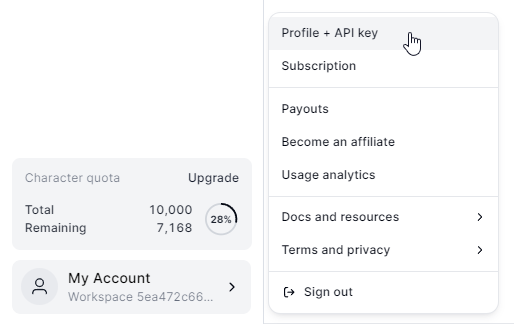
To connect ElevenLabs with Creatomate, you'll need your API key. You can create one by clicking on My Account in the bottom left corner, then choose API Keys:
Keep it on hand, you'll need it soon (in step 3).
2. Create an OpenAI account for ChatGPT and DALL·E
ChatGPT and DALL·E are both developed by OpenAI. In this step, we'll create an account and generate an API key to connect with both tools later.
First, create a free OpenAI account or sign in if you already have one. Then, navigate to the API section:
Next, from the left side menu, click on API keys. Then, click Create new secret key, provide a name, and click Create secret key:
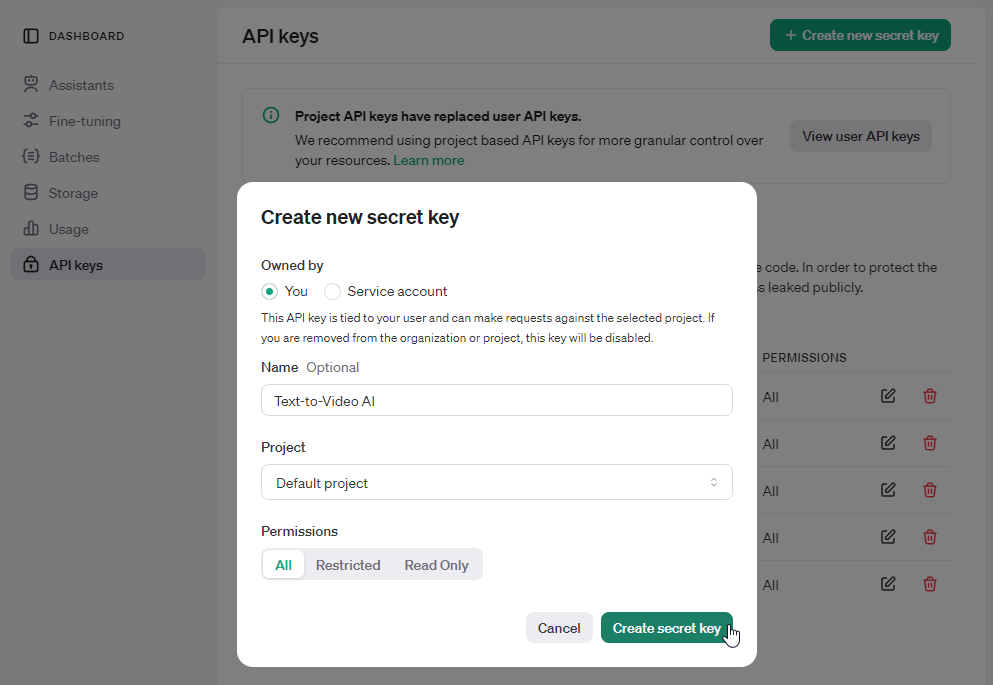
Keep your API key close by. You'll need it to connect DALL·E with Creatomate in the next step and ChatGPT with Make in step 5.
3. Set up a video template in Creatomate
Log in to your Creatomate account or create a free account if you don't already have one.
Before creating a video template, we need to connect our ElevenLabs and OpenAI accounts. This will allow us to set up the template to generate voiceovers with ElevenLabs and create images with DALL·E.
To do this, click on ... , then choose Project Settings. In the Integrations section, toggle the switch for ElevenLabs, paste your API key, and click Confirm. Next, do the same for OpenAI. Once you're done, close the Project Settings menu:
We're now ready to create a template. Let's navigate to the Templates page, and click the New button to open the template gallery. Go to the Voice Overs category and select the AI-Generated Story template. The 9:16 Vertical size is perfect, so click Create Template to open it in the editor:
The video editor might seem intimidating at first. No worries, it's pretty easy to get started.
Creatomate's editor is specifically intended for video automation. There are many similarities with other editing tools, but Creatomate has some unique features that set it apart. Instead of producing the final video, you can create a reusable design, called a template, capable of generating hundreds of unique videos. Every aspect of the video is customizable, including text, images, subtitles, and more. This provides you with a huge amount of freedom when it comes to video automation. Even the templates themselves are open source JSON that can be generated through automation.
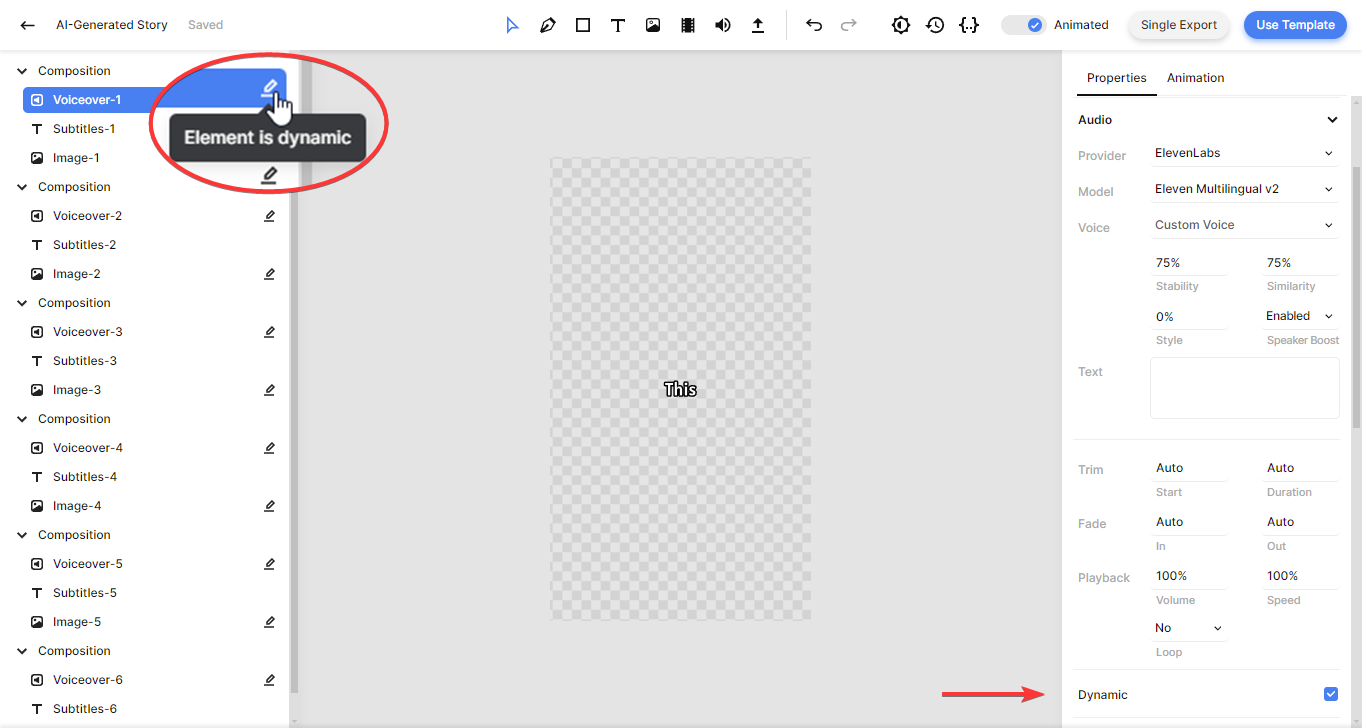
Let's focus on this AI-Genereated Story template. As you can see, there are 6 compositions, each corresponding to a scene in the video. Each composition includes a voiceover, subtitle, and image element. As you play with the template in the editor, you'll notice placeholders for the voiceovers, subtitles, and images. This is because the actual AI content will be generated as part of our automated workflow. If it doesn't make sense yet – in the next few steps, you'll see what I mean.
Our template is almost ready to use. All that's left is to specify the voice for the voiceover (optional) and configure the image elements for DALL·E. I'll demonstrate this with the first composition, and you can then do the same for the remaining five compositions.
On the left side panel, select the Voiceover-1 element. Then, navigate to the properties panel on the right, where you'll find the Audio property. This is where you can customize the voiceover. The Provider is already set to ElevenLabs. The Model setting lets you choose between four different text-to-speech models. It's best to stick with Multilingual v2, as it has great speech synthesizing and works with a lot of languages.

For the Voice option, Matilda is the default, a pre-made voice from ElevenLabs. If you want to use another premade voice, pick one from the drop-down menu. You can listen to a sample of each voice on the Speech Synthesis page in your ElevenLabs dashboard. And in case you prefer to use one of the voices from the VoiceLibrary, click on Matilda, scroll up, select Custom Voice, paste the voice ID, and click OK:
You also can adjust the Stability, Similarity, Style, and Speaker Boost. These AI parameters help fine-tune the voiceover generated by ElevenLabs. For example, the Stability parameter controls the level of emotion and randomness in the voice. Unless you have a specific reason to change them, I recommend leaving these settings at their default values, as they are ideal for most purposes. For more details about each setting, refer to ElevenLabs' Voice Settings documentation.
There's another important aspect of the voiceover elements you need to know: they are marked as dynamic, just like the image elements. This means we can input a dynamic text prompt via Make.com. Later on, we'll use ChatGPT's script to create an AI voiceover using our ElevenLabs integration.
Now, let's have a quick look at the subtitles. No changes are needed; I'll just show you how it works.
Select the Subtitles-1 element and scroll down to the Transcription property in the properties panel. Here, you have the option to customize the subtitles. As you can see, the Source points to the Voiceover-1 element, which tells Creatomate's auto-transcription feature to generate subtitles based on that voiceover. If you'd like, you can further customize the look and feel of the subtitles with the Style, Color, Fill, and Stroke attributes.
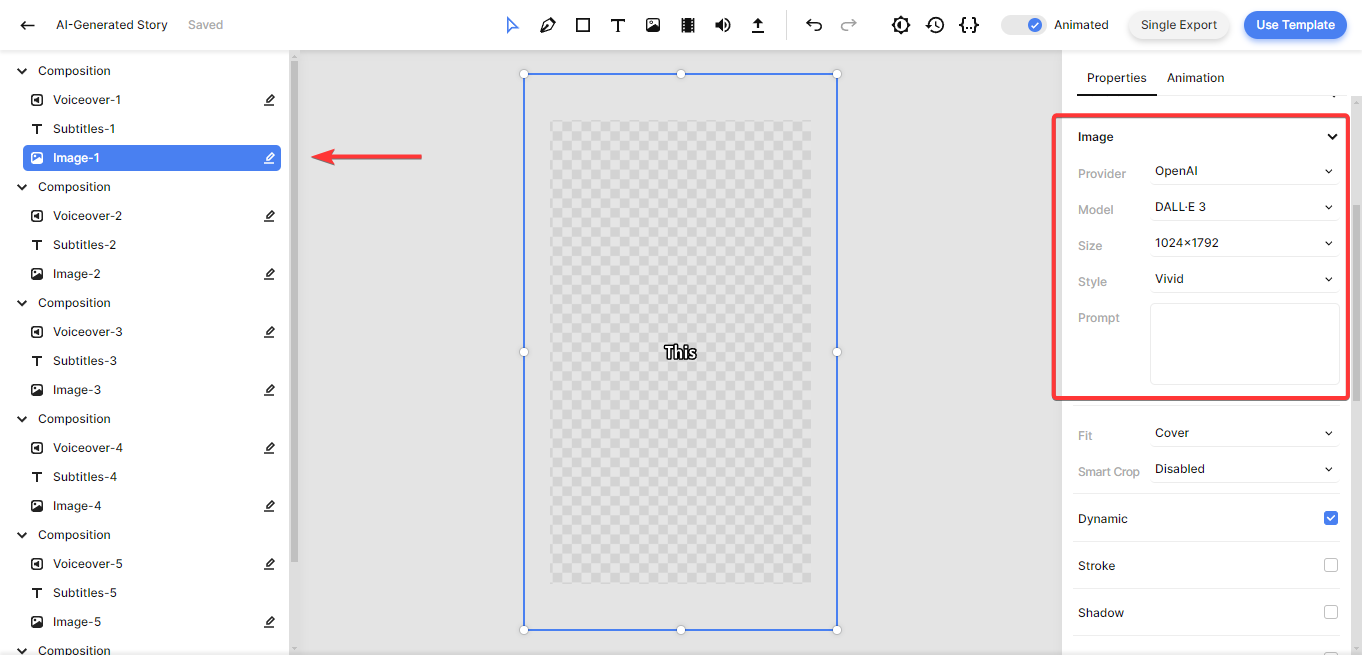
So far, we haven't had to make any changes to this template, but heads up, we've reached a crucial part: the image elements. By default, this template uses Stability AI. However, we want to use DALL·E to generate AI images for our videos. Let's change that.
Select the Image-1 element from the left side menu. In the properties panel on the right, set the Provider to OpenAI:
We can now choose between DALL·E 2 and DALL·E 3. For best results, I recommend DALL·E 3. Check out OpenAI's documentation to see how they're different.
Given that we're making vertical videos, set the Size to 1024x1792.
Style comes in two options: Vivid and Natural. Vivid generates highly dramatic and hyper-realistic images, while Natural produces more realistic and natural-looking images. Choose the style that best fits your needs.
We don't need to fill out the Prompt field ourselves. Since the image elements are dynamic, we'll use Make.com to automatically insert a text-to-image prompt for each video.
Now that you know how to adjust the voiceover and image elements, apply these changes to the other compositions as well. To do this efficiently, hold down the Control key and select all the voiceover elements from the left side panel. Then, make the necessary changes as outlined above. Repeat this for all image elements.
And that's it! Your template is now ready for automation. Let's move on to the next step to set up the automated workflow in Make.
4. Trigger the automated workflow
Automated workflows always start with a trigger, which is the event that kicks off the process. This trigger could be anything – for example, adding a new record to your Airtable base, adding a row in Google Sheets, or receiving a new message in a Slack channel. To keep things simple in this tutorial, I'll show you how to use a basic trigger. However, this is just for demonstration. In real-world applications, you can choose any trigger app that fits your needs.
Log in to your Make account or sign up for free if you don't already have one.
Click the Create a new scenario button, search for the Tools app and add the Basic trigger.
Create an item called Video Topic and enter the beginning of life. Then, click OK:
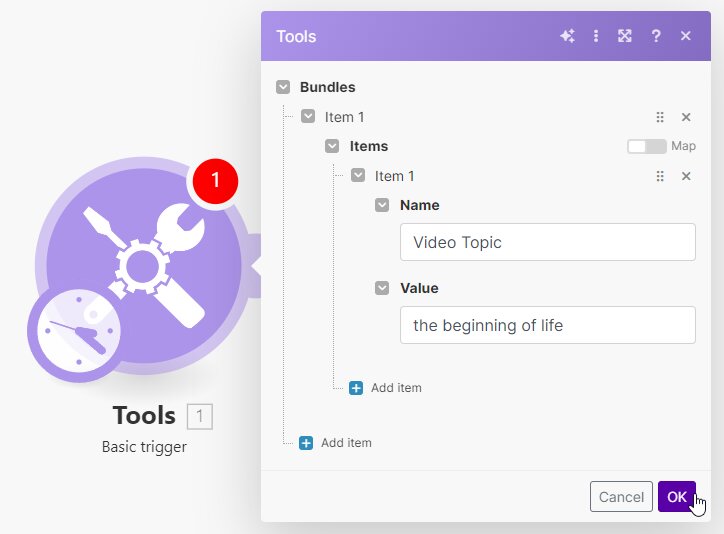
Next, right-click the module and select Run this module only:

We can now use this video topic to set up the rest of our scenario.
5. Generate a video script with ChatGPT
In this step, we'll configure ChatGPT to generate content for our videos. We'll instruct it to write a script, create image prompts, and come up with a title and description based on the video topic.
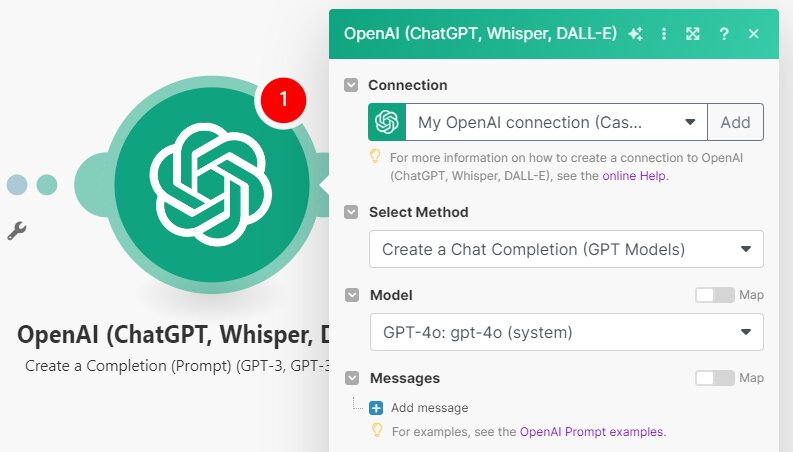
Click + to add another module. Search for and select the OpenAI (ChatGPT, Whisper, DALL-E) app and choose the Create a Completion (Prompt) (GPT-3, GPT 3.5, GPT-4) action.
First, use your API key from step 2 to create a connection. Then, make sure Select Method is set to Create a Chat Completion (GPT Models). For the Model, choose the one you want to use, such as GPT-4o:
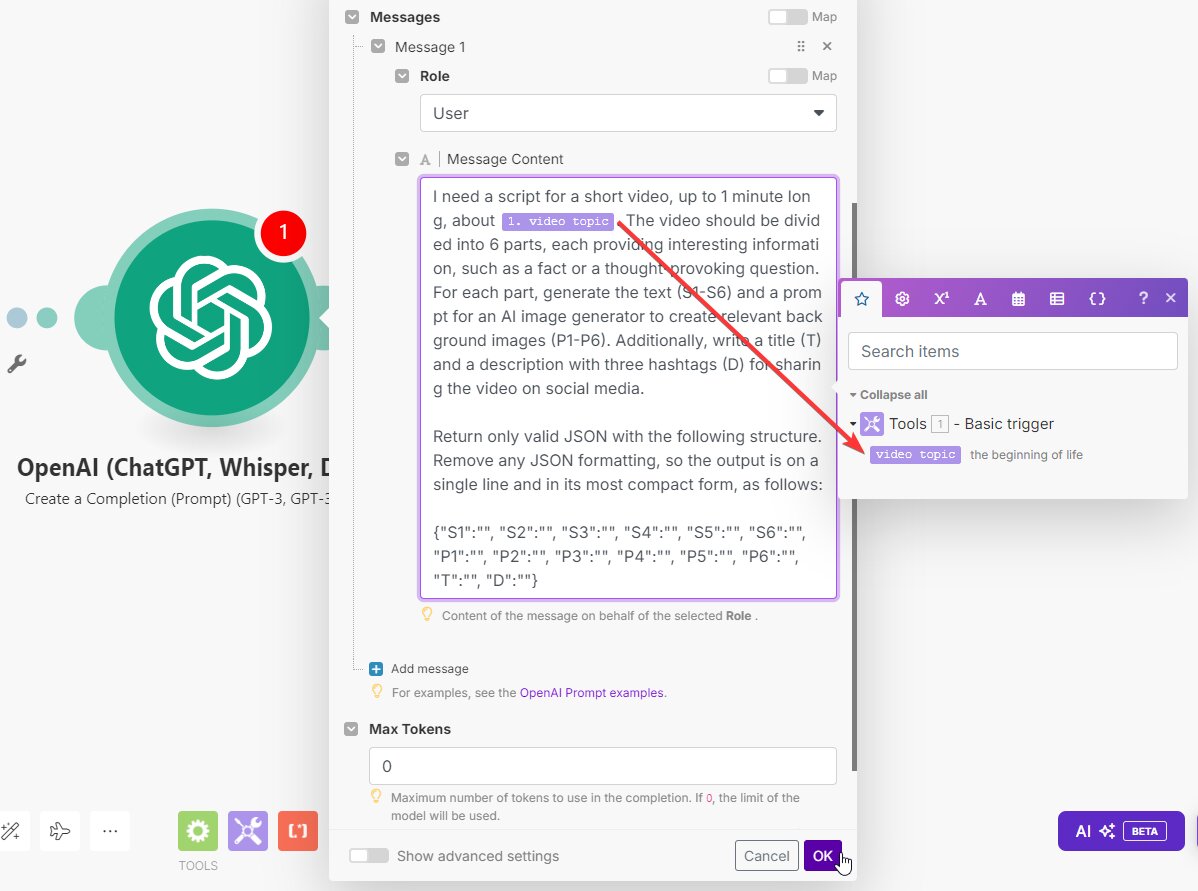
Under Messages, click Add message. Then, select User in the Role field, and copy and paste the following prompt into the Message Content field:
I need a script for a short video, up to 1 minute long, about [topic]. The video should be divided into 6 parts, each providing interesting information, such as a fact or a thought-provoking question. For each part, generate the text (S1-S6) and a prompt for an AI image generator to create relevant background images (P1-P6). Additionally, write a title (T) and a description with three hashtags (D) for sharing the video on social media.
Return only valid JSON with the following structure. Remove any JSON formatting, so the output is on a single line and in its most compact form, as follows:
{"S1":"", "S2":"", "S3":"", "S4":"", "S5":"", "S6":"", "P1":"", "P2":"", "P3":"", "P4":"", "P5":"", "P6":"", "T":"", "D":""}
Make sure to replace [topic] with Tools - Basic trigger -> video topic. Also, set Max Tokens to 0. When done, click OK:
Our ChatGPT module is set up correctly. We'll skip testing it for now and handle that in the next step.
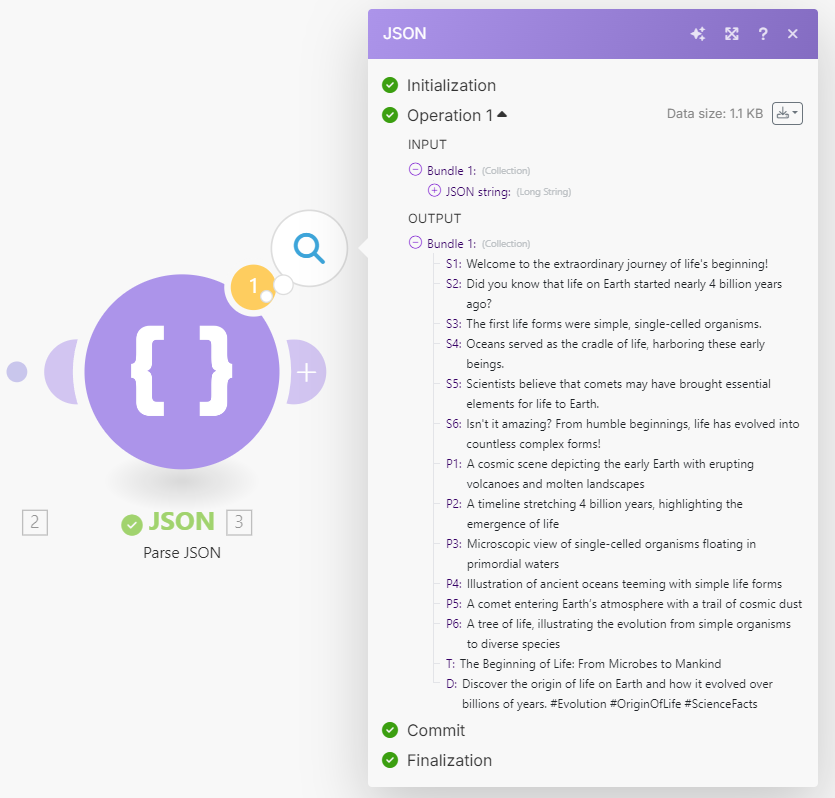
6. Parse the AI script
This step is simple but essential. We'll break down the JSON response from ChatGPT into individual items so we can easily connect them to our template in the next step.
Add the JSON app with the Parse JSON transformer.
In the JSON string field, select OpenAI (ChatGPT, Whisper, DALL-E) - Create a Completion (Prompt) (GPT-3, GPT-3,5, GPT-4) -> Result. Then, click OK:

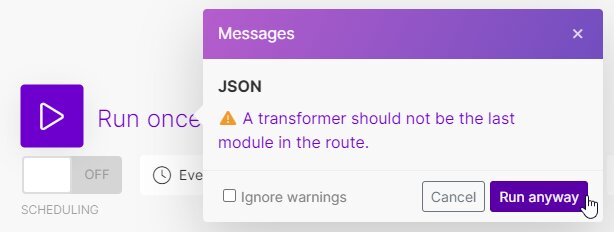
Now it's time to test our scenario. This will send a request to ChatGPT to generate the content, and the JSON module will parse it into individual items. Click the Run once button in the bottom left corner. You'll see a warning message indicating that a transformer (in this case, our Parse JSON module) shouldn't be the last module in the route. However, since we'll add more modules later, you can safely click Run anyway to continue the test:
Once the test is successful, indicated by all modules turning green, you can view the AI-generated content by clicking the magnifying glass icon:
We can now use this content to create videos.
7. Generate the video
In this step, we'll set up an action for Creatomate to generate the videos.
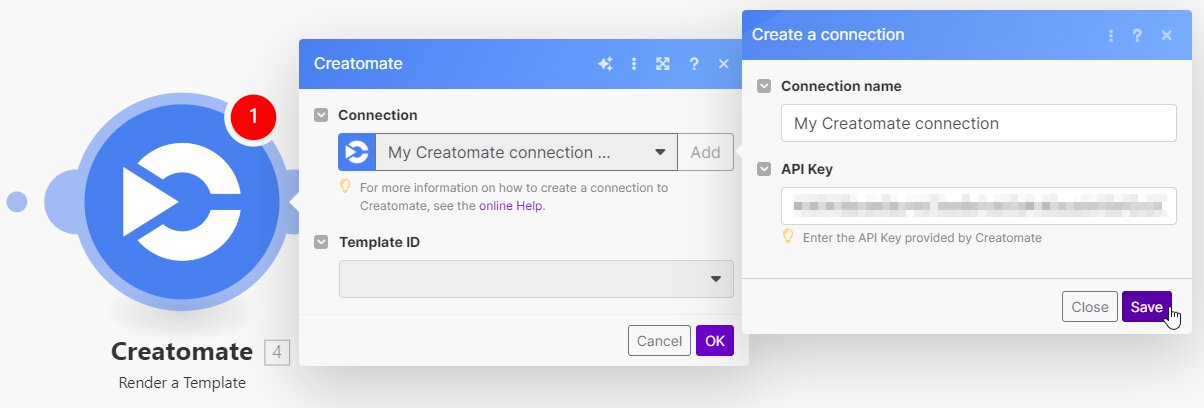
Add the Creatomate app with the Render a Template action to your scenario.
Create a connection first. You can do this by entering your project's API key, which you can find under Project Settings in your Creatomate dashboard:
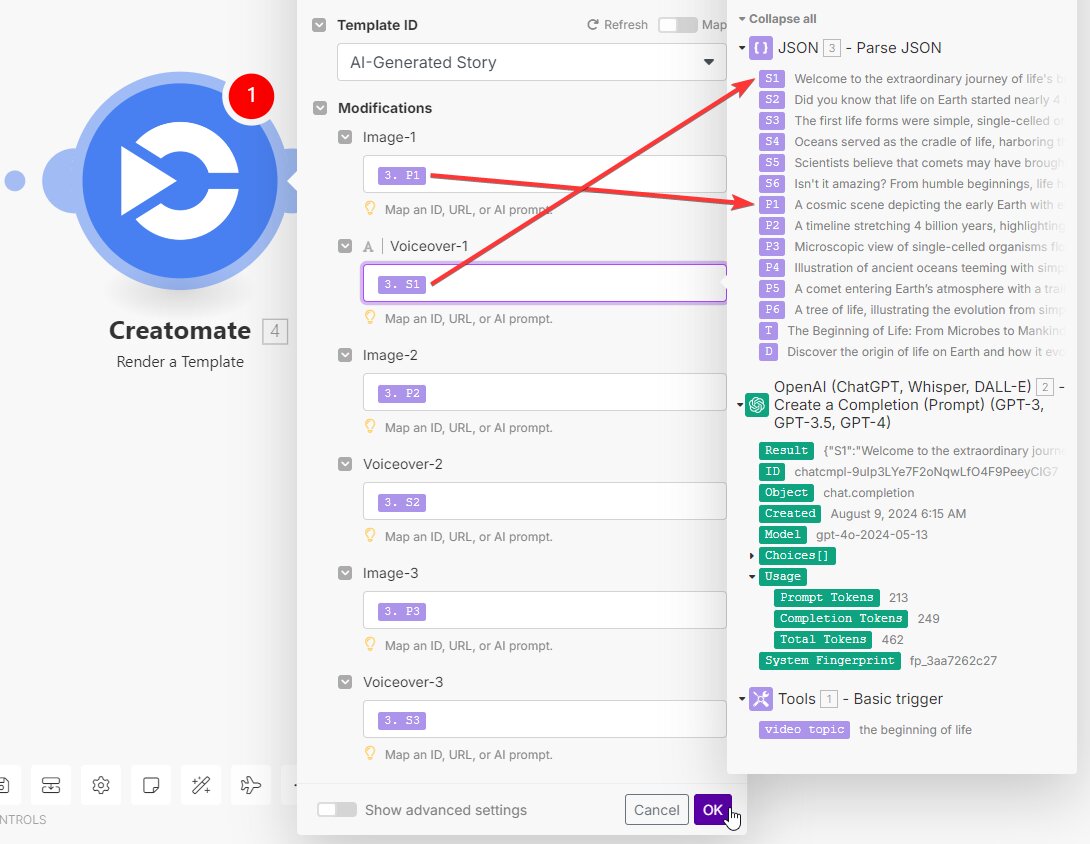
Next, select the AI-Generated Story template in the Template ID field. Make.com will now pull in the template's dynamic elements and list them under Modifications.
Now, let's connect our AI-generated text to our template as follows:
- Set Image-1 to JSON - Parse JSON -> P1
- Set Voiceover-1 to JSON - Parse JSON -> S1
- Set Image-2 to JSON - Parse JSON -> P2
- Set Voiceover-2 to JSON - Parse JSON -> S2
- Set Image-3 to JSON - Parse JSON -> P3
- Set Voiceover-3 to JSON - Parse JSON -> S3
- and so on.
When done, click OK:
Let's test if Creatomate can generate a video by clicking the Run once button. If everything is set up correctly, Creatomate will first send a request to DALL·E to create images. Next, it will ask ElevenLabs to produce the voiceovers. It will then transcribe the voiceovers and generate subtitles. Finally, it combines everything into a video.
This process may take a minute or two to complete. Once the test is successful, you can view the video by visiting the URL provided in the test result:
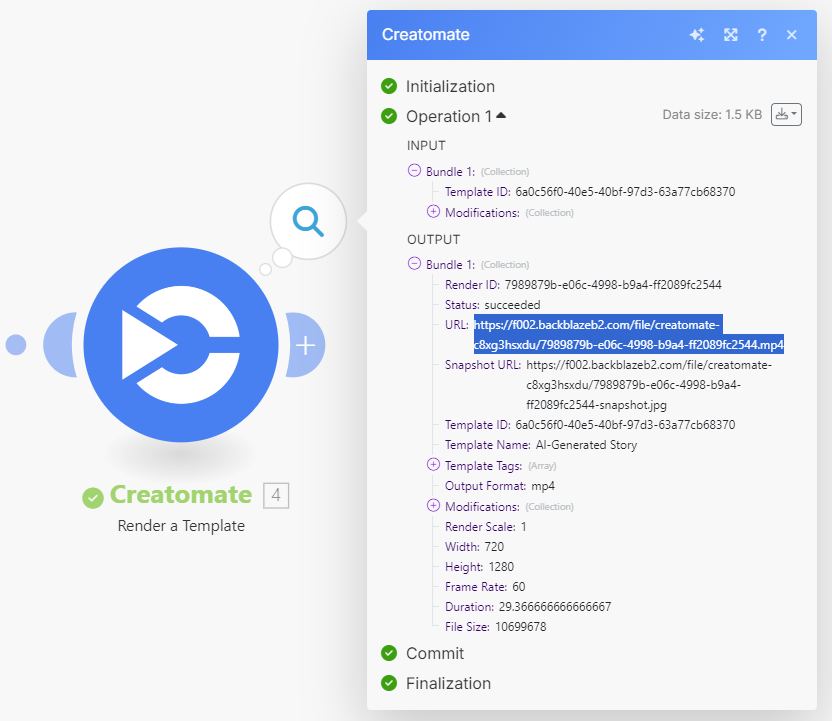
My video looks like this:
Note: Every time the ChatGPT module runs, it generates new content. Therefore, the video will likely differ from the output seen in the previous step.
8. Process the video
At this point, we've successfully generated the video and it's now ready for further processing. I'll show you how to upload it as a YouTube Short, but you can also post it as an Instagram Reel or a Facebook video. Alternatively, you can email the video to yourself for review and, once approved, share it on TikTok. The choice is yours.
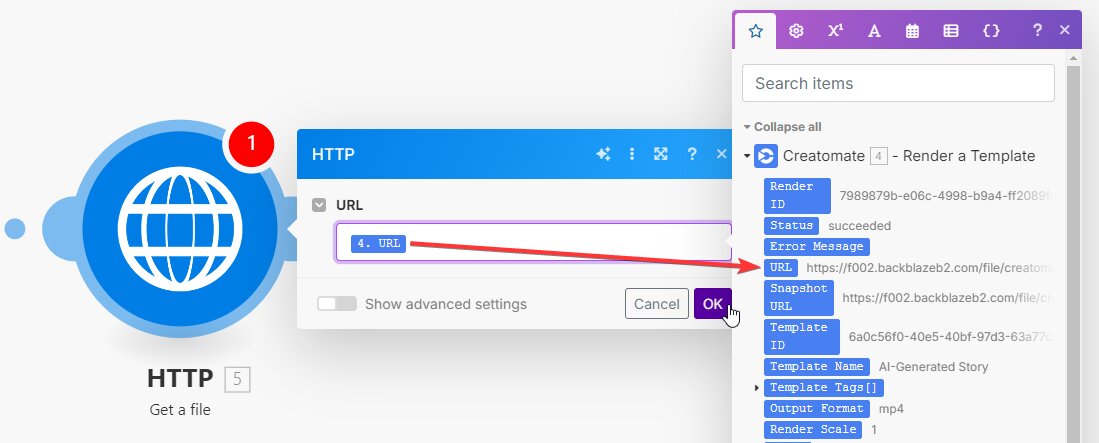
In the previous step, we received the video's URL. While most apps, including Instagram, can use this URL directly, YouTube requires the actual video file. Therefore, before setting up the YouTube module, we need to add a step to download the video first.
Add the HTTP app with the Get a file action. In the URL field, select Creatomate - Render a Template -> URL. Then, click OK:
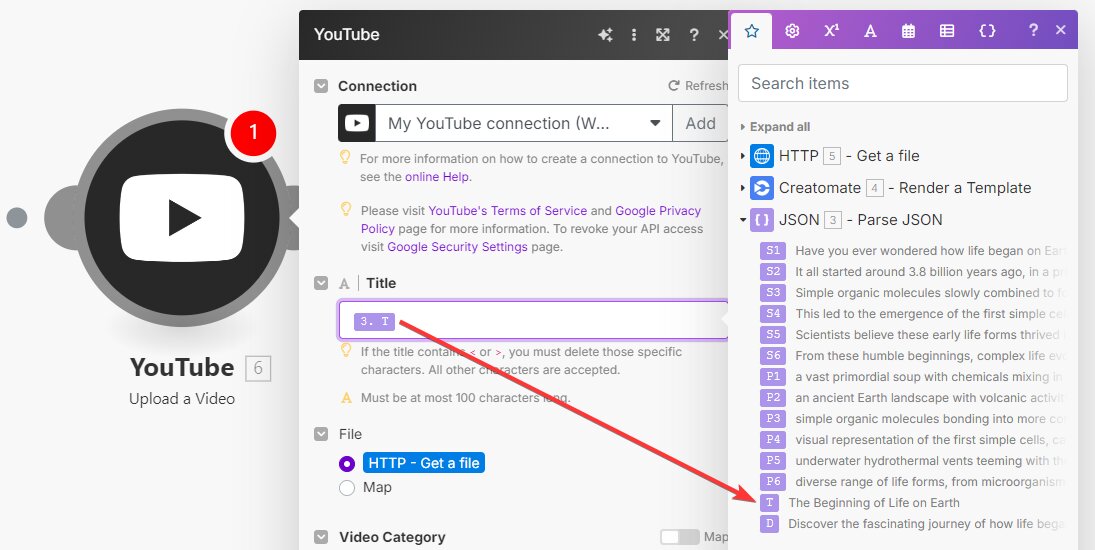
Next, add the YouTube app with the Upload a Video action.
Create a connection first. Then, for the Title, select JSON - Parse JSON -> T. For the File, the HTTP - Get a file option should already be selected:
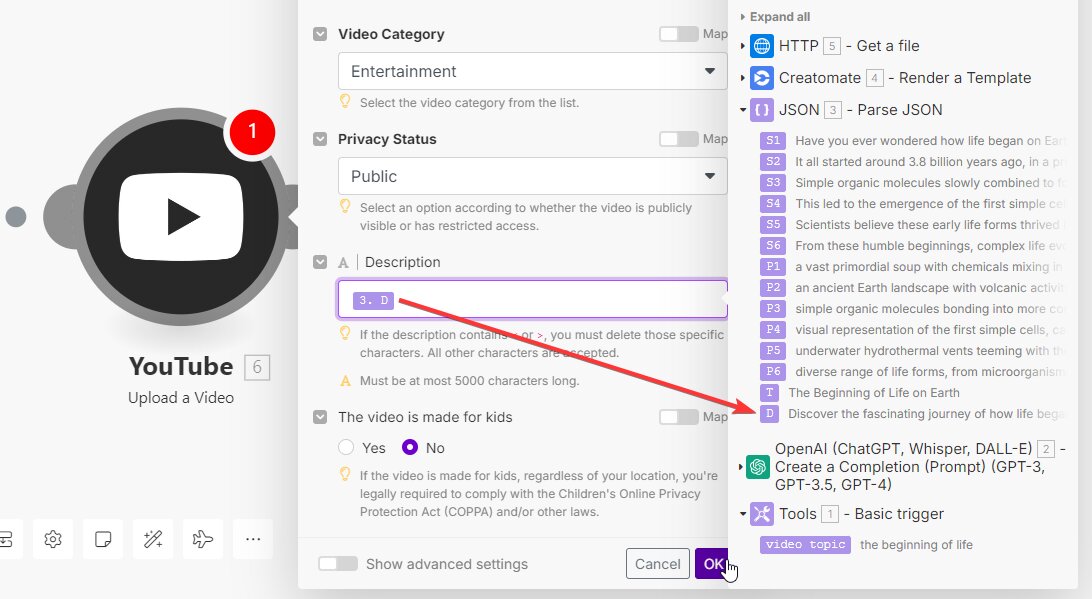
Set Description to JSON - Parse JSON -> D. Customize the other options as desired. When you're finished, click OK:
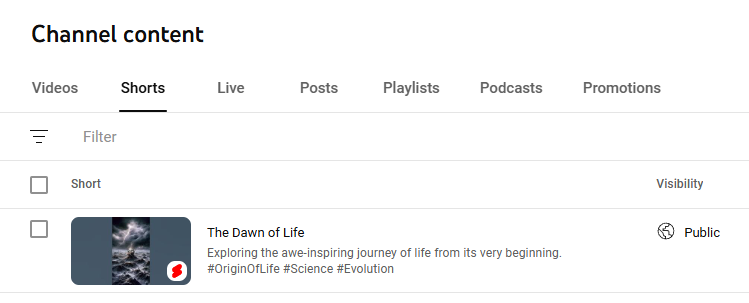
After setting up the module to process your video, click Run once for a final test. Within a few minutes, the video will be posted on my YouTube channel:
Note: If the YouTube module shows a warning (“Value must not be empty”), you can ignore it and continue the test run. After a successful test, you should be able to activate your scenario.
What's next for Text-to-Video with AI?
Well done! You've made it through this tutorial and learned how to automatically convert text into videos using different AI tools. Both Make.com and Creatomate offer great flexibility, allowing you to customize workflows to fit your specific needs. For example, you can design your own video templates in the editor, connect to different trigger apps, and process the videos as you wish.
If you're interested in automating more of your social media marketing, check out one of these tutorials next:
👉 How to Automatically Create Instagram Posts using Make
👉 TikTok Automation: How to Create TikTok Videos using AI
👉 How to Automate YouTube Shorts with AI-Generated Videos


