How to Automate Video Creation with Make.com

In this tutorial, you'll learn how to create short-form video content using Make.com and Creatomate's video generation API.
Video is still one of the best ways to grab people's attention. Whether you're posting on social media, sending a personal message, or running a campaign – it works. The real challenge is keeping up with the constant demand for new content. That's where automation comes in.
With Make.com, a no-code automation platform, you can take much of the manual work out of video marketing. From brainstorming ideas to generating and posting videos, most of the process can run on autopilot. In this tutorial, I'll show you how to build a simple workflow that automatically turns text and media into videos using the Creatomate video generation API. I'll also walk you through how to process and post the result on social media, just as a demo.
This example is only a starting point. With Creatomate's online template editor, you can design videos that match your style and goals. For example, you can create short videos for YouTube, TikTok, or Instagram – complete with voiceovers, animated subtitles, and custom visuals.
Tip: We've also created many other Make.com tutorials that explore different video automation workflows – from fully AI-generated shorts to personalized videos, automated news videos, and social media content.
If you're curious to see what's possible, check out our step-by-step tutorials.
Prerequisites
Make.com offers over 3,000 app integrations, making it easy to connect the tools that work best for you. This flexibility opens up many scenarios where video automation can be useful.
To keep this tutorial simple, we'll focus on the core concept of video generation so you can easily adapt it to your own needs and use cases.
Here are the tools we'll use:
- Creatomate: to create a template and generate videos.
- Make.com: to set up the automated workflow.
- Any app to process the video: I'll demonstrate how to use the Instagram for Business module to post the video as a Reel, but feel free to replace this with any other app of your choice.
How to create videos using Make.com
The first step is to create a video template in Creatomate. This template serves as the base for all the videos we'll generate. It includes dynamic elements – such as text, images, colors, and more – that can change from video to video.
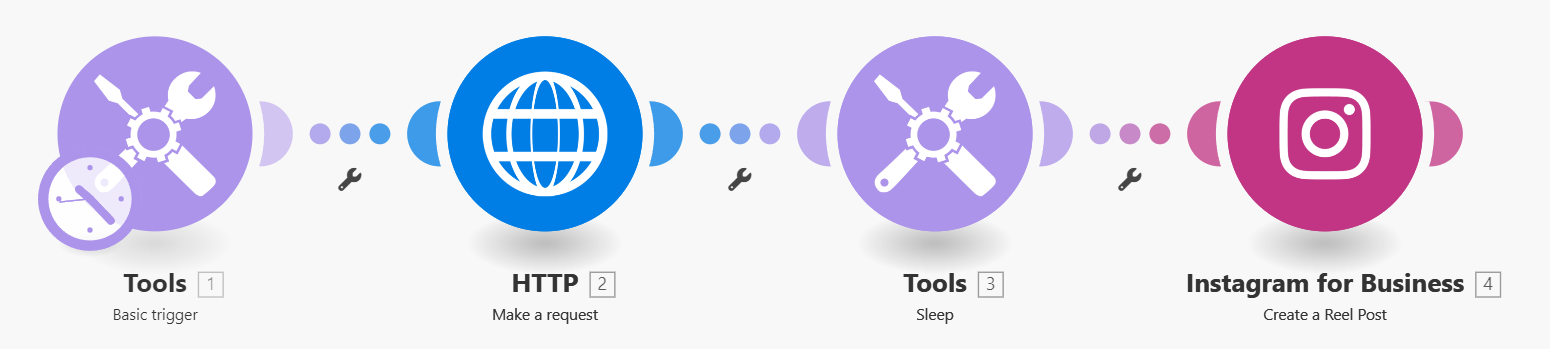
Next, we'll switch to Make.com and build a scenario. For this demo, we'll use a basic trigger to supply the video content. Of course, you can use any app that fits your workflow best.
Then, we’ll add a Creatomate module, select the template, and map the content we want to include in the video. Once the video is generated, you can use it however you like. A common use case is posting it as an Instagram Reel – but you can connect and publish to any app or platform that works for you.
The scenario will look something like this:
Ready? Let's get started!
1. Create a video template in Creatomate
Log in to your Creatomate account, or sign up for free if you haven't already.
Go to the Templates page and click New to open the gallery. You'll find plenty of pre-made templates that you can use as-is or customize to fit your needs. If you already have something specific in mind, you can also start from scratch and design your own.
For this tutorial, we'll use the Quick Promo template from the Featured category. Select the 9:16 Vertical size and click Create Template to open it in the editor:
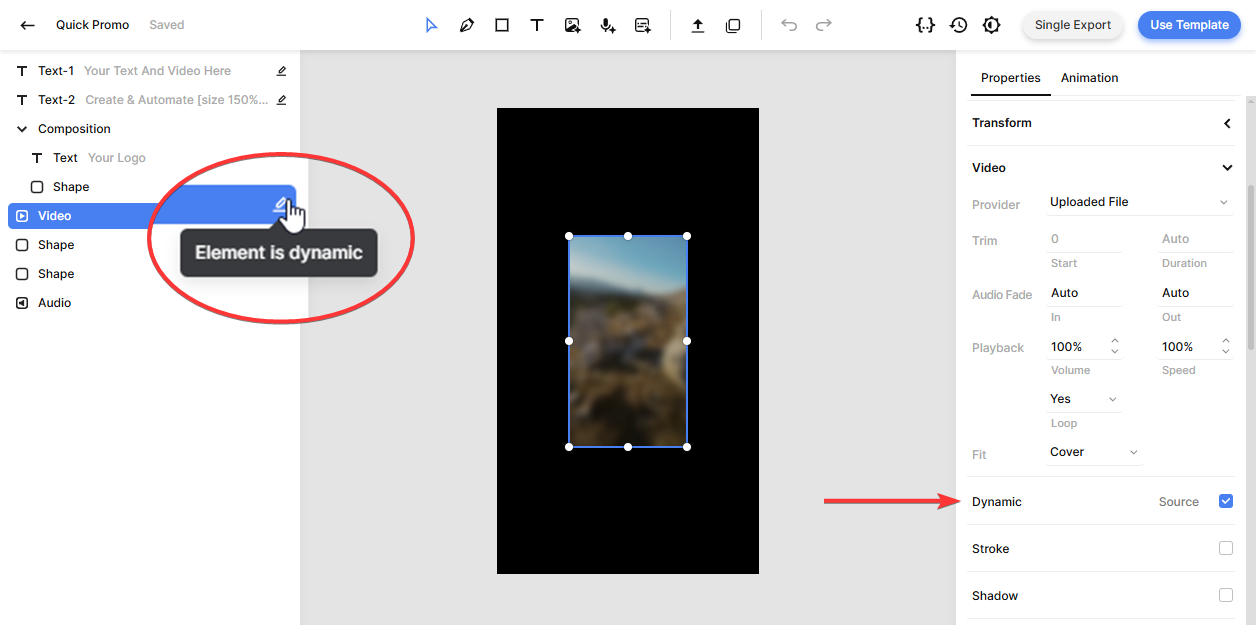
Each template you create is made up of elements (also called “layers”). Any of these elements can be automatically replaced with different content for each video through your Make.com scenario.
To enable this, you need to mark the elements as dynamic. Simply select the elements you want to update, then check the Dynamic option in the property panel.
In this example template, there's no need to make any changes – the elements Text-1, Text-2, and Video are already dynamic. However, this is an important step to remember when creating your own templates:
If you'd like to learn more about how the editor works, check out our documentation.
Let's move on to the next step, where we'll set up our Make.com scenario.
2. Add video content to your Make scenario
Note: To keep things simple, we'll start with one of the easiest triggers in Make.com. It doesn't require any setup or account logins, so you can follow along right away.
In real-world scenarios, you'll likely use a different app. As long as it provides the video content and a caption for posting, it will work. For example, you could store your video content in an Airtable base or a Google Sheets document, and trigger the workflow whenever a new row is added.
Log in to your Make account, or sign up for free if you don't already have one.
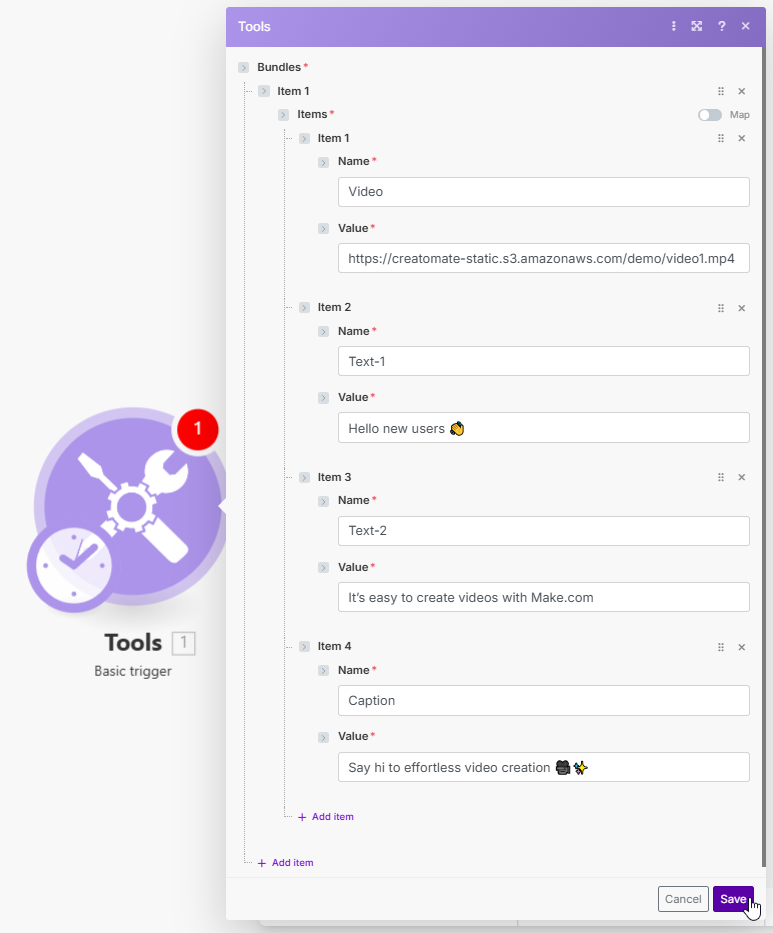
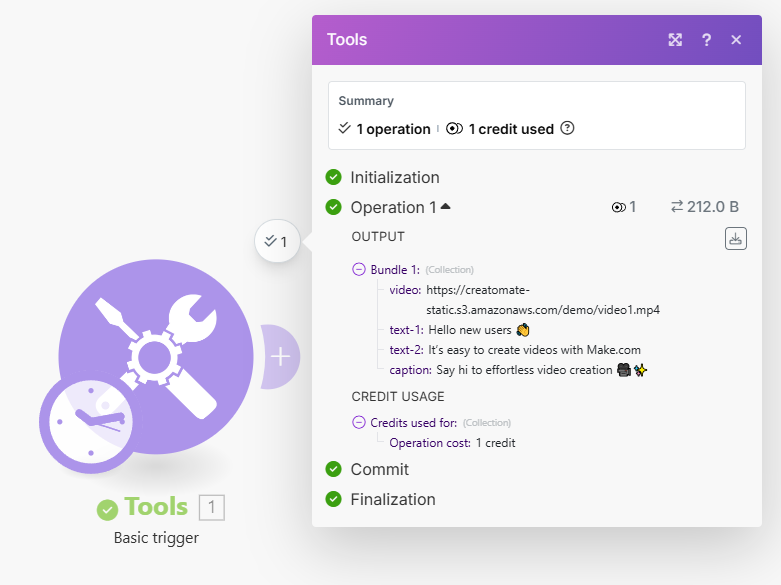
From your dashboard, click the pink Create scenario button. Then, search for and select the Tools app with the Basic trigger.
We'll add three items to match the dynamic elements in our template, and include a caption for posting:
- Video -> https://creatomate-static.s3.amazonaws.com/demo/video1.mp4
- Text-1 -> Hello new users 👋
- Text-2 -> It's easy to create videos with Make.com
- Caption -> Say hi to effortless video creation 🎥✨
Then, click Save:
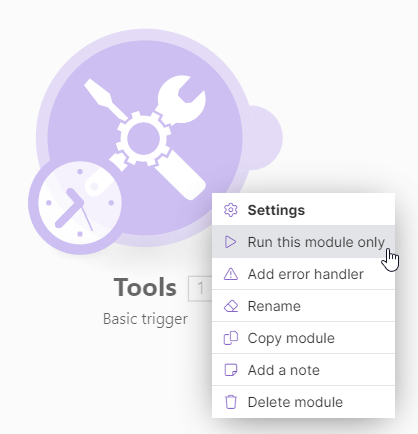
Right-click this module and select Run this module only:
You'll see that the output includes our items:
3. Generate the video
In this step, we'll create a video using Creatomate's API. We'll use the data from our trigger module and insert it into the video template we set up in step 1.
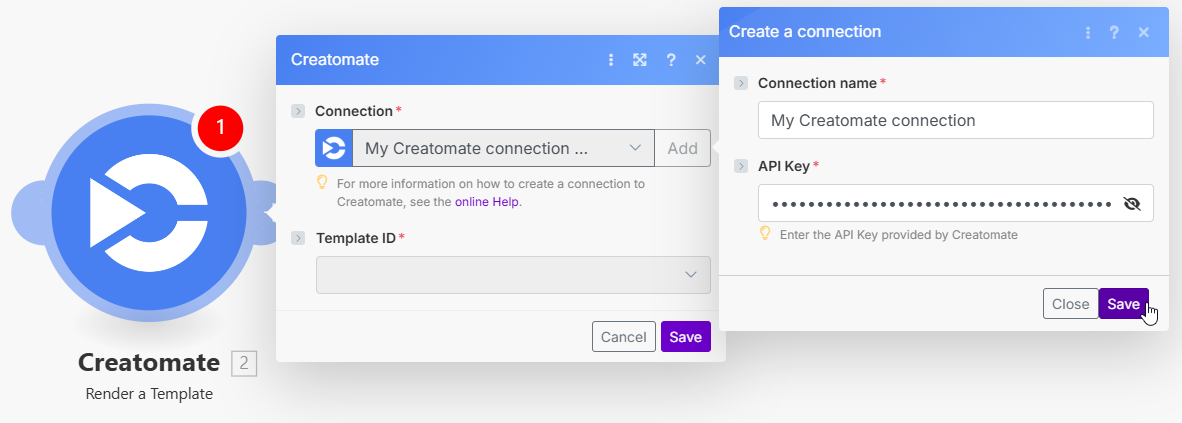
Click + to add a new module. Search for Creatomate as the app, and select Render a Template as the action.
Next, create a connection using your project's API key, which you can find under Project Settings in your Creatomate dashboard:
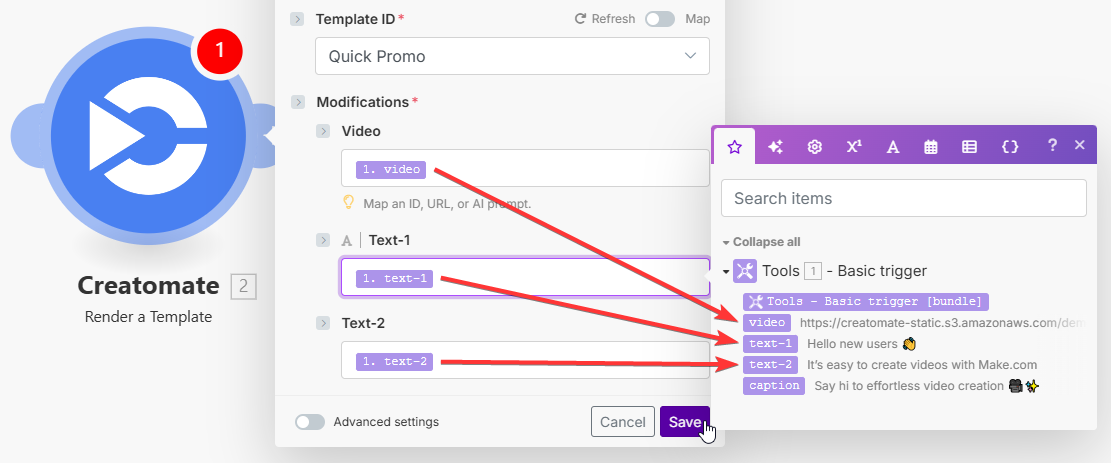
Next, select your Quick Promo template in the Template ID field. Make.com will automatically pull in the dynamic elements and list them under Modifications.
Now, let's map the data from our trigger to the template as follows:
- Set Video to Tools - Basic trigger -> video
- Set Text-1 to Tools - Basic trigger -> text-1
- Set Text-2 to Tools - Basic trigger -> text-2
Once done, click Save:
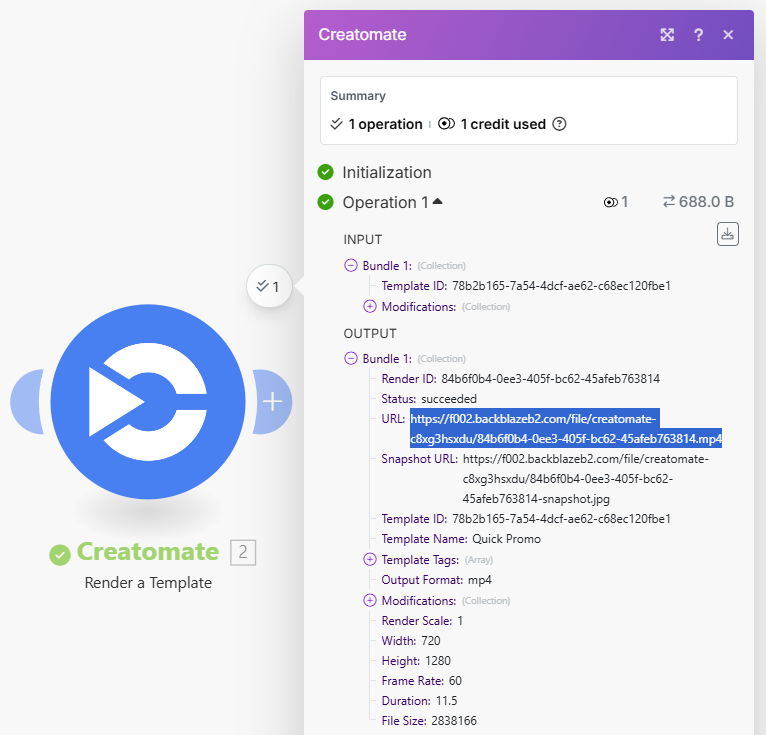
To test whether Creatomate can generate a video, click the Run once button:
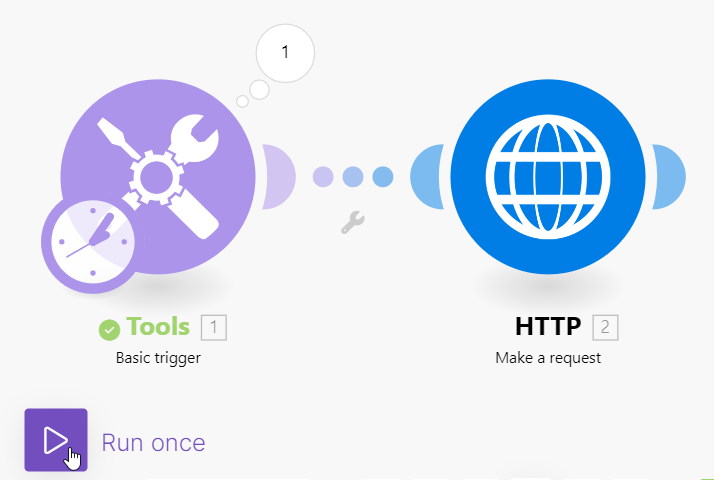
If the test runs successfully, the module will turn green. The output from Creatomate includes a video URL, which you can use to preview the video:
4. Process the video
In this final step, I'll show you how to post the video as an Instagram Reel. Of course, you can choose any other app integration that works best for your workflow.
Note: Some Make integrations, like YouTube, accept a file as input, while others – such as Instagram for Business – require a URL. If you want to use an app that needs a file, you'll first need to add a module to fetch it. You can refer to this tutorial for guidance (see step 4).
Click + to add another module. Search for the Instagram for Business app and select the Create a reel post the action.
Choose your account (or create a connection) and then select your page. In the Video URL field, select Creatomate - Render a Template -> URL:
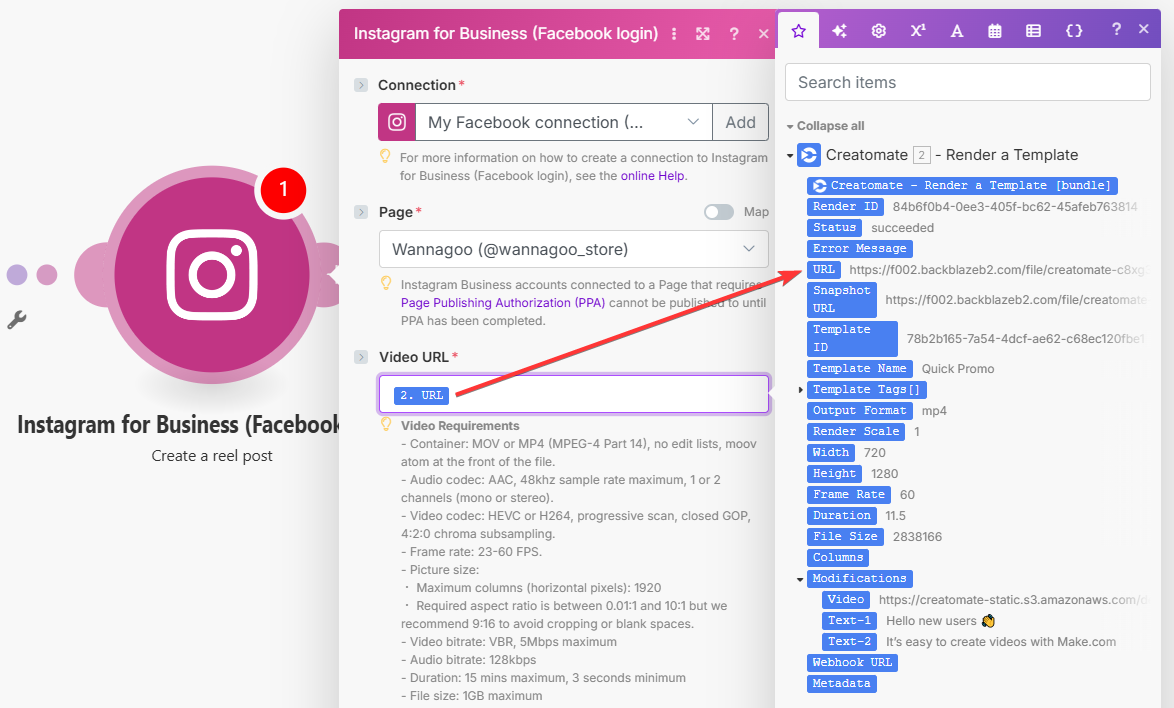
To add a caption, select Tools - Basic trigger -> caption in the Caption field.
You can set a cover frame manually if you like, but a more efficient way is to use the snapshot setting directly in the template. Since this tutorial isn't specifically about Instagram, we haven't covered that here. If you'd like to learn more, check out the template step in our dedicated Instagram Reels with Make.com tutorial. You can also choose whether to add a Location ID and share the reel on your feed.
When you're done, click Save:

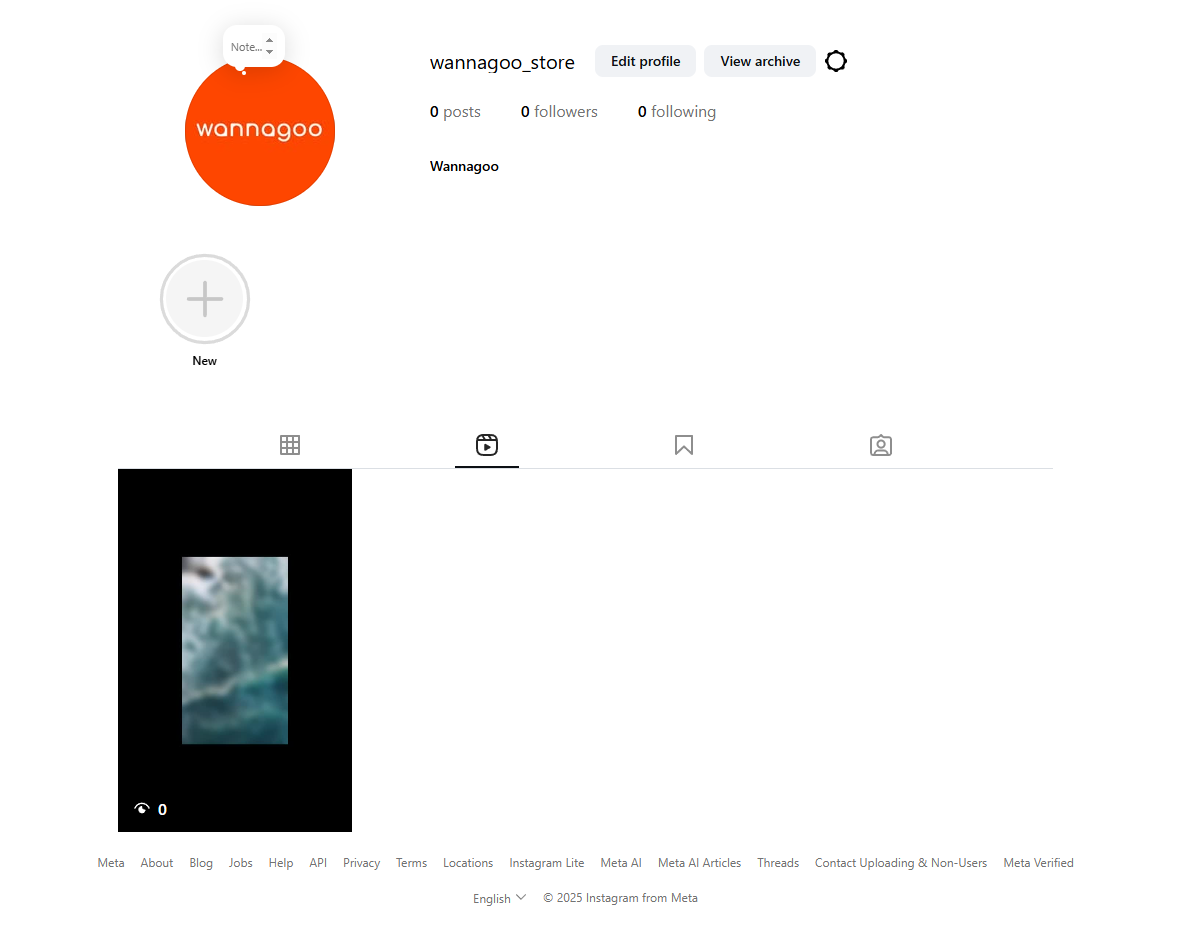
To give our scenario a final test, click Run once again. If everything is set up correctly, the video should appear on Instagram shortly:
What's next for video creation with Make.com
And that's it – pretty simple, right? Now that you know the basics, you can adapt them to fit your own needs and use cases. With so many apps and automation features available, the possibilities for video automation are virtually endless.
Here are a few events that you can use as a trigger to start your workflow:
- New records in Airtable
- New items published in an RSS Feed
- Scheduled social media posts using Google Sheets
Once your video is created, you can use it in a variety of ways:
- Send it by email
- Upload a file to platforms like Dropbox or Google Drive.
- Post it as a YouTube Short
To spark some inspiration, check out our blog page with step-by-step tutorials, or jump right into one of these:
👉 How to Automatically Add Subtitles to Videos using Make.com
👉 How to Create Videos with AI Voiceovers using Make.com
👉 How to Create AI-Generated Videos using ChatGPT and Make
👉 How to Automatically Create Instagram Reels using Make
👉 How to Automatically Create YouTube Shorts using Make
👉 How to Automatically Create TikTok Videos using Make
FAQs
How do I connect Creatomate to Make.com?
Start by adding a Creatomate module to your scenario. When prompted, click Add to create a new connection. Next, go to your Creatomate dashboard, click … in the top-left corner, select Project Settings, and copy your API key. Paste the key into the connection window in Make.com and click Save. Your Creatomate account will then be successfully linked to Make.com, and you can begin setting up your automations.
What kind of videos can I create?
There are many possibilities – from YouTube Shorts to personalized messages and advertisements. You can even integrate generative AI into your workflow. Video automation works by using a template that defines the design of your videos. As long as your videos follow a consistent format, they can be easily automated with Creatomate and Make.com. Check out our tutorials for common use cases.
Can I design my own video templates?
Yes, absolutely! Creatomate includes a powerful online editor that gives you all the tools you need to create almost any video design. You can start with a pre-made template from the gallery and customize it to fit your needs. If you already have a specific design in mind, you can also build your template entirely from scratch. Just open the editor and experiment with its features to create your own templates.
For detailed instructions on using the editor – including advanced features like auto arrangement, which adjusts the total video length to match your content (such as AI voiceovers) – check out the Editor section in the documentation.
Can I use AI to create videos with Make.com?
Yes! Generative AI opens up many possibilities for video automation. Make.com supports nearly 3,000 apps, including popular ones like OpenAI, which lets you use ChatGPT in your workflows. Creatomate also provides native integrations with tools like ElevenLabs (for AI voiceovers) and DALL·E (for AI-generated images), making the process even easier.
A popular use case is creating AI-powered faceless shorts for platforms like YouTube, TikTok, or Instagram. For example, you can build a scenario that takes a video topic – from a Google Spreadsheet, for instance – and sends it to ChatGPT to generate a storyboard. This can include a title, description, voiceover text, and image prompts. On top of that, Creatomate's auto-transcription feature can generate animated, word-by-word subtitles for your videos. Check out our tutorial for a step-by-step guide on setting up this workflow.
You might also like these tutorials


Start automating today
Start with a full-featured trial with 50 credits, no credit card required.
Get started for free →