How to use AI to Automate Videos for Shorts, Stories, and Reels

In this video automation tutorial, you'll learn how to use AI to auto-generate videos for YouTube, TikTok, and Instagram using OpenAI, Creatomate, and Zapier.
From DALL·E to Midjourney, and ChatGPT to Gemini, AI has never been more in the spotlight. And with OpenAI developing their text-to-video model Sora, the AI revolution is only just getting started.
For this tutorial, I'd like to take a practical approach by using generative AI in video automation. In this experiment, we'll combine multiple AI models, including ChatGPT for generative text, DALL·E for image generation, and ElevenLabs for text-to-speech.
By the end of this tutorial, we'll have an automated workflow that takes a single topic and makes an entire video from start to finish. These include the writing, the visuals, the voiceovers, and the subtitles. Here's what the AI generated after only being instructed to make a social media video about "The beginning of life":
AI-generated content can be unpredictable and chaotic. The less information an AI has to work with, the less predictable the video. So, to generate videos with AI, you've got to know how to correctly instruct it to output the desired results.
That's why we have to give AI a solid foundation to build on. Because we'll be generating a social media video, we'll be setting up a video template specifically for that. We'll tell the AIs to write a script for a short video, split it up into several scenes, and generate corresponding background images.
We'll design the video template using Creatomate. Using its visual editor and API, it is possible to customize every aspect of the video – from the styling to the scenes to the overall production. Because of that, this technique works for any kind of video, not just short social media videos. Our example will involve multiple AIs, ChatGPT, DALL·E, and ElevenLabs, so we need a way to tie them together. That's what Creatomate helps us with too.
And for the example to be complete, I'll show you how to set up a workflow so the video gets posted automatically on YouTube. For that, we'll use Zapier, which connects with thousands of other apps if you want to adapt it for a different purpose.
Prerequisites
To make this example realistic and simple, I'll demonstrate with a very basic Zapier workflow. Zapier is a platform that lets you connect any of the 6,000 supported apps to automate repetitive tasks. Once set up, a workflow runs automatically. The great thing about Zapier is that you don't need to write a single line of code to do that. This makes it really easy to use – even if you're not very tech-savvy.
For this demo, we'll need a way to feed the automated workflow a topic to generate the video above (in this case, "The beginning of Life"). We'll do this by creating a Slack channel that will automatically trigger the Zapier workflow. But this is completely optional as you can use any of thousands of apps to activate the workflow, such as Airtable, Google Forms, or any other app that works for your needs.
We'll use:
- Creatomate: to set up a video template;
- Zapier: to set up an automated workflow;
- Slack (optional): to provide a prompt for your videos;
- ChatGPT: to generate a script for the videos;
- DALL·E: to generate visuals for the videos;
- ElevenLabs: to generate voiceovers for the videos;
- YouTube, TikTok, or Instagram (optional): to automatically post the generated videos.
How to automate AI-generated videos?
OpenAI and ElevenLabs have by far the best APIs for generative AI and voiceover generation. So first things first, we need free accounts on both platforms. Next, we will connect them to a Creatomate template as the basis for generating the AI-generated video.
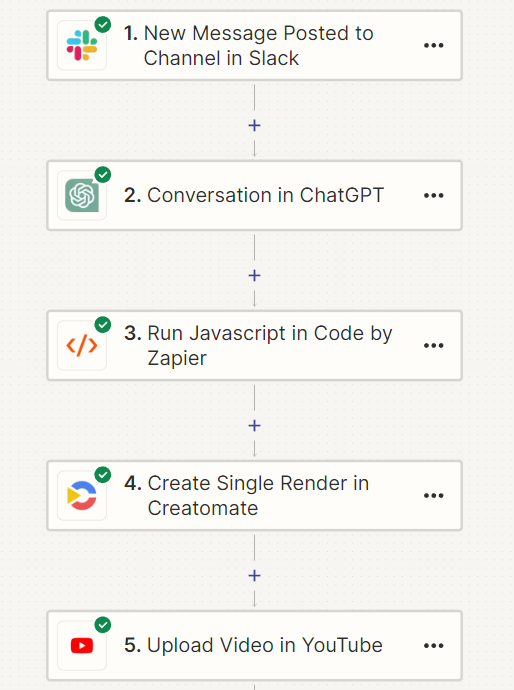
For the final piece, we'll set up a Zapier workflow. We'll pull data from Slack, feed it through ChatGPT, parse the reply, and put the video together in Creatomate. Finally, it gets posted on YouTube.
Here's what we'll build:
Let's get started!
1. Set up an ElevenLabs account for AI voiceovers
If you haven't used ElevenLabs before, you can sign up for a free account here. Basically, we just need an API key and a voice ID. This voice ID is optional, but I thought I'd show you since you probably want to customize it later on.
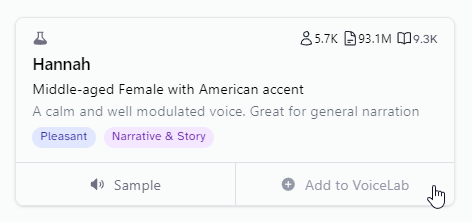
There are several ways to generate speech in ElevenLabs. The easiest way to get started is to use one of their premade AI voices. However, let's check out the voice library just a bit. This is what makes ElevenLabs so powerful; it has a huge library of community-created voices you can use; gentle voices for audiobooks, energetic voices for social media, and more serious ones for professional videos. You can even recreate your own voice by uploading an audio recording.
All of this can be done through their Voice Library. Head over there now by navigating to the Voices page and clicking on Library.

To import any of these voices to your account, click Add to My Voices:
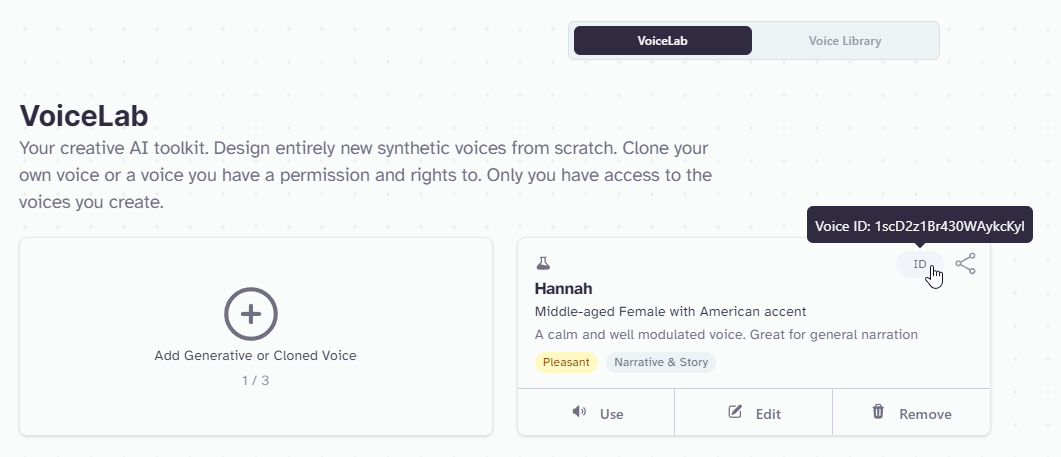
Return to the "My voices" page, and under Community, you'll see that the voice has been added. You will be able to specify this voice by its ID further on in this tutorial. Click the ID button for now and keep it somewhere for later:
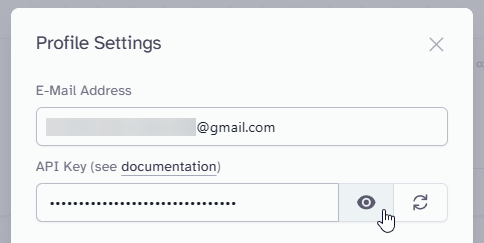
You'll also need your ElevenLabs API key. You can find it by clicking on your profile icon at the bottom left. Then, click Profile + API key:
That's all there is to ElevenLabs; with the voice ID and API key, it's on to the next step!
2. Set up an OpenAI account for ChatGPT and DALL·E
Sign in to your OpenAI account if you already have one, or create a free account. In your OpenAI dashboard, go to the API section:
Next, from the left side menu, click API keys. Then, click on Create new secret key, provide a name, and click Create secret key:
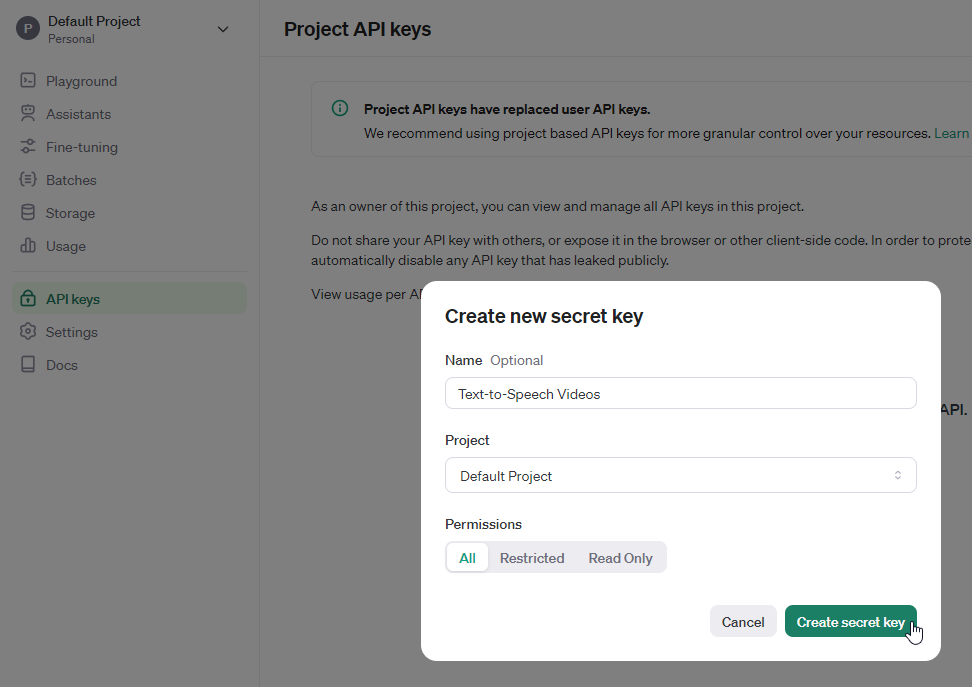
Keep your API key close by, you'll need it in the next step.
3. Set up a video template in Creatomate
Log in to your Creatomate account or create a free account if you don't already have one.
We'll start by entering our ElevenLabs and OpenAI API keys to connect with both tools. To do this, click on ... , then choose Project Settings. In the Integrations section, toggle the switch for OpenAI, paste your API key, and click Confirm. Next, do the same for ElevenLabs. Once you're done, close the Project Settings menu:
Your accounts are now set up, and we're ready to create a video template.
Let's navigate to the Templates page, and click the New button to open the template gallery. Go to the Voice Overs category and select the AI-Generated Story template. As we're creating a short-form vertical video, choose the 9:16 Vertical size, then click Create Template to open it in the editor:
The video editor might seem intimidating at first. No worries, it's pretty easy to get started.
If you're familiar with video editing, most of this will be familiar to you. Because Creatomate's editor is built for video automation, it works slightly differently. The editor doesn't confine you to specific designs; just about any type of video can be automated. This provides you with a lot of freedom to implement your own custom ideas. Even the templates themselves are open source JSON that can be generated through automation.
Let's focus on this voiceover template. As you can see, there are 6 compositions, each corresponding to a scene in the video. Each composition includes a voiceover, subtitle, and image element. As you play with the template in the editor, you'll see that the voiceovers, subtitles, and images haven't yet been generated. This is because they are just placeholders; the actual content is generated in your automation Zap. If it doesn't make sense yet – in the next few steps, you'll see what I mean.
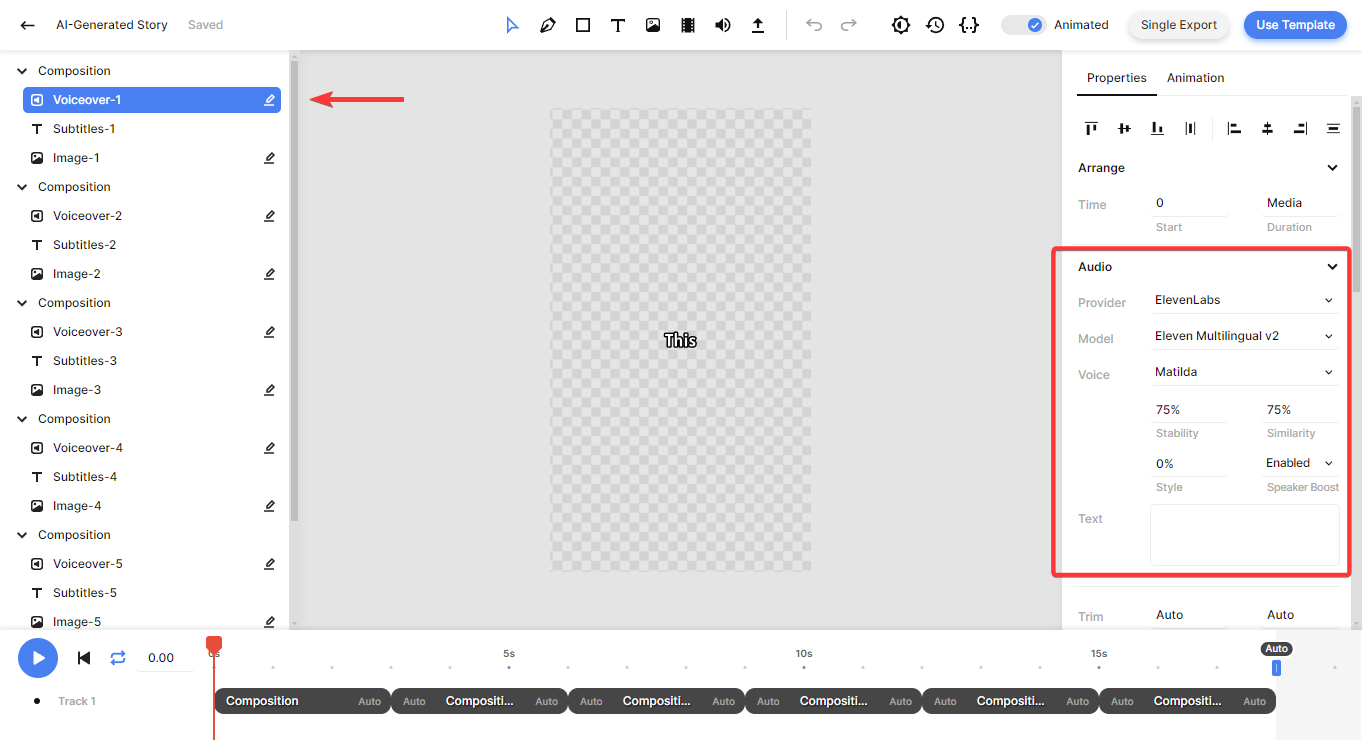
Our template is almost ready to use. All that's left is to specify the voice for the voiceover (optional) and configure the image elements for DALL·E. I'll demonstrate these adjustments with the first composition, and you can then do the same for the remaining five compositions.
On the left side panel, select the Voiceover-1 element. Then, navigate to the properties panel on the right, where you'll find the Audio property. This is where you can customize the voice over. The Provider is already set to ElevenLabs. The Model setting lets you choose between four different text-to-speech models. It's best to stick with Multilingual v2, as it has great speech synthesizing and works with a lot of languages.
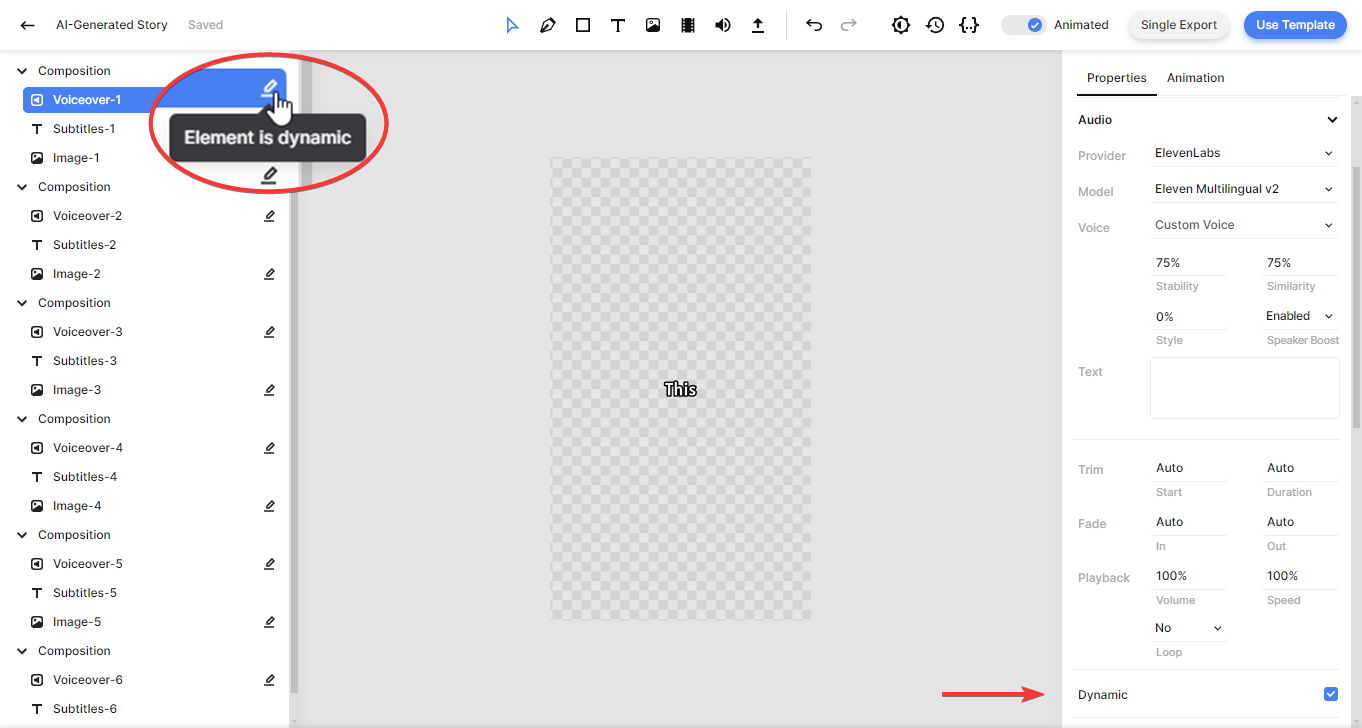
For the Voice, Matilda is the default; a premade voice from ElevenLabs. But what if you want a custom voice? To do this, click on Matilda, scroll up, and select Custom Voice. Paste the voice ID from your ElevenLabs dashboard, and click OK:
You also can adjust the Stability, Similarity, Style, and Speaker Boost. This is a set of AI parameters you can adjust to fine-tune the voiceover generated by ElevenLabs. For instance, the Stability parameter controls the amount of emotion and randomness in the voice. I recommend leaving them the way they are unless there is a good reason for changing them; the default settings are perfect for most purposes. You can read more about each setting in ElevenLabs' Voice Settings documentation.
Next, let's take a look at the voiceover elements. These elements are all set to Dynamic, just like the images. This essentially means that you will be able to replace them in Zapier. Later on in this tutorial, we'll map ChatGPT's output to this element in order to create a voiceover from its script. You don't need to make any changes now; everything has already been set up correctly.
Let's have a quick look at the subtitles. Select the Subtitles-1 element, then scroll down to the Transcription property in the properties panel. Here you can customize the subtitles. As you can see, the Source points to the Voiceover-1 element. This tells Creatomate to generate subtitles based on the voice over. You can further customize the look and feel of the subtitles with the Style, Color, Fill, and Stroke attributes.
So far, we haven't had to make any changes to this template, but heads up – the next step is very important. By default, this template uses StabilityAI. For this tutorial, however, we'll be using DALL·E to generate the visuals.
For that reason, we need to change StabilityAI to OpenAI. To do that, select the Image-1 element, and change the Provider:
After setting Provider to OpenAI, we can choose between DALL·E 2 and DALL·E 3. For best results, I recommend DALL·E 3. Check out OpenAI's documentation to see how they're different.
Given that we're making vertical videos, set the Size to 1024x1792.
Style comes in two flavors; Vivid and Natural. With Vivid, the model tends to generate hyper-real and dramatic images. Natural produces more natural-looking images.
We'll leave the Prompt field blank because we'll provide this through Zapier.
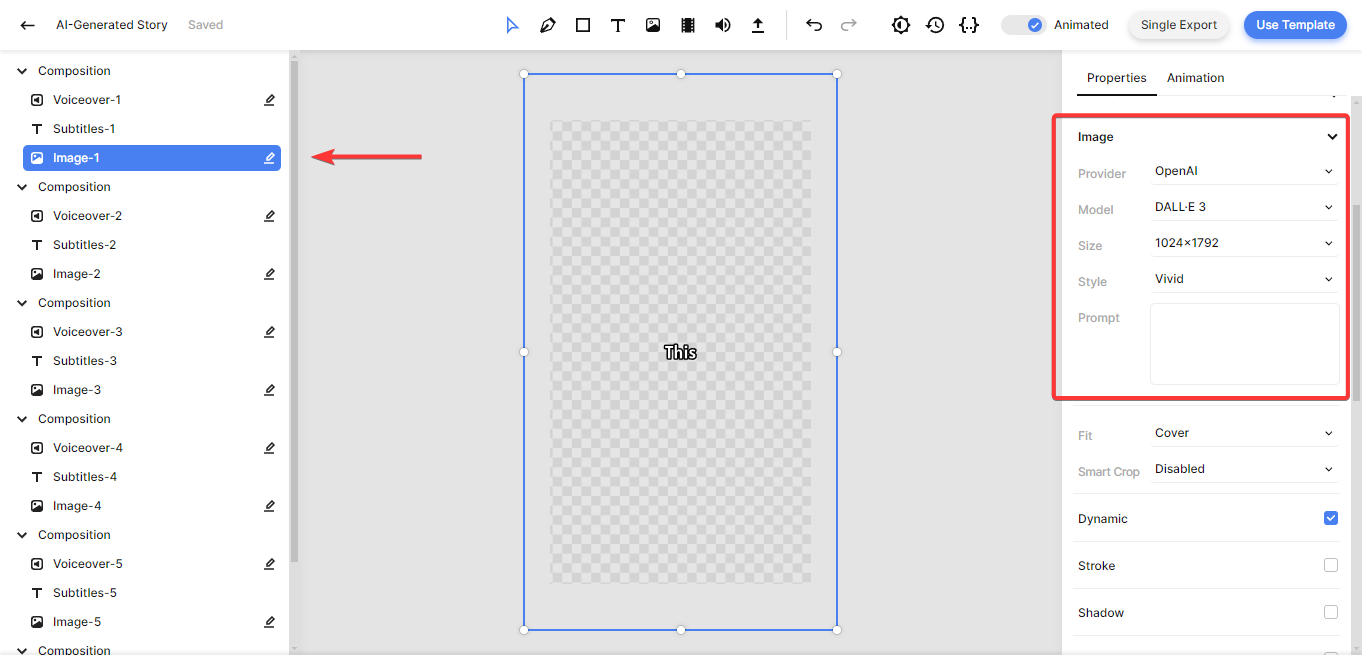
Make sure you apply these changes to all the image elements in the template; Image-1, Image-2, Image-3, etc. To do this quickly, hold down the control key while selecting each element in the left-side panel. With all images selected, make the changes as outlined above.
That's it, the template is now ready for automation!
To recap, we've created a new template with auto-generated voiceovers, subtitles, and background visuals. We've also connected Creatomate to ElevenLabs and OpenAI. Now whenever Creatomate receives an API request, it will automatically invoke ElevenLabs and OpenAI, then put everything together into a video. It'll also generate the subtitles.
Creatomate is now waiting for a signal to start generating videos. In order to do that, we'll integrate Creatomate with Zapier next. This lets us automate the whole process using any of the thousands of Zapier integrations.
4. Set up Zapier for video automation
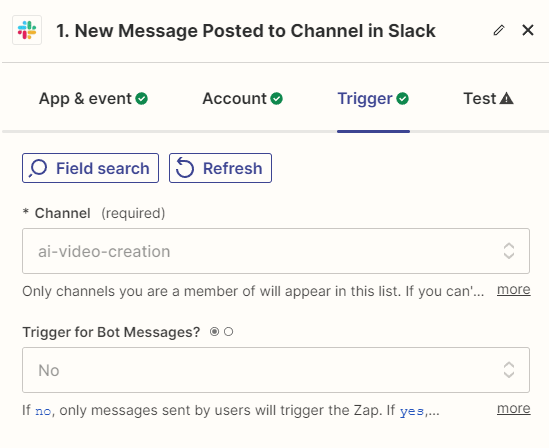
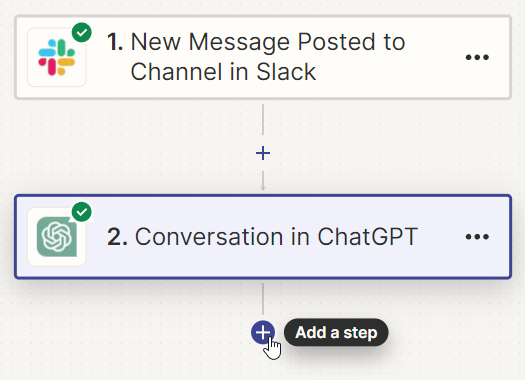
We're now ready to head over to Zapier.com to set up an automated workflow (also called a Zap). Every Zap begins with a trigger; this is the event that initiates the workflow. For this tutorial, I'm using the "New Message Posted to Channel" event from the Slack integration. As the name implies, it lets us send a message into our Slack channel to start the automated workflow. Feel free to use another trigger if you'd rather, since we don't use Slack for anything but pulling data into the workflow.
Log in to your Zapier account or sign up for free if you haven't already.
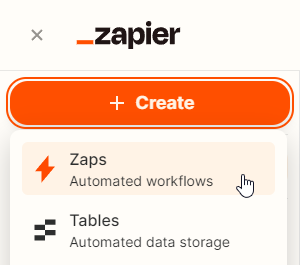
Once logged in, click the + Create button, and choose Zaps.
Once in the Zap editor, click the Trigger block. Search for and select Slack as the app, and New Message Posted to Channel as the event. Continue by signing in to your Slack account.
On the Trigger page, select your channel and choose if you want to trigger for bot messages. Then, click Continue:
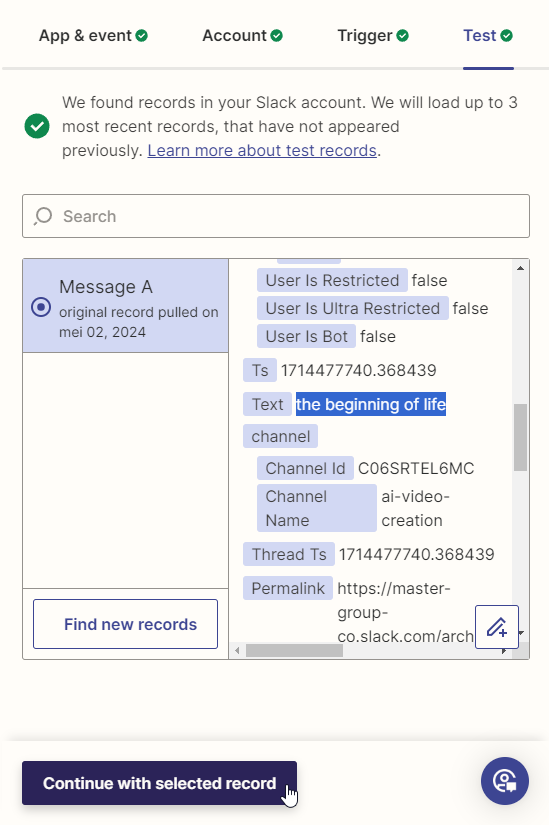
Click Test trigger on the Test page to make sure Zapier can find the message with the video topic. Once the test is successful, click Continue with selected record, and move on to the next step:
5. Generate a video script with ChatGPT
Next, we'll set up a Zap action to produce the script for the video. This will be done by using ChatGPT. Perhaps you have used ChatGPT's chatbot app before. With its large language model (LLM), it can write stories and information about pretty much anything.
A great feature of ChatGPT is that it can be integrated with Zapier as well. Here we have to be careful; if we want this to work in an automation workflow, we need to instruct the AI to answer in a certain way, otherwise it won't work. Fortunately, ChatGPT understands the concept of JSON (JavaScript Object Notation). The reason we use this format is that it's very reliable, which makes it great for automated workflows. We simply need to instruct ChatGPT to respond with a JSON-formatted response, and it'll be happy to do so.
Start by creating a Zap action, search for the ChatGPT app, and choose the Conversation event. Continue by signing in to your OpenAI account using the API key from step 2.
On the Action page, copy and paste the following prompt into the User Message field:
I am looking to generate text for a short video of maximum 1 minute. The video is about [topic]. The video is composed of 6 parts that provide interesting information about the subject, such as a fact or a thought-provoking question. I want you to generate the text to be read aloud (S1-S6), as well as a title (T) and description with three hashtags (D).
Return only valid JSON with the following structure. Remove any JSON formatting, so the output is on a single line and in its most compact form, as follows:
{"S1":"", "S2":"", "S3":"", "S4":"", "S5":"", "S6":"", "T":"", "D":""}
Make sure to replace [topic] with Slack -> Text, like this:
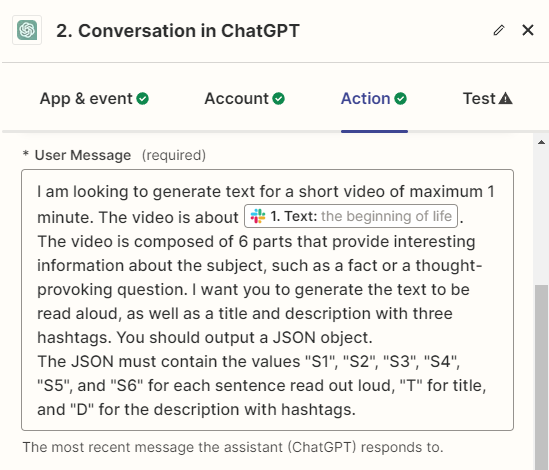
As you can see, this prompt tells ChatGPT to make a short video about the topic we provide. We also tell it to create 6 parts that correspond to our 6 scenes in the video template, and place them in JSON fields S1, S2, etc. We also let ChatGPT choose the title of the video and the description on YouTube.
Click Continue, then Test step:

Great! We've had the AI generate the script for our video, title, and description, then output it as JSON. Now we need to reformat it so it works with Zapier.
6. Parse the AI script
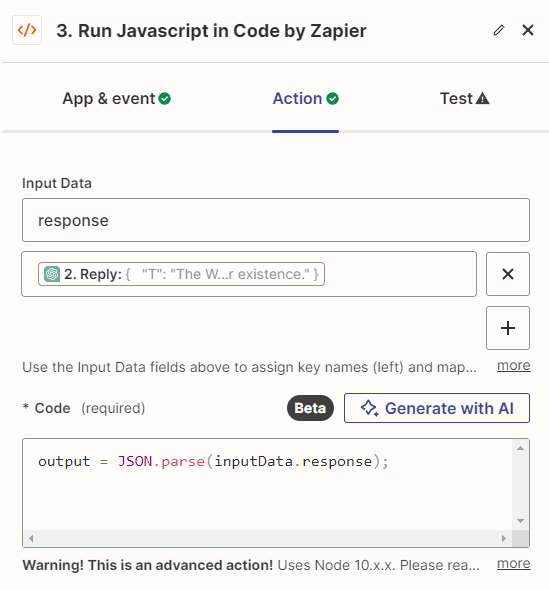
This step is simple, but essential. We need to convert the JSON response from the AI into something Zapier can understand. Click + to create a new step in your workflow:
Search for the Code by Zapier app, and select the Run Javascript event. Then, click Continue.
On the Action page, type response in the Input Data field, and select ChatGPT -> Reply. Then, in the Code field, copy and paste the following:
1output = JSON.parse(inputData.response);It should look like this:
When done, click Continue.
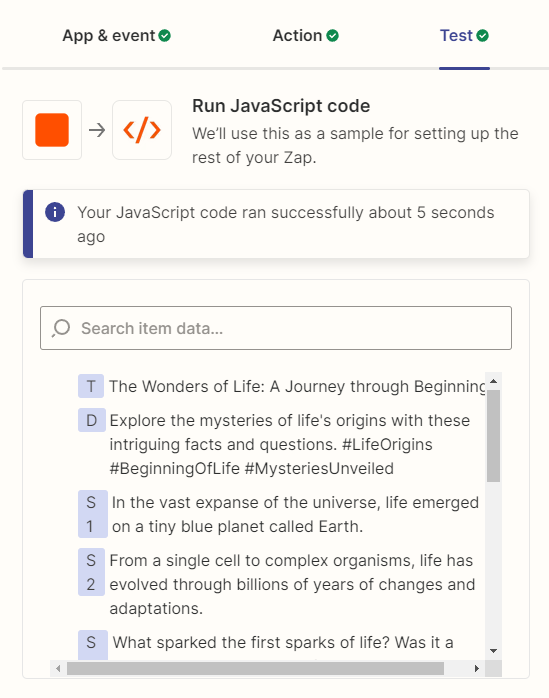
On the Test page, click Test step. You'll see that JSON is broken down into different fields; S1, S2, etc.:
7. Generate the AI video
Now that the AI-generated output has been broken down into separate fields, we can map it to the video template that we created earlier in Creatomate.
Click +, search for the Creatomate app, and choose the Create Single Render event. Continue by selecting your account or signing in with your project's API key, which you can find under Project Settings in your Creatomate dashboard.
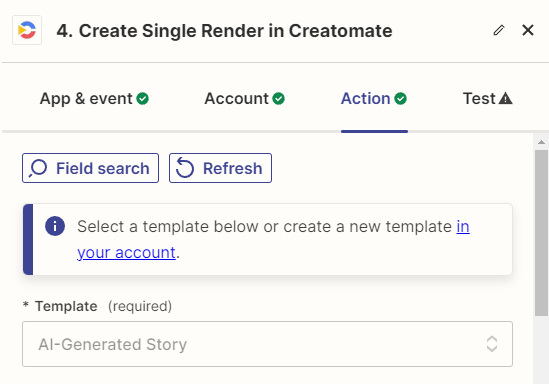
On the Action page, select the AI-Generated Story template in the Template field first:
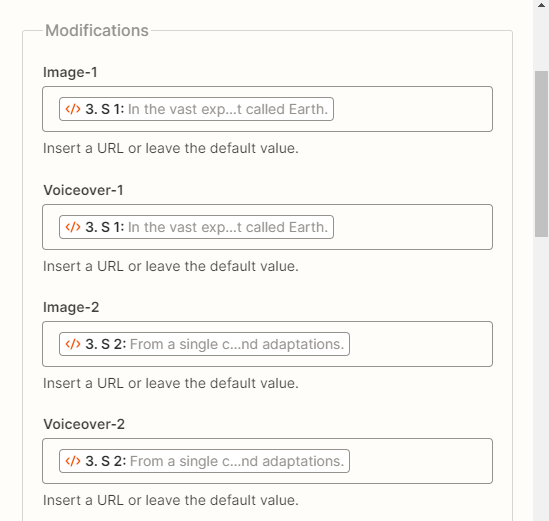
Here is where everything comes together. We'll insert the AI-generated sentences into the image and voiceover elements of the template. What happens next, is that Creatomate will use that text to create the voiceovers and images.
Whenever you pass text to a voiceover element, it'll be converted to speech. And when text is passed to an image element, it's used as a text-to-image prompt. As we received 6 sentences from ChatGPT, and we have 6 compositions in our template, we must map each sentence to a scene in the template.
So, here's what we have to do:
- Set Image-1 to Code by Zapier -> S1
- Set Voiceover-1 to Code by Zapier -> S1
- Set Image-2 to Code by Zapier -> S2
- Set Voiceover-2 to Code by Zapier -> S2
- Set Image-3 to Code by Zapier -> S3
- Set Voiceover-3 to Code by Zapier -> S3
- and so on
When done, click Continue.
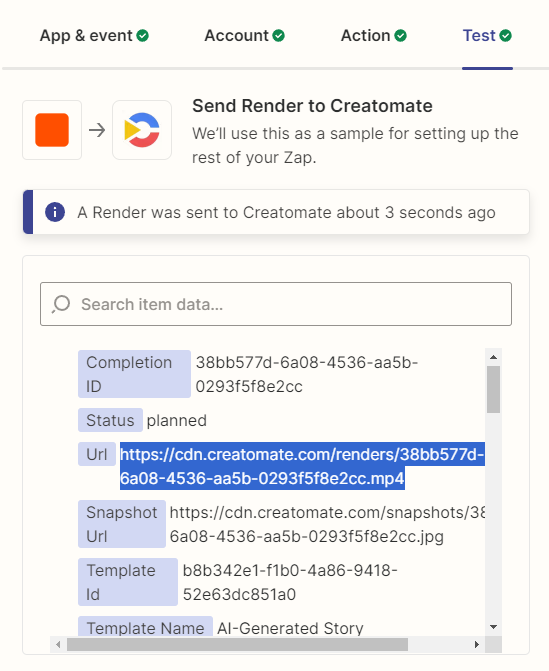
Click Test step on the Test page to run a test. If everything is set up correctly, Creatomate will do a few things. First, it will invoke DALL·E to generate the images. It will then use your ElevenLabs account to generate the voiceovers. Next, it auto-generates subtitles based on the voiceovers. Finally, it'll put everything together as a video.
It may take a minute or two for this process to complete. Let's sit back and relax for a bit. After a while, check out the video's URL. If you get a 'Not Found' page, the video hasn't been finished yet.
Remember, we'll only have to wait during the test run. Once the Zap is activated, it automatically waits for the video to finish before running your next Zapier action. For this tutorial, this is where we post the video to social media.
8. Post the video on social media
Note: At this point, we've successfully generated a video with voice over, subtitles, and images. As an example, I'll show you how to upload it as a YouTube Short. However, you can also share it on TikTok, Instagram, or Facebook. Alternatively, you can email it to yourself for a preview before sharing. It's up to you.
Click +, search for and choose YouTube as the app, and select Upload Video as the event. Continue by selecting your account or signing in first. Then, click Continue.
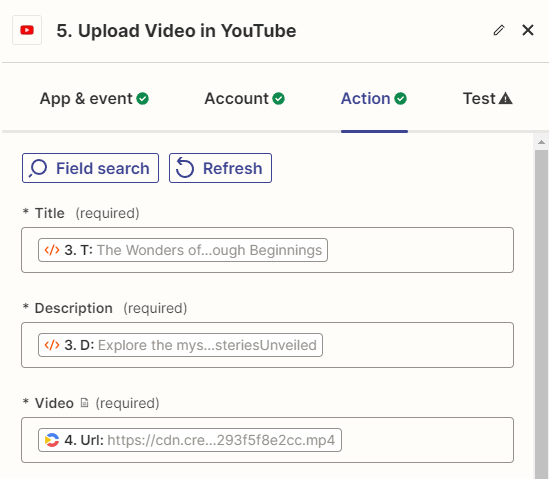
On the Action page, map the required fields as follows. We'll use the title and description generated by ChatGPT.
- Set Title to Code by Zapier -> T
- Set Description to Code by Zapier -> D
- Set Video to Creatomate -> Url
You can adjust the other settings however you like. When done, click Continue.
On the Test page, click Test step. This test will only make sure Zapier passes the correct data. No video will be uploaded to your YouTube channel right now.
The only thing left is to click Publish Zap to activate your workflow. From now on, whenever you send a video topic via Slack (or trigger the workflow with the app you've chosen), an AI-generated video will automatically be created and posted on your social media channel.
What's next for video automation using AI?
And that's how AI can be used to create videos through automation. While this opens up a wealth of possibilities, you also need to consider potential pitfalls. ChatGPT or DALL·E might not generate the content you like. In this respect, generative AI is a very powerful tool – no doubt it will influence the automation field for years to come. Like driving, it can save you time, but if you don't know what you're doing, you'll have difficulties down the road and end up missing your goal.
AI is helpful, but not a necessity when it comes to automating your social media marketing. If you'd like more control, there are alternatives that don't rely entirely on generative AI. One possible method is to create an Airtable (or Google Sheets) document to cherry-pick the content for your videos. You can then set up a Zapier trigger to activate your workflow when an item is added to your document. The benefit of this approach is that you can automate a lot of your video creation process, while still maintaining control over how the videos come out.
In conclusion, there are many opportunities for automating videos, both with and without AI tools. Creatomate has a flexible editor where you can create virtually any type of video design, and with Zapier supporting thousands of apps, you can always create a video automation workflow that fits your use case. To learn more, take a look at our blog page for a series of step-by-step tutorials.
You might also like these tutorials


Start automating today
Start with a full-featured trial with 50 credits, no credit card required.
Get started for free →