How to Create Many Videos in Bulk using a Spreadsheet

This tutorial will show you how to mass-create videos using a simple spreadsheet or CSV file.
Whether it's video ads, personalized videos, or social media content, producing videos by hand requires a considerable amount of effort. Given that video marketing continues to grow in popularity, we need a way to create videos at scale without being burdened by repetitive tasks.
The good news is that video automation is here to help, since the majority of marketing videos tend to share the same design, but feature different content. This process, called bulk video creation, involves using a spreadsheet to make tons of different videos based on a single video template. It's easy, and it only takes a few minutes to create your own videos in large quantities.
This tutorial shows you how to batch-create any kind of video using Creatomate. It comes with an online editor that allows you to create your own templates. Once you've set up a template, all you need to do is fill out the spreadsheet to mass-generate the videos:
What is bulk video creation?
Bulk video creation is the process of using video automation software to automatically generate large numbers of videos at once. Imagine you're running a business and want to send your customers a personalized video, say for an end-of-year campaign. If you're serving hundreds of customers, do you really want to spend days in front of a video editing tool to create a video for each one manually? Most likely, no. That's where bulk video creation comes into play.
It would be much easier to design one video template once, then pass a list of data through that template to create all videos in bulk. That's what Creatomate is made for.
How to bulk-create videos using a spreadsheet?
Make sure you've got a Creatomate account if you want to follow along. Don't have one yet? Create your free account here.
The first thing we'll do is create a template that will serve as the basis for the videos. After that, we'll make a feed, which is basically a spreadsheet that we use to create a bunch of videos all at once. Once we have added data to our feed, we can generate our videos at the click of a button. Last but not least, you'll be able to download the videos to your device.
As we wrap up, we will suggest a few ways to automate the process even further.
Ready, set, go!
1. Create a template
Log in to your account, navigate to the Templates page and click + New. You can choose a ready-made template from the gallery or design your own from scratch. For this tutorial, let's go with the Quick Promo template from the Featured category. The 1:1 Square size is fine and click Create Template to open the template in the editor.
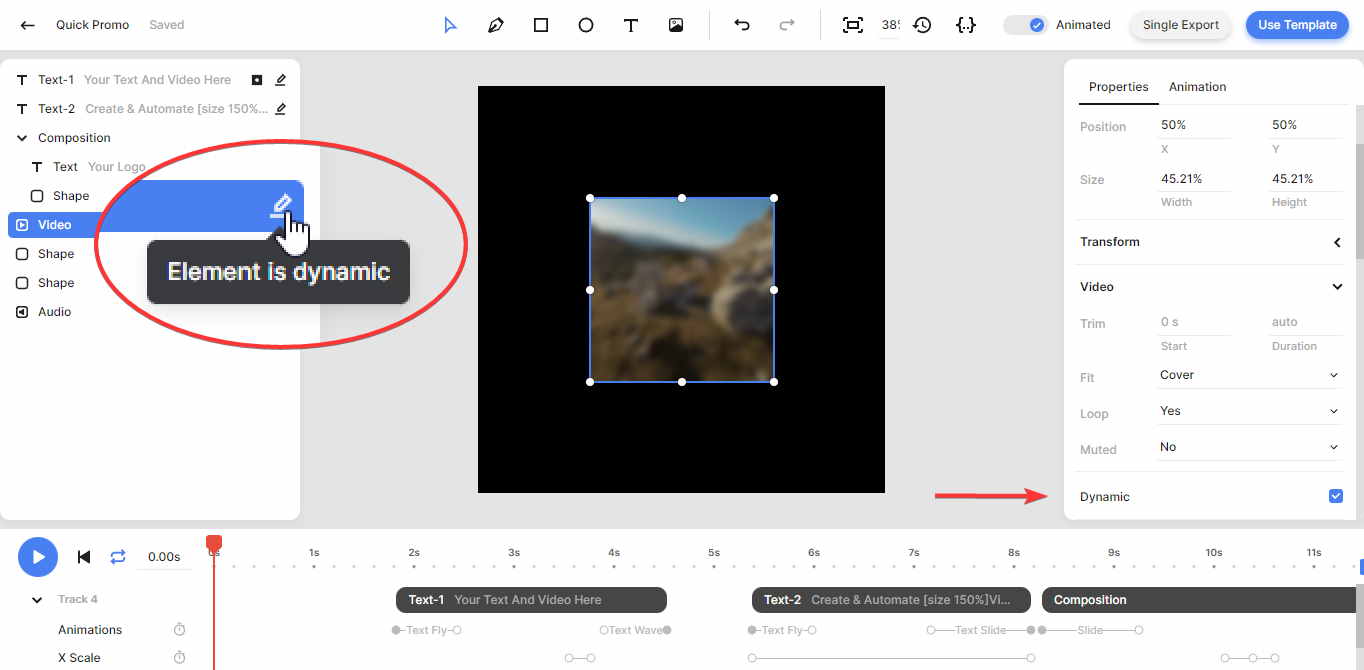
This template can be completely customized to fit our needs, but let's use it as-is for the purpose of this tutorial. Just remember that templates usually have one or more dynamic elements, which are the parts of the video that we want to replace in bulk (e.g., text captions, images, background videos, etc.).
In our Quick Promo template, the Text-1, Text-2 and Video elements are all dynamic. Through the feed we're about to create, we can replace these elements with other texts, images, and clips in order to make unique variations based on that video template:
If this sounds confusing, don't worry. It'll be a lot easier to grasp when we work with the feed, which we'll do in the next few steps.
2. Set up a feed
Click Use Template in the top right of the template editor. Let's choose the Spreadsheet to Video option. We can select an existing feed from our project, or use the Create New Feed option.
After clicking Continue, we'll be taken to our newly created feed. Now we can populate it with data to create video variants, which is what we'll do next.
3. Enter data
Your feed is made up of rows each representing a single video. So in order to create more videos, simply click Add Row. In the right-hand panel, you'll see a preview of your video as you enter data:
- Video column: select a video file from your device or enter a URL to a public video.
- Text-1 and Text-2 columns: feel free to enter any text here.
You can add as many rows as needed. Make sure to click Save when done. After saving, the status column updates from "Unsaved Row" to "No Render", meaning the rows are saved but no video is created yet (which is called a Render).
Tip: Rather than entering all the data by hand, you can also import a CSV file using the Import Data button.
Next, we'll generate our videos.
4. Generate videos
Under the video preview, notice the three options; Edit template, Create render and Download render. By clicking Create render, the video will be built for that row:
There is an even easier way to render multiple videos, and that's by selecting the corresponding rows, clicking n Rows Selected and clicking Create Renders. After confirming our action, the videos will be rendered all at once, which may take a few minutes:
When the videos are being built, the status indicates Rendering, and will change to Rendered when the videos are ready.
The next step is to download the videos.
5. Download videos
In the same way we created renders, we can download a single video by clicking the Download render button under the video preview:
To download the rendered videos in bulk, select some rows, click n Rows Selected, and then click Download Renders. Here, you can choose a file name. Then, click Download. A ZIP file with the rendered videos will be downloaded to your device.
Tip: You can also export the spreadsheet with the generated videos as a CSV file. You can do this by clicking the Export Data button located at the top of the spreadsheet.
Wrapping up
And that's all it takes to create many videos in bulk – it's as simple as editing a spreadsheet.
Batch video generation is just one of Creatomate's features. Besides generating videos from spreadsheets, it also has code and no-code integrations if you need set-and-forget automation. Explore the following tutorials to learn more:
👉 How to Automate Video Creation with Zapier
👉 How to Automate Video Creation with Make.com
👉 Add Subtitles to Videos in Bulk
👉 Create Personalized Videos in Bulk
👉 Using ChatGPT to Create Videos in Bulk
👉 Create Prospecting Videos for Sales Outreach in Bulk
👉 Batch-Create Videos for Shorts, Stories, and Reels
Please feel free to contact me at [email protected] if you have any questions, feedback, or want to discuss your use case.
Bulk Generation FAQs
How does bulk video creation work?
Bulk video creation starts with a template on which all videos are based. You can either create your own template with the online editor or select a pre-made template. You can then fill out a spreadsheet with the content for each video, such as texts, images, and video clips. It will now take only a few minutes for the videos to be generated automatically.
What are the benefits of bulk video creation?
The main advantage of generating videos in bulk is its efficiency. With traditional video creation methods, each video has to be made by hand. This becomes nearly impossible when dealing with hundreds of videos. Bulk video creation saves you time and also eliminates human error.
What’s the best tool for creating videos in bulk?
There are several bulk video creation tools available on the market, each with its own unique set of features. For instance, you may already be familia with Canva. Originally intended for one-time video and image creation, it lacks extensive capabilities for mass production. In contrast, Creatomate was specifically developed for automating videos. Equipped with a dedicated video editor, it simplifies design creation for this purpose. Its spreadsheet feature is a fundamental part of the product, and allows you to import a CSV file, preview videos before rendering, and export the spreadsheet with rendered content for use elsewhere. Moreover, Creatomate also provides a Zapier integration and an API, which will come in handy as your video automation needs grow.
Do I need any technical skills to create videos in bulk?
No, not at all. You don't need any technical knowledge to bulk-create videos using Creatomate. It's as simple as choosing or creating a template, and then filling out the spreadsheet with your video content.
How do I get started with bulk video creation?
Sign up for a free trial with Creatomate. From there, you can either follow the interactive guide in the dashboard or dive right into one of our step-by-step tutorials. We have several tutorials on bulk video creation covering practical use cases, all of which are available on our blog page.
You might also like these tutorials


Start automating today
Start with a full-featured trial with 50 credits, no credit card required.
Get started for free →