How to Bulk-Create Shorts, Stories, & Reel Videos with ChatGPT

In this tutorial, you'll learn how to create AI-generated videos for YouTube, TikTok, and Instagram in bulk using text content created by ChatGPT.
Right now, video generation models like Sora and Stable Video Diffusion lack the quality necessary for video marketing. The main problem with AI-generated videos is that they're unpredictable and often lead to hallucinations, so they're not really good for professional use.
But AI can still play a powerful role in social media marketing when using the right approach. By using video templates and pairing them with large language models (LLMs) like ChatGPT or Claude, you get consistent and controlled results.
In this article, I'll demonstrate a practical method of using AI for creating social media videos at scale. Using ChatGPT, we'll generate content for a large batch of videos and automate the process with a spreadsheet. A big benefit of this approach is that you can review and refine the AI-generated copy before producing the final videos, making sure they're up to your standards.
all chosen by the AI 🦾🤖
As you can see in the example video above, we're focusing on short-form videos that work perfectly for YouTube Shorts, TikTok, and Instagram Reels. That said, this automation method isn't limited to just these formats – you can use it to create all kinds of videos. With Creatomate's online template editor, you can design video templates exactly how you want them. So, if you have a different type of video in mind, keep reading!
💡 AI tip: Looking to create faceless shorts with AI voiceovers, animated subtitles, and background visuals using ChatGPT? Take a look at this tutorial instead. It shows you how to integrate ElevenLabs, DALL·E, and Creatomate's auto-transcription feature to produce these videos at scale.
How to use ChatGPT to create videos in bulk
To create videos with ChatGPT, the first step is to use a video creation platform like Creatomate. Here, we'll design a template that serves as the blueprint for all the videos we produce. In this template, we'll specify the elements we want to customize for each video, such as text, images, colors, and more.
Once the template is ready, the next step is to have ChatGPT generate the content for each video. We'll provide it with a detailed prompt tailored to match our video requirements.
Finally, we'll combine the video template with the content generated by ChatGPT. To do this, we'll use Creatomate's spreadsheet feature, which allows us to create multiple videos at once – hundreds or even thousands in a single batch.
Let's get started!
⚙ Automation tip: This tutorial focuses on bulk video generation using a spreadsheet. If you'd prefer to produce videos completely on autopilot, you can also build a no-code workflow using platforms like Zapier or Make.com. I've written step-by-step tutorials for both, showing how to create the same video featured here, as well as fully AI-generated videos with AI voiceovers, subtitles, and visuals:
👉 Use ChatGPT to Create Social Media Videos with Zapier
👉 Use ChatGPT to Create Social Media Videos with Make.com
👉 Create AI-Generated Videos with Voiceovers, Subtitles, and Visuals using Zapier
👉 Create AI-Generated Videos with Voiceovers, Subtitles, and Visuals using Make.com
1. Create a video template in Creatomate
Log in to your Creatomate account or sign up for free if you don't already have one.
Navigate to the Templates page and click the New button to access the template gallery. You can select a design you like, or create your own template from scratch. For this tutorial, go to the Social Media category, and select the 5 Facts Story template. Make sure the size is set to 9:16 Vertical, then click Create Template to open it in the editor:
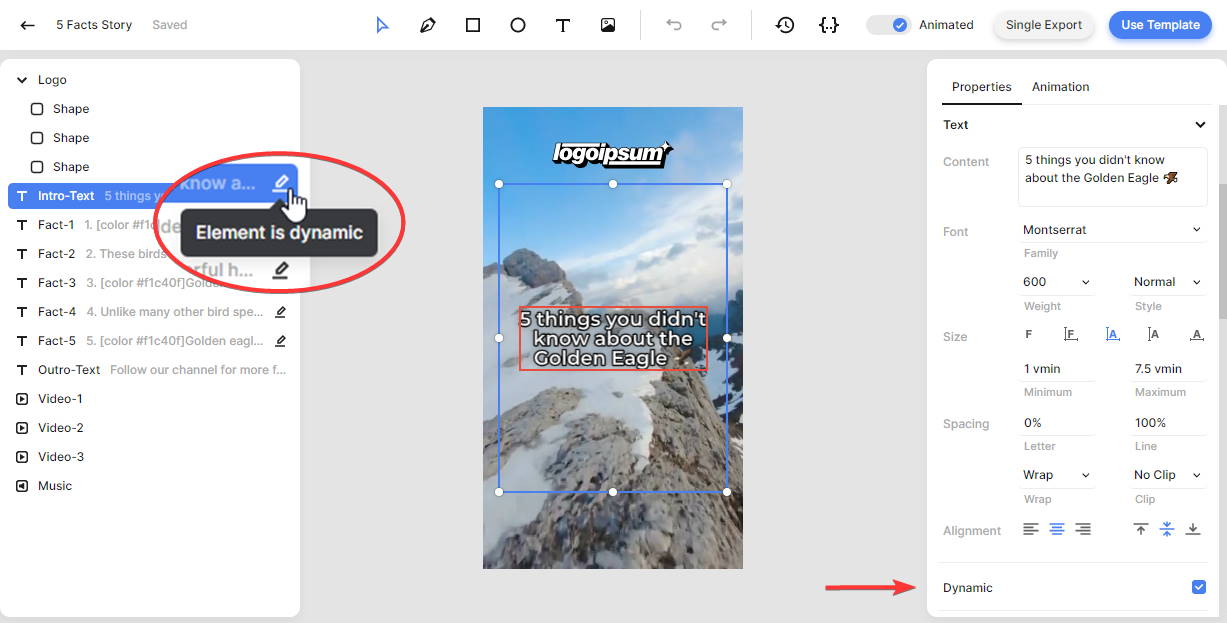
Let's take a closer look at our video design and how it fits into our automation plans. In the left side panel, you'll find the elements that make up our template. The key thing to note is that certain elements are marked as dynamic: Intro-Text, Fact-1, Fact-2, Fact-3, Fact-4, and Fact-5. These dynamic elements act as placeholders, allowing us to replace them with unique content generated by ChatGPT for each video:
Feel free to customize the template to fit your needs. For instance, you can upload your own logo or create a custom outro. To keep things simple, we'll use the template as-is for now. However, you can always come back and tweak the design later. If you'd like to learn more about using the editor, be sure to check out this quick guide.
Let's generate the video content in the next step.
💡 AI tip: In this template, only the text elements are dynamic, meaning ChatGPT is used solely to generate the text content for the videos. The template also includes three background videos: Video-1, Video-2, and Video-3. By default, these background videos remain the same for every video. However, you can easily customize them by using generative AI to create unique visuals for each one.
For example, you can make all three video elements dynamic. Then, in the right side panel, under the Video property, set the Provider to Stability AI. The final step is to connect your Stability account, which this tutorial will guide you through. Alternatively, you can replace the video elements with image elements and use DALL·E to generate background images instead. Here's how it works.
With this configuration, you can also have ChatGPT generate text-to-video/image prompts. Creatomate will send these prompts to your Stability AI or OpenAI account and use the AI-generated video clips or images as backgrounds in your final video. For step-by-step instructions, check out this tutorial.
2. Let ChatGPT generate the video content
In this step, we'll use ChatGPT to produce the text for our videos. To get the best results, it's important to provide clear instructions about the content we want and how it should be formatted. Since these videos are intended for social media, we can also ask ChatGPT to create a caption – though this is optional. Feel free to adjust the prompt to suit your specific needs.
Go to ChatGPT.com and log in to your account. If you don't have an account yet, simply sign up to get started.
Then, start a new conversation and send the following prompt:
I want to create a batch of 30 short-form videos for YouTube, TikTok, and Instagram. The theme for this batch is ‘nature', and each video will follow the ‘5 Facts About…'' format. Here's the structure of each video:
- Intro-Text: Introduce the topic, e.g., “5 things you didn't know about the Golden Eagle,” “5 surprising facts about Mount Everest,” or “5 amazing things about the summer monsoon.”
- Facts (1–5): Create a numbered list of 5 facts about the topic. Each fact should be one sentence long, include emojis, and highlight the most important words using [color #f1c40f] and [/color].
Additionally, create a social media caption for each video.
Generate a downloadable CSV file with the content for each video. Use the following columns: Intro-Text, Fact-1, Fact-2, Fact-3, Fact-4, Fact-5, and Caption.
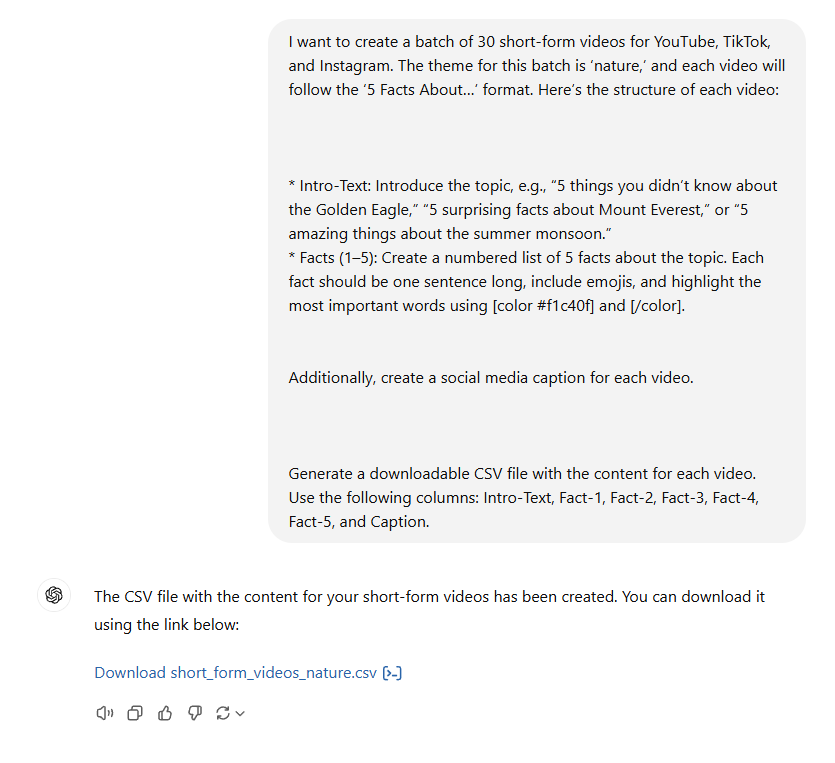
ChatGPT should have generated a CSV file as a response, similarly to the screenshot above. Click the link to download it; we'll need it for the next step.
Tip: Sometimes, ChatGPT may have trouble generating the content and respond with something like, "It seems I can't do more advanced data analysis right now. Please try again later." If that happens, ask it to present the information in a table with the same columns. If it still struggles, try requesting a smaller number of rows (e.g., five at a time). You can then combine these smaller batches into a single file by copying and pasting them into a Google Sheets document. From there, you can easily download the sheet as a CSV file, achieving the same result: a CSV file containing the content for your videos.
3. Set up a bulk generation spreadsheet
Back in Creatomate, click the Use Template button in the top right corner of the template editor. Choose the Spreadsheet to Video option, select Create new feed, and click Continue:
We've just created a new spreadsheet, also known as a feed. This feed is linked to our video template, with each column representing a dynamic element. Each row will be converted into a video. The first row serves as an example, using data pulled directly from the template.
Before uploading the CSV file, let's add a column for our captions. These captions won't appear in the video itself – they'll only be used for exporting in step 5. To add the column, click on Edit Columns, then Add column. Rename the new column to "Caption" and drag it to the top so it appears as the first column. Click OK to save your changes:
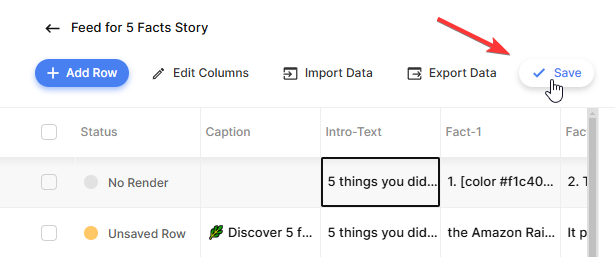
Now, let's upload the video content generated by ChatGPT. Click Import Data and upload the CSV file you downloaded earlier. Since ChatGPT has named the columns to match the template's dynamic elements, the system should automatically map them correctly. Double-check the mapping to be sure it's accurate, then click Continue. If you plan to update the feed later, select a merge column – I recommend using the Intro-Text for this. Click Continue again to proceed. Finally, review the summary to confirm everything looks correct, and click Import Data:
Once the data is inserted, click Save:
You might want to review the content generated by ChatGPT and apply changes to make your videos look better. Simply click on the text in a cell, just like you would in a regular spreadsheet (such as Google Sheets). Have your own video ideas? Just add a new row to the feed and enter the content manually. There's no need to rush – you can always come back later to edit your data whenever you want.
Next, I will show you how to create videos using this data.
4. Generate the videos
On the right, you'll find a preview of each video. As you click through the rows, you'll see that the text updates accordingly. To generate a specific video, simply click the Create render button below the preview:
The status for that row will change from “No Render” to “Rendering”. Once it updates to “Rendered”, your video is ready. To download it, click the Download render button below the preview. The video will then open in a new tab:

Now that you know how to create a single video, let's move on to creating multiple videos at the same time. Select a number of rows, then click N Rows Selected. From there, click Create Renders:
You can create as many renders as you need. In the next step, I'll show you how to access them.
5. Download the videos
In the previous step, you learned how to download a single video. But this tutorial is all about bulk video creation, so there's a much more efficient way to download multiple videos. I'll show you two methods – choose the one that works best for you.
The easiest way to download your videos is as a ZIP file. To do this, click N Rows Selected, then choose Download Renders. Select a column, such as Intro-Text, to use as the file name, and finally, click Download:
Another option is to export the entire feed, including the caption column. Instead of downloading the actual video files, this method provides links to the videos. The exported feed can be imported into tools like Google Sheets, making it easier to create your content calendar.
Click Export Data and select the columns you want to include, then click Continue. Next, choose the 5 Facts Story template to include the video links, and click Continue again. Review the summary, then click Export Data to complete the process:
You can now use the videos however you like!
What's next for video generation with ChatGPT
This tutorial demonstrated the incredible potential of ChatGPT for creating social media videos. With just a few simple instructions, it can generate outlines for an entire batch of videos! You can further refine the content by customizing your prompts to specify exactly what you want – or don't want – in your videos. And this is just the beginning; ChatGPT's capabilities go far beyond this.
In this tutorial, we've only used ChatGPT to generate text for the videos. But I have also mentioned that you can ask it to provide prompts for matching images and video clips. This allows you to use generative AI in a much broader way. How about creating faceless shorts for YouTube, TikTok, and Instagram? These short, engaging videos with voiceovers, animated subtitles, and AI-generated visuals. You can easily create these kinds of videos too, using ChatGPT and Creatomate. All you need is a text-to-speech tool like ElevenLabs or OpenAI TTS for the voiceovers, and an image or video clip generator like DALL·E or Stable Diffusion for the visuals. The animated subtitles will be created with Creatomate's auto-transcription feature.
You can create these fully AI-generated videos in the same way we did in this tutorial, using a bulk generation spreadsheet. Here's a tutorial that shows you how to do it. However, sometimes you might want to create videos on autopilot – such as on a specific schedule each day, or whenever a new Airtable record or Google Sheets row is added. In these cases, it's useful to set up an automated workflow. You can do this with no-code platforms like Zapier and Make.com. It might sound technical and complicated, but it's not – you don't need any coding skills at all. Just follow one of the tutorials below, and I'll guide you through the process step by step:
👉 Create AI-Generated Videos with Voiceovers, Subtitles, and Visuals using Make.com
👉 Create AI-Generated Videos with Voiceovers, Subtitles, and Visuals using Zapier
You might also like these tutorials


Start automating today
Start with a full-featured trial with 50 credits, no credit card required.
Get started for free →