How to Automate Content Creation with Airtable and Make.com

In this tutorial, you'll learn how to build an automation system that creates social media posts (for Instagram, Facebook, YouTube, and TikTok) using Airtable and Make.com.
Whether you're sharing in-depth articles, interviews, or simple social media updates, posting content regularly is key for social media marketing success. But creating all that content can quickly drain your time and distract you from more meaningful tasks. Thankfully, it doesn't have to be that way. With automated content creation, you can offload the work through automation.
In this tutorial, you'll learn how to automatically create videos and images for social media like Instagram Reels, Facebook posts, TikTok videos, and YouTube Shorts. We'll be using Airtable, a flexible database tool that can be used for all sorts of tasks, including content creation. While Airtable has built-in automation features, it also integrates seamlessly with no-code tools. Our plan is to integrate it with Make.com, an automation platform that connects to thousands of apps, allowing you to build your own custom workflows. One of these apps is Creatomate, an API specifically designed for generating videos and images.
By the end of this tutorial, you'll know how to connect all three tools to fully automate your social media posts – from creating visuals to publishing them on your preferred platforms.
We'll be automating a motivational quote video. But this is just an example. The concepts covered in this tutorial can be applied to any type of content, whether it's videos or images. So, if you're thinking of a different type of social media visual, keep reading! Creatomate has a template editor that allows you to create your own designs and video templates.
Prerequisites
These are the tools we'll use:
- Airtable: to organize our content ideas.
- Creatomate: to create a design and generate videos or images.
- a social media channel: such as Instagram for sharing posts (YouTube Shorts and Facebook can also be used).
- Make.com: to automate the content creation process.
If you're already familiar with the tools we'll be using, you probably know that Airtable, Make.com, and Creatomate offer a lot of flexibility. To keep this tutorial simple and easy to follow, we'll take a straightforward approach. However, keep in mind that you can customize every step, so feel free to do so. For example, you can modify the Airtable base to fit your data, choose which social media platform to connect to in Make.com, and design your own templates in Creatomate, even integrating generative AI if you'd like. I'll share some suggestions on what to try next as we wrap up this post.
How to create social media posts with Airtable and Make?
To start automatically generating social media content, the first step is to create a template in Creatomate. This template will serve as the foundation for all the videos or images we'll produce. Next, we'll set up an Airtable base containing the data to populate the template, along with a caption for the social media post and fields to configure the automation trigger.
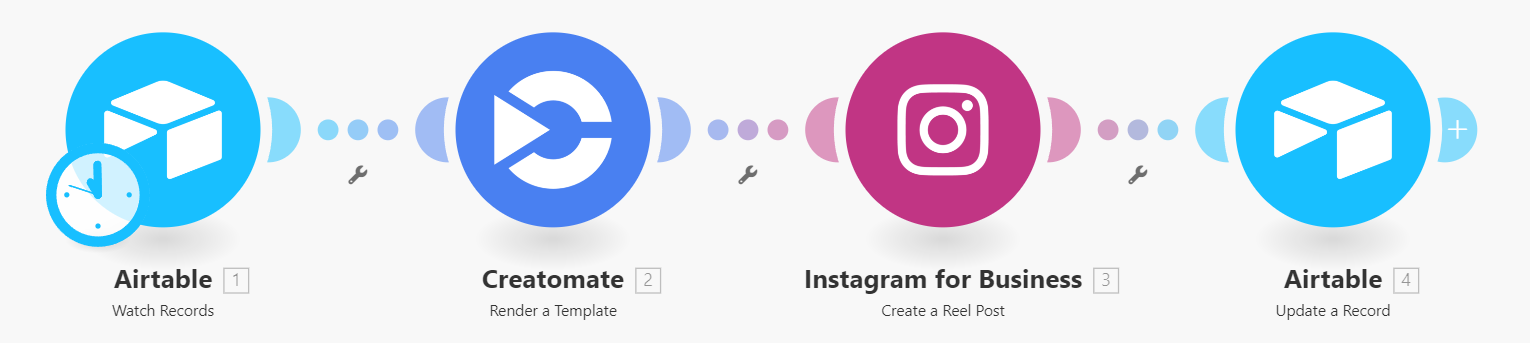
Once that setup is complete, we'll move to Make.com to build the automation. The scenario will start when new records are added to our Airtable view. Creatomate will then use that data to generate a video or image, which will be posted to social media. Finally, we'll update the Airtable base to indicate that the post has been published.
Here's what the scenario looks like:
Let's get started!
1. Create a template in Creatomate
Whether you want to create static images or short video clips, Creatomate's template editor allows you to create both video and image designs.
Log in to your Creatomate account or create a free account if you don't already have one.
Go to the Templates page and click the New button to open the template gallery. You can choose any template you like or design one from scratch. For this tutorial, navigate to the Marketing category and select the Image w/ Quote On Top template. Choose a size based on the social media platform you're planning to use. For shorts, stories, and reels, select the 9:16 Vertical size, then click Create Template to open it in the editor:
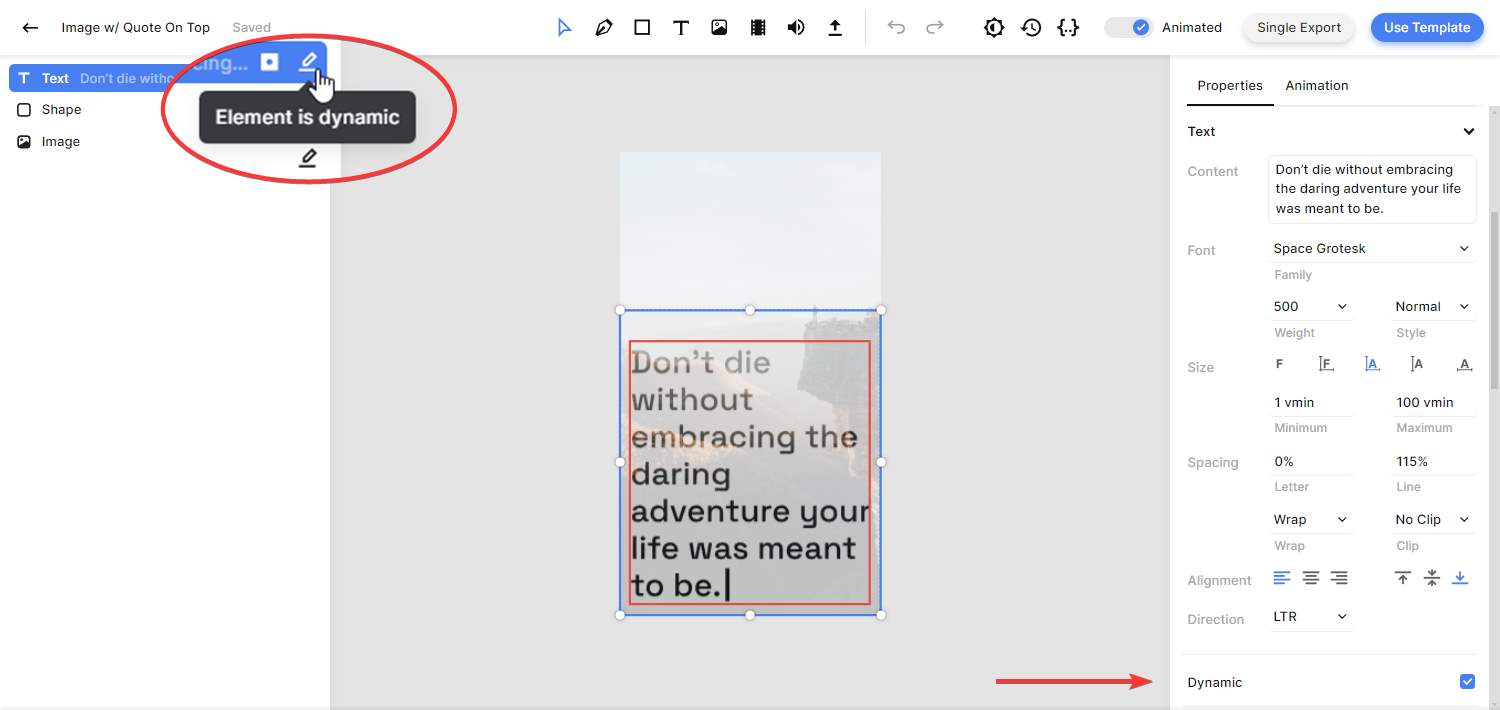
This template generates videos, but if you prefer, you can easily convert it into an image template. To do this, select a specific moment in the timeline that you want to use for the image, such as 4 seconds. Then, in the properties panel on the right, set the template Format to PNG or JPEG:
Let's take a closer look at the template and how it fits into our automation plans. In the left side panel, you'll notice that our design consists of three elements: Text, Shape, and Image. In addition, the Text and Image elements are marked as dynamic. This means we can replace that content with a unique quote and image for each video we generate through our automated workflow.
You can further customize the template if you'd like, but that's beyond the scope of this tutorial. If you want to learn more about using the editor, check out this quick guide.
With the template ready, let's move on to the next step: setting up our Airtable document.
2. Set up an Airtable base
In this step, we'll create an Airtable document that will serve as the foundation for our content creation process. Here, we'll create fields to populate our template, add a caption for social media, and include some fields to configure the trigger in Make.com.
Go to Airtable.com, and sign in if you already have an account. If you don't have one, you can sign up for free.
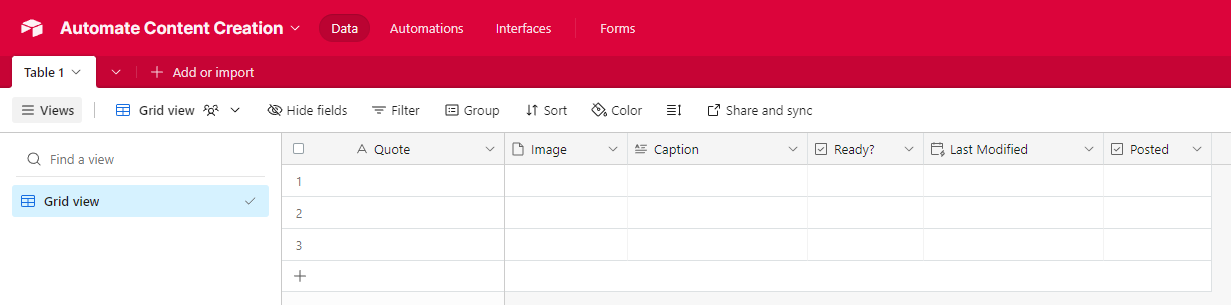
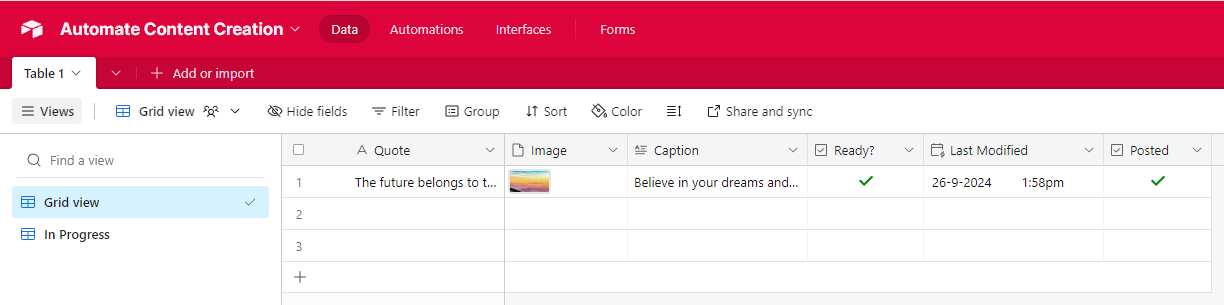
Let's create a new base from scratch: Automate Content Creation. On Table 1, set up the following fields:
- A Single line text field: Quote
- An Attachment field: Image
- A Long text field: Caption
- A Checkbox field: Ready?
- A Last modified time field: Last Modified
- A Checkbox field: Posted
For the Last Modified field, connect it to the Ready? checkbox field as shown below:

Your table should look like this (click on the screenshot to open it full screen):
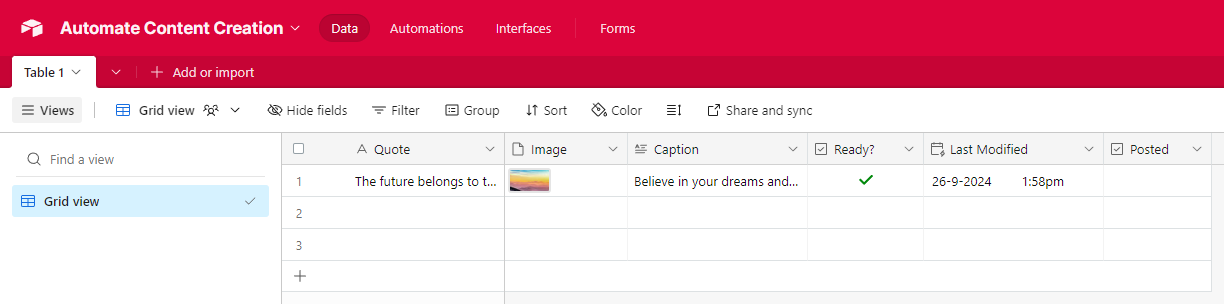
Now, let's create a dummy record that we'll use to set up the rest of our automation. Use the following data to populate the first record:
- For Quote, insert The future belongs to those who believe in the beauty of their dreams.
- For Image, upload a file from your device or download the image from this URL: https://cdn.creatomate.com/demo/mountains.jpg
- For Caption, insert Believe in your dreams and watch the future unfold. 🌟✨ #DreamBig #FutureIsBright #BelieveInYourself
- For Ready?, check the box (✅)
- The Last Modified field will update automatically.
- Leave the Posted field unchecked for now. We'll update it in step 6 of the tutorial.
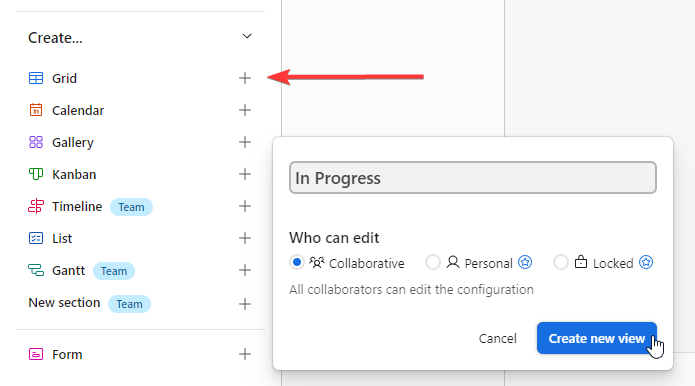
Next, we'll create a new view to use as a trigger for starting our Make scenario. Click + next to Grid, then rename the new view to In Progress, and click Create new view:
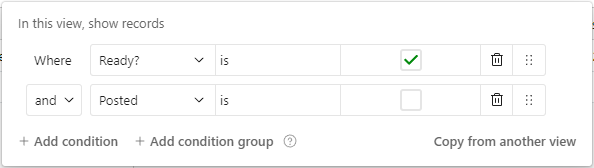
We want records to appear in the In Progress view only if the Ready? checkbox is ticked and the Posted checkbox is unchecked. This setup allows us to review and verify the content before it's used and helps us keep track of records that need to be processed, are currently being processed, and have been completed.
To set this up, add a filter with these two conditions: show records “Where Ready? is checked (✅)” “and Posted is unchecked (🟩)”:
Here's how it works: when a record is ready, checking the Ready? box will move it to the In Progress view and trigger our Make scenario. After the post is published on social media, we'll automatically tick the Posted checkbox (which we'll set up in step 6), removing the record from the In Process view.
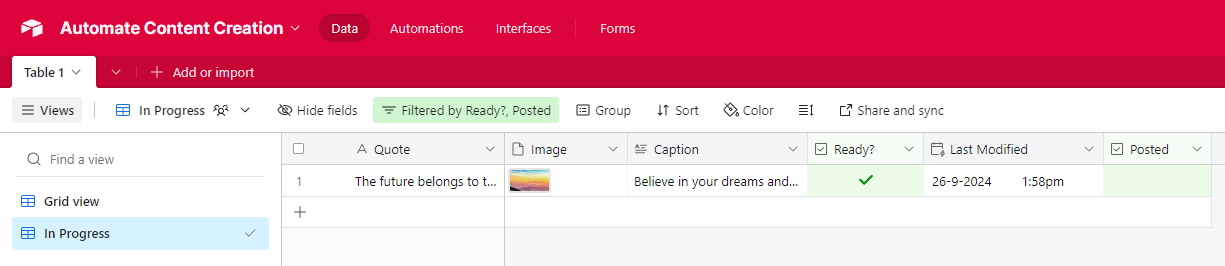
If everything went as planned, you should see the dummy record appear in the In Progress view:
Did it work? Great! Now, let's move on to Make.com.
3. Watch for new Airtable records
Here's where everything comes together. We'll build a Make scenario that:
- Retrieves a record from Airtable (trigger)
- Generates a video or image with Creatomate
- Posts it on social media
- Updates the Airtable record to mark it as published
Let's begin with the trigger; the event that starts the automation.
Log in to your Make account or sign up for free if you don't already have one.
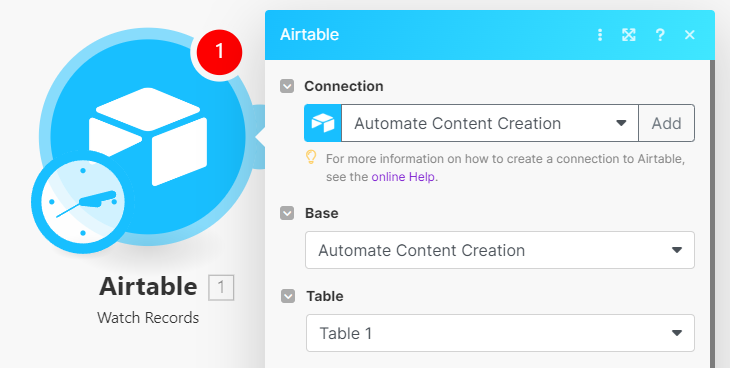
From your dashboard, click Create a new scenario. Then, search for and select the Airtable app with the Watch Records event.
First, create a connection. The easiest way is to select Airtable OAuth for the Connection Type. You can give it a name, then click Save:
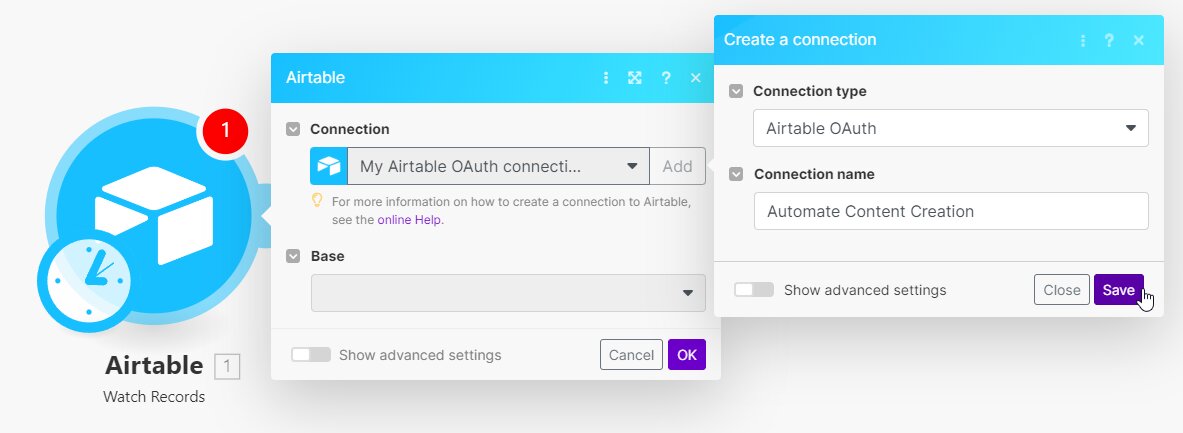
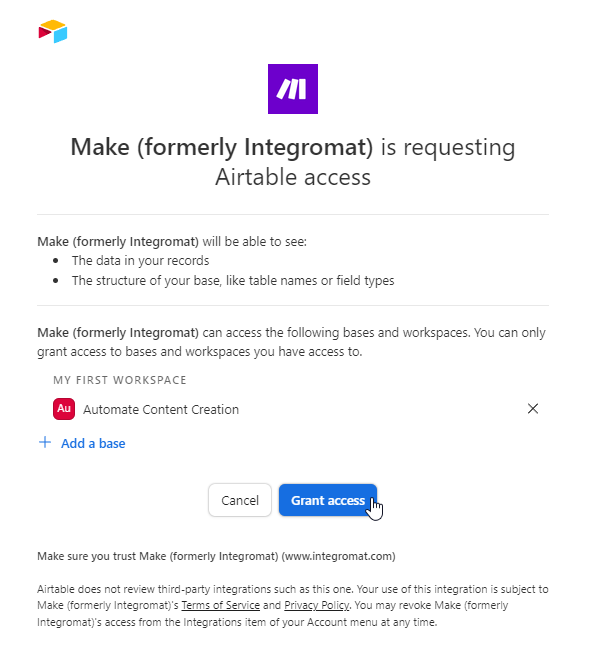
Next, sign in with your Airtable credentials. Click Add a base, search for the Automate Content Creation base, and click Grant access:
Your Airtable account should be connected with Make.com.
To configure the trigger module, select your Automate Content Creation base and Table 1:
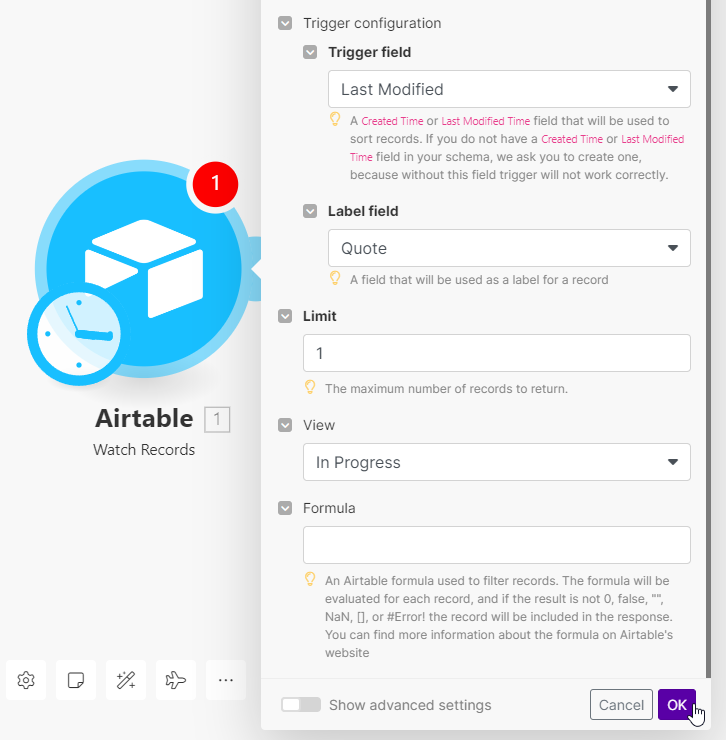
Set up the rest of the trigger with these settings:
- Trigger field: Set to Last Modified
- Label field: Set to Quote
- Limit: Set to 1 (we want to use only one record per scenario run)
- View: Set to In Progress
- Formula: Leave empty
When you're finished, click OK:
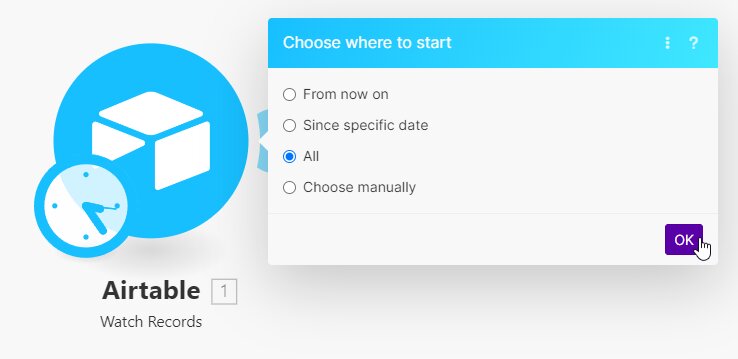
In the Choose where to start pop-up, select All, then click OK:
With the trigger in place, let's move on to setting up the action to create a video (or image).
4. Generate a video or image
In this step, we'll instruct Creatomate to generate a video (or image) using the template from step 1, along with the quote and image from our Airtable record.
Click + to add another module. Search for and select the Creatomate app with the Render a Template action.
First, create a connection using your project's API key, which you can find under Project Settings in your Creatomate dashboard:
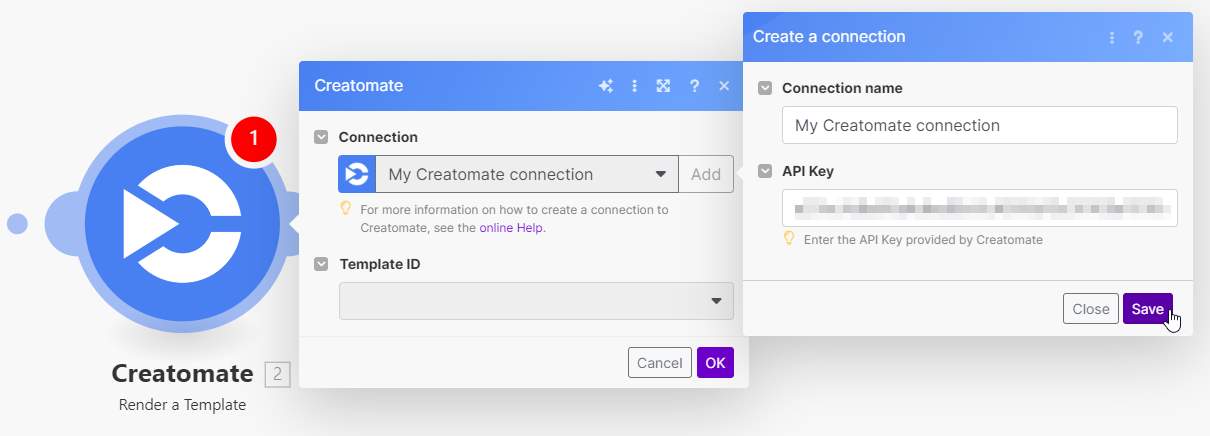
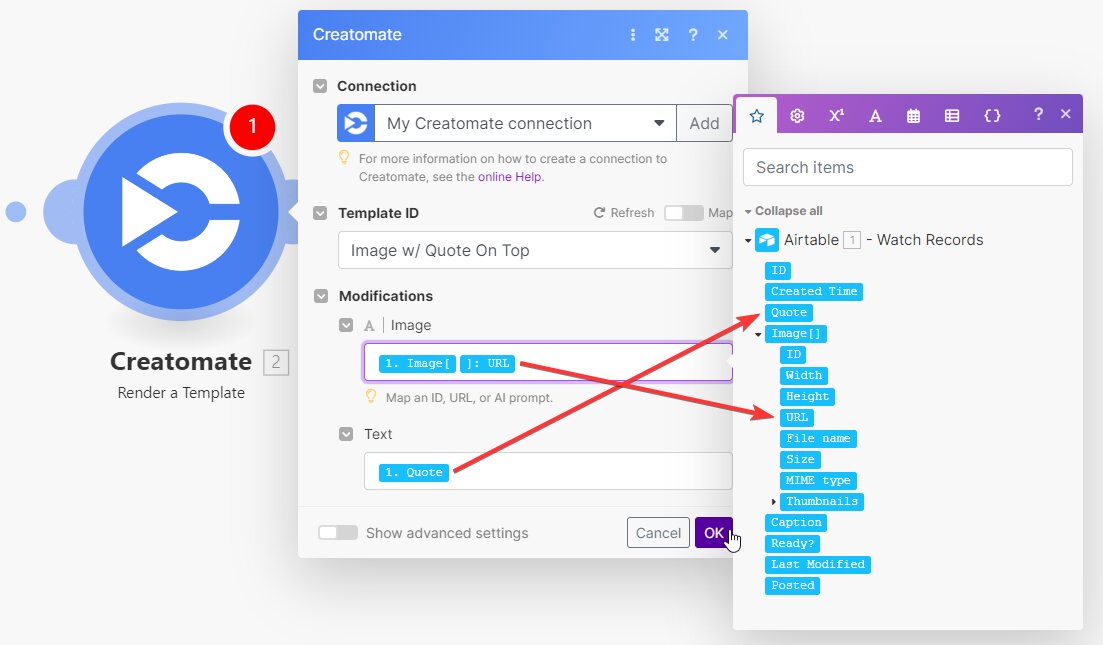
Then, choose the Image w/ Quote On Top template in the Template ID field. Make.com will now pull in the template's dynamic elements and list them under Modifications.
Let's connect our Airtable data to the template as follows:
- Set Image to Airtable -> Image -> URL
- Set Text to Airtable -> Quote
When done, click OK:
5. Post on social media
Once the video or image is created, you can use it however you like. I'll show you how to post it as a Reel on Instagram, but you can also share it on Facebook, LinkedIn (see step 6), or YouTube Shorts.
You might be wondering if you can auto-publish videos to TikTok as well. While Make.com has a TikTok integration, it doesn't support direct video uploads. As an alternative, you can email the videos to yourself and publish them manually, or use Zapier to auto-post TikTok videos via Buffer.
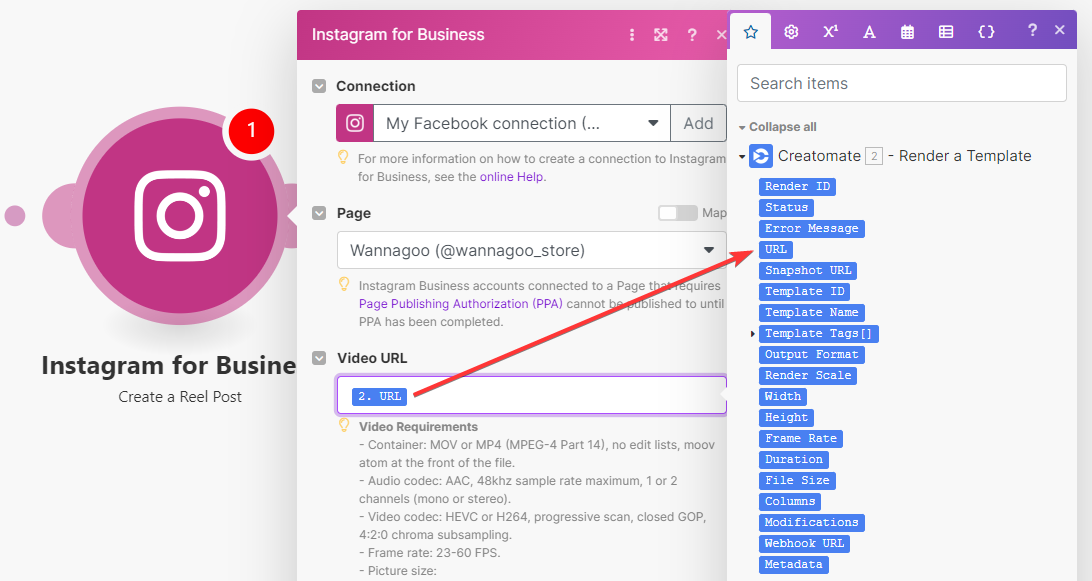
Add the Instagram for Business app with the Create a Reel Post event.
First, create a connection using your Facebook account and select the Instagram page you want to use.
Then, in the Video URL field, select Creatomate -> URL:
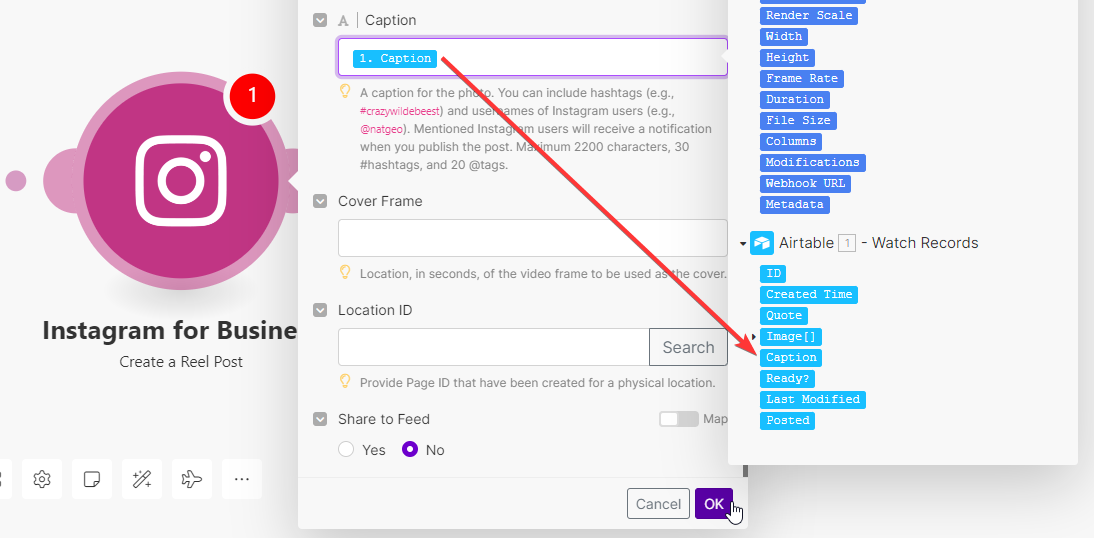
In the Caption field, select Airtable -> Caption. There's no need to enter a cover frame time, as this is already set in the template (using the Snapshot setting). You can also enter a Location ID and choose whether to share the video on your feed. Once you're finished, click OK:
6. Update Airtable record
In this step, we'll update the record, allowing you to quickly and easily see whether a row has been processed or not.
Add the Airtable app with the Update a Record event.
Just like with the trigger module, use the same connection, base, and table:
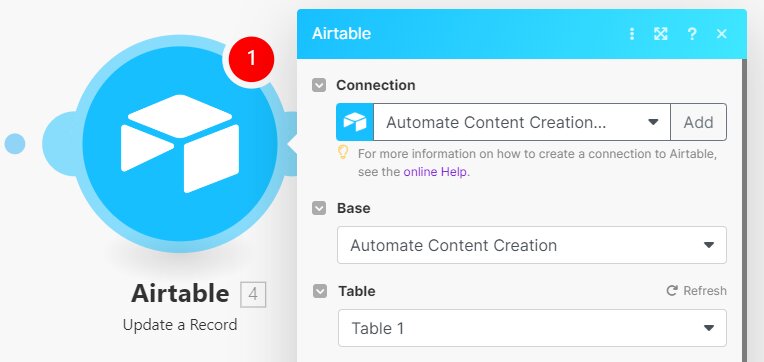
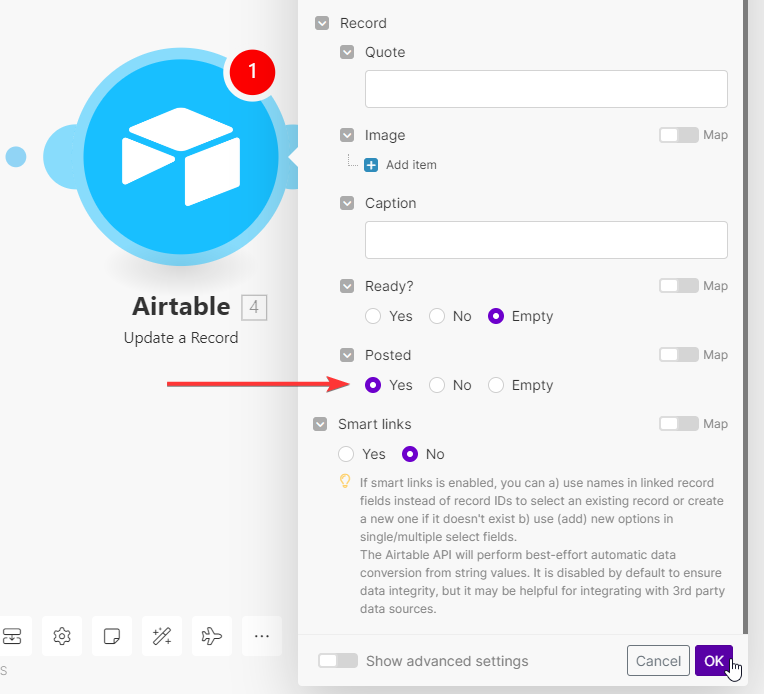
In the Record ID field, select Airtable -> ID:

The only thing we need to update is the Posted checkbox. Set it to Yes. After that, click OK:
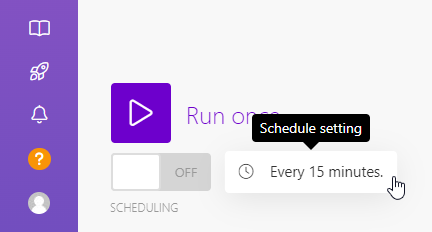
7. Schedule the automation
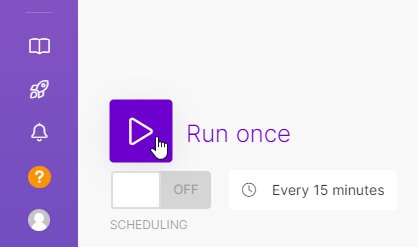
We have now completed the setup of the scenario. Let's test it to make sure everything works as expected. To do this, click the Run once button in the bottom left corner:
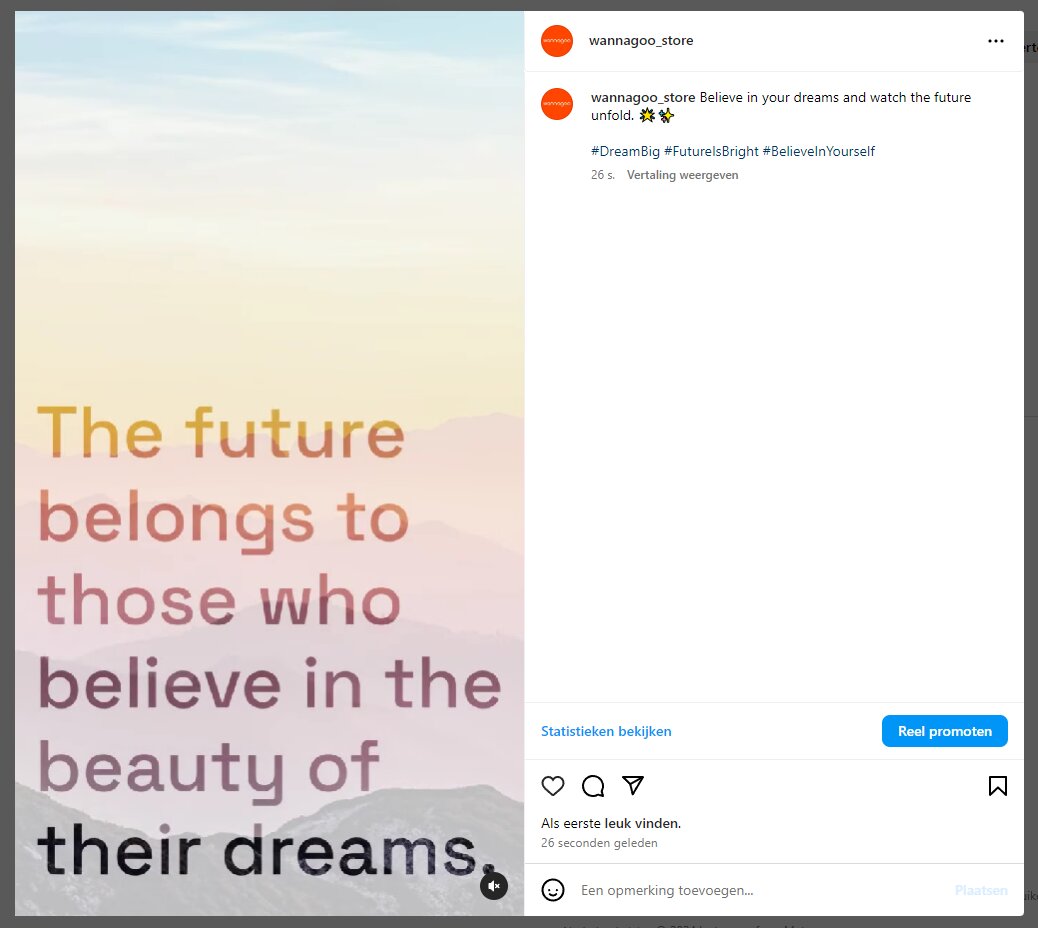
If everything goes according to plan, a video will be posted to your Instagram channel based on our dummy record within a few minutes:
Back in Airtable, the record should be updated with the Posted checkbox checked (✅) and should be moved out of the In Progress view:
Now that we've confirmed the scenario works, let's set up a schedule.
The great thing about Make.com is that you can customize exactly when and how often your scenario runs. For example, you can schedule it to run every weekday at 8:30 AM or three times a day, depending on your needs. It's entirely up to you how you set up the schedule.
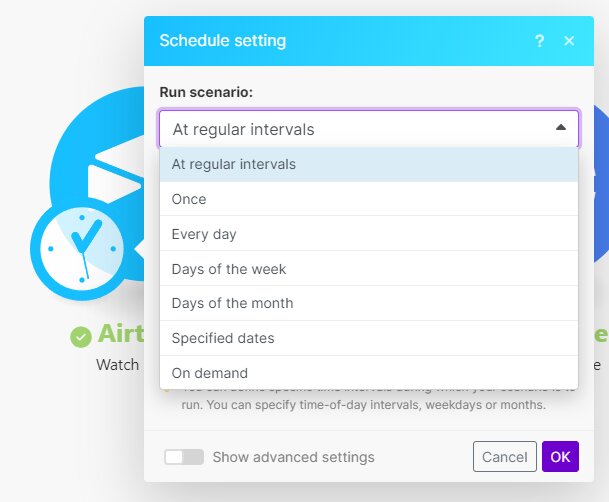
Click on the Every 15 minutes button to access the schedule settings:
Next, select the option that works best for you and configure it as needed. Keep in mind that you can always come back later to adjust the scheduling setting:
Once you've set up your schedule, all that's left to do is toggle the scheduling button to activate your scenario:
With this setup, Make.com will regularly check your Airtable base for new records. Make sure you populate it with your content ideas so that the automation system can transform them into social media posts. If the scenario starts and there are no records to process, it will halt the run and attempt again at the next scheduled time.
Next steps for video and image automation with Make
If you're familiar with Airtable and Make, you can use the steps outlined above to build your own scenarios. By combining different tools and apps, you can create an automation that perfectly fits your specific needs and use case.
Creatomate is also very flexible in terms of creating templates for different types of videos and images. It also supports AI technology, including auto-transcription for animated subtitles, and integrations with tools like ElevenLabs for voiceovers and DALL·E for images. This makes it easy to automatically create faceless, AI-generated shorts.
Here are some tutorials that may help you build your scenario:
👉 How to Automatically Create Instagram Posts using Make
👉 How to Automatically Create YouTube Shorts using Make
👉 How to Automatically Create TikTok Videos using Make.com
👉 How to Create AI-Generated Videos using ChatGPT and Make.com
👉 How to Automatically Convert Text to Video using AI and Make.com


