How to Automatically Turn Blogs and Articles into Videos using AI

In this tutorial, we'll use AI to summarize a web page, then convert it to a video using Zapier. This is great for turning articles, blogs, and product pages into social media videos.
Whether you have an e-commerce store, a blog, or a website that regularly publishes articles, video is one of the most effective means of promoting your content on social media.
Having said that, do you really want to make a video every time you publish new content on your site? Most likely not, given the extra labor involved. Fortunately, modern automation tools enable this task to be completely automated, and I will demonstrate this process in this tutorial.
This guide will show you how to summarize and convert any kind of web page into a short video, and then share it on social media – fully automated. As an example, we will be using an article from our own website, titled "The Best Video Generation APIs Reviewed". We will use GPT-3 or 4 to summarize the article in two short sentences, then create a video from the AI-generated text using Creatomate, and finally post the video on Facebook. Here's how the video turned out:
For simplicity's sake, we will keep the final video nice and simple. However, if you have a completely different idea, you can make your own automated video template using the online editor. And as we're using Zapier, you can customize the workflow exactly to your needs. This makes this approach incredibly flexible for creating video content automatically using AI.
Let's dive in!
Prerequisites
These are the tools we'll use:
- Creatomate: to create a template and generate videos. Sign up for free.
- OpenAI: to summarize the content.
- Facebook: or any other social media platform to share the video.
- Zapier: to set up the automated workflow.
How to convert blogs and articles into social media videos using AI and Zapier?
The first step is to create a template in Creatomate, which will serve as the design for all our videos. Then, we'll set up an OpenAI account and obtain our API key, which will later be used to connect GPT to Zapier.
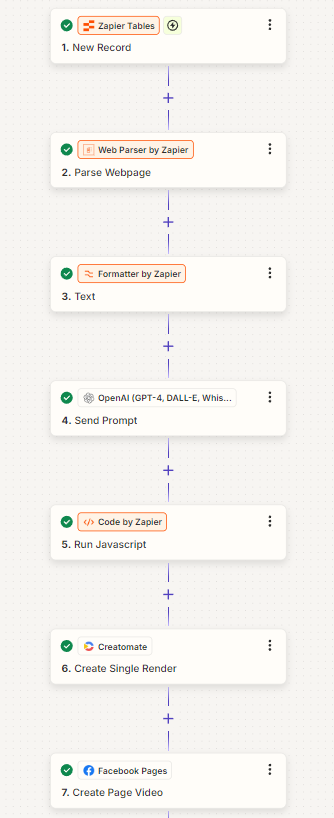
With the preparations complete, the next step is to move over to Zapier. We'll create a Zapier Table containing a content URL and an image, which will trigger the Zap. Next, we'll extract the content from the blog post and transform it into a shorter version for OpenAI to process. Using GPT, we'll generate a concise two-sentence summary that captures the essence of the content. This summary will be formatted for Creatomate, which will then generate the video. Once the video is created, we can share it directly on social media. I'll demonstrate how to post it on Facebook, but you can also choose Instagram, TikTok, or YouTube – it's entirely up to you. Here's what the completed Zap looks like:
Let's get started by creating a video template.
1. Create a video template in Creatomate
Log in to your Creatomate account or create a free account if you don't already have one.
Navigate to the Templates page and click New to open the template gallery. You can pick any template you like or design your own from scratch. But for this tutorial, let's use the Content Promotion template from the Marketing category. Choose a size you want, like 16:9 Landscape, and click Create Template to open it in the editor:
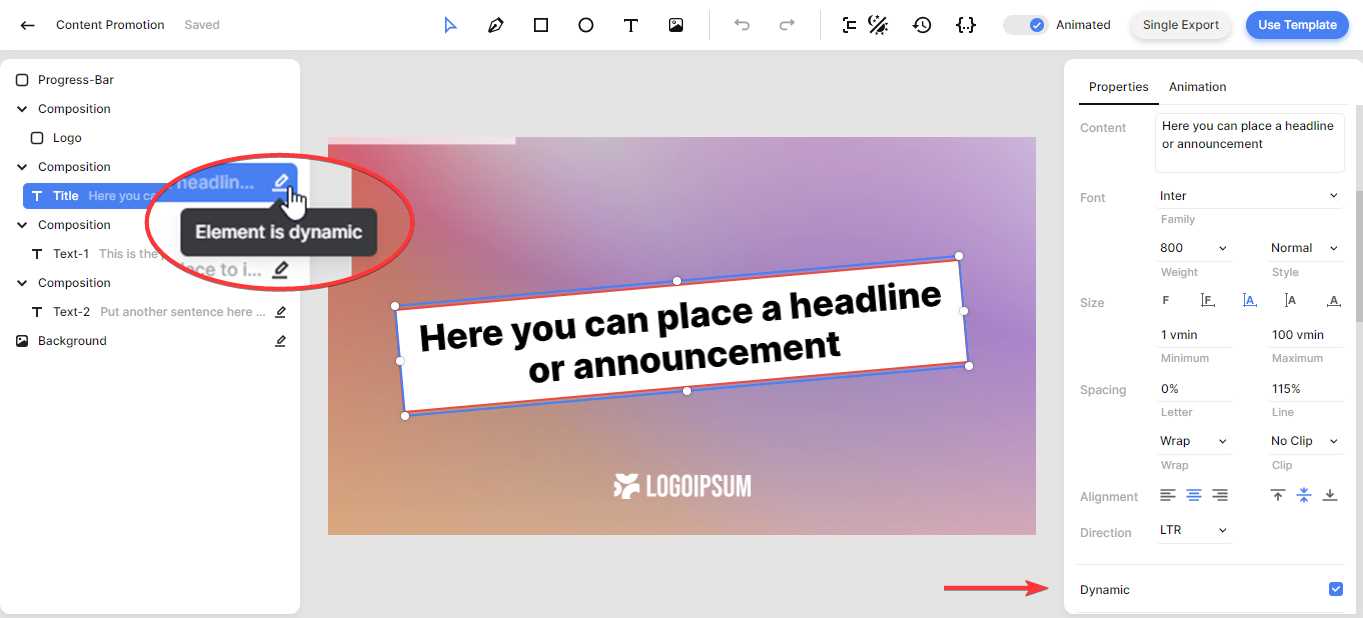
Let's take a closer look at the video design and how it fits into our automation plan. The template is made up of several elements, all of which are visible in the left side panel. You'll notice that some elements, like Title, Text-1, Text-2, and Background, are marked as dynamic. This means that we can automatically replace their content with different text and media through our Zapier workflow. In this tutorial, we'll use the AI-generated summary from our blog article and a selected image to populate the video template.
Feel free to customize the template to suit your needs. For example, you can replace the placeholder logo with your own. You can do this now, or come back later to make changes to the video design. If you'd like to learn more about using the editor, check out this quick guide.
To keep things simple, I'll be using the template as is.
2. Set up an OpenAI account
In this step, we'll create an account with OpenAI and generate an API key, which will be used later to connect GPT with Zapier.
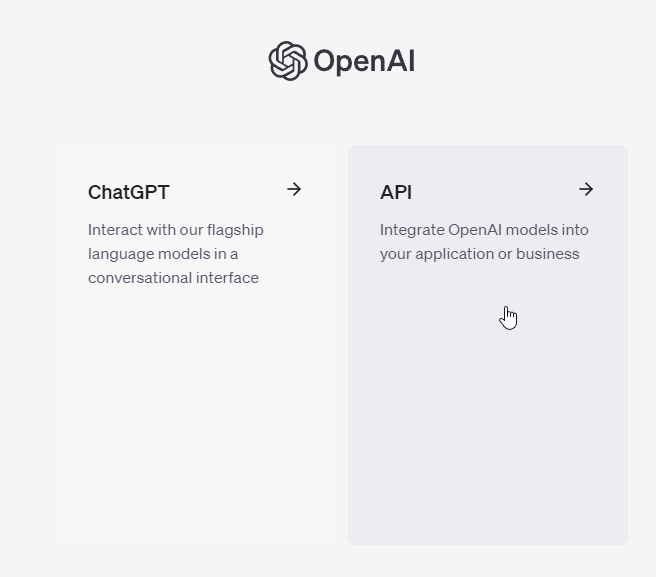
Create a free OpenAI account or sign in if you already have one. Then, go to the API section:
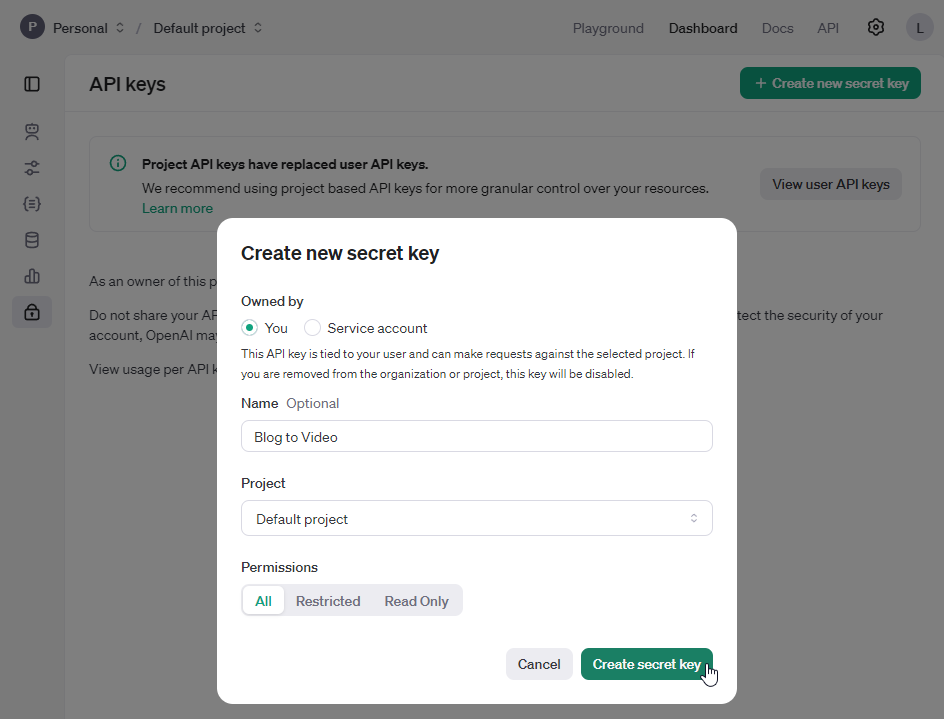
Next, go to your dashboard and click on the lock icon in the left side menu. Then, click Create new secret key, provide a name, and click Create secret key:
Keep your API key on hand. You'll need it in step 6.
3. Trigger the automated workflow
Every Zap starts with a trigger, the event that kicks off the automation. This trigger could be anything, like a new record being added to an Airtable base or a new row created in a Google Sheets document. As long as the trigger event activates the automation and includes the necessary information (in our case, the content URL and an image for the video background), it will work.
For demonstration purposes, I'll use a Zapier Table as the trigger. Once you grasp the concept, you can easily swap in any other app that suits your needs.
Log in to your Zapier account or sign up for free if you haven't already. From the left menu, navigate to the Tables page. Click the Start blank button, enter a name, and hit Create table:
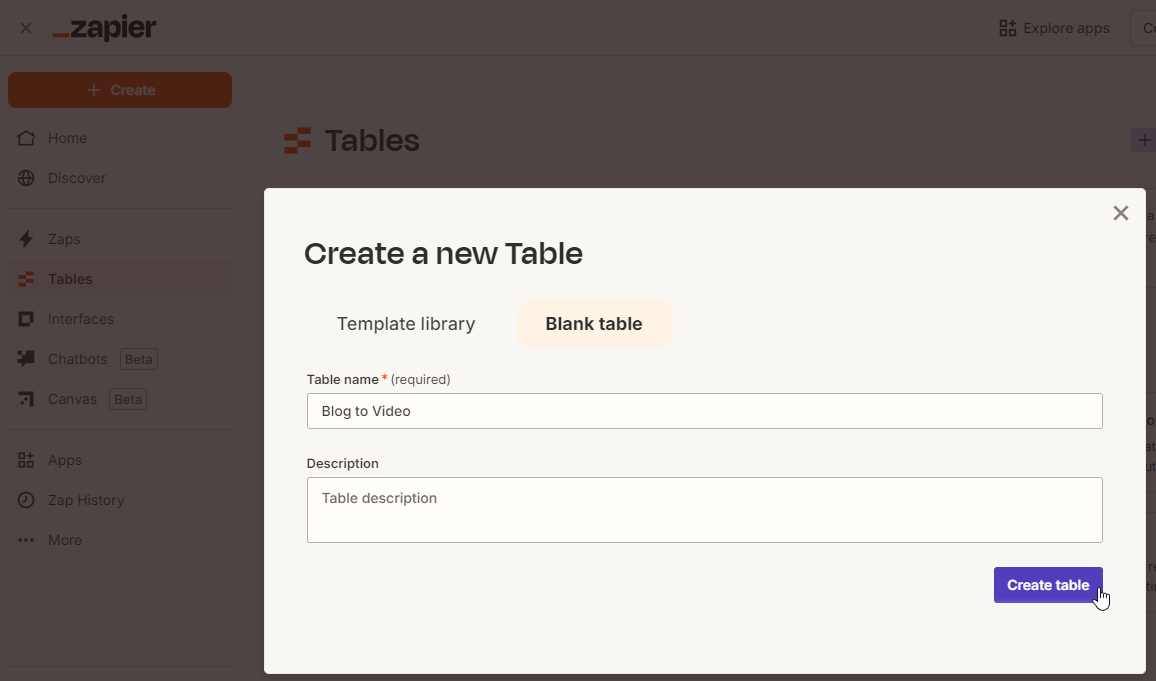
In the table editor, let's create a simple table with just two fields: Content URL and Image (both should be URL field types).
Next, we'll add some sample data for the first record. You can use the following:
- Set Content URL to https://creatomate.com/blog/the-best-video-generation-apis
- Set Image to https://cdn.creatomate.com/demo/gradient.jpg

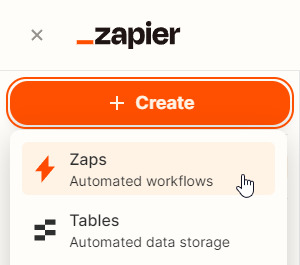
Now, return to your Zapier dashboard. Then, click the Create button, and choose Zaps:
We're now in the workflow editor, where we'll set up our Zap. Start by clicking on the Trigger block. Search for and select Zapier Tables as the app, and choose New Record as the trigger event. Then, click Continue.
In the Table ID field, select the table you just created:
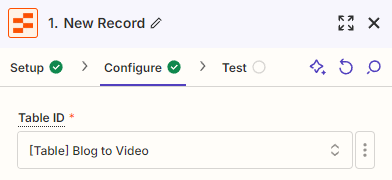
Then, click Continue.
To make sure Zapier can find records in our table, click Test trigger. If the test is successful, it will return our test record. After that, click Continue with selected record:
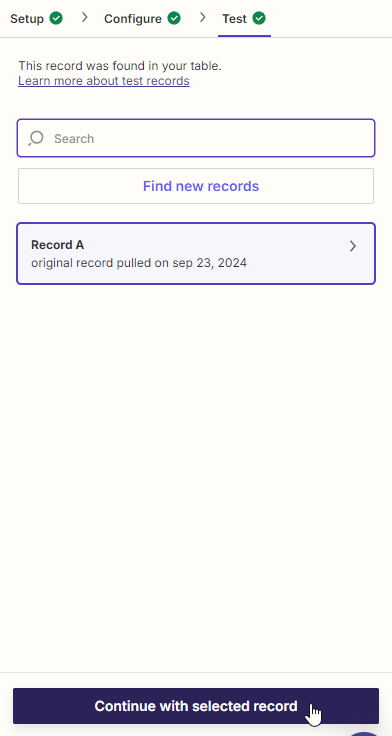
We can now use this data to set up the rest of our Zap.
4. Parse the web page
This action lets us parse the blog post and retrieve its content, so that we can summarize it in the following steps.
Search for and select Web Parser by Zapier as the app and Parse Webpage as the action event, then click Continue.
Next, select Zapier Tables -> URL (containing the blog post link) in the URL to Parse field. Choose HTML for the Content output format and select False for the Continue on failure option:
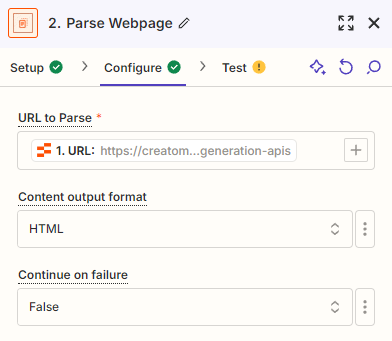
Then, click Continue.
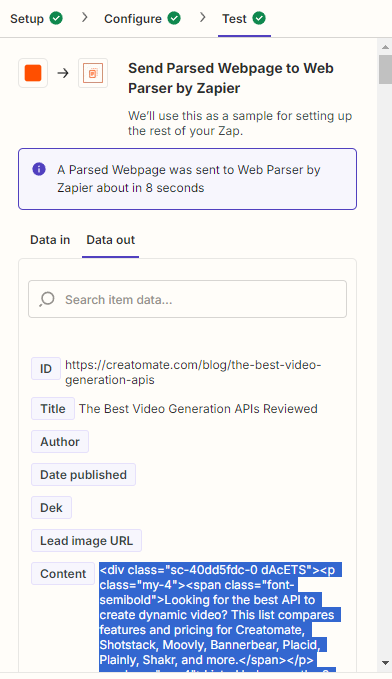
Click Test step to make sure everything is working properly. The test result should show the page's content in the content field:
5. Truncate the blog post
At the moment, GPT only allows you to send a limited amount of data to summarize, so we'll need to truncate the article to make sure we don't exceed this limit.
Click + to add a step to your Zap:

Search for the Formatter by Zapier app and select Text as the action event. Then, click Continue.
To configure the action, select Truncate in the Transform field first. Then, select Web Parser by Zapier -> Content in the Input field, set Max Length to 4095 tokens, and set Append Ellipsis to True:
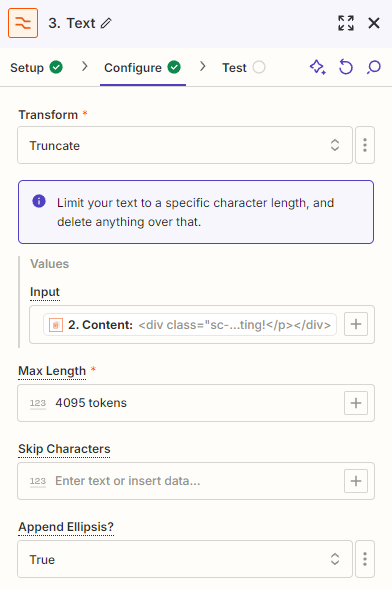
When done, click Continue.
Click Test step to make sure everything is working correctly. Once the test is successful, we'll use the output to generate a summary with AI in the next step.
6. Summarize the content
In this step, we'll create a prompt to summarize the blog post.
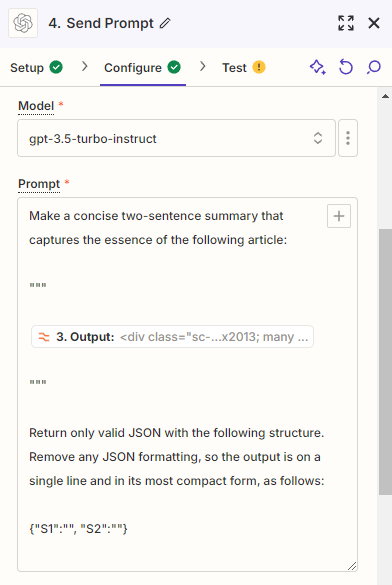
Click +, search for the OpenAI (GPT-4, DALL-E, Whisper) app, and select the Send Prompt action event. Continue by signing in to your OpenAI account using the API key from step 2.
Next, select the Model you want to use, such as gpt-3.5-turbo-instruct. Then, copy and paste the following into the Prompt field:
Make a concise two-sentence summary that captures the essence of the following article:
"""
[Output from Formatter Step]
"""
Return only valid JSON with the following structure. Remove any JSON formatting, so the output is on a single line and in its most compact form, as follows:
{"S1":"", "S2":""}
Make sure to replace [Output from Formatter Step] with the Formatter by Zapier -> Output value. Check out the screenshot below to see what it should look like:
Once this is done, there is no need to modify any of the other settings, and you can proceed by clicking Continue.
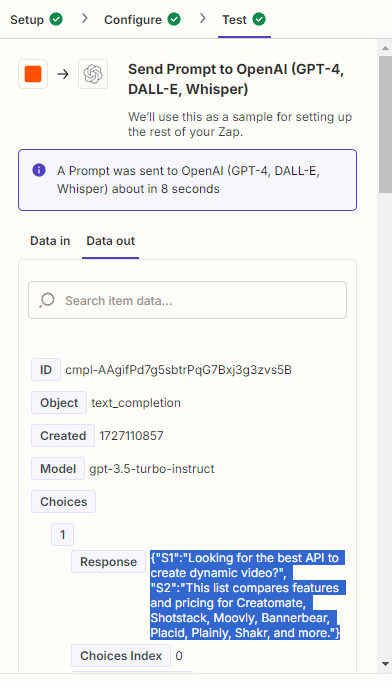
Then, click Test step to send a test request to OpenAI. The response should provide a 2-sentence summary, similar to the image below:
7. Process the AI summary
In this step, we'll convert the output of GPT into a format that Creatomate can use. Don't worry; it's simpler than it sounds. All you need to do is copy and paste a single line of JavaScript code.
Add the Code by Zapier app, and select the Run Javascript action event. Then, click Continue.
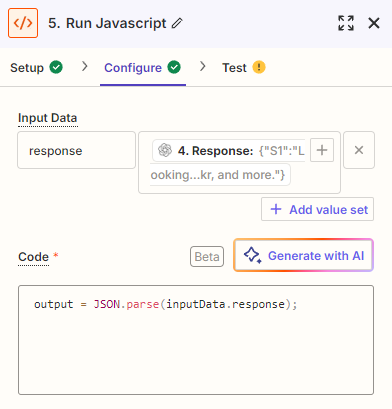
Next, type response in the Input Data field and select OpenAI -> Response. Then, in the Code field, copy and paste the following:
1output = JSON.parse(inputData.response);It should look like this:
When done, click Continue.
Then, click Test step. You should receive output similar to the screenshot below, with the summary divided into two values: S1 and S2.

8. Generate the video
In this step, we'll combine data from the previous steps to generate a video.
Add the Creatomate app with the Create Single Render action event. Continue by selecting your account or signing in with your project's API key, which you can find uder Project Settings in your Creatomate dashboard.
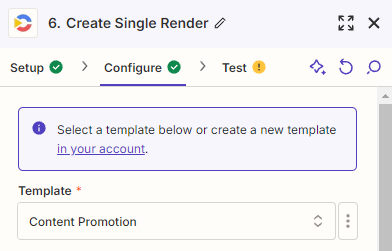
Then, select the Content Promotion template in the Template field first:
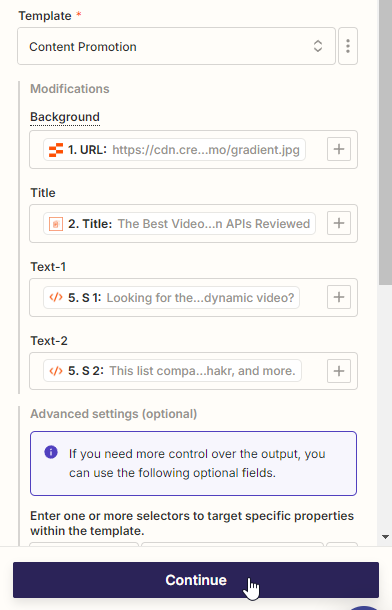
Zapier will now automatically detect the dynamic elements of the template and list them under Modifications. Let's map the data from the previous steps to the template as follows:
- Set Background to Zapier Tables -> URL (containing the image link)
- Set Title to Web Parser by Zapier -> Title
- Set Text-1 to Code by Zapier -> S1
- Set Text-2 to Code by Zapier -> S2
When done, click Continue:
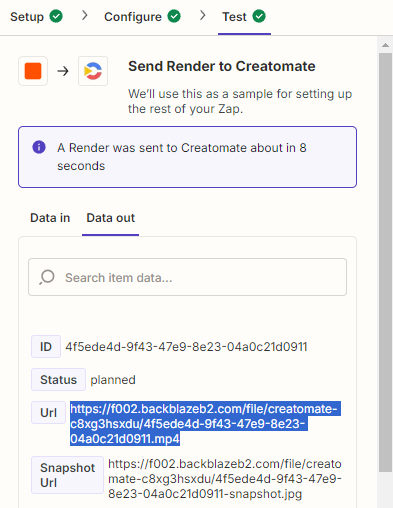
Click Test step to confirm that Creatomate can successfully generate a video based on the template and provided data. You can view the video by visiting the URL given in the test result. Please note that rendering may take some time, so if you encounter a 'Not Found' message, wait a few seconds and refresh the page. This will only occur during Zap setup; once it's live, it will wait for the video to finish before proceeding with the next step.
9. Share on social media
In this final step, we'll create a Facebook post with the generated video, so it gets posted to social media automatically. However, you can easily swap this for another platform, like Instagram, TikTok, or YouTube, if you prefer.
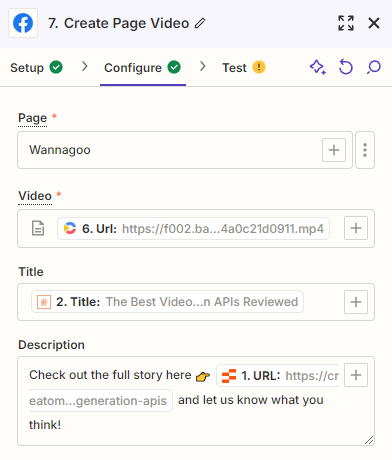
Add the Facebook Pages app with the Create Page Video action event. Continue by selecting your account or signing in first.
Next, select your Facebook page first. To configure the post, select Creatomate -> Url in the Video field, select Web Parser by Zapier -> Title in the Title field, and write a call to action in the Description field, like "Check out the full story here 👉 Zapier Tables -> URL (containing the blog post link) and let us know what you think!":
When done, click Continue.
Click Test step to verify that Zapier can publish your Facebook post. If the test is successful, go to your Facebook page, and you should see the post there:

Last but not least, click Publish to activate your Zap.
What's next for video generation using AI
Well done! You've successfully set up a Zapier workflow that automatically creates a video from a URL and publishes it to social media. Now, whenever you add new content to your site, simply provide its URL and an image to your chosen trigger app, and the rest will handle itself.
In this tutorial, we've used AI to generate a summary of the content, but you don't have to rely on this. Alternatively, you can provide your own summarized sentences for more control over the video. To do this, simply add extra fields for the summary in the Zapier Table or any other app you're using, and skip the Web Parser, Formatter, OpenAI, and Code by Zapier steps.
If you want to take generative AI to the next level, consider setting up a fully automated workflow to create faceless TikTok videos or YouTube Shorts. With this automation, you only need to enter a topic for your videos; AI and automation will take care of the rest. In just a few minutes, a short-form video with voice overs, subtitles, and images will be posted to your channel. If you're interested in learning more, visit our blog page or dive right into one of the tutorials below:
👉 How to Create Videos with AI Voice Overs using Zapier
👉 How to Automatically Add Subtitles to Videos using Zapier
👉 Use ChatGPT to Auto-Create Social Media Content with Zapier
👉 How to Use AI Images from DALL·E to Create Videos with Zapier
You might also like these tutorials


Start automating today
Start with a full-featured trial with 50 credits, no credit card required.
Get started for free →