How to Automatically Add Subtitles to Videos using Zapier

In this tutorial, you'll learn how to auto-transcribe videos and audio files to add animated word-by-word captions to your social media videos using Zapier and Creatomate.
There are several reasons why subtitles are essential for social media videos. Most people scroll through their feed with the sound off, so without captions, a large part of your audience will miss your message. Videos with subtitles also tend to perform better, as animated captions help capture attention.
It's therefore a good idea to always add subtitles to your videos. However, manually transcribing content can be time-consuming, especially if you publish regularly. Fortunately, speech-to-text AI has improved to the point where this process can be automated.
In this tutorial, I'll show you how to set up an automated workflow to generate subtitles for your video clips. As an added step, we'll also publish the transcribed videos to social media automatically. To do this, we'll use Creatomate for transcription and video rendering, and Zapier to build the automation.
The video above shows the auto-transcribed video we'll produce through our Zap. As you can see, it's highly accurate at identifying the correct words, so there's no need for manual corrections.
When you look at captions used on YouTube, TikTok, and Instagram, you'll notice a wide range of styles. That's why we'll use Creatomate to automate our video captions. It supports almost any subtitle style used on social media, and its template editor lets us fully control the animation and design. In addition to captions, you can also add outros, overlays, combine clips, and more.
💡 AI tip: You can also use a text-to-speech tool like ElevenLabs to generate AI voiceovers. Creatomate can then automatically transcribe the audio and create animated subtitles. Here's a step-by-step tutorial.
Prerequisites
In this tutorial, we'll build a Zap that automatically runs whenever a new video file is added. As an example, we'll use a Zapier Table to provide the workflow with a list of video clips to transcribe. However, you can replace this trigger with any of Zapier's thousands of supported app integrations to fully customize the workflow.
For example, you could trigger the workflow whenever a video file is uploaded to Google Drive and then automatically publish the subtitled version to Instagram.
We'll use the following tools:
- Creatomate: to create a video template and automatically generate subtitles.
- Zapier: to build the automated workflow.
- Zapier Tables (optional): or any other app to import videos from.
- YouTube (optional): or any other platform where you want to publish or further process the videos.
How automatic subtitle generation works with Zapier
Let's take a closer look at the overall process.
First, we'll create a template in Creatomate, where we'll configure the subtitles and choose their visual style. Next, we'll create a Zapier Table that contains a list of video clips to process.
After that, we'll build a Zap that automatically runs whenever a new video clip is added to the table. The Zap will send the video to Creatomate to generate a transcribed version with subtitles. Once the video has been rendered, the completed result will automatically be published as a YouTube Short.
Here's what the final Zap will look like:

Let's get started!
1. Create a transcription template in Creatomate
In this step, we'll create the template that will automatically generate and style the subtitles for our videos.
Log in to your Creatomate account, or sign up for free if you don't have one yet.
Next, navigate to the Templates page and open the template gallery. For this tutorial, we'll use the Highlighted Subtitles template from the Auto-Subtitles category. Choose a format, such as 9:16 Vertical, and click Create Template to open it in the editor:
This template already includes everything needed for automatic subtitle generation. Let's briefly look at how it's structured.
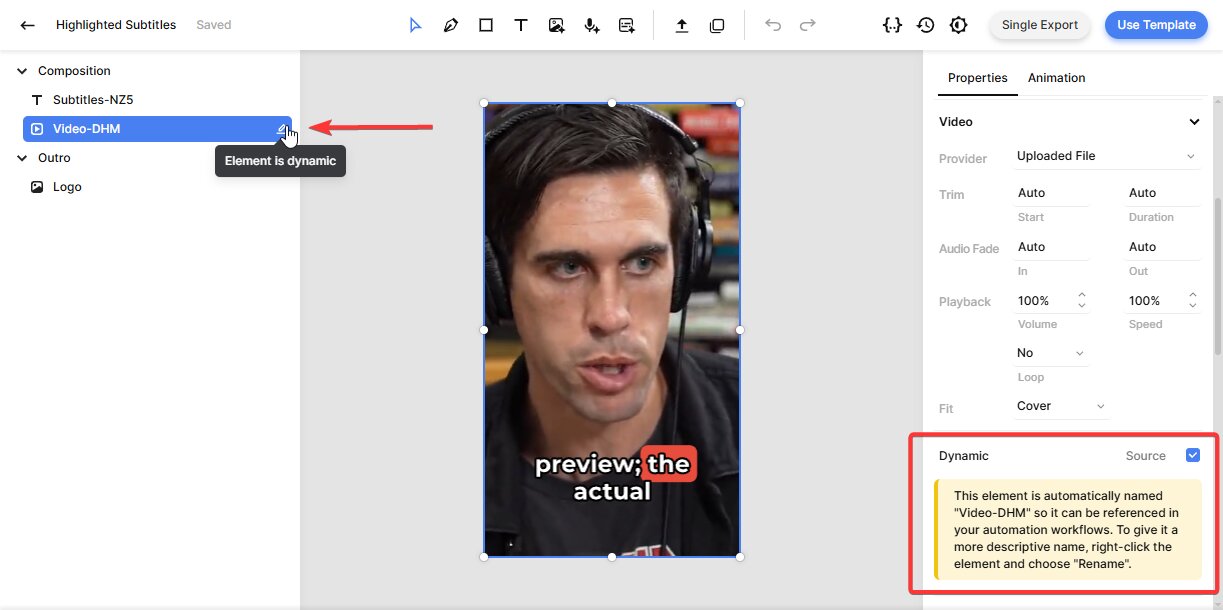
In the left-hand panel, you'll find three main elements:
- a subtitles text layer (Subtitles)
- a placeholder video (Video)
- an outro image (Logo)
The Video element is configured as dynamic. This allows us to automatically replace it later from within Zapier, so the same template can be reused for any video clip in your workflow:
At this point, the subtitles shown in the editor are only placeholder text. The actual subtitles will be generated automatically when the Zap runs and processes a real video file.
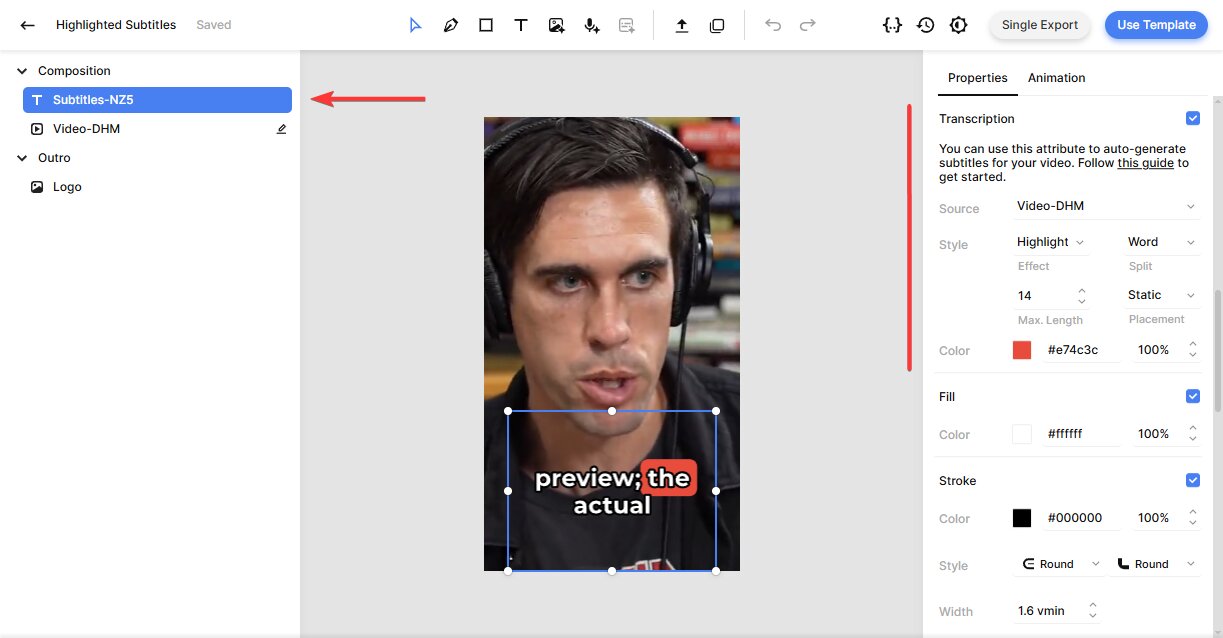
To customize the subtitles, select the Subtitles element. Then, in the properties panel on the right, scroll down to the Transcription settings.
Here, you'll see that the Source property is set to the Video element. This tells Creatomate to generate subtitles based on the audio track of that video.
You can now fully customize the appearance and animation of the subtitles using the Style settings. For example, if you want to display one word at a time – a style commonly used on YouTube Shorts, TikTok, and Instagram Reels – set the “Max. Length” property to 1.
The editor provides a live preview, so feel free to experiment with different styles and animations until you find a look you like:
For now, we'll keep the template mostly unchanged so we can focus on setting up the automation itself. You can always come back later to further customize the design or explore more advanced template features.
2. Set up a video source
In this example, we'll use a Zapier Table to store the videos we want to process. If you're already familiar with Zapier, you can skip this step and use any trigger you prefer instead, such as Google Sheets, Airtable, Google Drive, or another supported app.
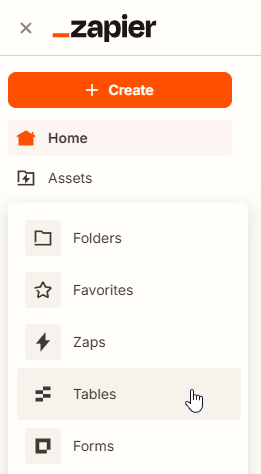
Log in to your Zapier account. From your dashboard, go to Assets and select Tables:
From there, click Create table, choose the option to start from scratch, and name the table (for example: Auto-Subtitle Videos). Then click Create table to confirm:

Next, create the following fields:
- A link field: Input Video
- A text field: Title
- And a long text field: Description
We'll use the Input Video field for the source video that should be transcribed. Make sure it's a publicly accessible direct file URL (e.g. ending in .mp4). The Title and Description fields will later be used when publishing the completed video to social media.
Now, create a sample record that we can use while setting up the automation:
- Input Video -> https://cdn.creatomate.com/demo/the-daily-stoic-podcast.mp4
- Title -> More of What Matters, Less of What Doesn't 💡✨
- Description -> Finding balance is about focusing on the things that truly matter! It's not just about adding more to your life—it's also about cutting out the things that don't serve you. 🧘♀️ #MoreJoy #LessStress #LifeBalance
It should look like this (click on the screenshot to open it full screen):

3. Set up the automation trigger
With your video source ready, it's time to build the automation. In this tutorial, we'll use Zapier Tables, but you can replace it with any trigger app that fits your needs.
Click the Create button and select Zaps:

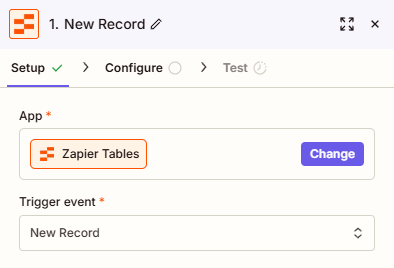
Once in the Zap editor, click the Trigger block. Search for the Zapier Tables app and select the New Record trigger event. This will make the Zap run every time a new video is added to your table.
Proceed by clicking Continue.
To configure the trigger, select your Auto-Subtitle Videos table in the Table ID field:

Then, click Continue.
Click Test trigger to let Zapier fetch the sample record from your table. If the test is successful, click Continue with selected record, and move on to the next step:

4. Generate the subtitled video
In this step, we connect Zapier to Creatomate and use the template we created earlier to generate the final subtitled video. The input video from the trigger is sent to Creatomate, where it is transcribed, styled, and rendered automatically.
Search for the Creatomate app and select the Create Single Render action event. Then, connect your account using your Creatomate API key, which you can find under Project Settings in your dashboard.

When done, click Continue.
To configure the action, select the Highlighted Subtitles template in the Template field first. Then, map the input video from your trigger to the template by selecting the URL from your Zapier Tables record and assigning it to the Video modification field:

Then, click Continue.
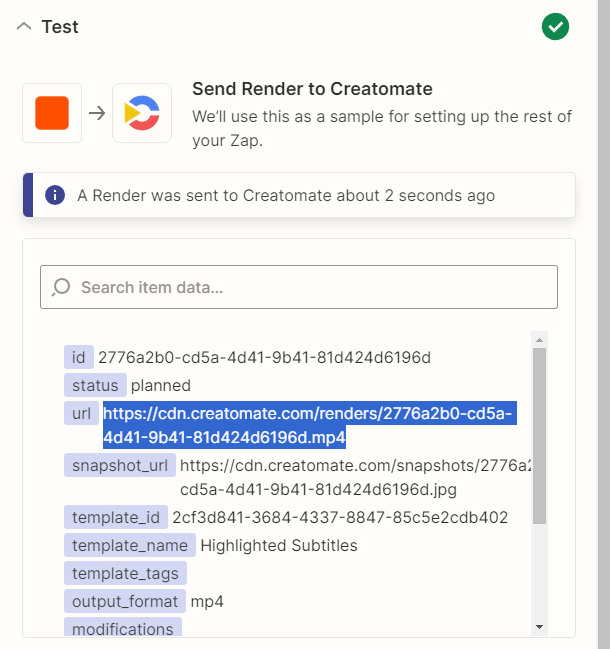
Click Test step to make sure everything works correctly. Creatomate will take the input video, insert it into the template, and generate the final subtitled video. This rendering process may take a moment. If you open the output link too quickly, you may see a “Not Found” page. This simply means the video is still being processed – wait a moment and try again. This only applies during manual testing in Zapier. In a live Zap, the workflow will automatically wait until rendering is complete before continuing to the next step.
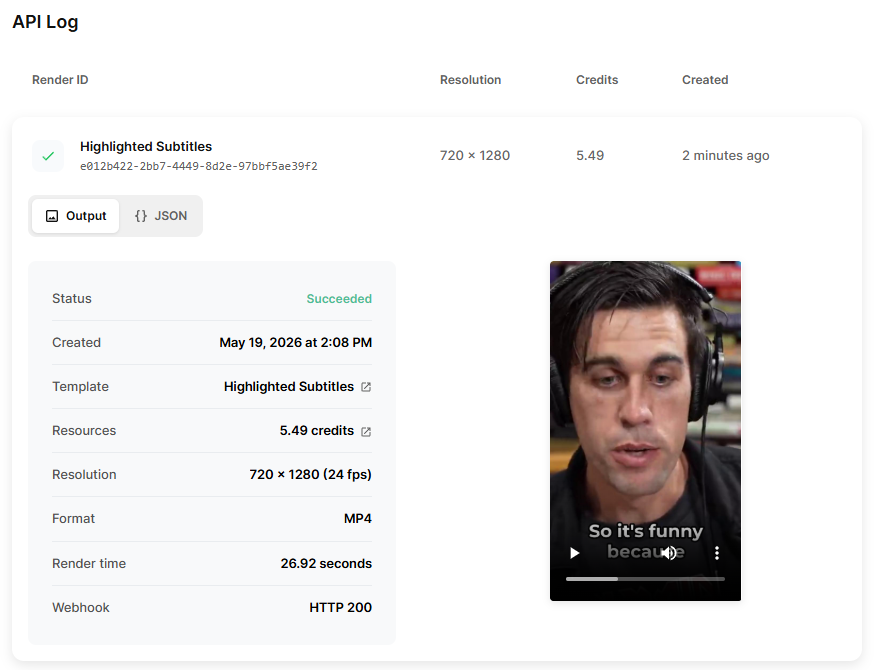
Tip: For more insight into what's happening behind the scenes, you can open the API Log page in your Creatomate dashboard. Here you'll find an overview of all render requests, including their status, processing time, and output details.
This is especially useful for monitoring renders and troubleshooting issues if something doesn't work as expected.
5. Publish the video to social media
At this point, the subtitled video has been successfully generated and is ready to be published.
In this example, we'll upload it as a YouTube Short, but you can easily adapt the workflow for other platforms such as Instagram, TikTok, or Facebook.
Click + to add a step to your Zap:

Search for the YouTube app, and select the Upload Video action event. Then, choose your account or sign in if needed:

Then, click Continue.
To configure the action, map at least the required fields:
- Set Title to Zapier Tables -> Title
- Set Description to Zapier Tables -> Description
- Set Video to Creatomate -> Url

You can optionally customize the remaining upload settings, then click Continue.
Finally, click Test step to verify that the correct data is being passed to YouTube. During testing, the video will not actually be uploaded to your channel. The upload will only happen once the Zap is live.
Last but not least, publish your Zap to activate the automation. From this point on, every new video added to your source table will automatically be transcribed, rendered, and published to your preferred social media platform.
Next steps for automated subtitles
With Creatomate, you can eliminate the manual work of creating and synchronizing subtitles for every video. Combined with Zapier, you've now built a simple automation that turns raw videos into fully subtitled, ready-to-publish content.
Now that your Zap is up and running, you can easily extend it to fit your workflow. For example, you could connect different trigger apps, publish to multiple platforms, or add extra steps such as AI-generated titles and descriptions.
The combination of Zapier and Creatomate gives you a flexible foundation for building all kinds of automated video workflows.
If you'd like to explore more, check out these step-by-step tutorials:
👉 How to Create Videos with AI Voice Overs using Zapier
👉 How to Automatically Create and Post TikTok Videos using Zapier
👉 How to Automatically Create & Post YouTube Shorts using Zapier
👉 How to Automatically Create Instagram Posts using Zapier
👉 How to Automatically Create Facebook Posts using Zapier
👉 How to use AI to Automate Videos for Shorts, Stories, and Reels
You might also like these tutorials


Start automating today
Start with a full-featured trial with 50 credits, no credit card required.
Get started for free →