How to Create and Edit Video with PHP

This tutorial shows how to create and render dynamic video using PHP and the Laravel framework, but you can use any other PHP library as well.
In this article, we'll look at two ways of creating video using PHP and the Creatomate video API:
- Create video by template: This is best for generating video with a consistent design. Think of short videos (marketing videos, video ads, or social media stories) with only minor differences in content. You begin by creating a template in the video editor, then inserting content (unique text captions, images, or video clips) into that template to make a unique video.
- Edit video entirely with PHP: Use this method if you want to create or edit video without following any particular template. Typically, this is used for video editing tasks such as stitching, resizing, cropping, adding overlays, adding subtitles, generating video slideshows, etc.
The easiest way to generate video is by using a video template, then rendering that template with dynamic data from our PHP application, like the example above. This is what we are going to look at first. Following that, we'll look at generating video entirely with code.
Prerequisites
No matter which approach we choose, let's start by setting up a PHP project.
1. Create a new PHP Laravel project
In your terminal, run the following command to set up a new Laravel project. Let's call it create-video-php. If you use PHP without the Laravel framework, no worries, just create your PHP project as usual.
$ composer create-project laravel/laravel create-video-php
Then navigate to the project directory:
$ cd create-video-php
2. Import the Creatomate PHP library
To create videos from our new PHP project, we'll install the creatomate/creatomate PHP library as one of our dependencies:
$ composer require creatomate/creatomate
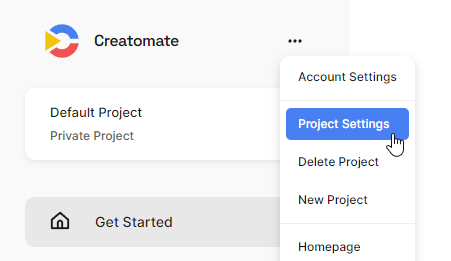
3. Get your API key
Sign up for a free Creatomate account and get your API key under project settings in your dashboard:
Now that everything is set up, it's time to add video creation capabilities to our PHP application.
Method 1 – Create video by template
1. Create a video template
As we're rendering based on a video template, we first have to create one. Navigate to Templates and click New. Let's choose the Quick Promo template and click Create Template:
After the template is created, we're taken to the template editor. Here we can edit the video to our liking, but let's leave it for now. Instead, click the Use Template button in the upper right corner of the editor. In the window that opens, click API Integration. Then copy your template ID from there:
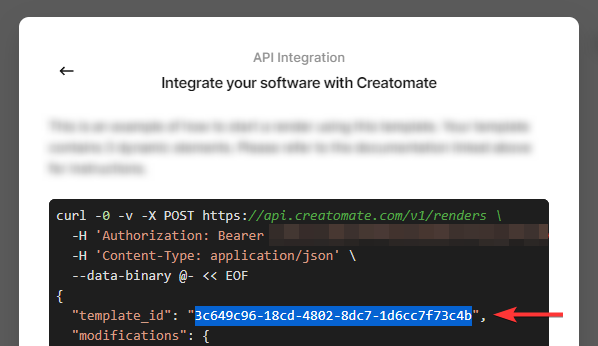
Now that we have both an API key and a template ID, let's return to our PHP code.
2. Create a Laravel route
Let's add a POST endpoint to our Laravel application that generates a new video when it gets called. So navigate to the file routes/api.php, and add a new API route:
1<?php
2
3use Illuminate\Support\Facades\Route;
4use Creatomate\Client;
5
6Route::post('/videos', function () {
7
8    $client = new Client('YOUR_API_KEY');
9
10    $renders = $client->render([
11        'template_id' => 'YOUR_TEMPLATE_ID',
12        'modifications' => [
13            'Text-1' => 'Hi! 👋 Thanks for trying out Creatomate!',
14            'Text-2' => 'Change this text to anything you want. ✨🦖',
15            'Video' => 'https://creatomate-static.s3.amazonaws.com/demo/video5.mp4',
16        ],
17    ]);
18
19    return response()->json($renders, 200, [], JSON_UNESCAPED_SLASHES | JSON_PRETTY_PRINT);
20});
You can see that to create a video, we simply call the render function with our API key and template ID. We also specify any values that we want to insert into our template before it is rendered using modifications. In this example, we simply replace the text Text-1 and Text-2 with our own captions, and replace the background video by providing a URL to a video.
3. Run the script
Run the Laravel application using the following command:
$ php artisan serve
As we have created an POST route at /videos, we've to use a tool to call that endpoint. In this case, I'm going to use cURL, but you can also use Postman or Insomnia:
$ curl -X POST http://127.0.0.1:8000/api/videos
As you can see, the POST request takes a few seconds to complete while the video is being rendered. When finished, you'll receive back an array of renders with the completed video:
1[
2    {
3        "id": "22b1729c-864e-4b90-80b6-59e0580e2b53",
4        "status": "succeeded",
5        "url": "https://cdn.creatomate.com/renders/22b1729c-864e-4b90-80b6-59e0580e2b53.mp4",
6        "snapshot_url": "https://cdn.creatomate.com/snapshots/22b1729c-864e-4b90-80b6-59e0580e2b53.jpg",
7        "template_id": "25c5ad4e-ffba-4183-a434-6ef469baa97b",
8        "template_name": "Quick Promo",
9        "template_tags": [],
10        "output_format": "mp4",
11        "render_scale": 0.25,
12        "width": 480,
13        "height": 270,
14        "frame_rate": 60,
15        "duration": 11.5,
16        "file_size": 1227218,
17        "modifications": {
18            "Video": "https://creatomate-static.s3.amazonaws.com/demo/video5.mp4",
19            "Text-1": "Hi! 👋 Thanks for trying out Creatomate!",
20            "Text-2": "Change this text to anything you want. ✨🦖"
21        }
22    }
23]
Let's check out the video by visiting the URL. As you can see, the modifications that we passed were applied to the template and an MP4 was generated:
In this example, we've used the synchronous render function to wait for a render to complete. If you'd rather use a non-blocking function, you can also use the startRender function. Check out the source of the PHP SDK on GitHub to see how it works.
Method 2 – Create video entirely with PHP
Here's another way. Rather than using a template, we'll build the video entirely in PHP. With just a bit of JSON, we can tell the API exactly how to produce the video from start to finish. With this approach, we are able to generate dynamic videos right from our PHP application with incredible flexibility. One example is to generate a dynamic video slideshow featuring an arbitrary amount of scenes and pictures. Another example is to programmatically edit video files (trim, stitch, crop, resize, apply filters, etc.) directly in PHP.
Fundamentally, this approach isn't that different from the first method. In fact, all video templates in Creatomate are entirely based on this JSON format. This template editor simply provides a convenient way to edit templates using a drag-and-drop interface while hiding the JSON underneath. However, if you prefer, you can view and edit the JSON of any template using the source view of the video editor.
Let's create another Laravel project and try a few examples. For more examples, check out the GitHub repository that has plenty of other PHP-to-video example scripts. I'll keep it as practical as possible, but if you want a more detailed explanation, check out the JSON-to-video documentation.
Example 1 – Join two or more videos together
Let's say we want to stitch together multiple video clips, but we do not know the lengths of the clips. Fortunately, we don't have to do any processing within our PHP application to figure out how long the videos are, because the API can do that for us. All we have to do is tell the API to play each clip after the other.
This can be done by putting the video elements on the same track, as shown in the code below. We also tell Creatomate to crossfade the video clips for 1 second by adding a transition to the second video element:
1<?php
2
3use Illuminate\Support\Facades\Route;
4use Creatomate\Client;
5
6Route::post('/videos', function () {
7
8    $client = new Client('YOUR_API_KEY');
9
10    $source = new Creatomate\Source([
11        'output_format' => 'mp4',
12        'width' => 1280,
13        'height' => 720,
14        'elements' => [
15
16            new Creatomate\Elements\Video([
17                'track' => 1,
18                'source' => 'https://creatomate-static.s3.amazonaws.com/demo/video1.mp4',
19            ]),
20
21            new Creatomate\Elements\Video([
22                'track' => 1,
23                'source' => 'https://creatomate-static.s3.amazonaws.com/demo/video2.mp4',
24
25                // Add a transition between the videos
26                'transition' => new Creatomate\Animations\Fade(['duration' => 1]),
27            ]),
28        ],
29    ]);
30
31    $renders = $client->render(['source' => $source]);
32
33    return response()->json($renders, 200, [], JSON_UNESCAPED_SLASHES | JSON_PRETTY_PRINT);
34});Example 2 – Resize a video
Here's a completely different example. Let's say we want to resize a video clip to 1080 by 1080. Even though we don't know the video clip's resolution or length, we'd like it to cover the full output resolution without showing black bars around the video (commonly known as letterboxes).
We can accomplish this by setting the output resolution to 1080 by 1080 and simply specifying the video element. As elements expand to the size of the output resolution by default, the video clip will be cropped to 1080 by 1080. The fit option allows us to specify how the video is scaled. For example, to letterbox a video, we set fit to "contain". The default is "cover":
1<?php
2
3use Illuminate\Support\Facades\Route;
4use Creatomate\Client;
5
6Route::post('/videos', function () {
7
8    $client = new Client('YOUR_API_KEY');
9
10    $source = new Creatomate\Source([
11        'output_format' => 'mp4',
12        'width' => 1080,
13        'height' => 1080,
14        'elements' => [
15            new Creatomate\Elements\Video([
16                'source' => 'https://creatomate-static.s3.amazonaws.com/demo/video1.mp4',
17
18                // By default, fit is 'cover'. There's also 'contain' and 'fill', for example:
19                // 'fit' => 'contain',
20            ]),
21        ],
22    ]);
23
24    $renders = $client->render(['source' => $source]);
25
26    return response()->json($renders, 200, [], JSON_UNESCAPED_SLASHES | JSON_PRETTY_PRINT);
27});If you wish to take it a step further, you can letterbox the video, but fill up the black edges with a blurred copy, much like you see when vertical videos (e.g., TikTok videos, YouTube Shorts, Stories) are displayed horizontally. Check out this PHP example to see how this can be accomplished.
Example 3 – Trim a video
What if we want to limit a video's duration to a maximum of 10 seconds? The following example shows how. By specifying a trim_duration, a video can be trimmed to a maximum length. And should the clip be shorter than this trim duration, the clip's length will be used instead.
As you can see, we haven't specified any dimensions. Creatomate's default behavior is to find and use the first image or video clip, using those dimensions as output:
1<?php
2
3use Illuminate\Support\Facades\Route;
4use Creatomate\Client;
5
6Route::post('/videos', function () {
7
8    $client = new Client('YOUR_API_KEY');
9
10    $source = new Creatomate\Source([
11        'output_format' => 'mp4',
12        'elements' => [
13            new Creatomate\Elements\Video([
14
15                // This video is 20 seconds long
16                'source' => 'https://creatomate-static.s3.amazonaws.com/demo/video5.mp4',
17
18                // Trims the video to a maximum of 10 seconds
19                'trim_duration' => 10,
20            ]),
21        ],
22    ]);
23
24    $renders = $client->render(['source' => $source]);
25
26    return response()->json($renders, 200, [], JSON_UNESCAPED_SLASHES | JSON_PRETTY_PRINT);
27});Example 4 – Add an overlay to a video
This example shows how to add animated text overlays to videos. As we want video and text to appear simultaneously, we want them on separate tracks. However, if we omit the track property, that's already what happens by default, so we don't need to define any track numbers.
We can see several things happening with the text element. The first thing we did was set emoji_style to "apple". With Creatomate, you can use over 10.000 different emojis from all major platforms, including Facebook (Instagram), Google, and Twitter. We can simply include the emoji in the text property of the text element. Additionally, there is the enter text animation. You can choose from over a hundred animations for creating compelling text overlays. And as you can see, you have a wide range of options for styling text.
Last but not least, note that the text is scaled and positioned based on relative units. This enables the text overlay to adjust to the dimensions of the background video, regardless of its resolution or aspect ratio. So, if we pass a vertical video instead, the text will automatically fit perfectly. For more text examples, please refer to this demo.
1<?php
2
3use Illuminate\Support\Facades\Route;
4use Creatomate\Client;
5
6Route::post('/videos', function () {
7
8    $client = new Client('YOUR_API_KEY');
9
10    $source = new Creatomate\Source([
11        'output_format' => 'mp4',
12        'frame_rate' => 60,
13
14        // Choose between 'facebook', 'google', 'twitter' and 'apple'
15        'emoji_style' => 'apple',
16
17        'elements' => [
18
19            new Creatomate\Elements\Video([
20                'source' => 'https://creatomate-static.s3.amazonaws.com/demo/video4.mp4',
21            ]),
22
23            new Creatomate\Elements\Text([
24                'text' => 'This text adjusts automatically to the size of the video. 🔥',
25                'y' => '75%',
26                'width' => '100%',
27                'height' => '50%',
28                'x_padding' => '5 vw',
29                'y_padding' => '5 vh',
30                'y_alignment' => '100%',
31                'font_family' => 'Open Sans',
32                'font_weight' => 700,
33                'font_size_maximum' => '10.4 vmin',
34                'background_color' => 'rgba(255,255,255,0.69)',
35                'background_x_padding' => '23%',
36                'background_y_padding' => '8%',
37                'background_align_threshold' => '0%',
38                'fill_color' => '#333333',
39                'enter' => new Creatomate\Animations\TextSlide([
40                    'duration' => '2 s',
41                    'easing' => 'quadratic-out',
42                    'split' => 'line',
43                    'scope' => 'element',
44                    'background_effect' => 'scaling-clip'
45                ]),
46            ]),
47        ],
48    ]);
49
50    $renders = $client->render(['source' => $source]);
51
52    return response()->json($renders, 200, [], JSON_UNESCAPED_SLASHES | JSON_PRETTY_PRINT);
53});Example 5 – Add music to a video
In the following example, we will add background music to an existing video. You can see in the code snippet below that it is as simple as defining a video and audio element.
For this example, we wish the audio track to play for as long as the video, and to fade out at the end of the video. We can do this by setting duration to null. As a result, the API stretches the audio element to the length of the final video, which is in turn based on the length of the video element:
1<?php
2
3use Illuminate\Support\Facades\Route;
4use Creatomate\Client;
5
6Route::post('/videos', function () {
7
8    $client = new Client('YOUR_API_KEY');
9
10    $source = new Creatomate\Source([
11        'output_format' => 'mp4',
12
13        'elements' => [
14
15            new Creatomate\Elements\Video([
16                'source' => 'https://creatomate-static.s3.amazonaws.com/demo/video4.mp4',
17            ]),
18
19            new Creatomate\Elements\Audio([
20                'source' => 'https://creatomate-static.s3.amazonaws.com/demo/music1.mp3',
21                // Make the audio track as long as the output
22                'duration' => null,
23                // Fade out for 2 seconds
24                'audio_fade_out' => 2,
25            ]),
26        ],
27    ]);
28
29    $renders = $client->render(['source' => $source]);
30
31    return response()->json($renders, 200, [], JSON_UNESCAPED_SLASHES | JSON_PRETTY_PRINT);
32});Example 6 – Convert a video to a GIF
The following code example shows how to produce a GIF from a video. We could use this, for instance, if we wanted to embed a video in an email as many email clients don't play MP4 videos.
Since GIF is an inefficient format, we limit its dimensions to 400 by 400 pixels. This can be accomplished by specifying a max_width and max_height in the options. This will preserve the aspect ratio of the original video.
There are two quality settings: "fast" and "best". The most suitable option depends on your use case. For on-the-fly GIF generation, you're probably better off setting gif_quality to "fast". However, if you really want the best quality and don't care about processing time, you can pick "best". Omitting this option sets it to "fast" by default.
Also, GIF files tend to be very large. To combat this, use gif_compression to set the level of compression, where 0 means no compression and 200 means heavy compression. With a higher value, you'll get a smaller file size, but the quality will suffer too.
1<?php
2
3use Illuminate\Support\Facades\Route;
4use Creatomate\Client;
5
6Route::post('/videos', function () {
7
8    $client = new Client('YOUR_API_KEY');
9
10    $source = new Creatomate\Source([
11
12        'output_format' => 'gif',
13
14        // Set to 'fast' or 'best' depending on your preference
15        'gif_quality' => 'best',
16
17        // Compression level ranging from 0 to 200 (0 means no compression, 200 means heavy)
18        'gif_compression' => 30,
19
20        // Frame rate of the GIF
21        'frame_rate' => 15,
22
23        'elements' => [
24            new Creatomate\Elements\Video([
25                'source' => 'https://creatomate-static.s3.amazonaws.com/demo/video1.mp4',
26            ]),
27        ],
28    ]);
29
30    $renders = $client->render([
31        'source' => $source,
32
33        // Maximum width and height
34        'max_width' => 400,
35        'max_height' => 400,
36    ]);
37
38    return response()->json($renders, 200, [], JSON_UNESCAPED_SLASHES | JSON_PRETTY_PRINT);
39});Example 7 – Take a still from a video
In the last example, we'll take a screenshot of a video at a specific point. The use of this feature is particularly useful when you wish to generate a thumbnail or poster for a video.
Setting output_format to "jpg" instructs the API to create a JPEG image, even if your source includes video or animation. It will then go to the time specified with the snapshot_time option and get the frame at that point in time. Leaving out snapshot_time means it will take the first frame.
1<?php
2
3use Illuminate\Support\Facades\Route;
4use Creatomate\Client;
5
6Route::post('/videos', function () {
7
8    $client = new Client('YOUR_API_KEY');
9
10    $source = new Creatomate\Source([
11
12        'output_format' => 'jpg',
13
14        // Take a screenshot at 2 seconds
15        'snapshot_time' => 2,
16
17        'elements' => [
18            new Creatomate\Elements\Video([
19                'source' => 'https://creatomate-static.s3.amazonaws.com/demo/video1.mp4',
20            ]),
21        ],
22    ]);
23
24    $renders = $client->render(['source' => $source]);
25
26    return response()->json($renders, 200, [], JSON_UNESCAPED_SLASHES | JSON_PRETTY_PRINT);
27});
Wrapping up
In this article, we explored two ways to create video using PHP. The first approach involved the use of a video template. For the second method, the entire video was generated with PHP.
We can see that both methods have their own merits. Template-based approaches let you create a video template, then insert dynamic data into the template to generate MP4s, which is the quickest and easiest way to make videos programmatically. The source-based method, on the other hand, gives you the most flexibility, as using PHP lets you make pretty much any type of video entirely programmatically.
When in doubt, I recommend starting with the template-based approach. It allows you to quickly familiarize yourself with Creatomate's features through an interactive video editor that does not require any programming knowledge. That's especially advantageous if you work with designers. Should you find that the template system is no longer flexible enough for what you require, the source editor always provides access to the template's JSON source. From there, you can think about generating it entirely from scratch within your PHP application using the source-based approach.
Whenever you have questions or want to talk about your use case, you can reach me at [email protected]. I'm always glad to help.
As a final note, I encourage you to also check out the GitHub repository with more than 50 PHP examples that cover the most common video editing scenarios.
Happy video rendering!
You might also like these tutorials


Start automating today
Start with a full-featured trial with 50 credits, no credit card required.
Get started for free →