How to Automatically Create Facebook Posts using Make

In this tutorial, you'll learn how to auto-generate videos and images for your Facebook posts using Creatomate and Make.com.
To succeed in Facebook marketing, you need a steady stream of engaging content. Regularly sharing updates, especially those with eye-catching videos or images, is one of the most effective ways to keep your audience active and interested. Yet, creating these posts can quickly eat up more time that you'd like. Thankfully, automation is here to save the day.
In this tutorial, I'll walk you through setting up a workflow that automatically creates and publishes Facebook posts, complete with visuals. We'll use Make.com to handle the automation part and Creatomate, a video and image generation API, to produce the content. By the end, you'll have an automated system that generates Facebook posts like the one shown below:
This is a perfect example of marketing automation in action. By repurposing existing content, such as customer reviews, you can consistently generate engaging Facebook posts. All you need to do is curate the data that goes into the workflow, and automation will handle the rest.
Want to create a different type of Facebook post? No problem! The process in this tutorial can be applied to other marketing strategies as well. With Creatomate's online template editor, you can easily create video or image designs tailored to your specific needs.
Prerequisites
Since you'll probably want to build an automation for your own use case, we'll keep things simple. After you finish this quick guide, you can easily customize it to suit your specific requirements.
Here are the tools we'll use:
- Creatomate: to create a design and generate visuals.
- Make.com: to set up the automated workflow.
- a Facebook Page: to automatically publish your posts.
How to automate Facebook posts with Make.com?
To auto-generate videos and images for Facebook, we'll start by creating a template in Creatomate. This design will serve as the foundation for your visuals.
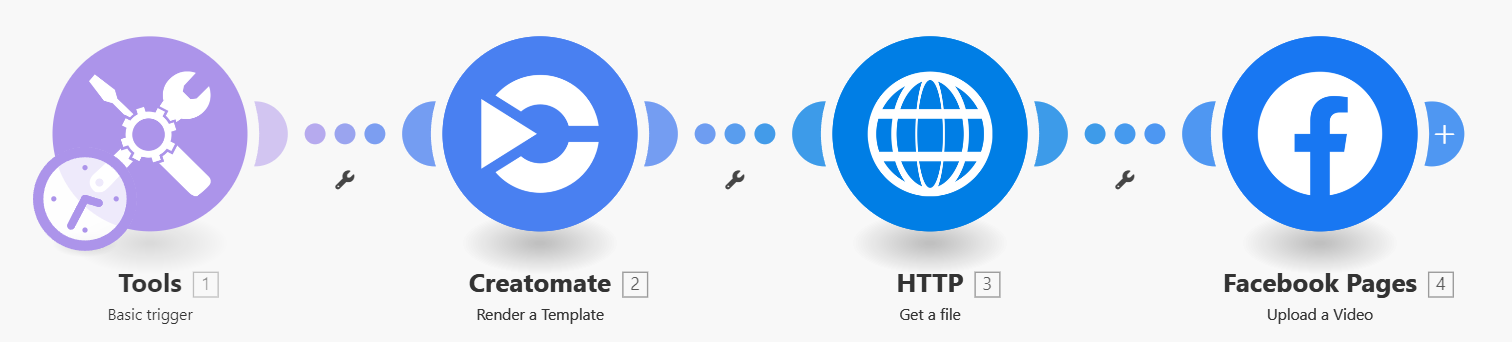
Next, we'll set up a scenario in Make.com. For simplicity, I'll use a basic trigger as the data source for our workflow. In real-world applications, you can use any app, like Google Sheets or Airtable. The Creatomate module will then generate a video or image, and once it's ready, it will be posted to your Facebook page. Here's what our setup looks like:
Let's get started!
1. Create a video/image template in Creatomate
Log in to your Creatomate account or sign up for free if you don't already have one.
Go to the Templates page and click the New button to open the gallery. You can choose any template you like, whether it's a video or an image, or even create your own design from scratch. For this tutorial, let's navigate to the Social Media category and select the Animated Review template. Choose the 6:4 Landscape size, then click Create Template to open it in the editor:
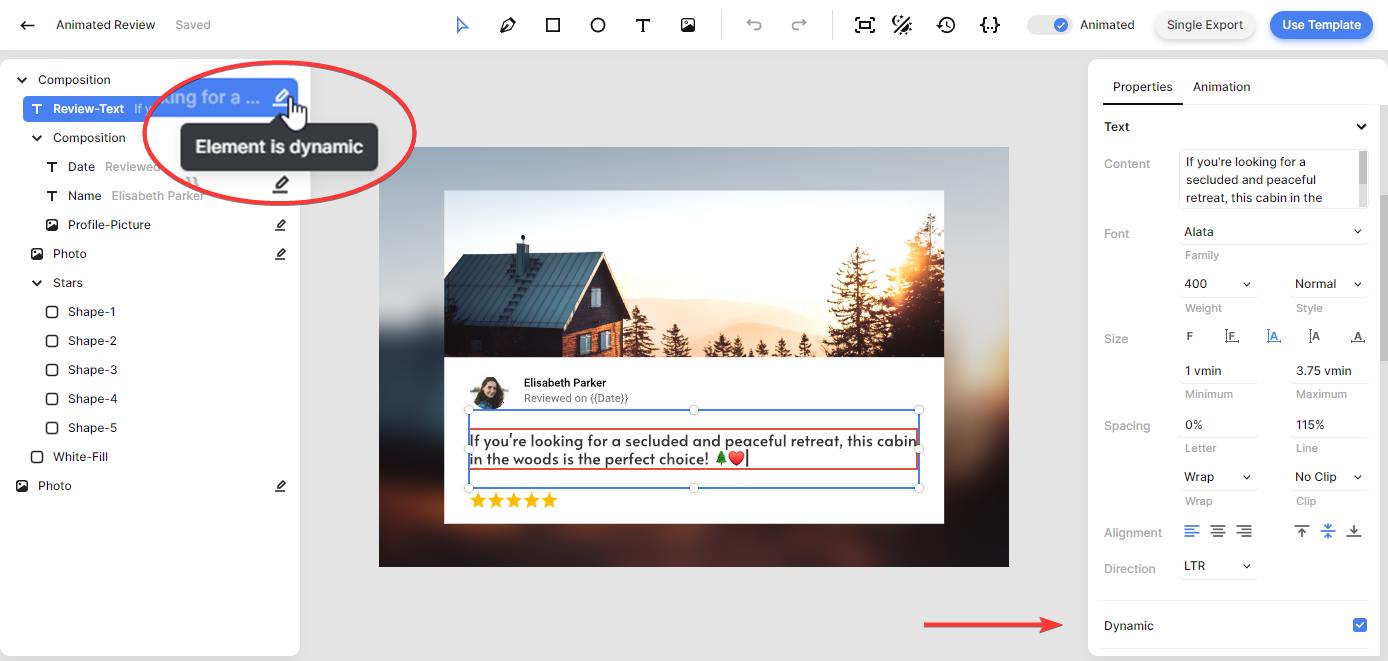
The first thing you'll notice is that this template generates a video. If you wish, you can easily convert it into an image template. To do this, select a specific moment in the video you want to use as an image design, such as 8 seconds. Then, in the properties panel on the right, set the template Format to PNG or JPEG:
Now, let's take a look at our design and how we can use it to automate Facebook posts. In the left side panel, you'll find the elements that make up our template. One important thing to know is that elements can be marked as dynamic. In our template, the Review-Text, Date, Name, Profile-Picture, and Photo elements are all dynamic. This means we can replace their content with different text and images using the automated Make scenario we're about to set up:
That's it for the template for now. We'll use it as it is, but you can customize it if you want. Feel free to make changes now or come back later to refine your design. If you'd like to learn more about how the editor works, check out this quick guide.
Let's proceed to Make to set up the automated workflow.
2. Trigger the automated workflow
A scenario always starts with a trigger, the event that initiates the automation. For this demonstration, I’ll use a simple trigger, but you can choose the app that best fits your needs, such as Airtable or Google Sheets. As long as it activates the scenario and provides the content for the visuals and a description for the Facebook post, you're good to go.
Log in to your Make account or sign up for free if you don't already have one.
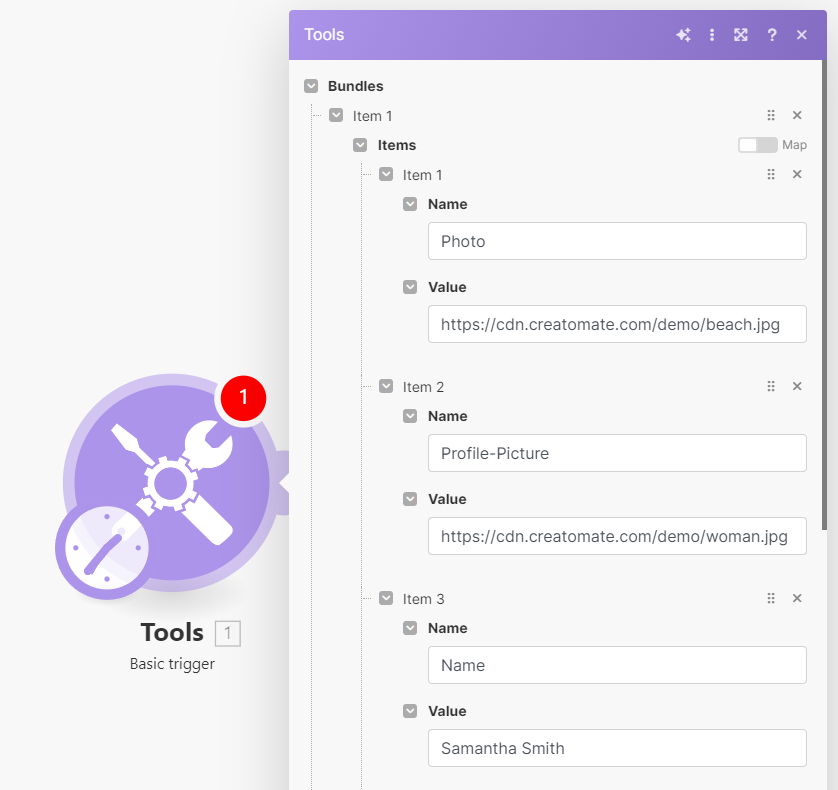
From your dashboard, click Create a new scenario. Then, search for and select the Tools app with the Basic trigger.
Let's add the following items:
- Photo -> https://cdn.creatomate.com/demo/beach.jpg
- Profile-Picture -> https://cdn.creatomate.com/demo/woman.jpg
- Name -> Samantha Smith
- Date -> August 5, 2024
- Review-Text -> Our stay at the oceanfront accommodation was spectacular. Waking up to the sound of the waves and enjoying the breathtaking views made our vacation unforgettable. We highly recommend it! ☀️👨👩👧👦
- Description -> Happy customer here!
When done, click OK:

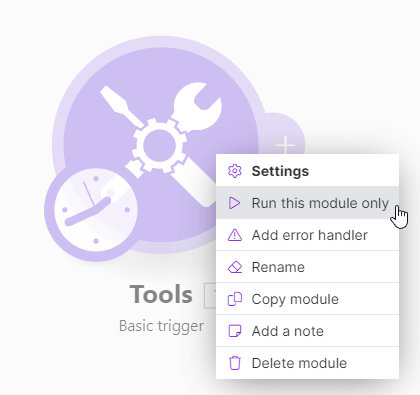
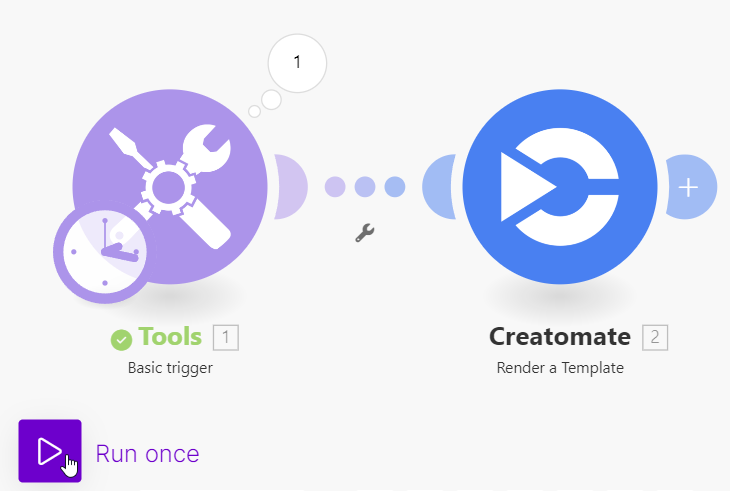
Next, right-click the module and select Run this module only:
We can now use this content to create Facebook posts.
3. Generate the video/image
In this step, we'll set up an action for Creatomate to create videos or images using the template from step 1 and the data from our trigger.
Click + to add the Creatomate app with the Render a Template action.
First, create a connection using your project's API key, which you can find under Project Settings in your Creatomate dashboard:
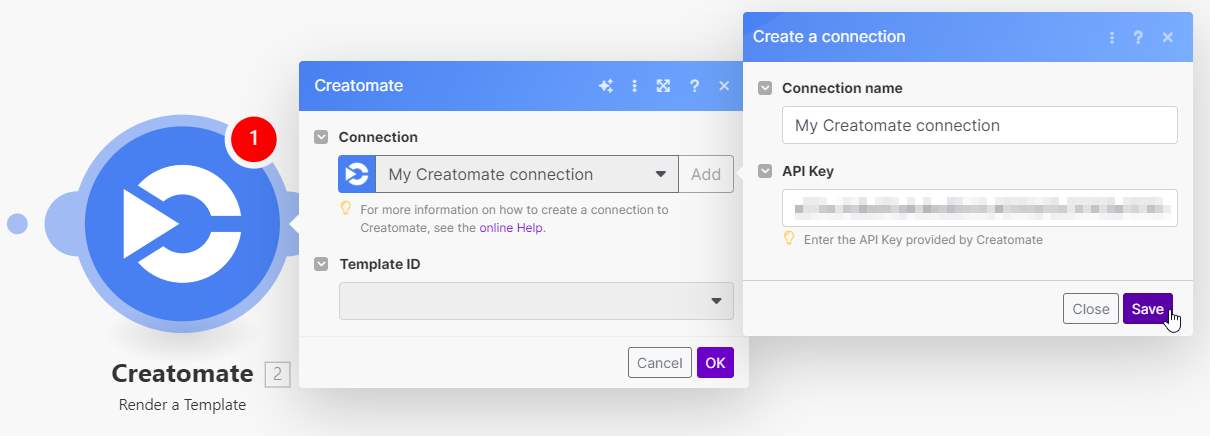
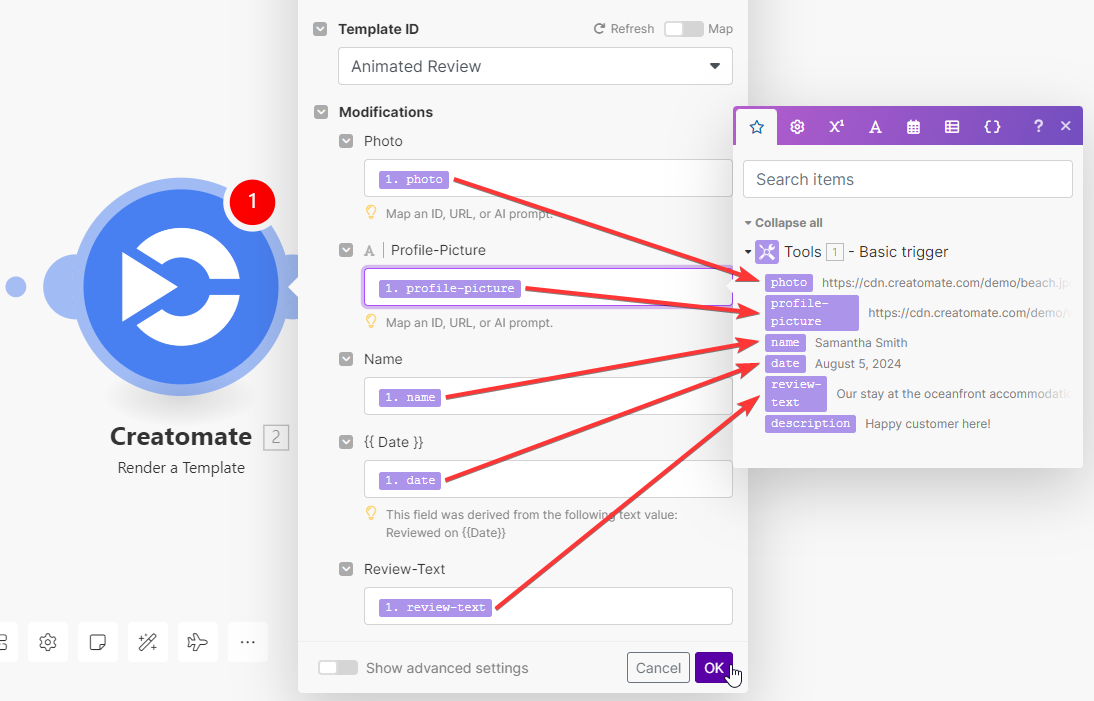
Then, choose the Animated Review template in the Template ID field. Make.com will now pull in the template's dynamic elements and list them under Modifications.
Let's connect our video content to the template as follows:
- Set Photo to Tools - Basic trigger -> photo
- Set Profile-Picture to Tools - Basic trigger -> profile-picture
- Set Name to Tools - Basic trigger -> name
- Set Date to Tools - Basic trigger -> date
- Set Review-Text to Tools - Basic trigger -> review-text
When done, click OK:
To test if Creatomate can generate a visual, click the Run once button in the bottom left corner:
Once the test is successful and the module turns green, you can view the visual by visiting the provided URL:
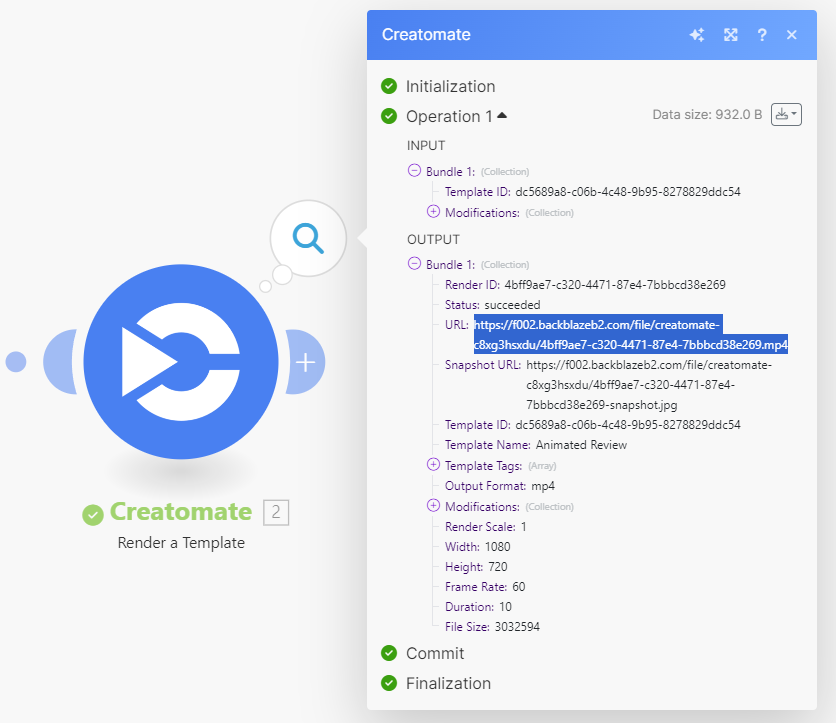
In the next step, we'll download the visual.
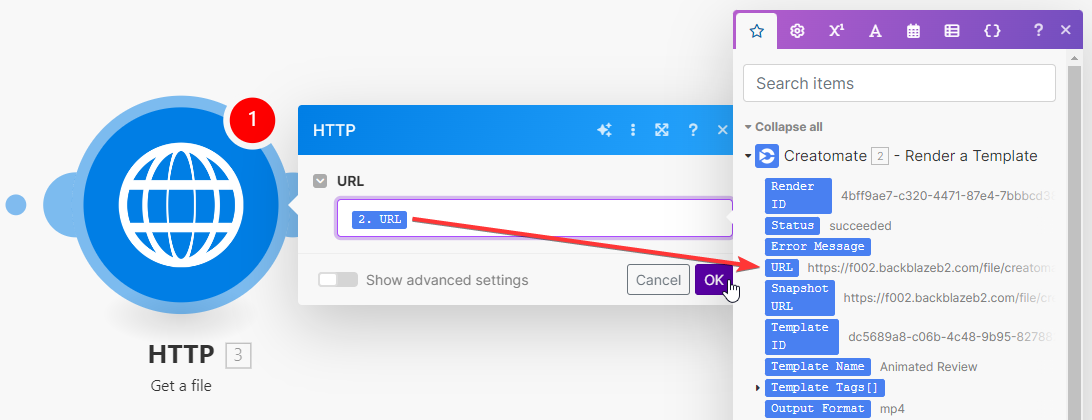
4. Download the visual
This step is simple but essential. The Facebook module we'll set up next needs the actual file, not just a URL to the image or video. Therefore, we'll set up an action to download it.
Add the HTTP app with the Get a file action.
In the URL field, select Creatomate - Render a Template -> URL. Then, click OK:
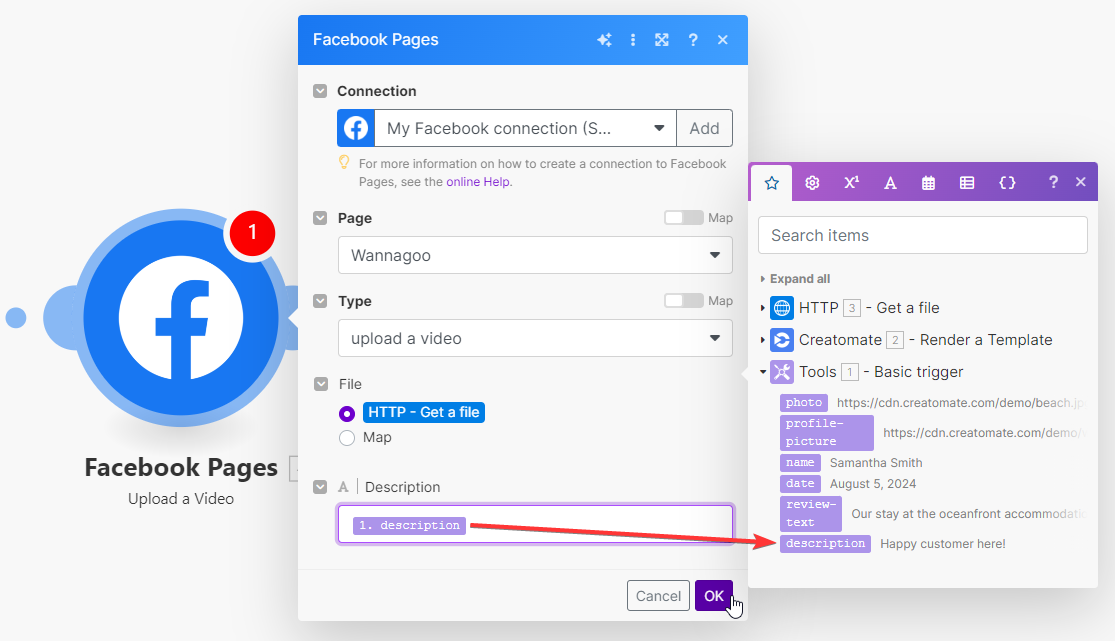
5. Post on Facebook
Finally, we'll post the visual on our Facebook page. Since we're working with videos in this tutorial, I'll show you how to upload a video. However, the steps for posting images are almost identical.
Add the Facebook Pages app with the Upload a Video (or Photo) action.
First, create a connection and select your Facebook page. Choose upload a video for the Type. The HTTP - Get a file option should be preselected. For the Description, select Tools - Basic trigger -> description. When done, click OK:
Now it's time to test the scenario. Click the Run once button again to run the entire workflow. If everything is set up correctly, a video (or image) should be posted on your Facebook page within a few minutes:
Tip: The HTTP module has a file size limit depending on your Make subscription. For example, on the free plan, you can process up to 5 MB, which is sufficient for images but may be limited for larger videos. However, the Facebook Pages - Upload a Video module includes the option to “download a video from URL”. This allows you to link directly to the URL from the Creatomate module, eliminating the need for the HTTP module.
Once you're happy with your workflow, toggle the ON/OFF button to activate your automation.
Next steps for Facebook automation
You've now learned the basics of automating Facebook posts with Make.com and Creatomate. The greatest thing about both tools is how flexible they are – you can totally tweak things to fit exactly what you need. For example, you can connect your favorite app to trigger the scenario and design videos or images that fit your use case.
But social media marketing doesn't end with Facebook. You can also use the same approach to automate YouTube Shorts, Instagram posts, and TikTok videos. And if you really want to up your game, think about including generative AI to create your visuals and posts. We've got a ton of step-by-step tutorials to guide you, whether you're using AI tools or not. Check out one of these tutorials next:
👉 How to Automatically Create YouTube Shorts using Make
👉 How to Automatically Create TikTok Videos using Make.com
👉 How to Automatically Create Instagram Posts using Make
👉 How to Automatically Add Subtitles to Videos using Make
👉 TikTok Automation: How to Create TikTok Videos using AI
👉 How to Automate YouTube Shorts with AI-Generated Videos
You might also like these tutorials


Start automating today
Start with a full-featured trial with 50 credits, no credit card required.
Get started for free →