How to Create Videos with AI Voice Overs using Make.com

In this no-code tutorial, you'll learn how to automatically generate AI voiceover videos using ElevenLabs, Creatomate's video rendering API, and Make.com.
Whether you're creating storytelling videos, instructional content, or personalized messages, a good voiceover can make all the difference. Recording your own voice might work for a few videos, but it becomes impractical when you need to create hundreds. Fortunately, there's a better option: AI-powered text-to-speech tools. In fact, the quality of AI-generated voiceovers has improved so much that it's hard to tell them apart from real human voices.
In this tutorial, I'll guide you through generating AI voiceovers with ElevenLabs and turning them into social media videos using Creatomate. We'll use Make.com, a no-code automation platform, to automate everything from video creation to social media posting.
We’ll create the video you see above, complete with animated subtitles. This is just one example – the possibilities are virtually limitless. Creatomate's online template editor lets you design videos for your own concepts. If you have a completely different video in mind, you can still follow along.
To keep things simple, we'll provide the texts for the voiceovers and the images used as backgrounds in our automated workflow. But with generative AI improving every day, you could also use tools like ChatGPT and Stability.ai to generate content. While we won't cover that here, check out this tutorial if you want to explore AI-generated content with video automation.
Prerequisites
Here are the tools we'll use:
- Make.com: to set up the automated workflow.
- Creatomate: to create a template and generate videos.
- ElevenLabs: to generate AI voiceovers.
- Any app for further processing: for example, Instagram for social media posting.
How to auto-generate voiceover videos using Make.com
To automate AI voiceover videos, we need a text-to-speech tool and a video generation platform. First, we’ll create an account with ElevenLabs, choose a voice for the voiceover, and obtain our API key. Next, we’ll set up a video template in Creatomate, which will serve as the design for all our videos.
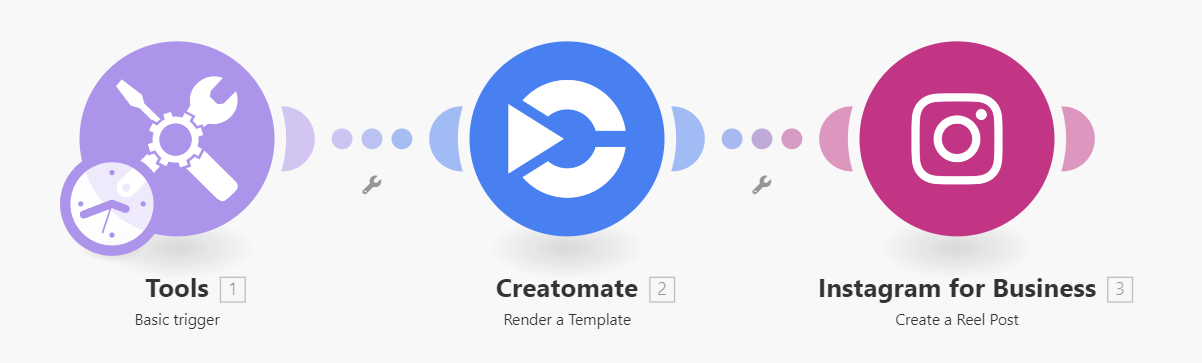
Once the template is ready, we’ll tie everything together using Make.com. Make supports nearly 3,000 app integrations, enabling you to create automations tailored to your needs. In this tutorial, we’ll take a straightforward approach: I’ll show you how to use a simple set of data as a trigger and post the generated voiceover video as an Instagram Reel.
Once you understand the concept, you can customize this workflow with any app that suits your needs.
Note: ElevenLabs integrates directly with Make.com, but we won’t use that integration here. Instead, we’ll connect ElevenLabs to Creatomate, which allows us to automatically generate animated, word-by-word captions for the voiceovers. This makes videos more engaging for social media audiences.
Let's get started!
1. Choose an AI voice and get your API key in ElevenLabs
There are many text-to-speech tools available, but ElevenLabs is one of the most advanced AI voice generators on the market. It produces high-quality audio that sounds like a natural human voice, complete with accents, emotions, styles, and more.
Another impressive feature of ElevenLabs is the variety of ways you can create AI voiceovers. For example, you can design custom voices or even clone your own voice.
To keep this tutorial simple, we'll use a voice from the voice library.
Sign up for ElevenLabs, or log in if you already have an account.
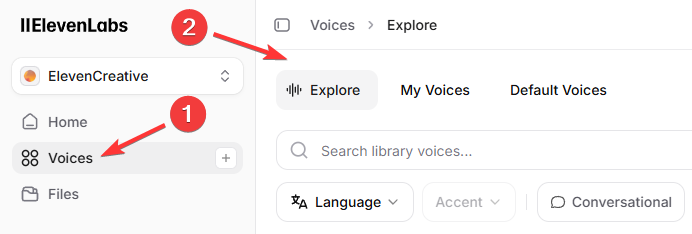
Navigate to the Voices page, then open the Explore tab:
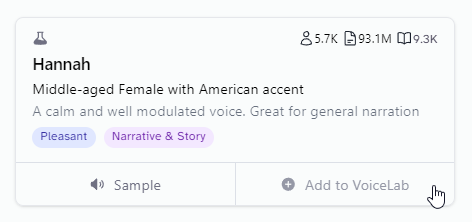
Here, you can browse the available voices and choose one for your AI voiceover. To add a voice to your account, click the + button:
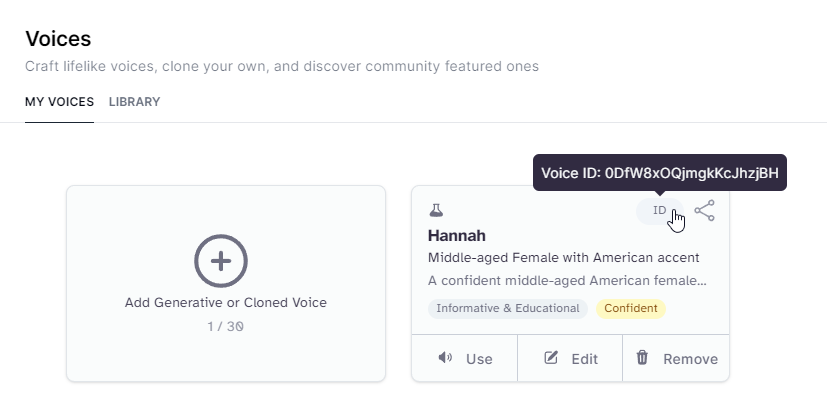
Go to the "My Voices" tab. You should now see the voice you just added. Click the three dots next to the voice and select Copy voice ID. Keep this ID handy – you'll need it in the next step:
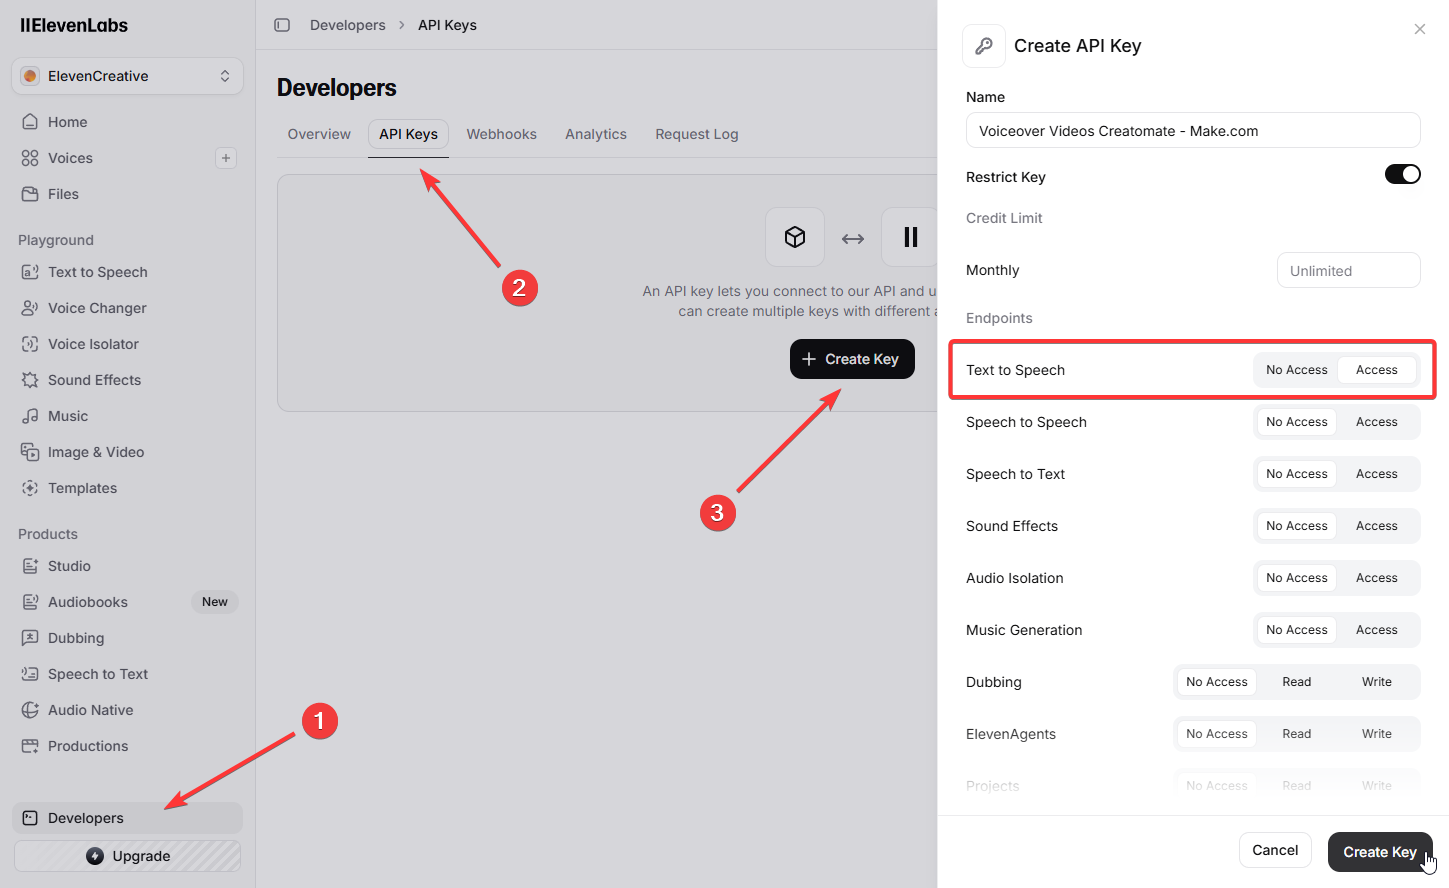
You'll also need your ElevenLabs API key. To create one, click Developers in the bottom-left corner and open the API Keys tab. Then click + Create Key and make sure Text to Speech access is enabled:
Now that your voice and API key are ready, let’s move on to Creatomate.
2. Create a video template in Creatomate
Log in to your Creatomate account, or create a free account if you don't have one yet.
First, connect your ElevenLabs account. Click ... in the left sidebar and choose Project Settings. In the Integrations section, enable ElevenLabs by toggling the switch. You'll then be prompted to enter your API key. Once you've entered it, click Confirm:
With this integration, Creatomate can access your ElevenLabs account to generate voiceovers for your videos. In the template we’ll set up next, you can customize the voiceovers.
Go to the Templates page and click New to open the template gallery. Navigate to the Voice Overs category and select the Short-Form Voice Over template. Choose a format such as 9:16 Vertical, then click Create Template to open it in the editor:
The video editor might seem intimidating at first, but it's actually easy to use.
Creatomate's video editor is specifically designed for video automation. While it shares similarities with traditional video editors, it also includes unique features. Instead of producing a single video, you create a reusable template that can generate hundreds of unique videos automatically. Every aspect of the video is customizable, including text, images, subtitles, and more. This provides you with a huge amount of freedom when it comes to video automation. Even the templates themselves are open source JSON, which can be manipulated or generated through automation.
Let's focus on our voiceover template. As you can see, there are 4 compositions, each corresponding to a scene in the video. Each composition includes a voiceover, subtitle, and image element. As you play with the template in the editor, you'll notice placeholders for the voiceover and subtitle elements. This is because the actual voiceovers and subtitles will be generated as part of our automated workflow. We'll see how that works later on.
The template is almost ready to use; the only thing left to do is specify the voice you want to use as a voiceover. I'll demonstrate this with the voiceover element in the first composition, you can then decide if you want to do the same for the other compositions too.
On the left side panel, click the Voiceover-1 element. Then, navigate to the properties panel on the right, and find the Audio property. This is where you can customize the voiceover. The Provider is already set to ElevenLabs. For the Model, you can choose from several text-to-speech models. In most cases, it's best to stick with the Multilingual v2 model, as it has great speech synthesizing and works with a lot of languages.
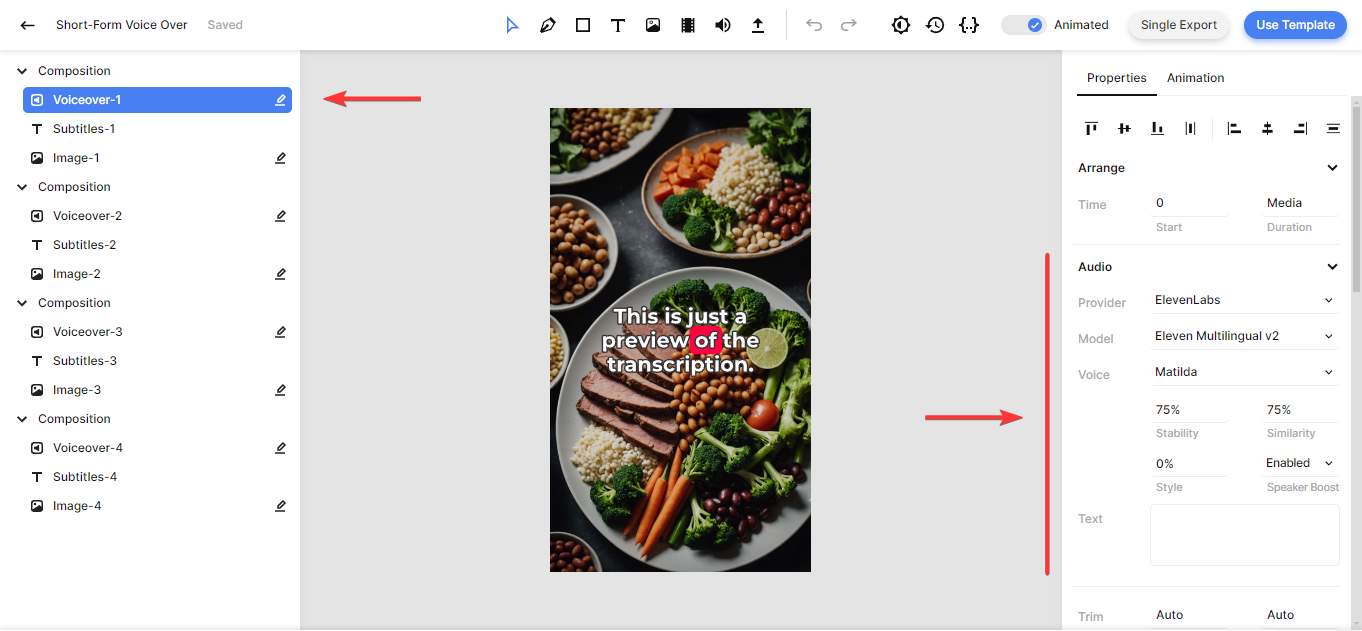
For the Voice setting, Matilda is selected by default. This is one of the premade voices provided by ElevenLabs. If you want to use a voice from the Voice Library, click Matilda, scroll up, select Custom Voice, and paste the Voice ID you copied in step 1. Then click OK:
You also can adjust the Stability, Similarity, Style, and Speaker Boost. These AI parameters fine-tune the voiceover. For instance, the Stability parameter controls the amount of emotion and randomness in the voice. I recommend leaving them the way they are unless there is a good reason for changing them; the default settings are perfect for most purposes. You can read more about each setting in ElevenLabs' Voice Settings documentation.
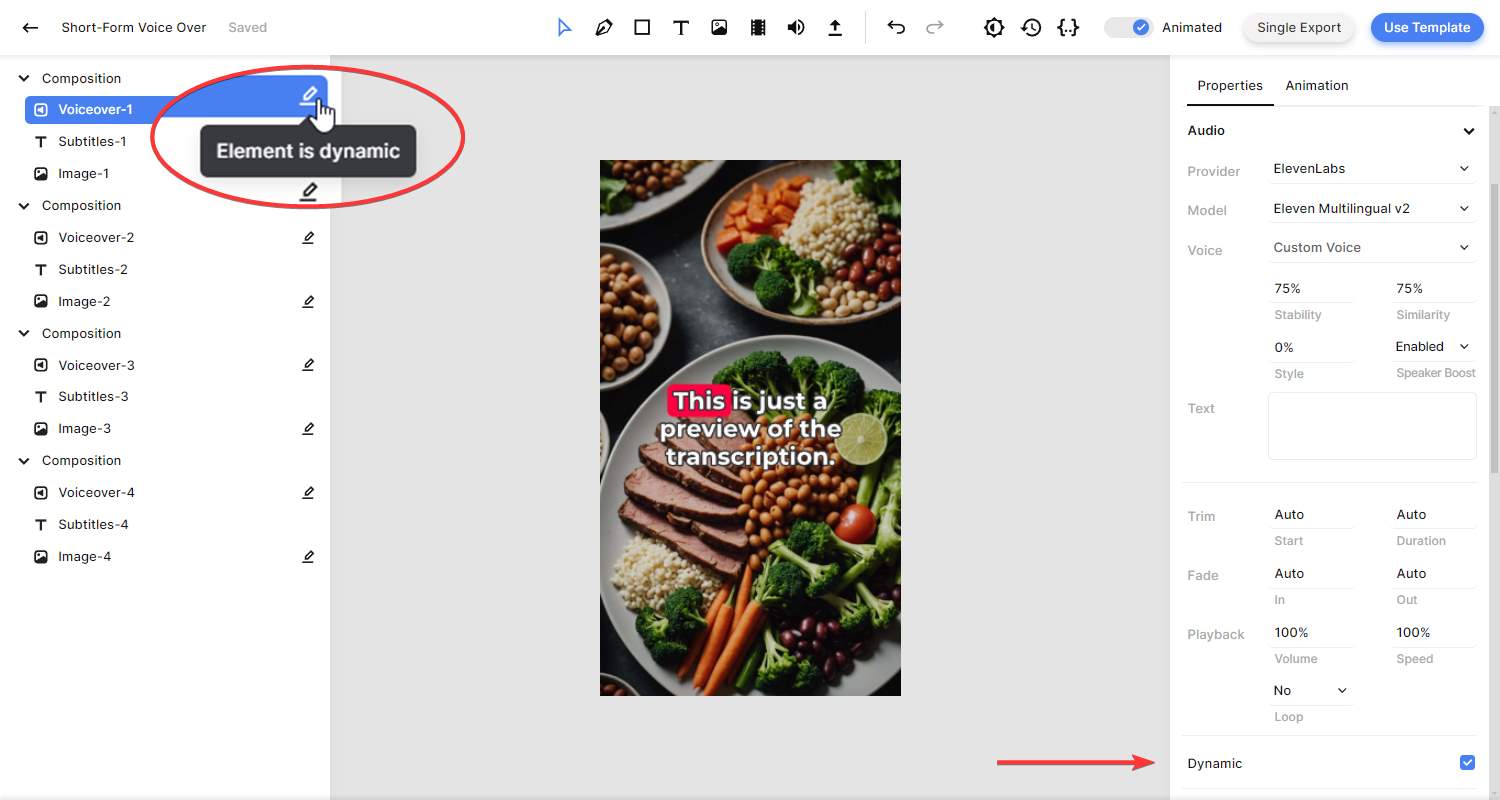
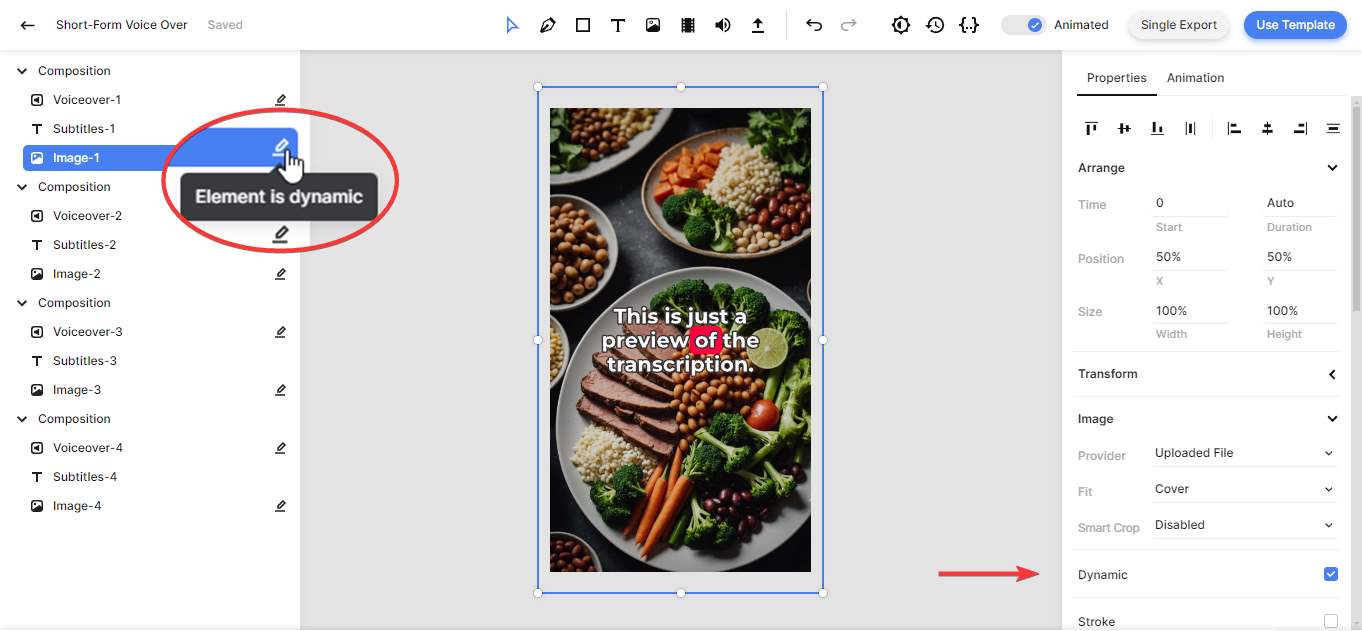
All voiceover elements, along with images, are marked as dynamic. This allows us to replace the content using our Make.com workflow. Any text you insert will be converted to speech using the specified voice.
To complete the template setup, let's also take a quick look at the subtitles. No changes are needed here, it's just to show you how it works.
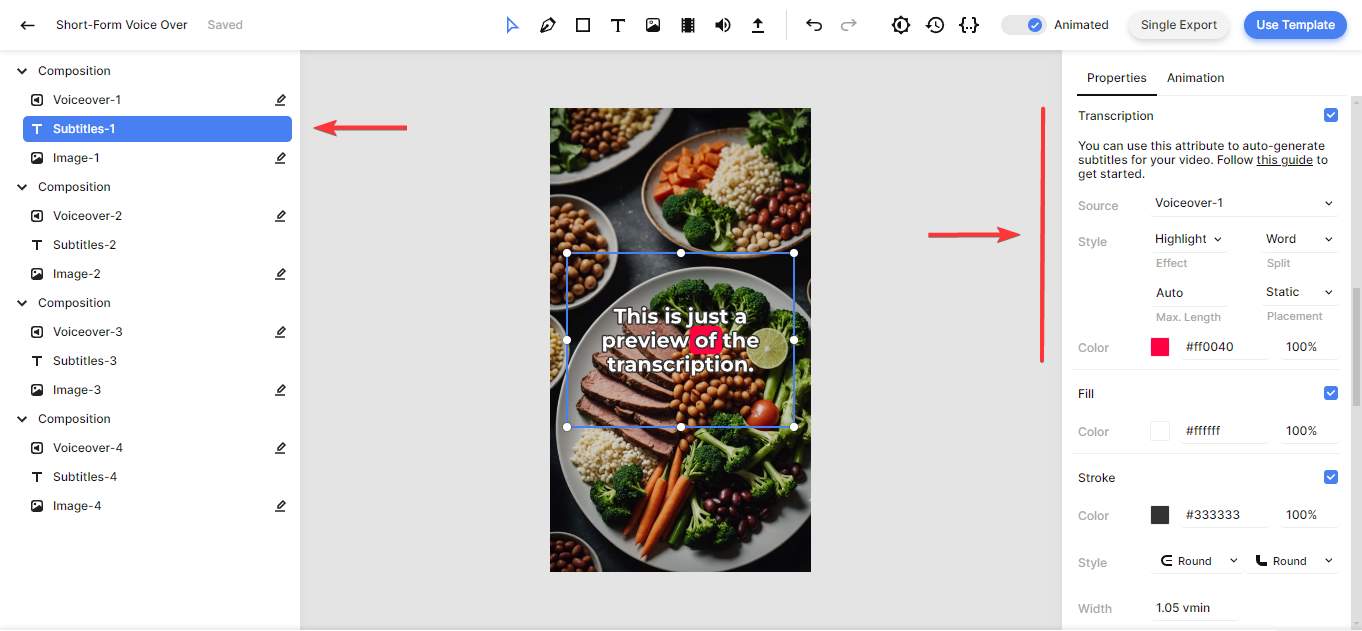
From the left side panel, click on the Subtitles-1 element. In the properties panel on the right, scroll down to the Transcription property. Here you can customize the subtitles. As you can see, the Source points to the Voiceover-1 element. This tells Creatomate to generate subtitles based on the voiceover audio. If you want to further customize the look and feel of the subtitles, you can use the Style, Color, Fill, and Stroke properties:
Before we get to Make.com, let's take a final look at the Image-1 element. Just like all the voiceover elements, it is a dynamic element. This means you'll be able to replace it with a different image for each video:
💡 AI tip: If you wish, you can also use generative AI to create images for your videos. By changing the Provider from "Uploaded File" to Stability, you can input a text prompt for the images instead of an image URL. For this to work, you need to create a connection with Stability first, just like we did with ElevenLabs. Here's a tutorial for using Stable Diffusion (via Stability). The tutorial uses Zapier, but the process works the same in Make.com.
With the template ready, we can move on to the next step: setting up the automation in Make.com.
3. Set up a trigger in Make.com
In this step, we’ll provide the automated workflow with the content for our videos: the voiceover text and the background images. Since we’ll also demonstrate posting the generated video as an Instagram Reel, we’ll include a caption – but this is optional.
You can use many apps for this purpose, but to keep it simple, we’ll use a basic trigger with sample data. In real-world workflows, you might use Airtable, Google Sheets, or any app that works best for your project.
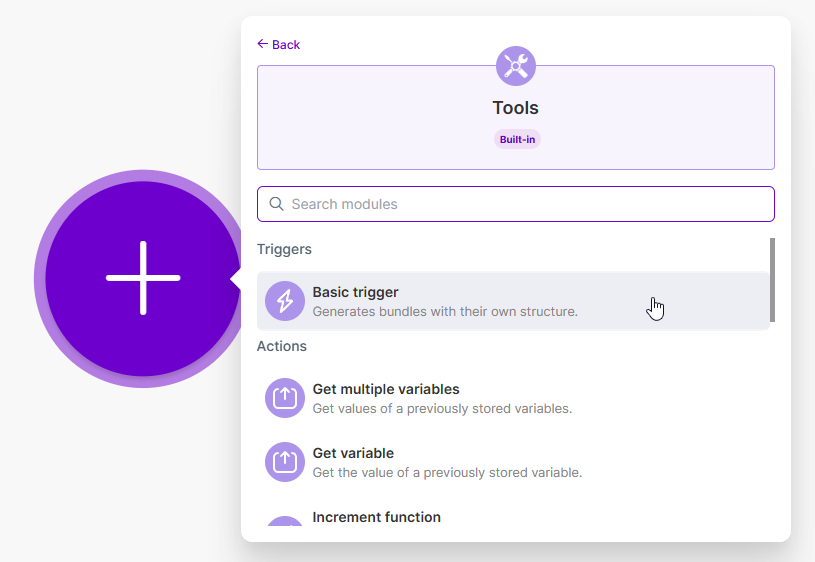
Sign in to your Make.com account and click Create a new scenario. Once in the scenario editor, click the big + button to add the Tools app with the Basic trigger:
Let's add the following items to your trigger:
- Image-1 -> https://cdn.creatomate.com/demo/better-sleep-1.jpg
- Text-1 -> The 3 Best Tips for Better Sleep
- Image-2 -> https://cdn.creatomate.com/demo/better-sleep-2.jpg
- Text-2 -> Create a Relaxing Bedtime Routine: Wind down before bed with activities like reading, taking a warm bath, or practicing relaxation techniques.
- Image-3 -> https://cdn.creatomate.com/demo/better-sleep-3.jpg
- Text-3 -> Maintain a Consistent Sleep Schedule: Go to bed and wake up at the same time every day, even on weekends, to regulate your body's internal clock.
- Image-4 -> https://cdn.creatomate.com/demo/better-sleep-4.jpg
- Text-4 -> Exercise Regularly: Stay active during the day, but avoid vigorous exercise close to bedtime for better sleep quality.
- Instagram Caption -> Struggling to sleep? 😴 We've got you covered! Check out our top tips for improving your sleep quality. Say goodbye to tossing and turning with these simple yet effective strategies. #SleepWell #SleepBetter #HealthyLiving
It should look like this:
Once you've added the sample data, click Save.
💡 AI tip: You can also use an AI text generator like ChatGPT to create a script for your videos. Instead of providing voiceover text with your trigger, simply specify a topic for your video. Then, add a ChatGPT module and give it instructions on what to generate. Besides the script, you can also ask it to create image prompts, which you can map to the image elements using Stability. Here's a tutorial to help you get started.
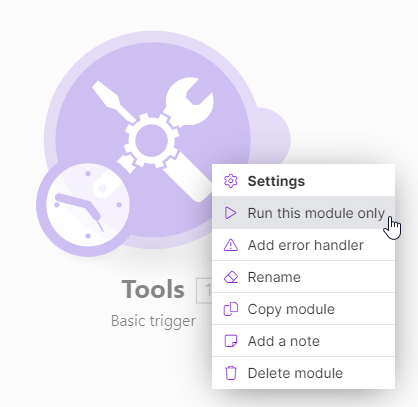
Then, right-click the module and click Run this module only:
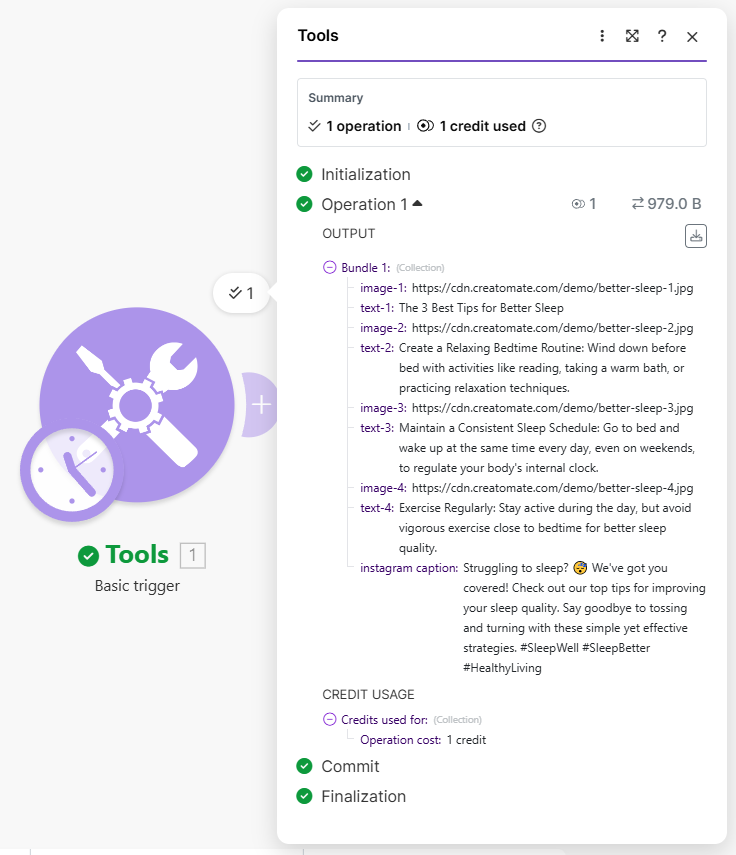
We can now use this data to set up the rest of our workflow:
Next up, generating the voiceover videos using Creatomate.
4. Generate the voiceover video
Click + to add another module. Choose the Creatomate app with the Render a Template action.
First, create a connection by entering your project's API key, which you can find under Project Settings in your Creatomate dashboard.
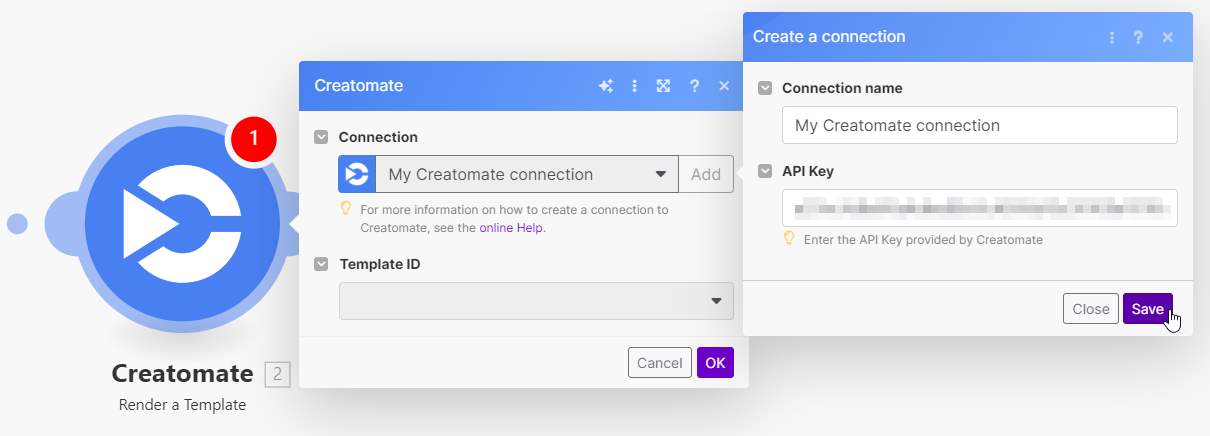
Then, choose your Short-Form Voice Over template in the Template ID field. Make.com will now pull in the template's dynamic elements and list them under Modifications.
Now, let's map the video script and the background images to our template as follows:
- Set Image-1 to Tools - Basic trigger -> image-1
- Set Voiceover-1 to Tools - Basic trigger -> text-1
- Set Image-2 to Tools - Basic trigger -> image-2
- Set Voiceover-2 to Tools - Basic trigger -> text-2
- Set Image-3 to Tools - Basic trigger -> image-3
- Set Voiceover-3 to Tools - Basic trigger -> text-3
- Set Image-4 to Tools - Basic trigger -> image-4
- Set Voiceover-4 to Tools - Basic trigger -> text-4
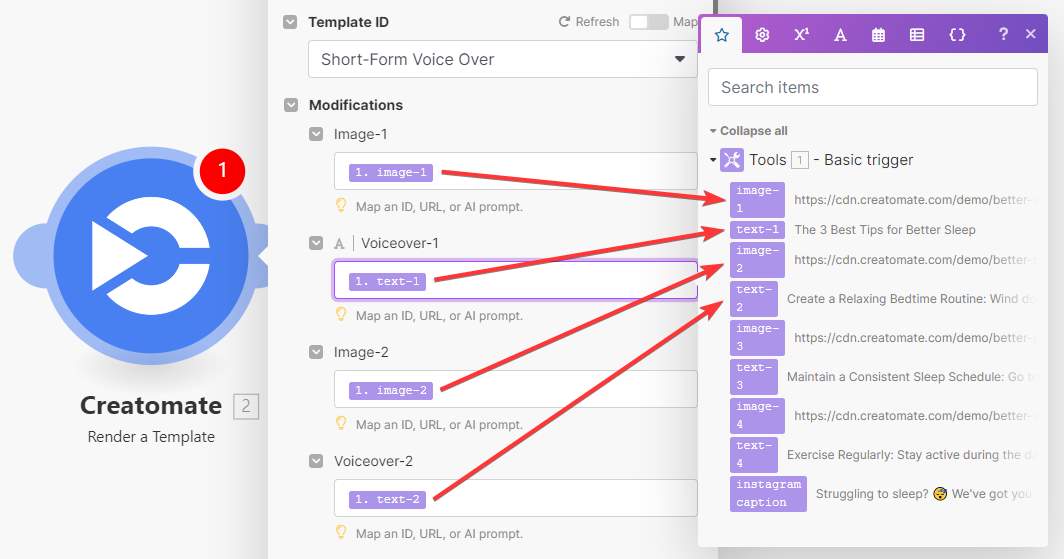
When done, click Save.
Click the Run once button to test if Creatomate can generate the video:
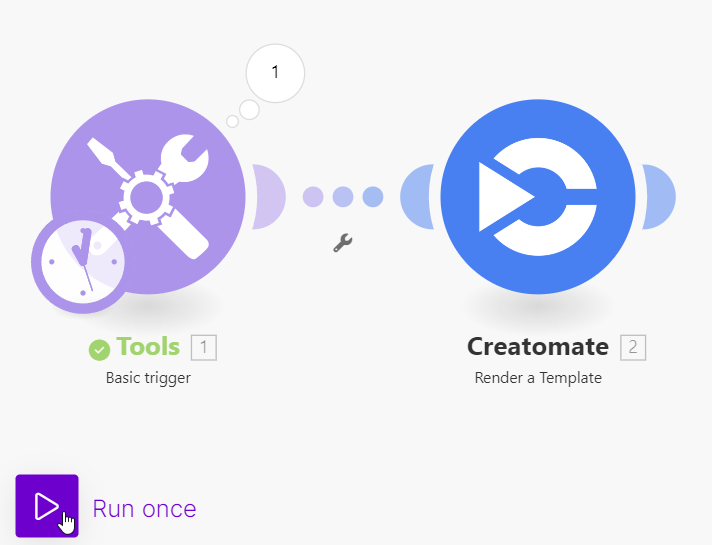
Creatomate now sends a request to ElevenLabs to generate voiceovers based on our text inputs. Next, it transcribes the files and creates animated captions. The system also inserts the images into the template. This process might take a minute or two to complete.
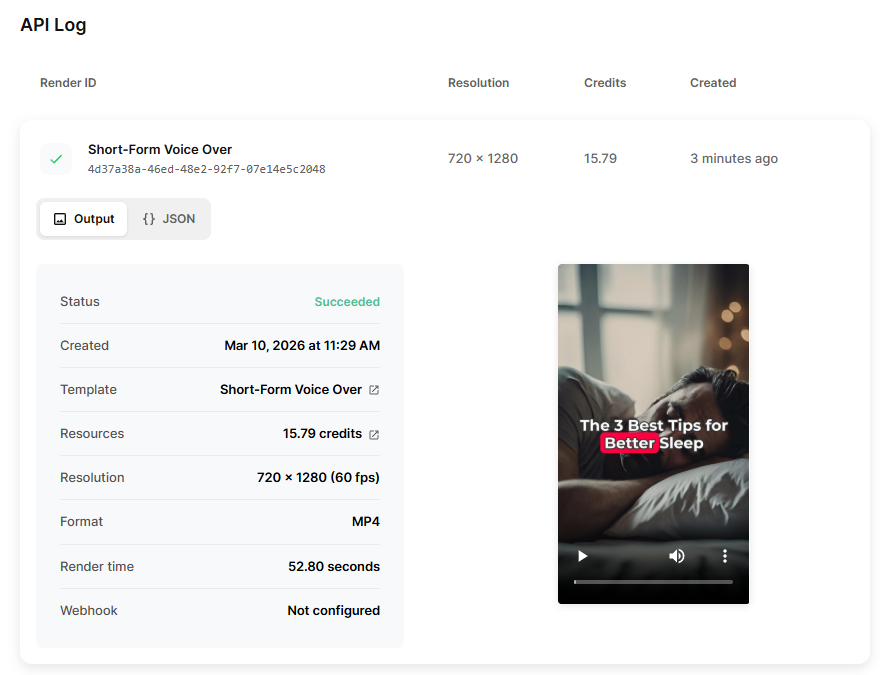
Once the test succeeds, the module turns green. You can preview your video by clicking the white bubble and visiting the provided URL:
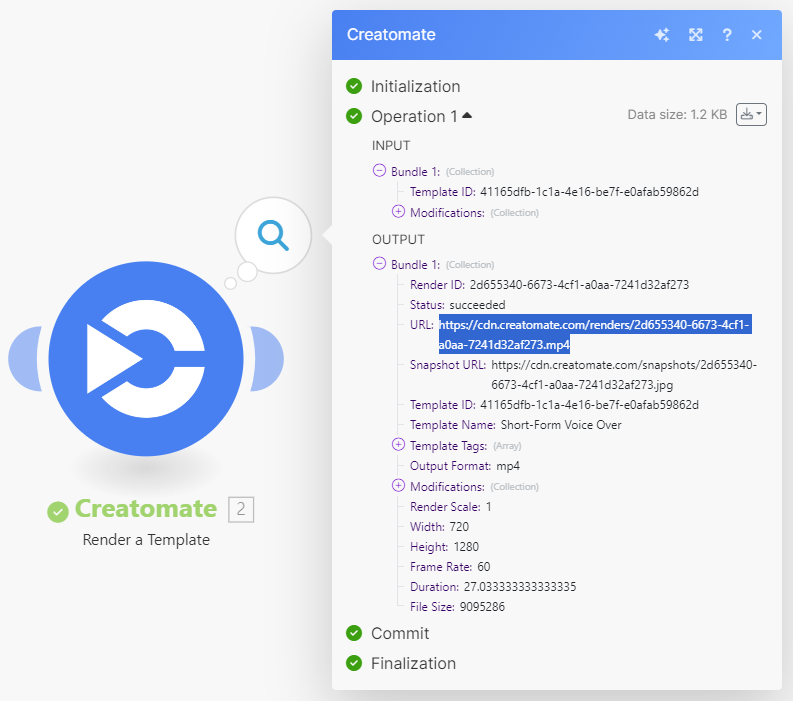
Tip: On the API Log page in your Creatomate dashboard, you can monitor all API calls. If something goes wrong with a render, this is the place to check. You’ll see error messages with details and suggestions for fixing the issue.
With your video successfully generated, we can now move on to the last step.
5. Post the video on social media
By now, we have successfully generated a voiceover video. You can use it however you like. As an example, I'll show how to share it as an Instagram Reel. But feel free to use any app that works for you. If you need some help, you can check out these tutorials on posting videos to Facebook, uploading them as YouTube Shorts, or sending them by email for posting on TikTok.
Note: Certain app integrations in Make, like "Facebook Pages", take a file as input, whereas others, such as "Instagram for Business", expect a URL. If your chosen app requires a file, you’ll need to add a module to fetch the file first. Check out this tutorial as a reference (step 4).
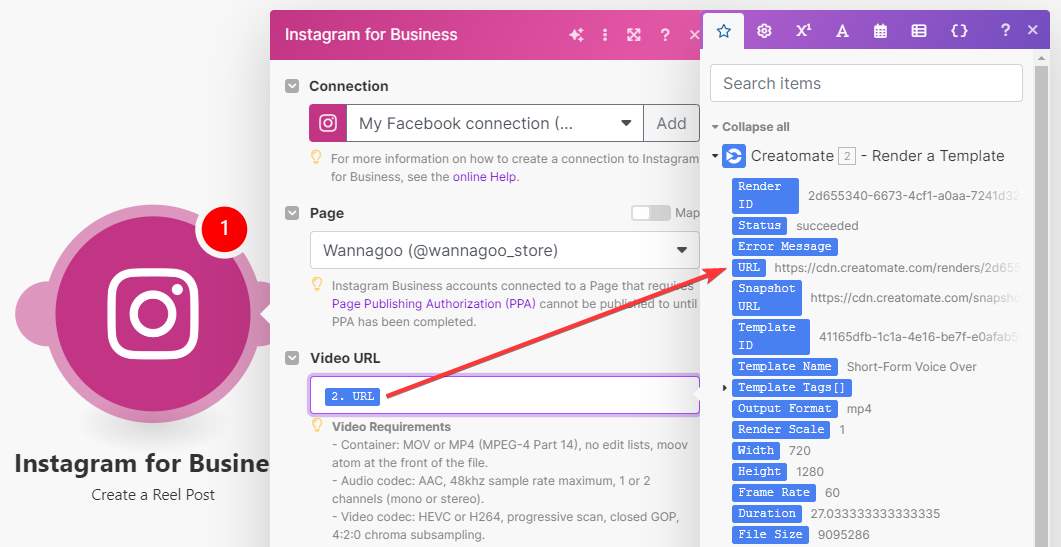
Add the Instagram for Business app with the Create a Reel Post action to your scenario.
Choose your account or create a connection, then pick your page. In the Video URL field, select Creatomate - Render a Template -> URL:
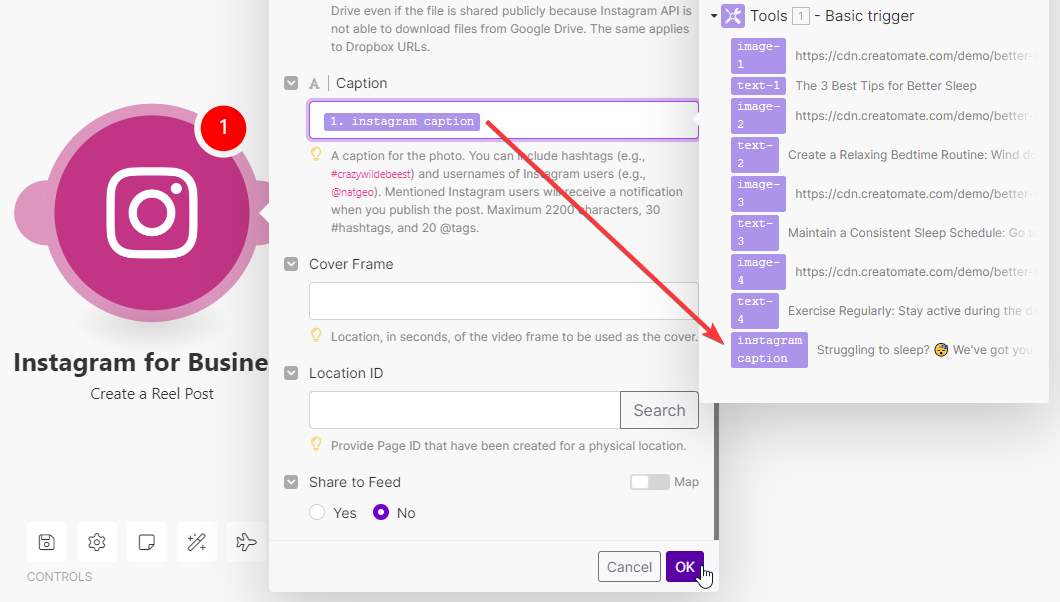
Finally, select Tools - Basic trigger -> instagram caption in the Caption field. Adjust the other settings to your preference. When you're done, click Save:
Everything is set up correctly so the video, complete with voiceovers and subtitles, should appear on your Instagram account.
Ready for a test run? Let's click Run once one more time. This will execute the entire workflow again. Once you confirm that the Instagram module has run successfully, go to your channel to check if your Reel has been posted:
Once you're happy with your workflow, just activate your automation.
What's next for video automation with Make.com
That's it! You now know how to automatically generate videos with voiceovers and subtitles using Make.com.
And this is just the beginning – video automation has a lot more to offer. Creatomate can help you create all kinds of social media and marketing videos, with or without AI.
We’ve put together a collection of tutorials to help you explore even more possibilities. You can find them all on our blog page, or jump straight into some of our most popular guides below:
👉 How to Automatically Create YouTube Shorts using Make
👉 How to Automatically Create TikTok Videos using Make
👉 How to Automatically Create Instagram Posts using Make
👉 Create Videos with AI Voiceovers, Subtitles, and Visuals using Make
FAQs
How do I connect ElevenLabs to Make.com?
ElevenLabs offers a native Make.com integration that allows you to generate AI voiceovers using their text-to-speech API. However, if you want to add voiceovers directly to automated videos, there is an easier approach.
Instead of connecting ElevenLabs directly to Make.com, you can connect your ElevenLabs account to Creatomate. Creatomate has a built-in ElevenLabs integration that automatically generates the voiceover audio during the video creation process.
This setup also makes it possible to generate subtitles automatically, since the subtitles can be linked directly to the voiceover element in your video template.
Connecting ElevenLabs to Creatomate is simple. Just enter your ElevenLabs API key in the Project Settings of your Creatomate project. Once connected, you can configure the voice and voiceover settings directly in your template.
Step 2 of this tutorial explains exactly how to set this up.
What is the best AI voice generator for Make.com?
There are several text-to-speech APIs available, but ElevenLabs is widely considered one of the most advanced AI voice generators.
It produces highly realistic voices with natural accents, emotions, and speaking styles, making it ideal for automated videos, narrations, and social media content.
ElevenLabs also works particularly well with Creatomate, which offers a native integration. This makes it easy to generate AI voiceover videos with animated subtitles as part of a Make.com automation workflow.
Can I add automatic subtitles to AI voiceover videos in Make.com?
Yes. Creatomate includes an automatic transcription feature that can generate subtitles from AI voiceovers.
When a voiceover is generated using ElevenLabs, Creatomate can automatically transcribe the audio and create subtitles that are synced with the spoken dialogue.
You can fully customize the style, color, positioning, and animation of the subtitles in the Creatomate template editor. This allows you to create professional-looking AI voiceover videos with dynamic subtitles that match your brand.
You might also like these tutorials


Start automating today
Start with a full-featured trial with 50 credits, no credit card required.
Get started for free →