Auto-Generate News Summary Videos using AI and Make.com

In this tutorial, you'll learn how to automate the creation of daily news videos for social media from written articles (RSS feed items) using ChatGPT, Make, and Creatomate.
News, publishing, and other content websites are typically built around written content. But with more people spending time on social media, there's a huge opportunity to reach a wider audience: by sharing short news videos on platforms like YouTube, TikTok, and Instagram.
In this tutorial, I'll show you how to build a Make.com scenario that automatically creates a daily news summary video and posts it to social media. We'll use ChatGPT to review the titles and summaries of today's RSS feed items, then have it pick the three most interesting, important, or engaging ones for our video.
Our goal is to create videos like this, complete with AI voiceovers and animated subtitles:
Have a different type of video in mind? No problem! Creatomates comes with an online template editor that lets you design videos exactly the way you want. You can also customize the voiceovers and subtitles to suit your preferred style.
Prerequisites
These are the tools we'll use:
- Creatomate: to create a design and generate news videos;
- ElevenLabs: to generate AI voiceovers;
- ChatGPT: to select the news items for the videos;
- an RSS feed: to get the latest news updates;
- a social media account (Instagram, YouTube, or TikTok): to post the videos;
- Make.com: to build the automated workflow.
Tip: If your RSS feed publishes fewer than three articles per day, you wouldn't have enough RSS items for a summary video. However, you can still create a single video per RSS item. I've written a step-by-step tutorial on how to set this up in Zapier, and the same process can easily be applied to Make.com.
How to automate daily news summary videos
First, we'll set up an ElevenLabs account, choose a voice for the voiceover (optional), and create an API key. To use ChatGPT, we'll need an OpenAI account, along with an API key and a few dollars in credits.
Next, we'll head to Creatomate, where we'll create a video template. This design will serve as the foundation for all our news summary videos.
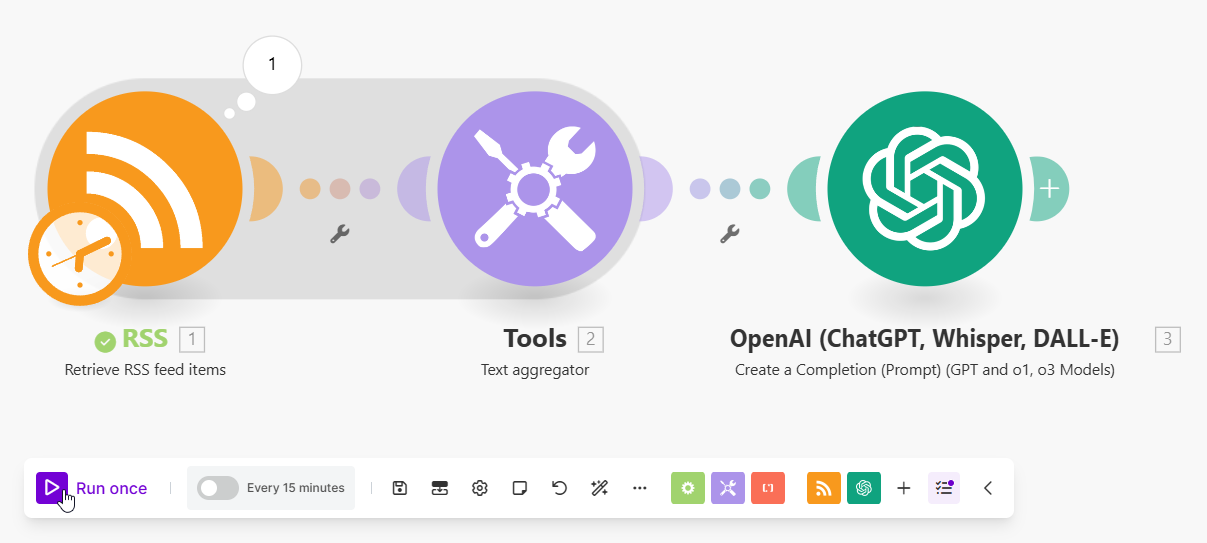
After that, we'll move on to Make.com. We'll start by setting up a module to retrieve items from a specific RSS feed. To convert this data into a format ChatGPT can understand, we'll add a text aggregator module. ChatGPT will then select three news items and generate a caption for social media. Creatomate will insert the news items into the template, creating a video with AI voiceovers, subtitles, and the article's image. The news summary video can then be posted on social media, such as Instagram. Finally, we'll schedule the scenario to run at a time that works best for us. This is what the scenario looks like:

Let's dive in!
1. Set up ElevenLabs for AI voiceovers
In this step, you can choose a voice for the voiceovers, but it's entirely optional. You can also stick with the default voice from the template or select one later. However, we do need to generate an API key to connect ElevenLabs with Creatomate in step 3.
Go to ElevenLabs.io and sign up for a free account, or sign in if you already have one. You'll receive 10,000 free credits to start.
ElevenLabs provides several options for creating AI voiceovers. To keep things simple, I'll show you how to use a voice from their library. But if you prefer, you can also create a custom voice or even clone your own.
Let's click Voices in your sidebar, then go to Library:

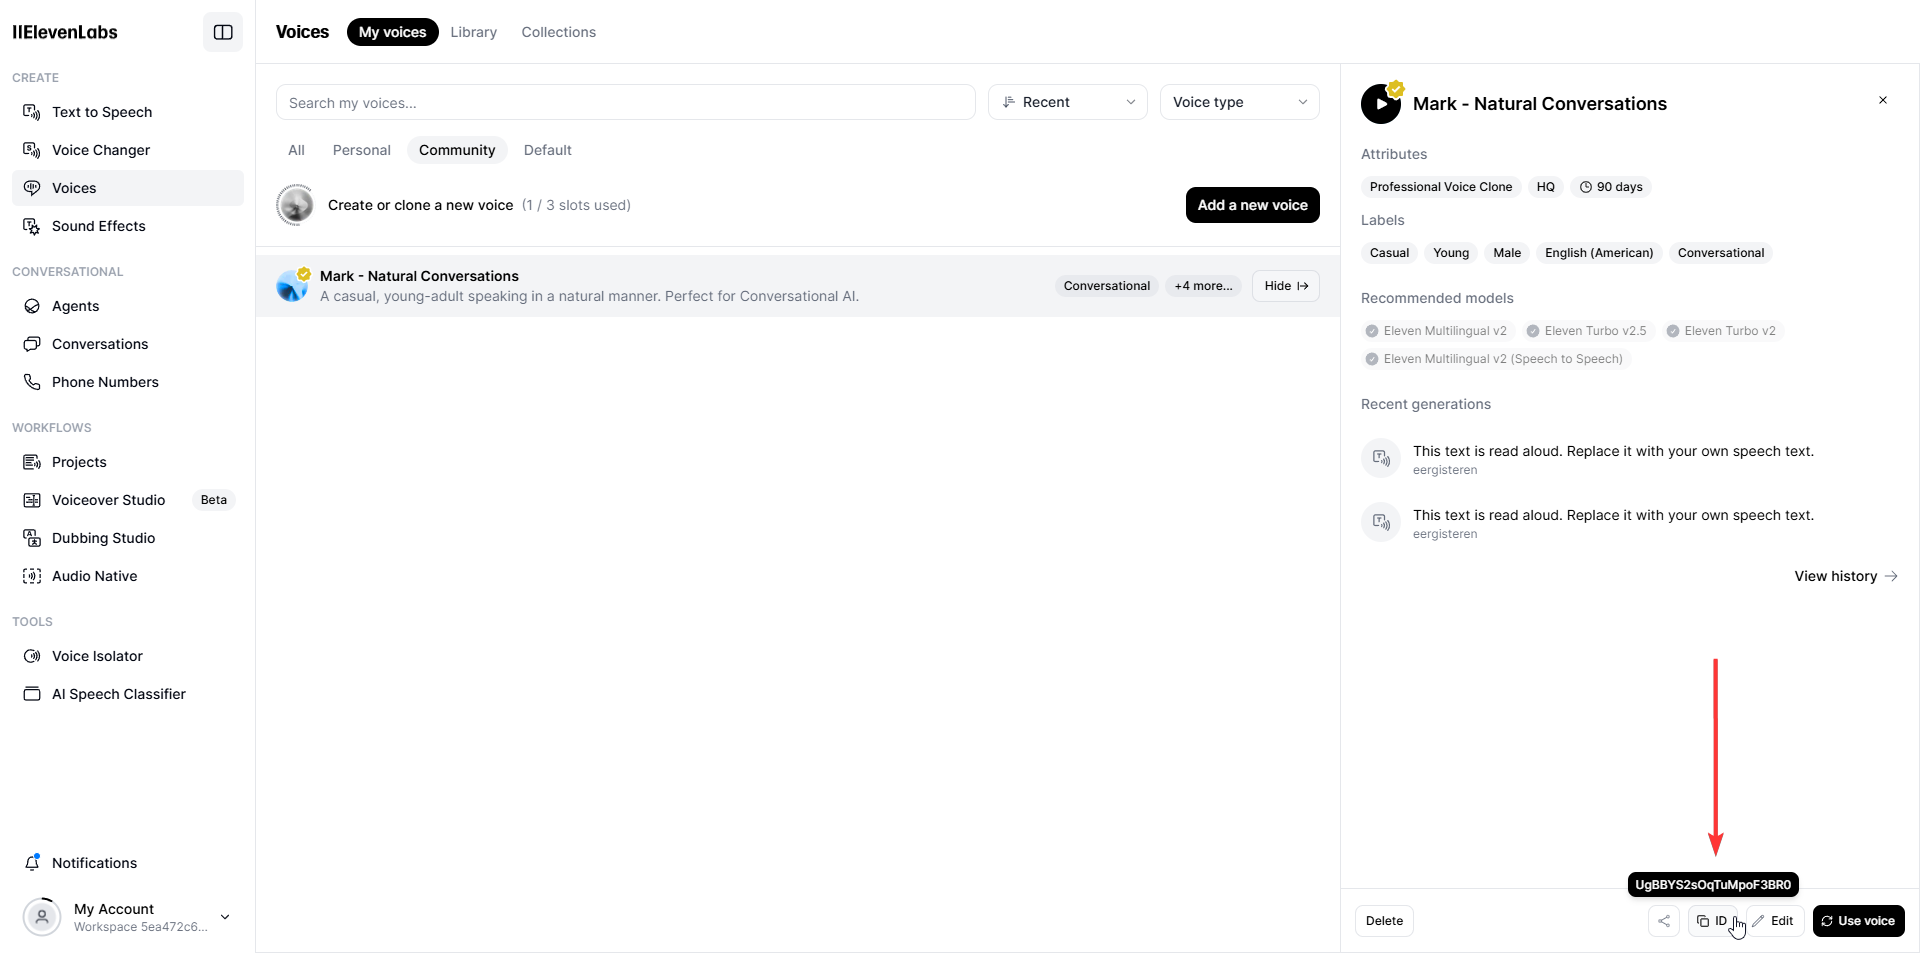
From the Voice Library, select a voice for your voiceover, then click Add:
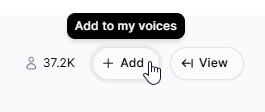
To use this voice in your videos, you'll need its unique ID. Go to the "My Voices" page and open the Community tab to find the voice you added. To copy the voice ID, click View, then click the ID button. You don't need to do this right now – I just want you to know where to find it when needed. (Click the screenshot to view it in full screen).
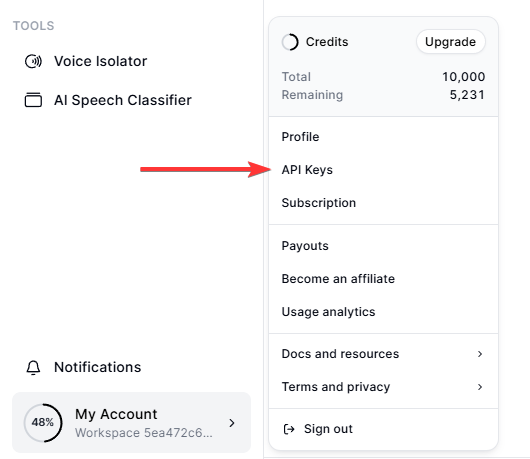
One final step in ElevenLabs before moving forward: you'll need an API key to connect with Creatomate. To generate one, click My Account in the bottom left corner, then select API Keys:
Keep it safe and secure. You'll need it soon.
2. Set up an OpenAI account for ChatGPT
We'll use ChatGPT to select news items later in this tutorial (in step 6). For now, let's prepare our OpenAI account and get the API key for when we need it.
Create a free OpenAI account or sign in if you already have one. Then, go to the API section:

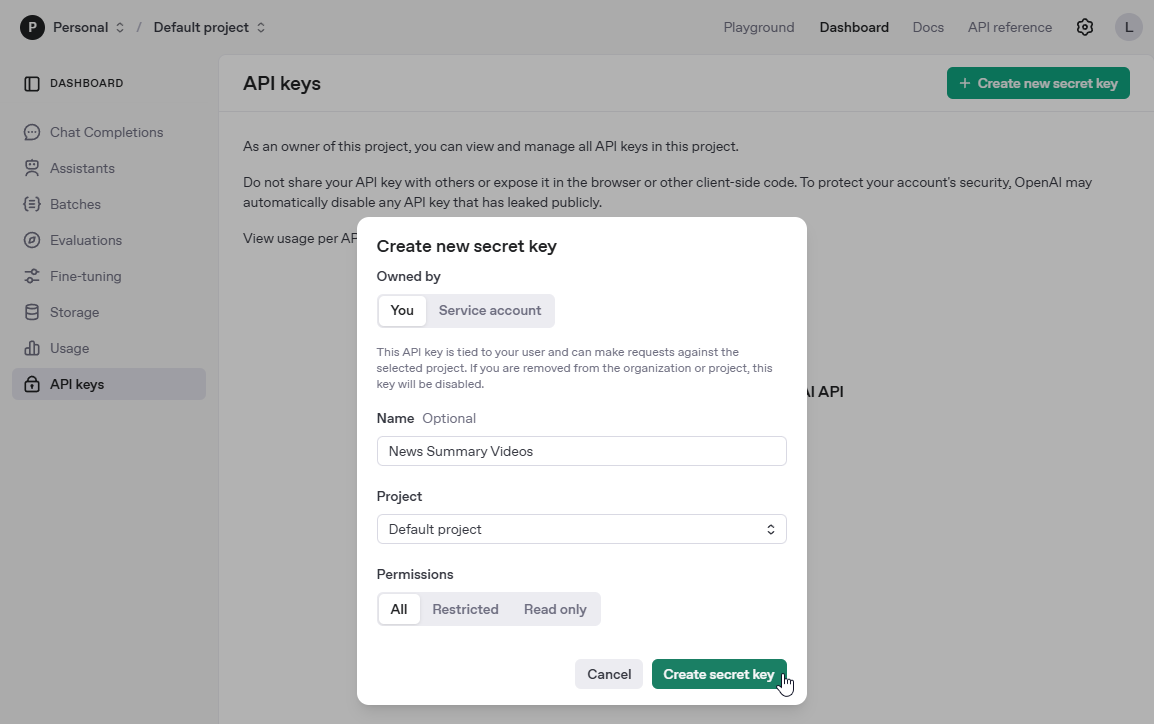
Next, go to your dashboard and click API keys in the left side menu. Then, click Create new secret key, provide a name, and click Create secret key:
Keep it in a safe and secure place. You'll need it shortly.
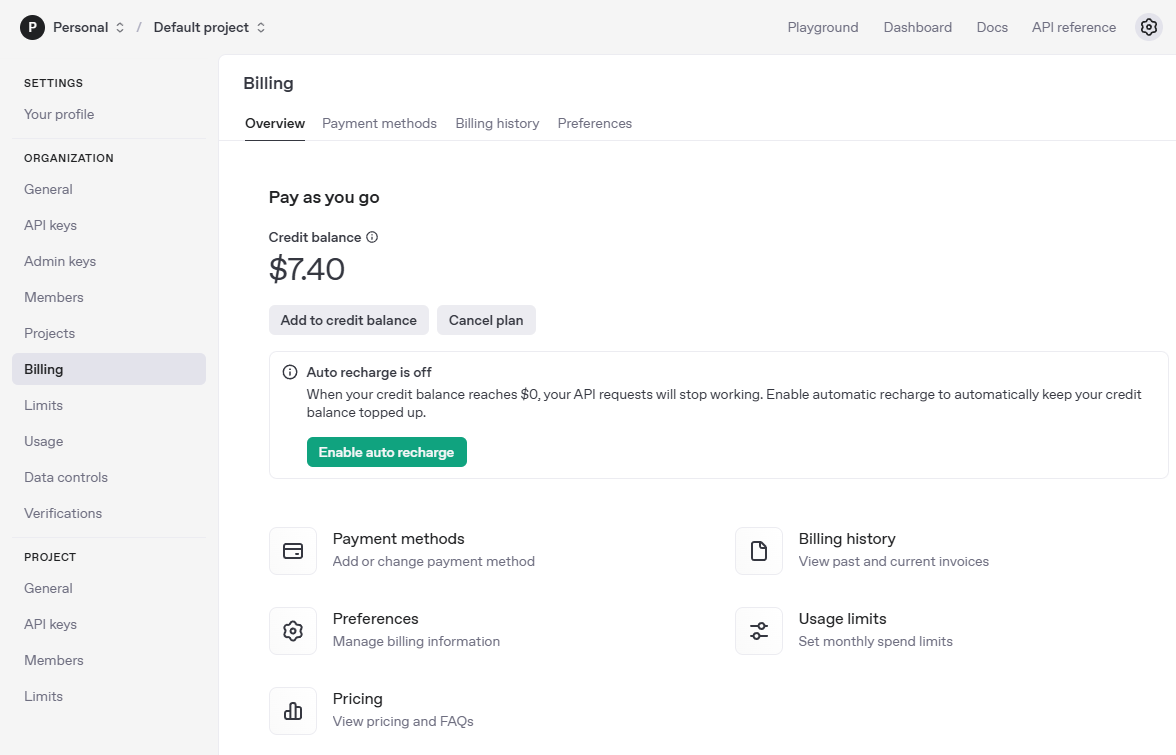
To use ChatGPT on Make.com, you'll need to purchase OpenAI credits. You can begin with a small amount, such as $5, for example. Simply go to the Billing page to add some credits to your balance:
We've completed the setup with ElevenLabs and OpenAI. Now, let's move on to Creatomate.
3. Create a news video template in Creatomate
Log in to your Creatomate account or create a free account if you don't already have one.
Before creating our news summary template, we first need to connect our ElevenLabs account. To do this, click ..., then choose Project Settings. Under Integration, toggle the switch for ElevenLabs, paste your API key, and click Confirm:
With this integration, Creatomate can send requests to your ElevenLabs account to generate voiceovers for your videos.
Now, let's create a video template. Go to the Templates page and click New to open the template gallery. If you have a custom design in mind, you can create one from scratch. For this tutorial, head to the Voice Overs category and select the News Summary template. Choose the 9:16 Vertical size, then click Create Template to open it in the editor:
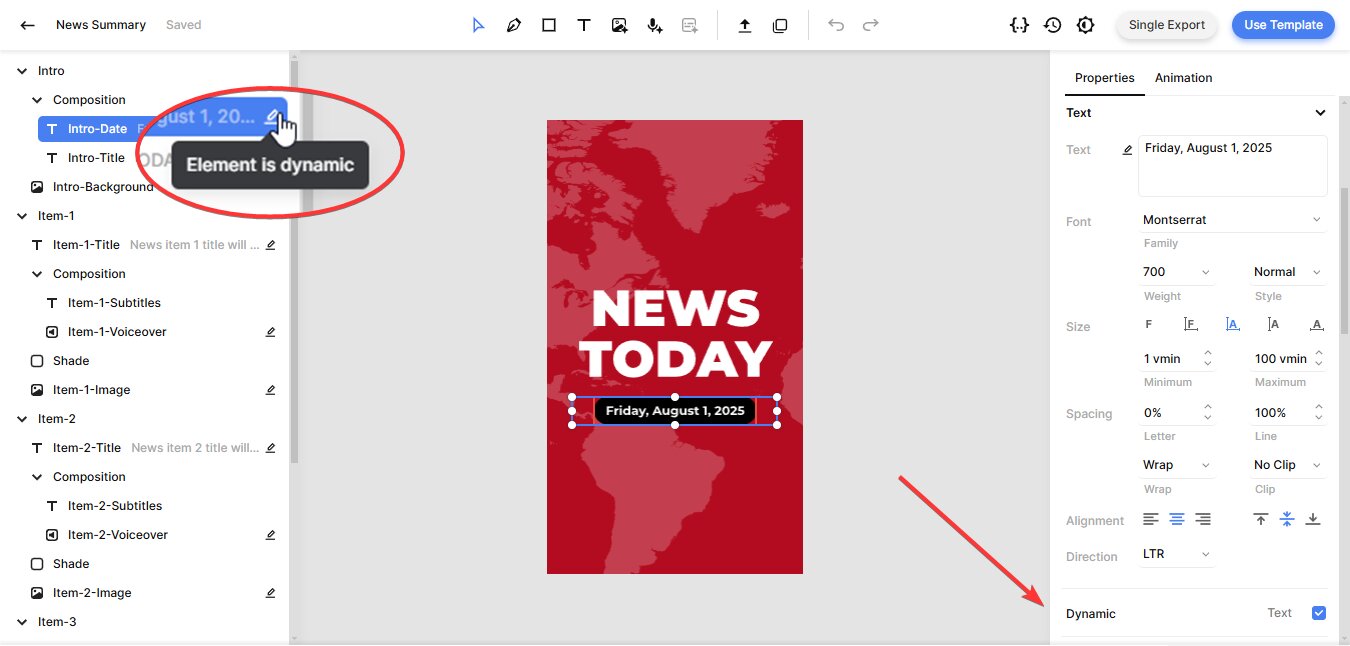
Let's look at our video design and see how it fits into our automation plans. In the left side panel, you'll find the elements that make up our template. The first thing to note is that elements can be marked as dynamic. In our template, the Intro-Date, along with the titles, voiceovers, and images for the three news items are dynamic. This means we can automatically insert new content to generate unique videos:
When you play with the template in the editor, you'll notice that there are no voiceovers yet, and the subtitles are still placeholders. This is because the actual content will be generated once we input data using our Make.com scenario. Don't worry if you don't get it right away; it'll all become clear soon.
The template is ready to use as it is, so no changes are needed. However, if you'd like, you can customize the voiceovers and subtitles in any style you prefer. This part is optional, and for those interested, I'll show you how.
Select the Item-1-Voiceover, and in the right-hand panel, find the Audio property. The Provider is already set to ElevenLabs. For the Model, it's best to stick with Eleven Multilingual v2, as it offers excellent speech synthesis and supports multiple languages:
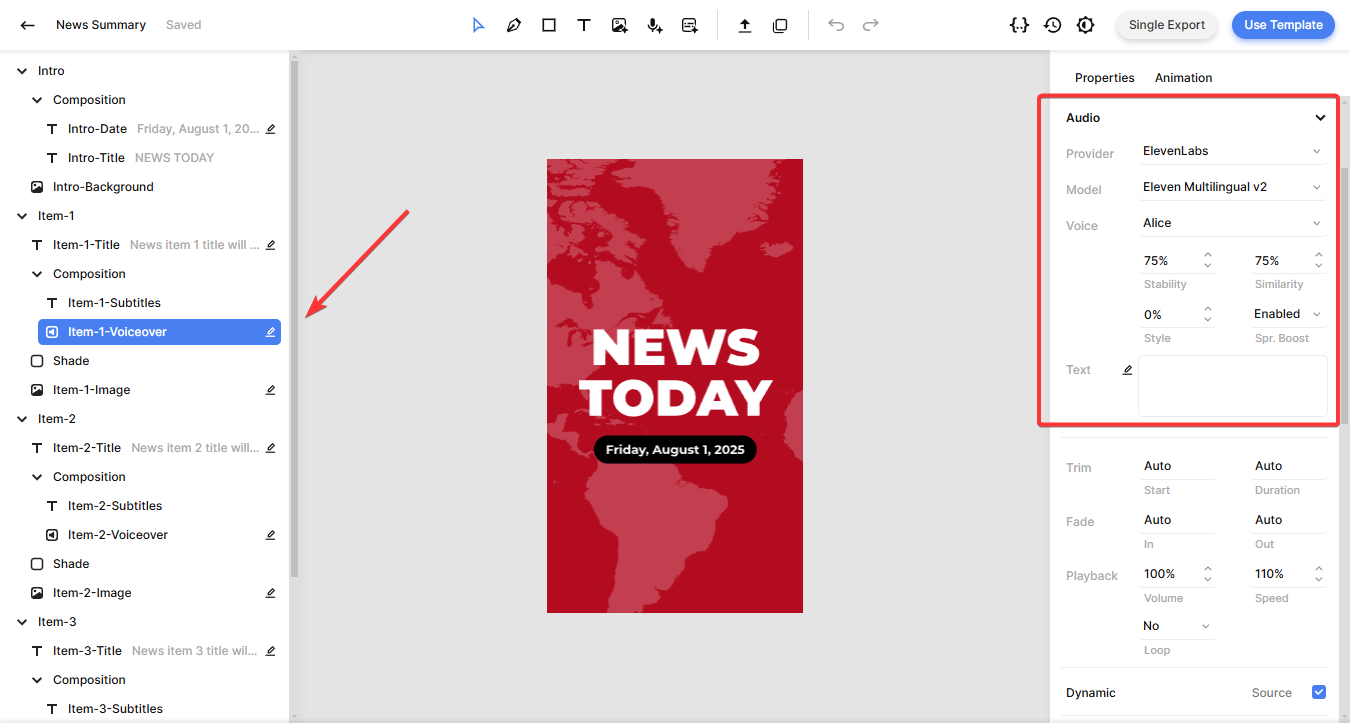
The default Voice is set to Alice, a pre-made one from ElevenLabs. If you'd prefer to use the voice you selected in step 1, you can easily switch it here. Just click on Alice, select Custom Voice, paste the voice ID, and click OK:
You can fine-tune the voiceover by adjusting the Stability, Similarity, Style, and Speaker Boost settings. However, the default settings generally work best, so we recommend keeping them unless you have a specific reason to change them. For more details on each setting, refer to ElevenLabs' Voice Settings documentation.
Tip: Some voices in ElevenLabs may sound a bit slow. You can use the Speed setting to increase the reading pace.
Let's review the subtitles next. Select the Item-1-Subtitles element, and find the Transcription property. The Source is set to the Item-1-Voiceover element, which tells Creatomate to generate subtitles based on the voiceover. For the Item-2 and Item-3 compositions, the mapping is similar. You can also adjust the Style, Color, Fill, and Stroke settings to customize the appearance of the subtitles:
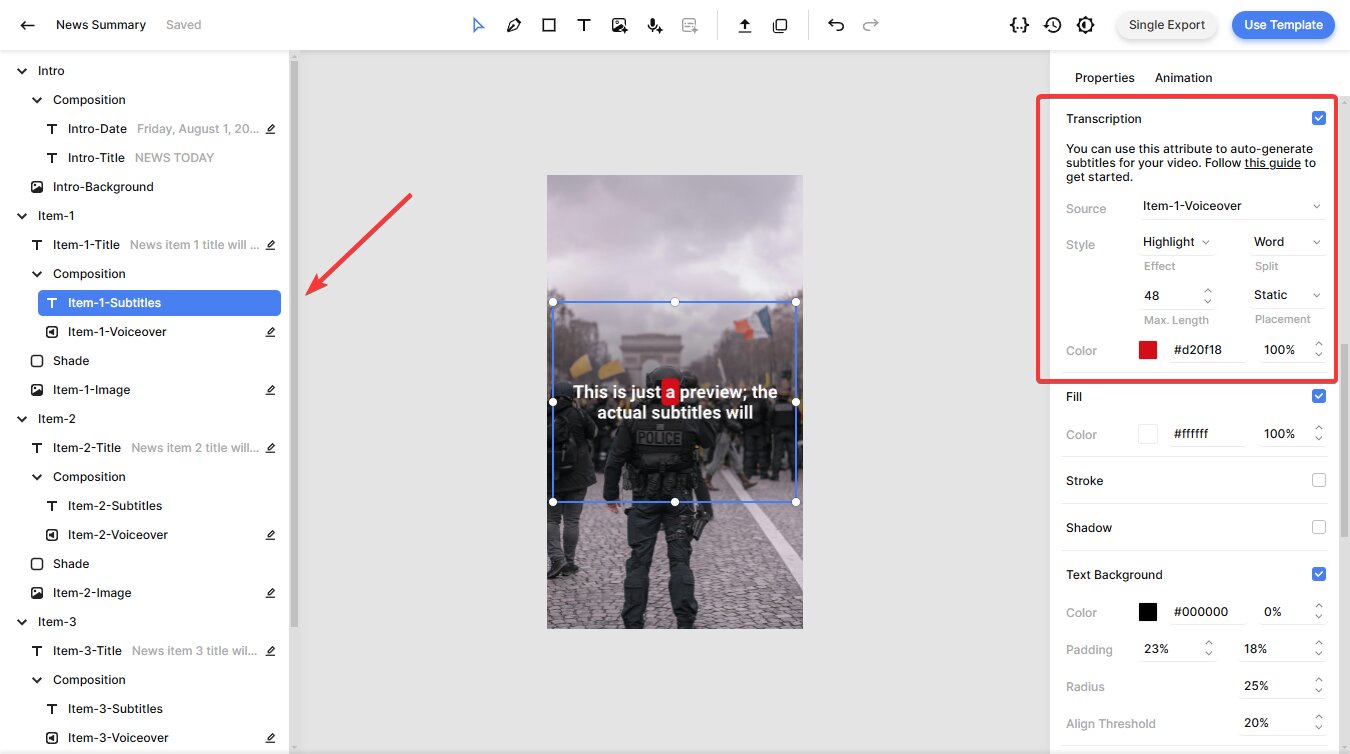
If you've made any changes, make sure to apply them to the elements in the Item-2 and Item-3 compositions as well to keep the design consistent.
With our template ready, it's time to set up the automated workflow. Let's move on to Make.com.
4. Get today's news items
Log in to your Make.com account or create a free account if you don't already have one.
From your dashboard, click the Create a new scenario button. Once in the scenario editor, search for the RSS app, and select the Retrieve RSS feed items action.
In the URL field, enter the link to the RSS feed you want to monitor. To demonstrate, here's one from The New York Times: https://rss.nytimes.com/services/xml/rss/nyt/World.xml
The Date from and Date to fields serve as filters, allowing you to retrieve only news items from today. You can set them by either copying and pasting the following values directly or using the Date and Time functions in Make.com:
- Date from -> {{setHour(setMinute(now; 0); 0)}}
- Date to -> {{now}}
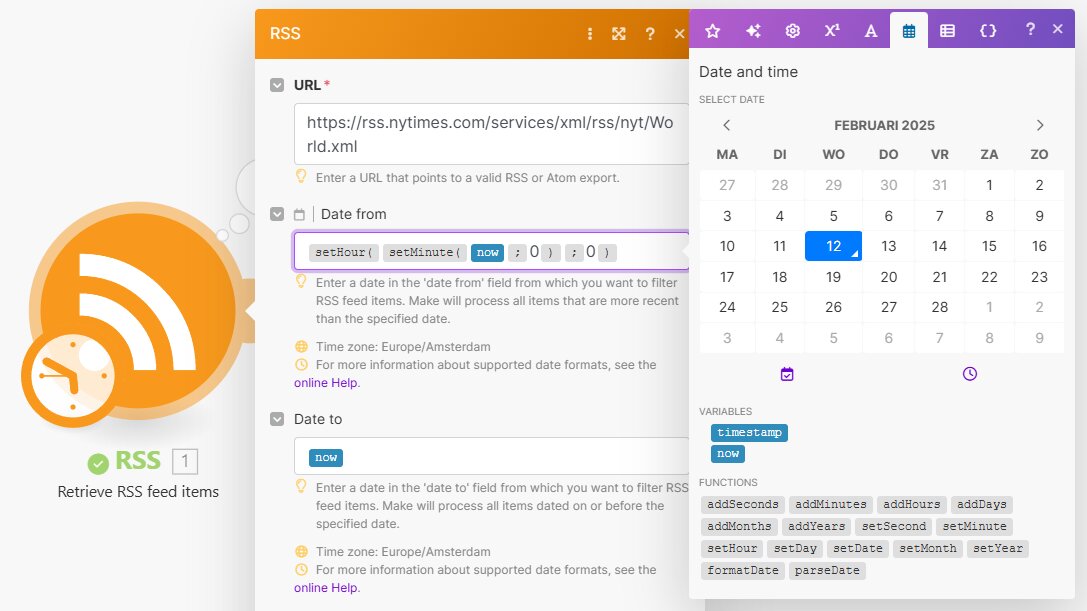
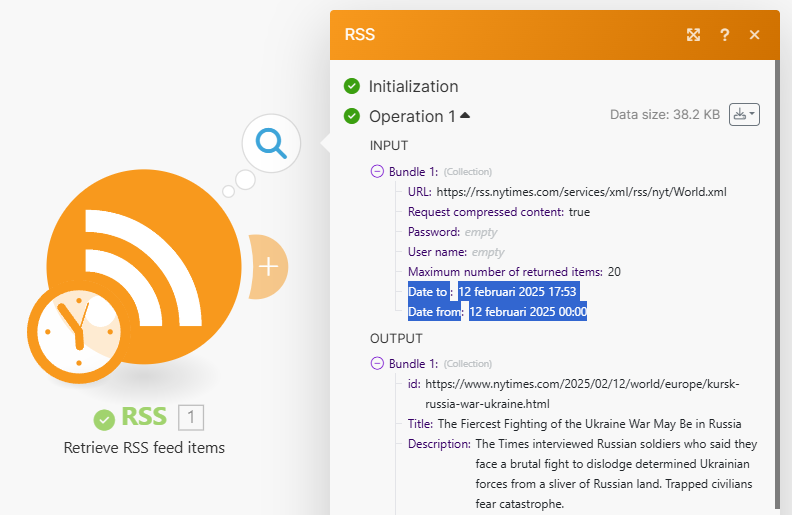
Let's set the Maximum number of returned items to 20. You can adjust this based on the average number of daily items in your RSS feed. Setting it slightly higher than the actual amount ensures that all items are processed. Once you're done, click Save:

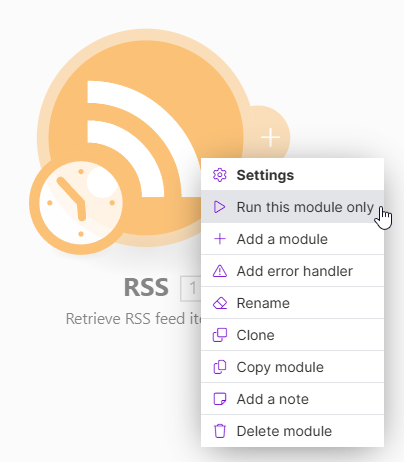
To make sure it works, right-click the module and select Run this module only:
Click the magnifying glass icon to see what this operation did.
First, let's review the input fields:
- The Date to is set to NOW, the current time at the moment of setup and testing.
- The Date from is set to midnight, marking the start of today. This is defined by the formula we used to set up the module.
Note: Remember that NOW is a variable, meaning it adjusts to the time when the scenario runs. In the final step of this tutorial, we'll schedule the scenario to run in the evening. Once the automation is live, it will retrieve articles from that day up until its scheduled run time, allowing it to collect news items from nearly the entire day.
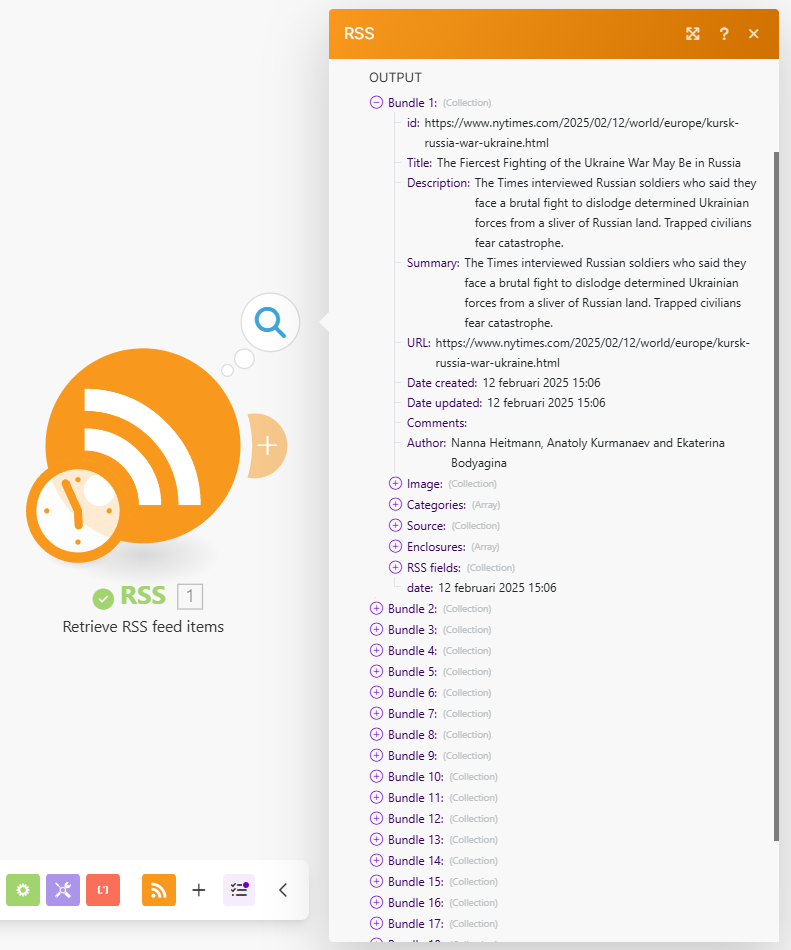
Looking at the output, we can see that up to 20 news items ("bundles") have been returned:
5. Turn into one string
In this step, we'll combine all the bundles into a single text string to make it easier for ChatGPT to process.
Click + to add a module to your scenario. Search for the Tools app and select the Text aggregator.
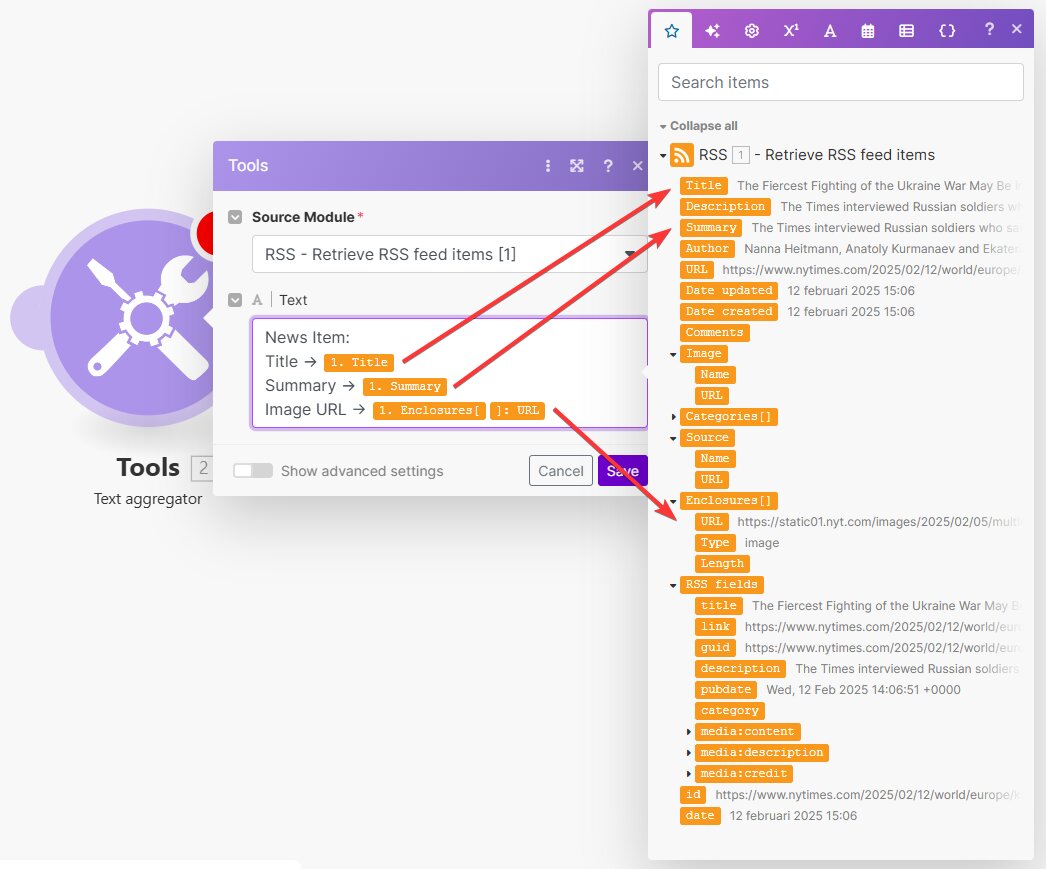
For the Source Module, select the RSS - Retrieve RSS feed items module. Then, in the Text field, we can specify which data from the news items we want to use. For our news summary video, we only need the title, summary, and image of the articles, so set it up like this:
News Item:
Title -> RSS - Retrieve RSS feed items: Title
Summary -> RSS - Retrieve RSS feed items: Summary
Image URL -> RSS - Retrieve RSS feed items: Enclosures -> URL
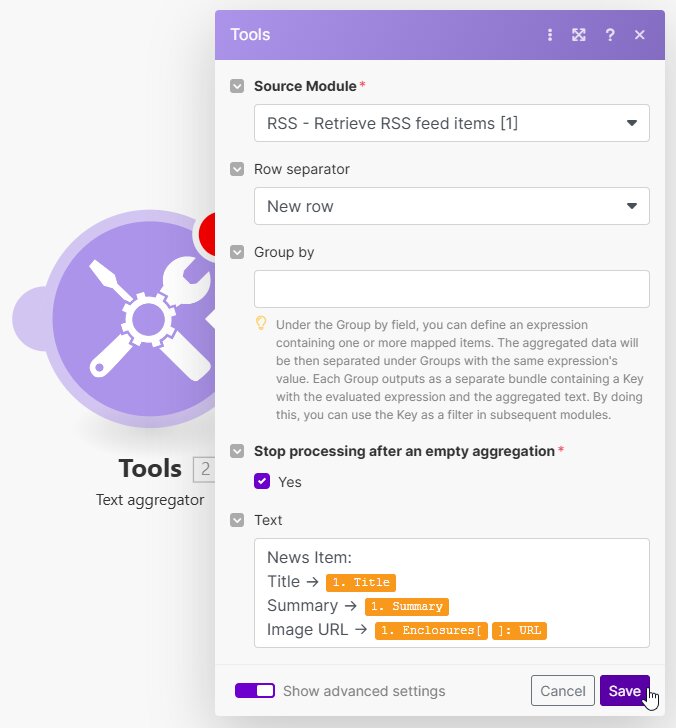
Next, toggle the switch to Show advanced settings. To place each news item on a new line, select New row in the Row separator field. Additionally, check the box to set Stop processing after an empty aggregation to Yes. This will automatically stop the scenario if the RSS feed doesn't provide any news items. Once done, click Save:
6. Select 3 news items for the summary video
In this step, we'll use ChatGPT to select three news items for our video. The prompt is fully customizable, so feel free to adjust it to guide ChatGPT in selecting items based on your criteria. For example, you can specify topics that interest you, what appeals to your audience, or simply ask for variety in the news items.
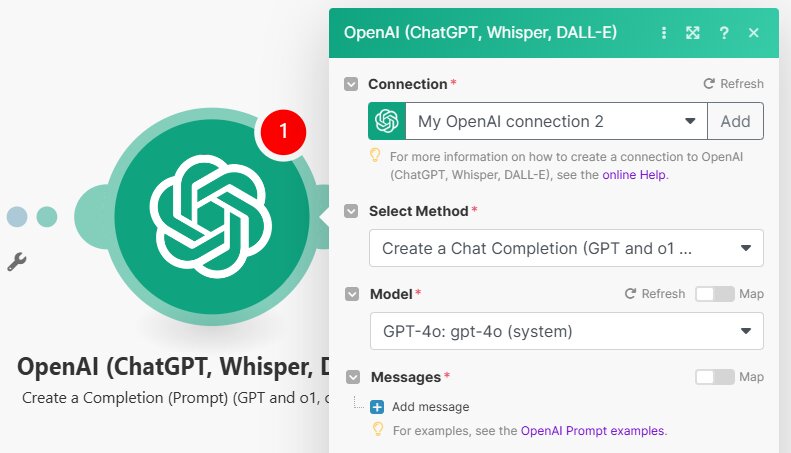
Add the OpenAI (ChatGPT, Whisper, DALL·E) module and select Create a Completion (Prompt) (GPT and o1, o3 Models).
First, create a connection using the API you created in step 2. In the Select Method field, choose Create a Chat Completion (GPT and o1 models). Then, choose the Model you want to use, such as GPT-4o:
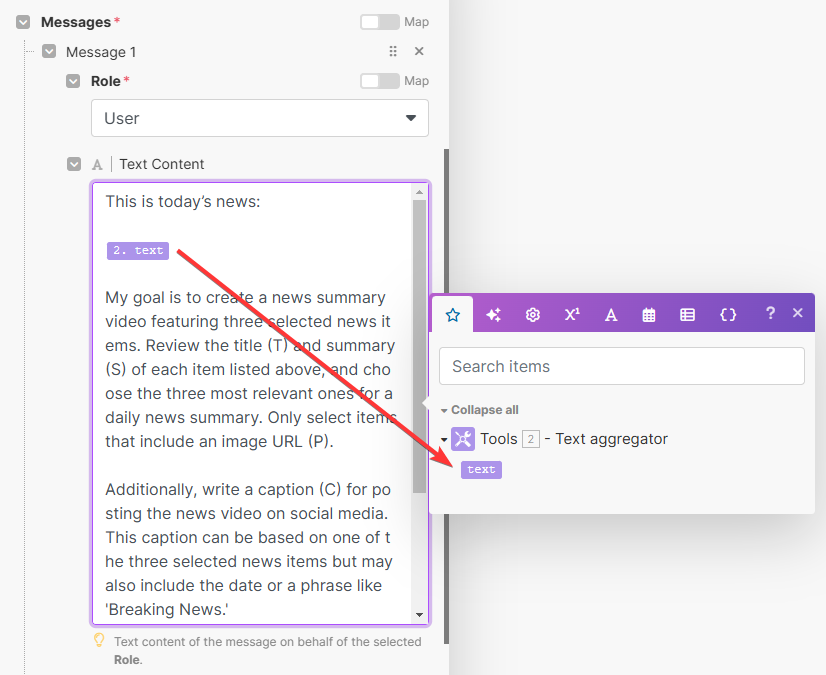
Under Messages, click Add message. For the Role, select User. In the Text Content field, paste the following prompt:
This is today's news:
[Output from Text aggregator]
My goal is to create a news summary video featuring three selected news items. Review the title (T) and summary (S) of each item listed above, and choose the three most relevant ones for a daily news summary. Only select items that include an image URL (P).
Additionally, write a caption (C) for posting the news video on social media. This caption can be based on one of the three selected news items but may also include the date or a phrase like 'Breaking News.'
Return the result as a valid JSON object in the most compact format, without extra formatting, as follows:
{"T1":"", "S1":"", "P1":"", "T2":"", "S2":"", "P2":"", "T3":"", "S3":"", "P3":"", "C":""}
Be sure to replace the [Output from Text aggregator] placeholder with the actual Tools - Text aggregator -> text value, as shown below:
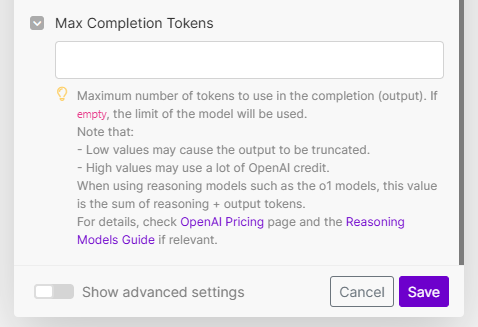
Leave the Max Completion Tokens fields empty for the best result:
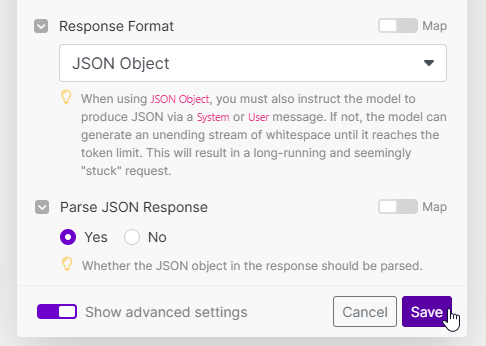
We've already instructed it to output a JSON string, but we can make this more specific to ensure it works properly. Toggle the switch to Show advanced settings. Under Response Format, select JSON Object. Also, set Parse JSON Response to Yes to automatically break it into separate items for easier processing with Creatomate. Once you're done, click Save:
Now it's time to run a test. Click the Run once button in the bottom left corner:
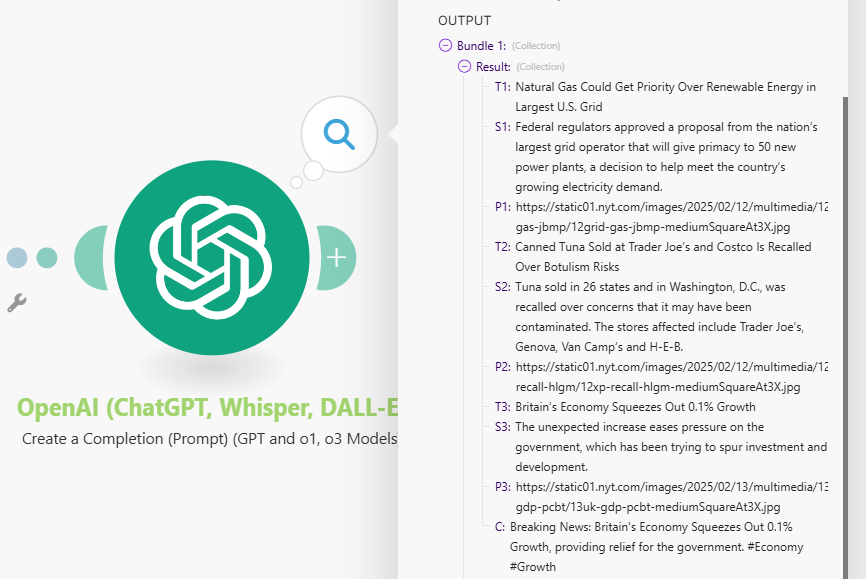
If everything goes well, ChatGPT will return the content of three news items, along with a social media caption:
Did it work? Awesome! Now, let's use this information to generate a video.
7. Generate the news summary video
Add a Creatomate module with the Render a Template action.
First, create a connection using your project's API key. You can find it in the same Project Settings menu where we entered the ElevenLabs API key:
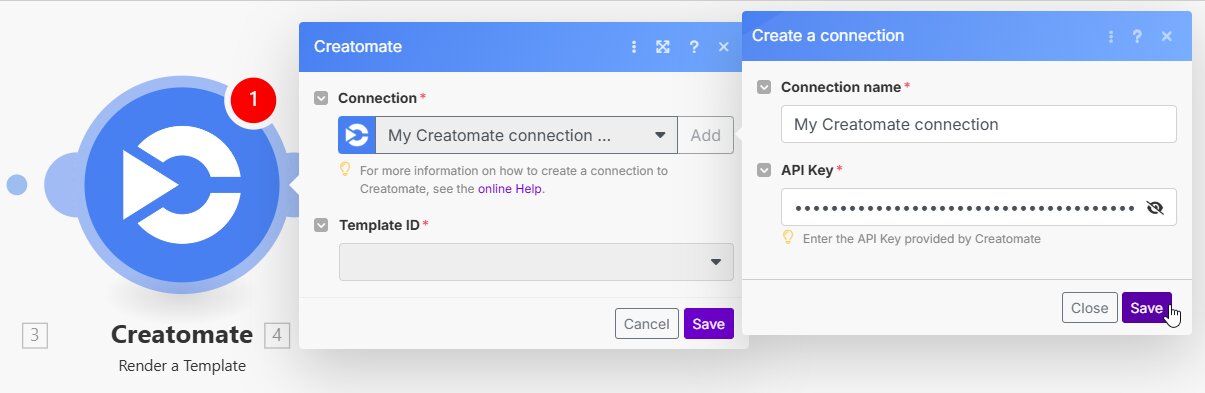
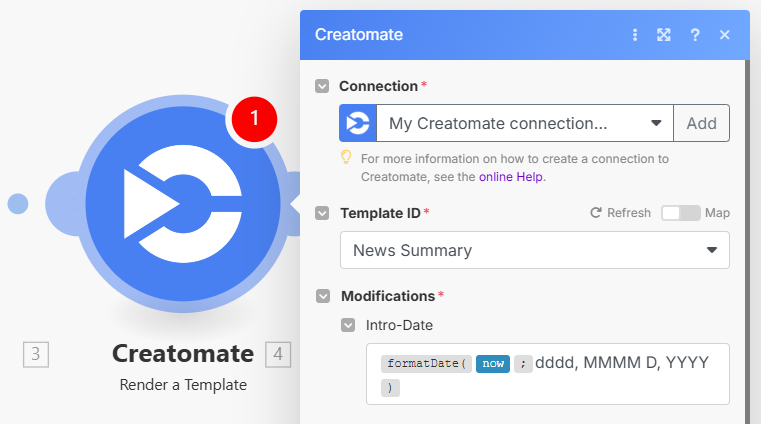
Next, select the News Summary template in the Template ID field. The dynamic elements will automatically appear under Modifications.
Let's begin with the Intro-Date. You can choose exactly how the date appears in the video. For example, to match the template format (Friday, August 1, 2025), paste this formula: {{formatDate(now; "dddd, MMMM D, YYYY")}}
If you prefer a different date format, refer to Make's documentation page to create your own formula.
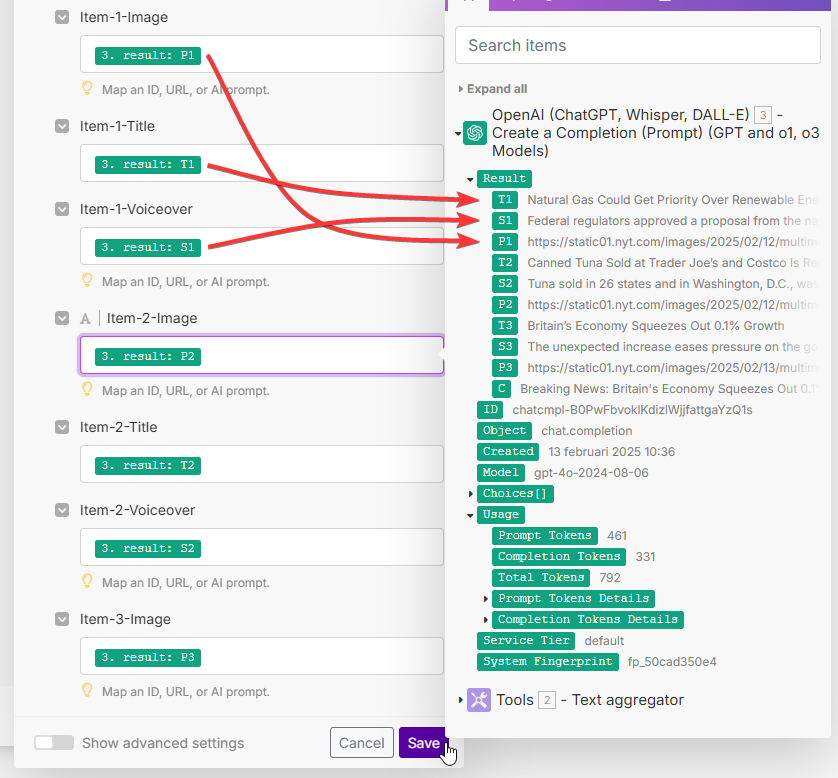
Next, let's map the news articles to the template as follows:
- Set Item-1-Image to OpenAI - Create a Completion -> Result -> P1
- Set Item-1-Title to OpenAI - Create a Completion -> Result -> T1
- Set Item-1-Voiceover to OpenAI - Create a Completion -> Result -> S1
- And so on for the second and third news items.
Once you're done, click Save:
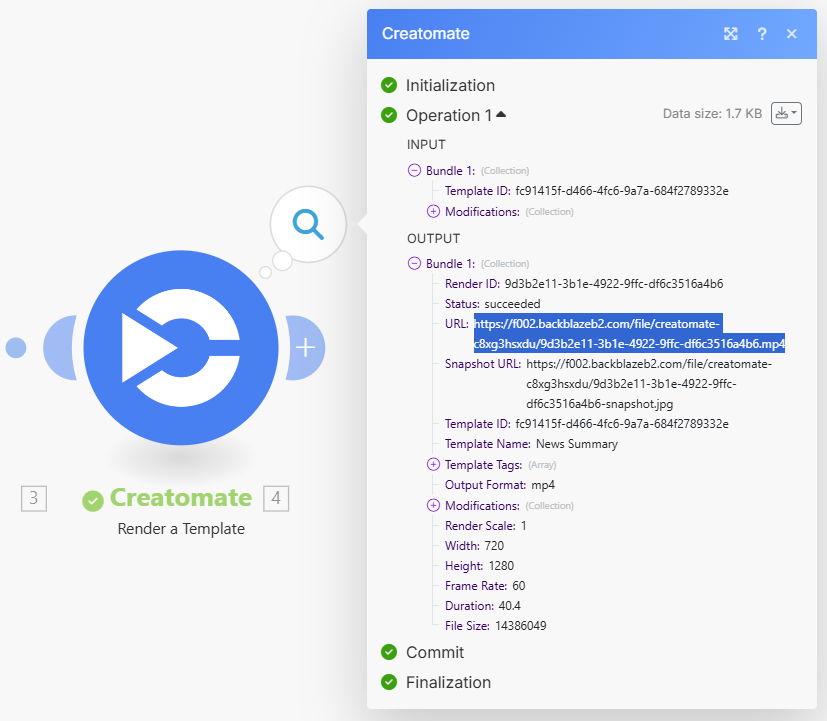
To make sure Creatomate can generate a video, click the Run once button again.
If the test is successful, you can visit the URL in the result to check your video:
My video turned out like this:
Let's move on to posting the video.
8. Post on social media
In this step, we'll set up a module to process the video. I'll show you how to share it as an Instagram Reel, but you can also upload it as a YouTube Short or email it for posting on TikTok (since there's currently no direct method available on Make.com).
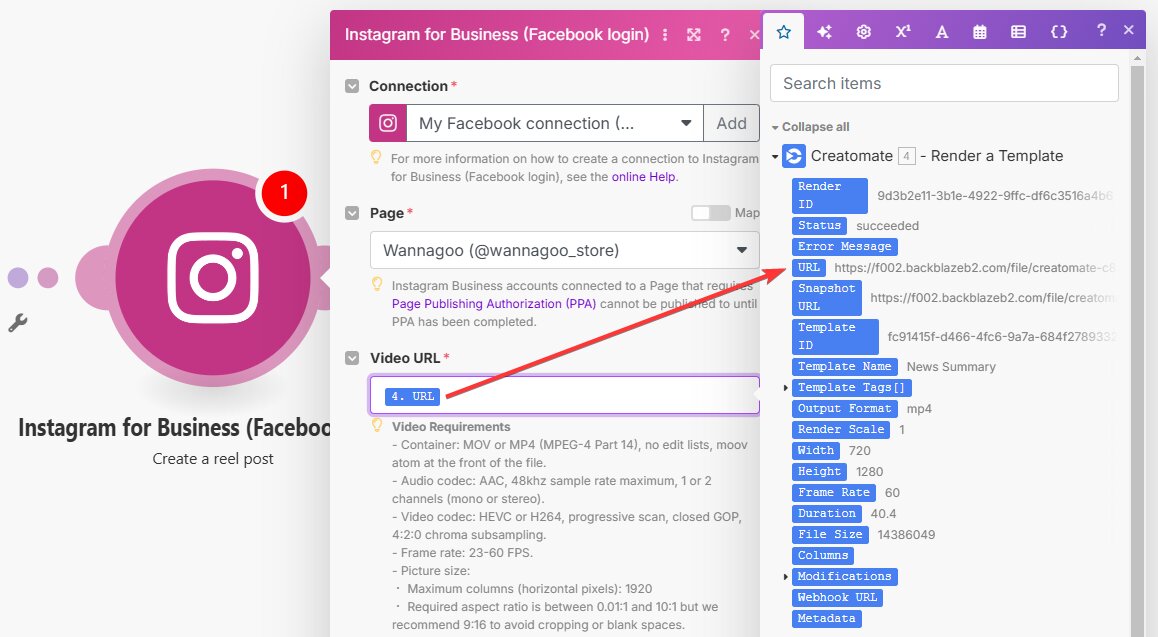
Add the Instagram for Business module with the Create a Reel Post action.
First, connect your Facebook account and select the Instagram page where you want to post the video.
Then, in the Video URL field, select Creatomate - Render a Template -> URL:
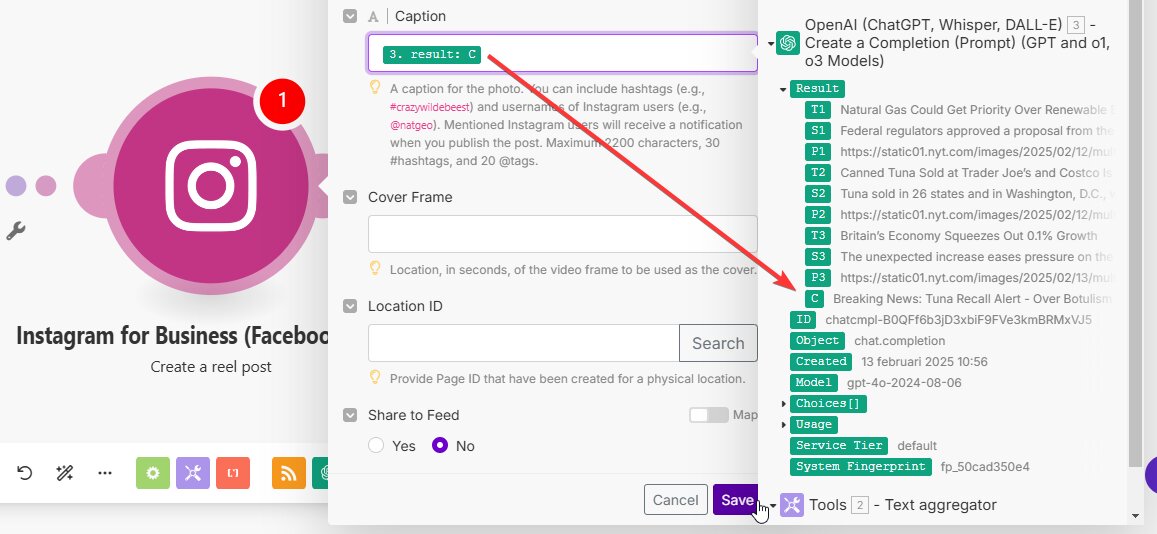
In the Caption field, select OpenAI - Create a Completion -> Result -> C. Our template already includes a snapshot at the beginning of the video, which will automatically be used as the cover, so you can leave the Cover Frame field empty. Customize the other settings as needed. Once you're finished, click Save:
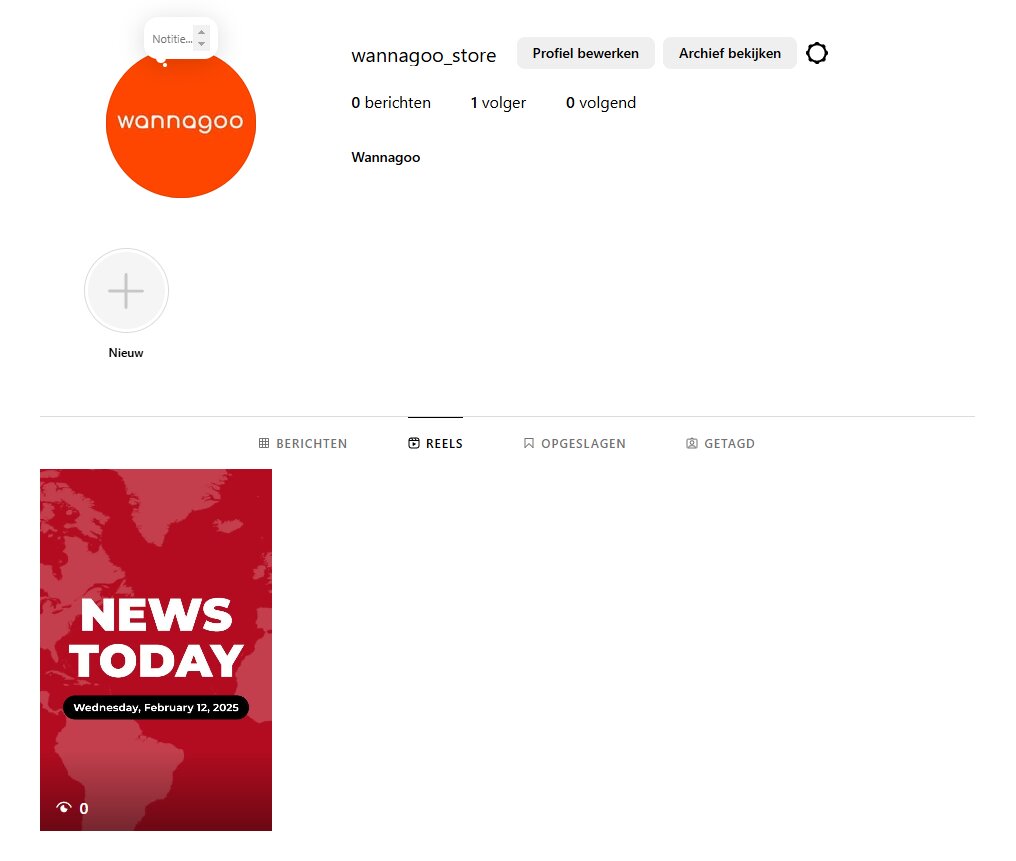
Ready for a final test? Click Run once again. If everything works as planned, a news summary video will be posted to your Instagram channel within a few minutes:
9. Schedule scenario
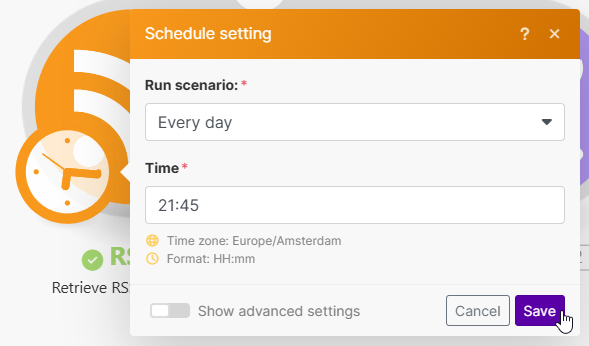
Finally, choose the time you want to create and post your daily news summary video. I recommend setting it as late as possible to gather the most published items of the day, giving ChatGPT the most news to choose from. However, this depends on when and how many news items are posted, so feel free to adjust the timing to fit your needs.
Click the clock icon to set up the scenario schedule. For example, you can schedule it to run Every day at 21:45. Once done, click Save:
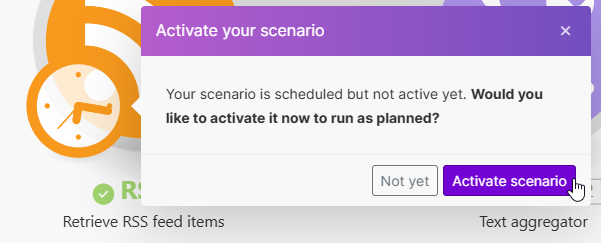
Last but not least, click Activate scenario:
And that's it – you're all set!
What's next for automated video creation
That's it! You've successfully built a workflow that automatically posts a daily summary video of the most important news to your social media channels.
We used ChatGPT to select news items, but did you know it can also create video storyboards? Just give it a topic, and it'll generate content for each video. An AI voiceover can then read the text, while Creatomate's auto-transcription service takes care of the subtitles. You won't have background images like the ones from the RSS feed in this tutorial, but generative AI has a fix for that too – just let DALL·E handle it.
Such a workflow makes it possible to fully automatically create faceless shorts for YouTube, TikTok, and Instagram. To learn more, check out the tutorial linked below.
👉 How to Automatically Convert Text to Video using AI and Make.com


