How To Auto-Create Personalized Videos Using Zapier

In this no-code tutorial, you'll learn how to automatically generate personalized videos (year-in-review, etc.) using Zapier Tables and video automation.
Using videos in marketing is already effective, but by personalizing these videos, they become even more appealing to individual viewers. Whether you intend to offer tailored onboarding experience to new customers, reach out to prospects in a unique manner, or thank your users at the end of the year, personalized videos have the potential to increase engagement, improve customer retention, and boost conversion rates. And the best part? You can automatically generate a large number of personalized videos using a straightforward workflow.
This tutorial will guide you through the process of setting up an automated Zapier workflow that can process various types of personalized data and convert it into videos using Creatomate, a video generation API. You can use any data source that is supported by Zapier, including CRM tools, which may contain various information such as names, email addresses, job titles, photos, and other relevant data.
Below is an example of a personalized year-in-review video we'll create. However, make sure to check out the editor, which allows you to create your own video designs based on your specific use case and available data.
Are you looking for a way to create personalized videos without relying on Zapier? Check out our tutorial on how to create personalized videos at scale using a video generation spreadsheet.
Prerequisites
These are the tools we'll use:
- Creatomate: to create a template and generate videos. Sign up for free.
- Zapier: to set up the automated workflow.
- (Optional) Zapier Tables: or any other app that provides data for personalization and processes videos.
To provide a basic concept of how to automate personalized videos, we will be using Zapier Tables. However, you can replace this app with any app that you prefer, such as a CRM tool like HubSpot or another source where you have stored customer data, like Airtable. Once the videos are created, we will update Zapier Tables with a URL to the video. Once again, this is just an example. It's up to you how you process the videos.
Adapt this workflow to fit your needs using the apps that are most convenient to you.
How to automate personalized videos using Zapier
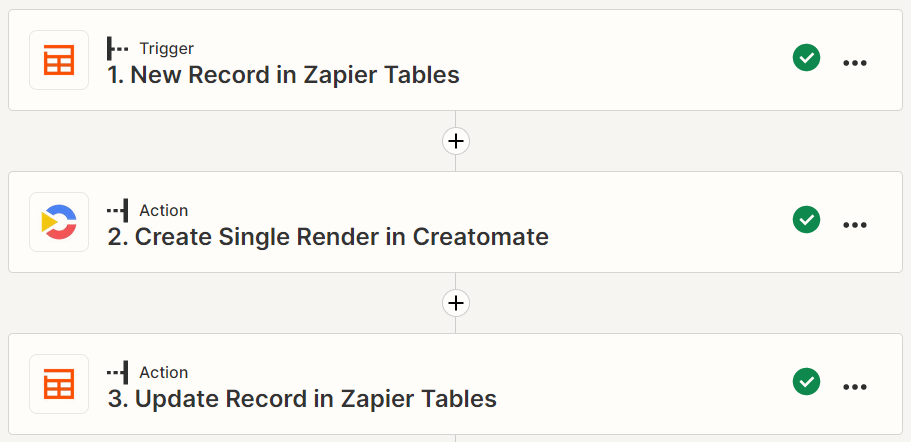
As a first step, we will create a personalization template in Creatomate, which will form the basis of all of our videos. We'll then set up an automated workflow using Zapier. To do this, we'll create a table in Zapier that will serve as the trigger for our Zap. Creatomate then generates a video using the template and the personalized data from a new table record. Last but not least, the table will be updated with the video link. Here is what our Zap will look like:
Let's get started by creating a template.
1. Create a personalization template in Creatomate
Log in to your account and navigate to the Templates page. Click the + New button and browse the template gallery. You can choose any ready-made template you like or design your own from scratch. For this tutorial, let's use the Retrospective Short template from the Personalization category. Select a size according to the videos you want to create, like 16:9 Landscape, and click Create Template to open it in the editor:
Let's take a look at the left side panel. Here we can find the elements that make up our template. It's important to know that elements can be marked as dynamic. In our template, the Name, Contributions, and Photo are dynamic elements. This means we can replace its content with other text and media through the automated Zapier workflow we're about to set up.
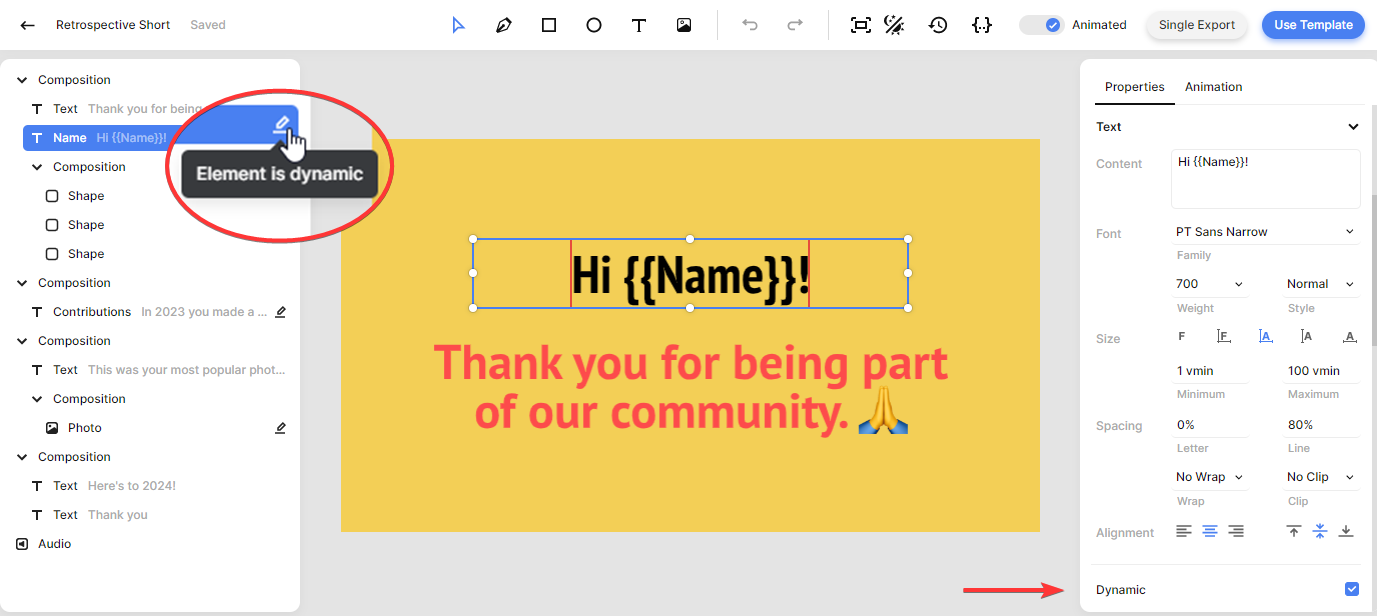
The template can now be customized however you like. And if you want to make an element dynamic or non-dynamic, simply select it and check the Dynamic property from the right side panel, as shown above.
Next, let's create a table in Zapier for our personalized data. If you want to use another app, you can skip the next step.
2. Create a Zapier Table for personalized data
If you don't want to use Zapier Tables in your workflow, you can skip this step.
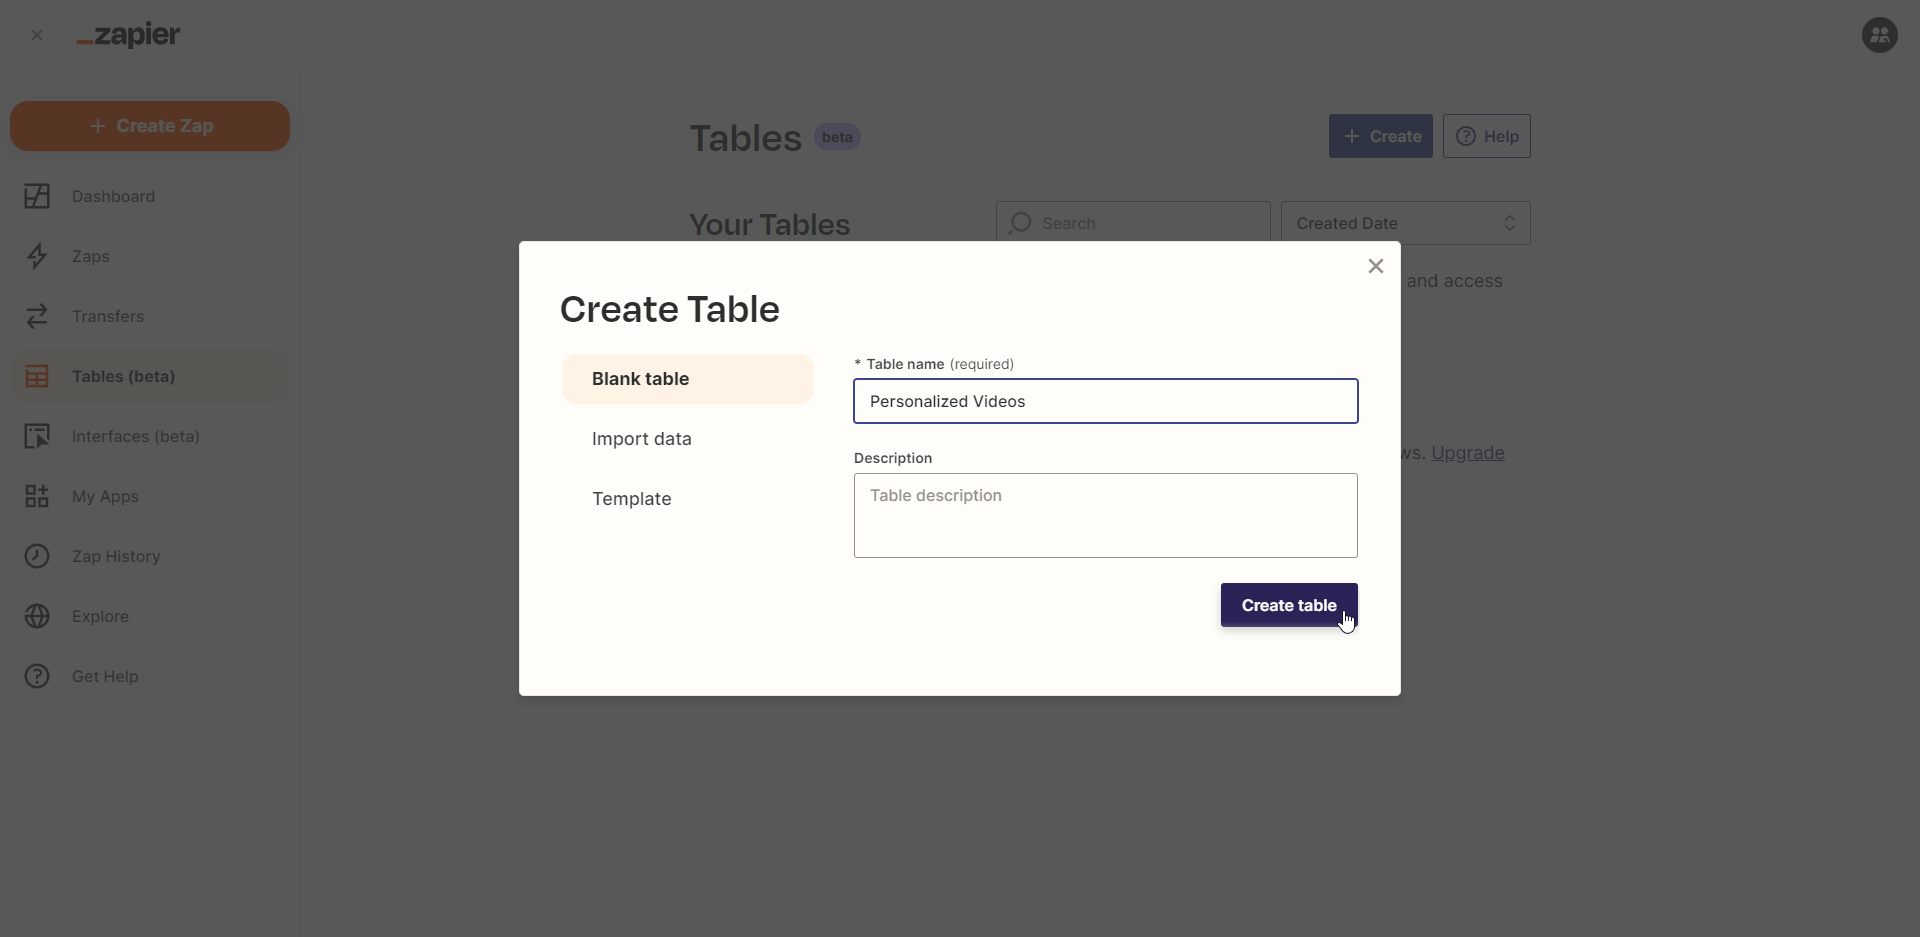
Log in to your Zapier account and navigate to the Tables (beta) page. Click the + Create button, enter a name, like Personalized Videos, then click Create table:
We'll be taken to our newly created table. According to the dynamic elements in our template, we'll create text fields for Name and Contributions, and a link field for Photo. Additionally, we'll also create a Video URL link field where we'll store the link to the video once it's ready:
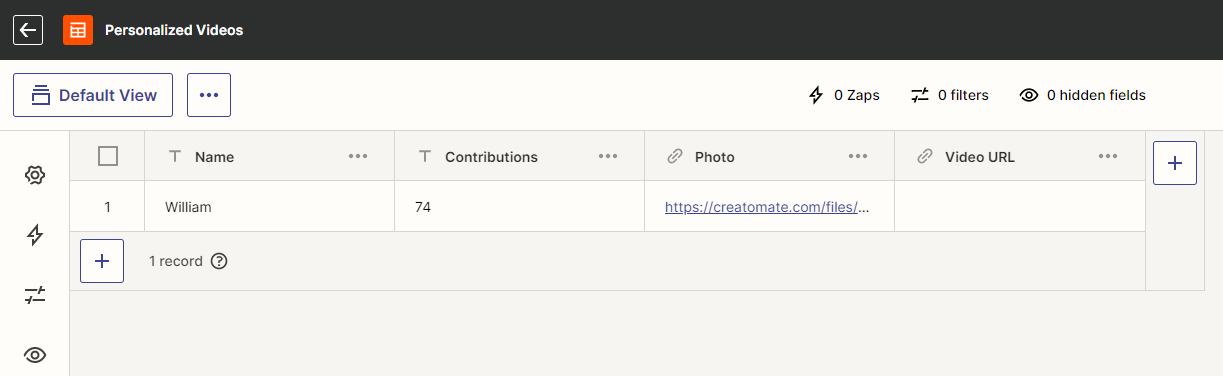
Put some test data in the first row for the Name, Contributions, and Photo columns. Leave the Video URL column blank. Next, we'll use this table to set up our Zap.
3. Add trigger: New Record in Zapier Tables
Tip: Rather than Zapier Tables, you can use any other app to provide personal information.
From your Zapier dashboard, click the + Create Zap button. Search for the Zapier Tables app and select the New Record event. Then, click Continue.
On the Trigger page, select Personalized Videos in the Table ID field. Then, click Continue:
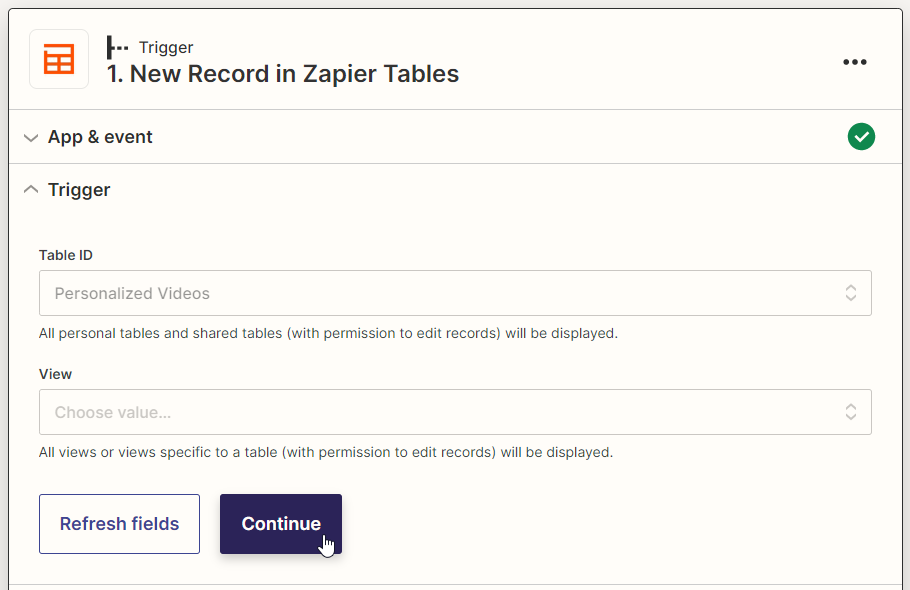
Click Test trigger on the Test page to make sure Zapier can find the record we've just created. When the test is successful, click Continue, and move on to the next step.
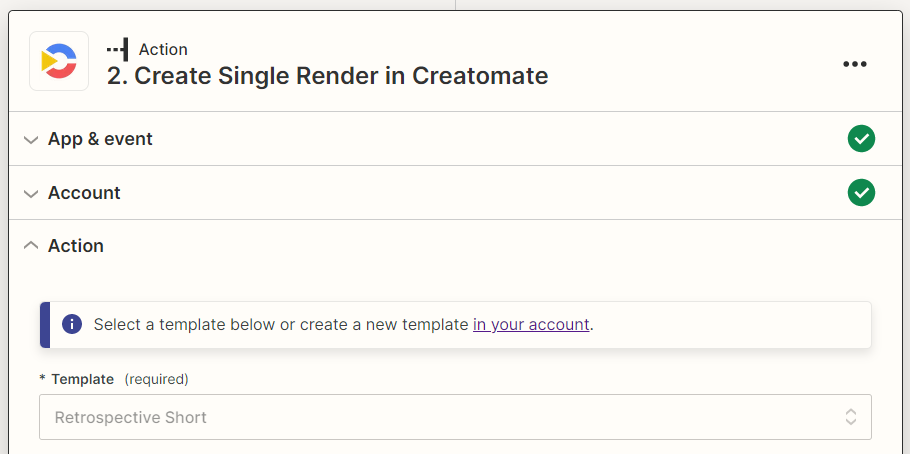
4. Add action: Create Single Render in Creatomate
Search for the Creatomate app and select the Create Single Render event. Continue by selecting your account or signing in with your project's API key first.
On the Action page, select your Retrospective Short template in the Template field first:
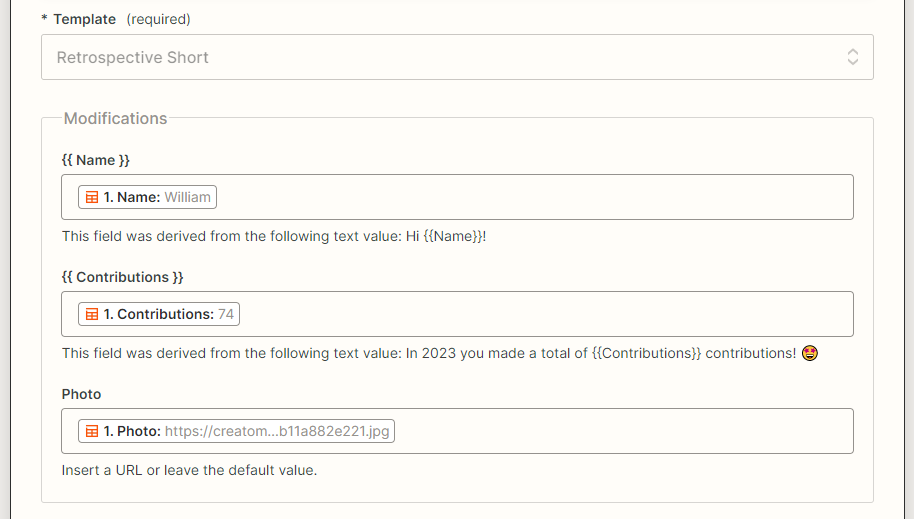
The templates' dynamic elements will automatically be detected and listed under Modifications. Now we can map data from the trigger app to the template as follows:
- Set {{ Name }} to Zapier Tables -> Name
- Set {{ Contributions }} to Zapier Tables -> Contributions
- Set Photo to Zapier Tables -> Photo
When done, click Continue:
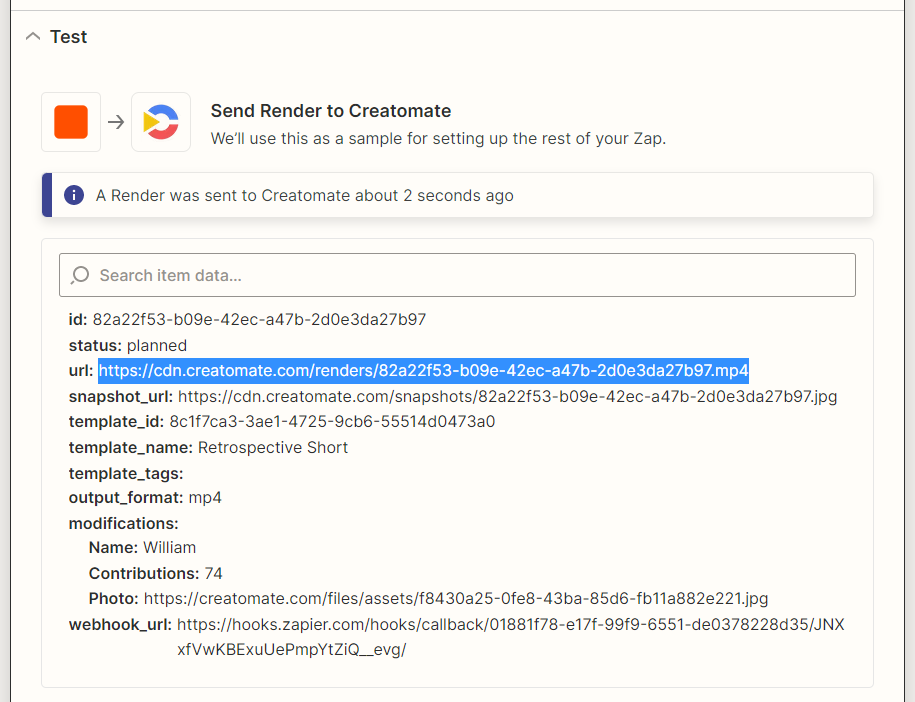
To ensure that Creatomate can generate a video based on the template and provided data, click Test step on the Test page. You can check the video by accessing the URL provided in the test result. Please note that rendering the video may take some time. If you receive a Not Found message, wait for a few seconds, then refresh the page. This may occur during the testing phase, but once the Zap is live, it will wait for the video to finish before proceeding. If this test is successful, move on to the next step:
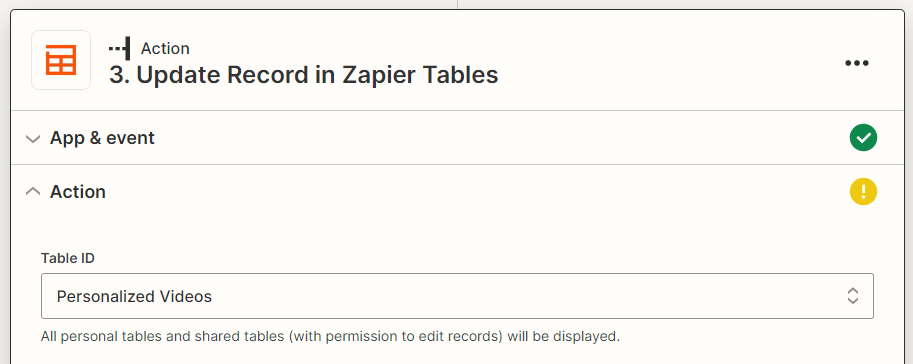
5. Add action: Update Record in Zapier Tables
Tip: Feel free to use any app to process the generated videos.
Click +, search for the Zapier Tables app, and select the Update Record event. Then, click Continue.
On the Action page, select the Personalized Videos table in the Table ID field first:
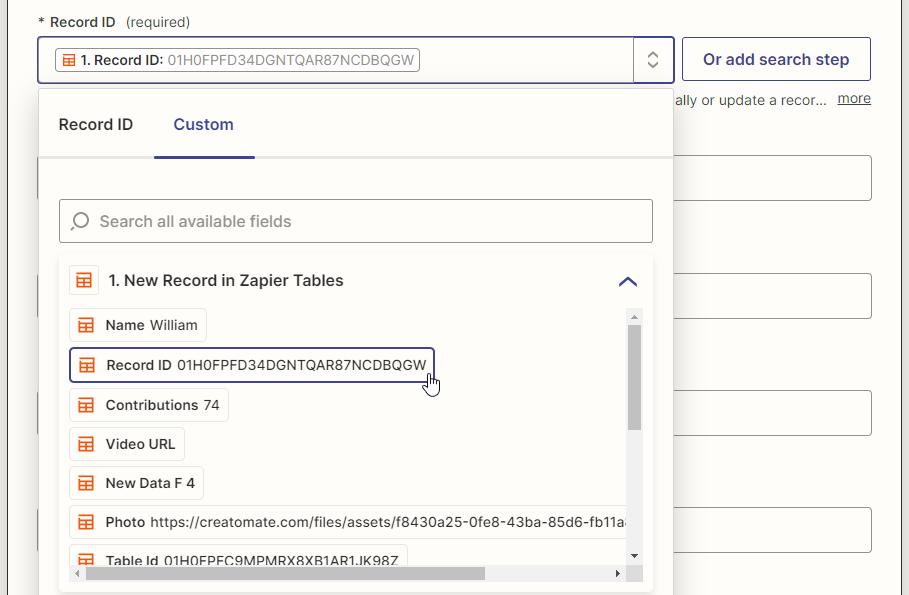
Next, select Zapier Tables -> Record ID from the Custom tab in the Record ID field:
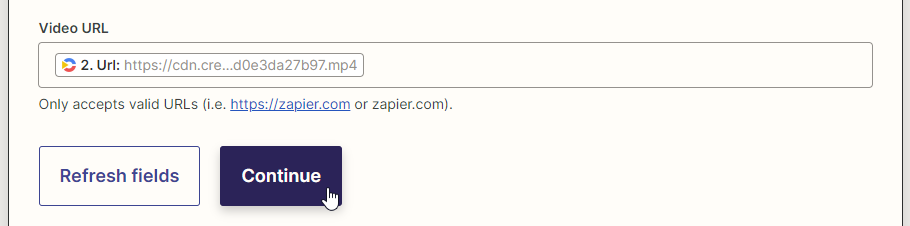
Then, select Creatomate -> Url in the Video URL field. Then, click Continue:
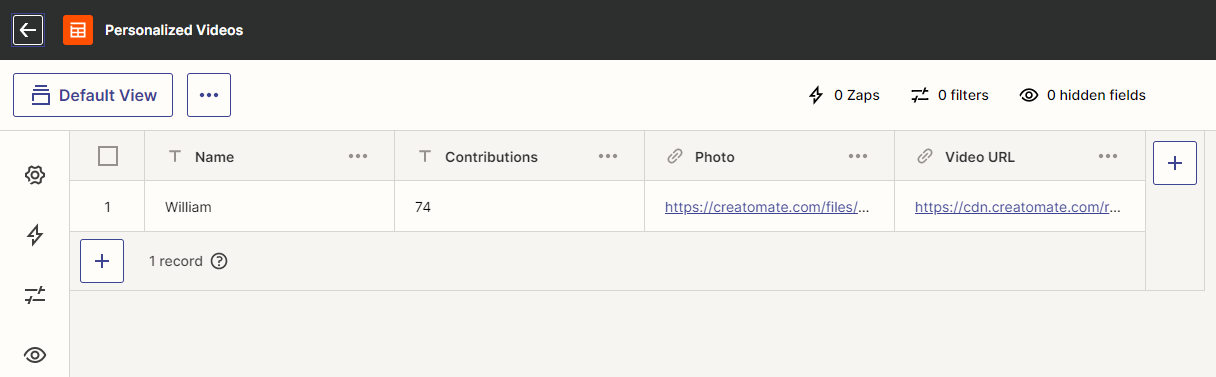
Click Test step on the Test page to make sure Zapier is able to update the record with a link to the video. Here's what our table should look like:
Last but not least, when the test is successful and you're happy with your workflow, click Publish Zap to activate it.
Wrapping up
That's it! You now know how to automatically create personalized videos using Zapier and Creatomate. All kinds of personalized videos can be automated using a template customized to your needs. Here, we've set up a simple Zap, but you can use any app to build a workflow that suits your needs.
Next, check out our tutorial where we explore an alternative method of scaling personalized videos without Zapier.
You might also like these tutorials


Start automating today
Start with a full-featured trial with 50 credits, no credit card required.
Get started for free →