How to Create Images with Make.com (Integromat)

In this tutorial, you'll learn how to auto-generate marketing images using Make.com (formerly Integromat) and Creatomate, which will then be posted on social media.
Image automation isn't as complicated as it used to be. With the right tools and workflows, anyone can set up an automated workflow to generate images for social media, personalized content, advertisement, or any other marketing purpose. In this guide, I'll show you how.
Creatomate is an image and video platform for marketing automation. When used in combination with a no-code platform such as Make.com, you can set up scenarios that run a specific task completely on autopilot. Consider the case of a realtor wanting to automate their marketing outreach. This can be accomplished by setting up an automated scenario that runs whenever a new house is listed, and then automatically posts the generated image on social media.
As an example, the following image was automatically generated following the steps in this tutorial. Of course, this isn't just for real estate - you can create image templates for virtually any purpose using the online editor. Be sure to give that a try as well!

Tip: Did you know creating videos is just as easy? In this tutorial, you'll find out how to automatically create and post video content, such as Instagram Reels, using Make and Creatomate.
Prerequisites
Make.com (formerly known as Integromat) is a no-code automation platform with over 1,800 app integrations, allowing you to automate repetitive tasks between your favorite apps. As we will keep it simple and create a workflow that generates images based on a simple set of data, make sure to modify the workflow to fit your needs.
Here are the apps we'll use:
- Creatomate: to create a template and generate images. Sign up for free.
- Make.com: to set up the automated workflow.
- Facebook Pages: or any other app to use the auto-generated images.
How to create images with Make (Integromat)?
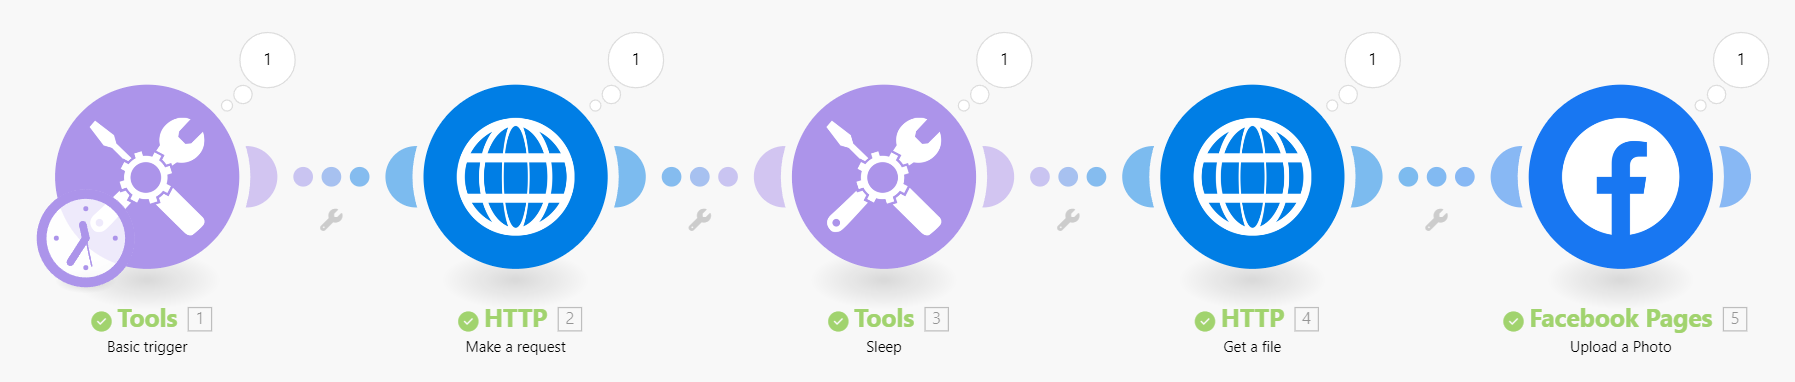
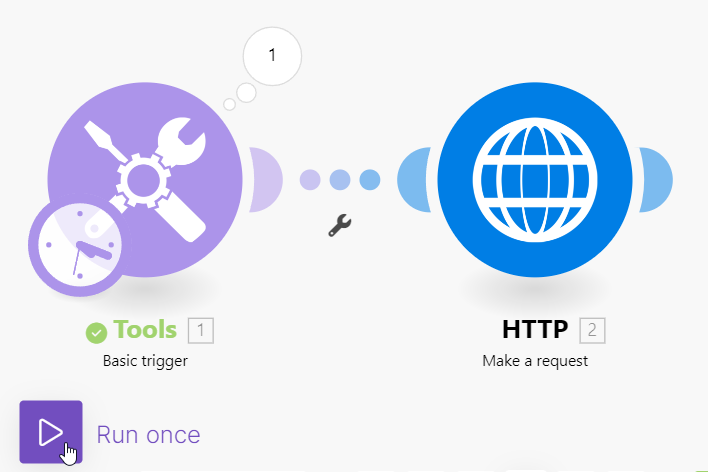
The first step in automatically generating images is to create a template in Creatomate. This design will serve as the foundation for all the images. After that, we will move on to Make and create a new scenario. Here, we'll set up a basic trigger to input data. Following that, with Creatomate's REST API, we'll generate images using both the template and data from our trigger. Once the image has been created, we will add a module to retrieve it. And finally, we'll complete the process by sharing the image on Facebook. Here's what the scenario looks like:
Let's get started by creating an image template.
1. Create an image template in Creatomate
Start by logging in to your Creatomate account. Then, go to the Templates page and click + New. You can choose any template you like, but let's use the Real Estate Banner template from the Real Estate category for this tutorial. Select the 16:9 Landscape size and click Create Template to open it in the editor:
Now, let's take a look at the left side panel. Here, we can find the elements that make up our template. It's important to know that elements can be marked as Dynamic. In the template we're working with, elements such as Price, Description, Features, and Photos are all dynamic. This means that we can replace their content with different text and media via the automated Make scenario we're about to set up in the upcoming steps:
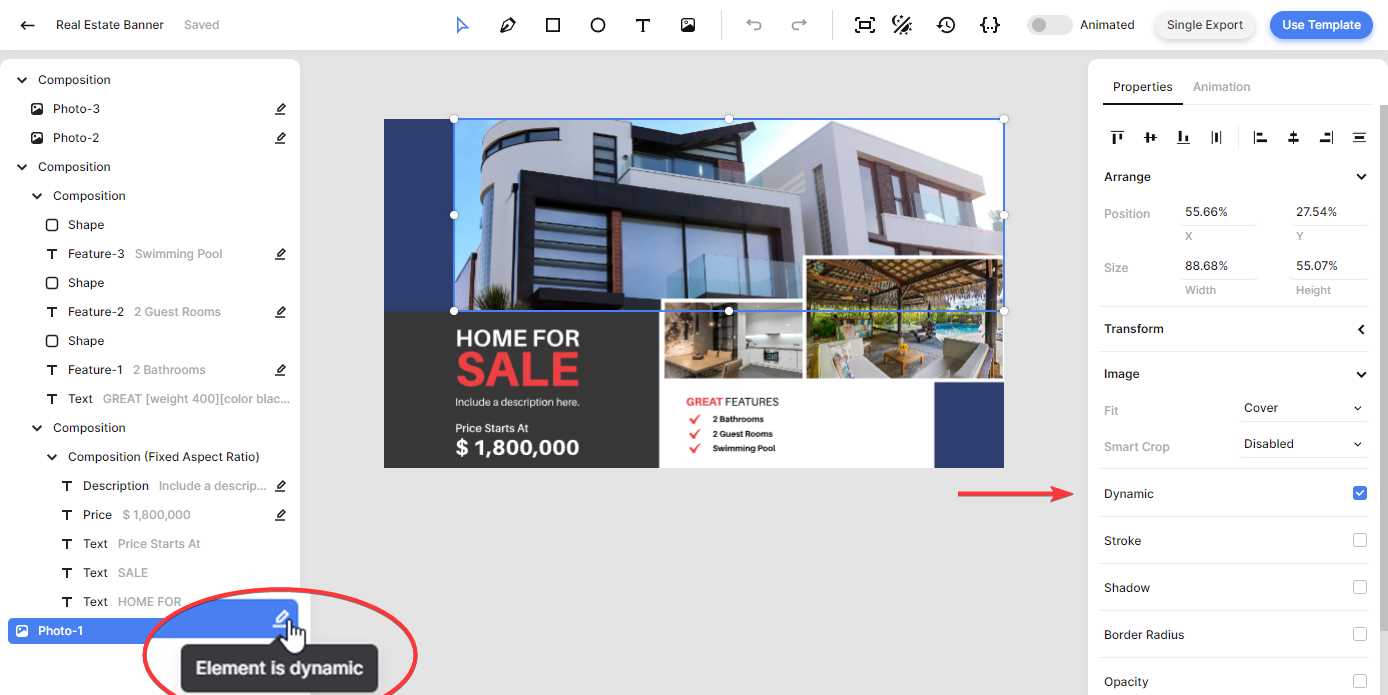
Feel free to customize the template however you like. If you wish to make any element dynamic, simply select the element and enable the Dynamic property from the right side panel, as shown above. For simplicity, I'll use the template as-is.
Now, let's move on and create our scenario in Make.
2. Set up a trigger in Make.com
In this step, we'll set up a simple trigger module to demonstrate how image generation works. However, feel free to use any trigger that suits your needs.
First, sign in to your Make account, and then click + Create a new scenario. Let's search for Tools as the app and choose Basic trigger as the trigger.
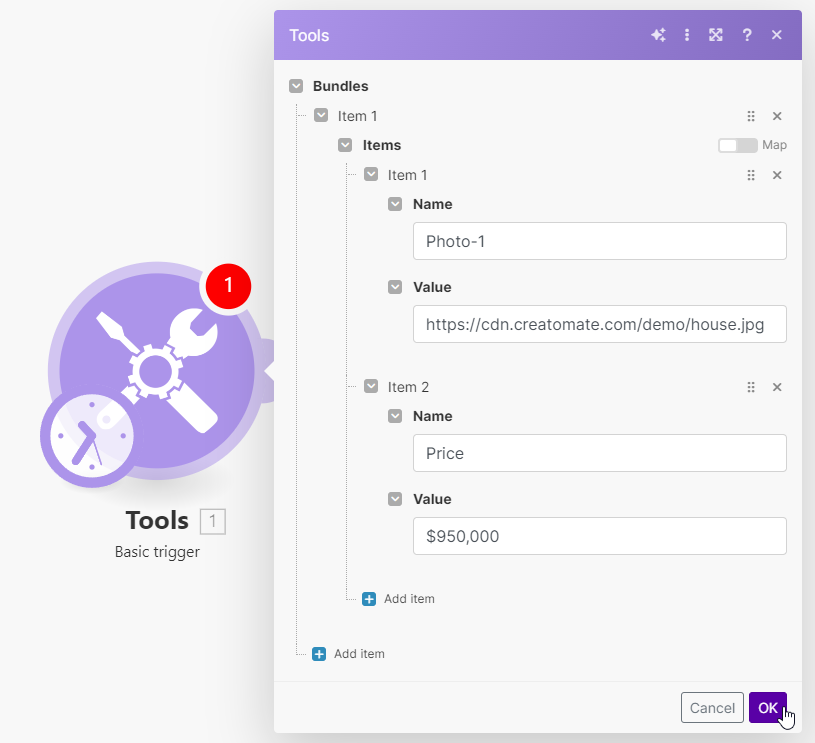
Next, let's add two items to our trigger. This data will be used to replace the dynamic elements within our template:
- Photo-1 -> https://cdn.creatomate.com/demo/house.jpg
- Price -> $950,000
Click OK to proceed:
Note: Although our template has more dynamic elements than the two items we've just added to the trigger, these two examples will suffice to show how the process works.
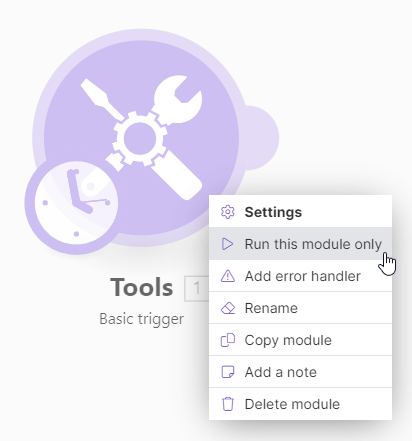
To verify that our trigger has been set up correctly, right-click on this module and choose Run this module only:
Once this test succeeds, proceed to the next step, where we'll use this data to automatically generate an image.
3. Generate the image
In this step, we'll use the Creatomate module to make an image. Basically, we'll map the data from a previous module onto the template to replace the dynamic elements.
Click + to add another module. Search for and choose Creatomate as the app and Render a Template as the action.
First, create a connection using your project's API key , which you can find under Project Settings in your Creatomate dashboard:

Then, select your Real Estate Banner template in the Template ID field. Make.com automatically pulls in the dynamic elements and lists them under Modifications.
Now, let's map the data from our trigger to the template as follows:
- Set Photo-1 to Tools - Basic trigger -> photo-1
- Set Price to Tools - Basic trigger -> price
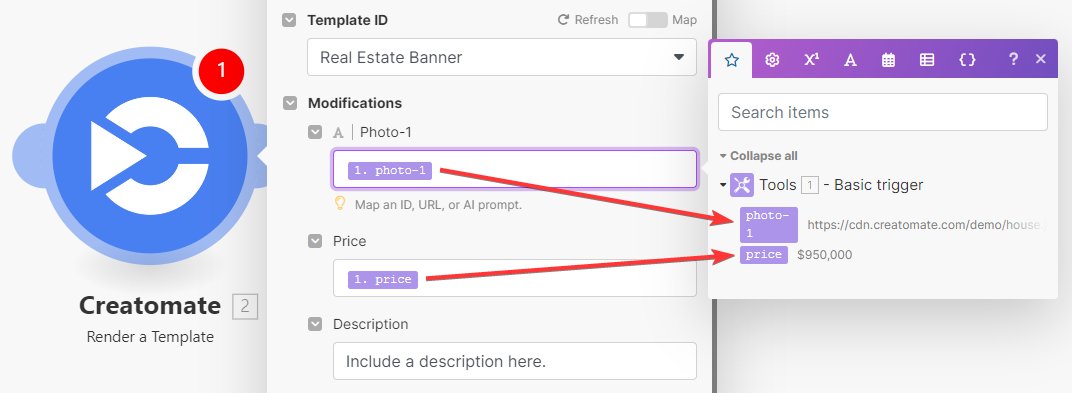
Note: As you can see, the other dynamic elements (description, features, and images) are also listed here. For simplicity, we will not change them. If you don't insert new data, the template's default values will be used.
Once done, click OK.
To test if Creatomate can generate an image for us, click the Run once button located in the bottom left corner:
If the test runs successfully, the module will turn green. To view Creatomate's output, click the magnifying glass icon. If you want, you can preview the image by visiting the URL:
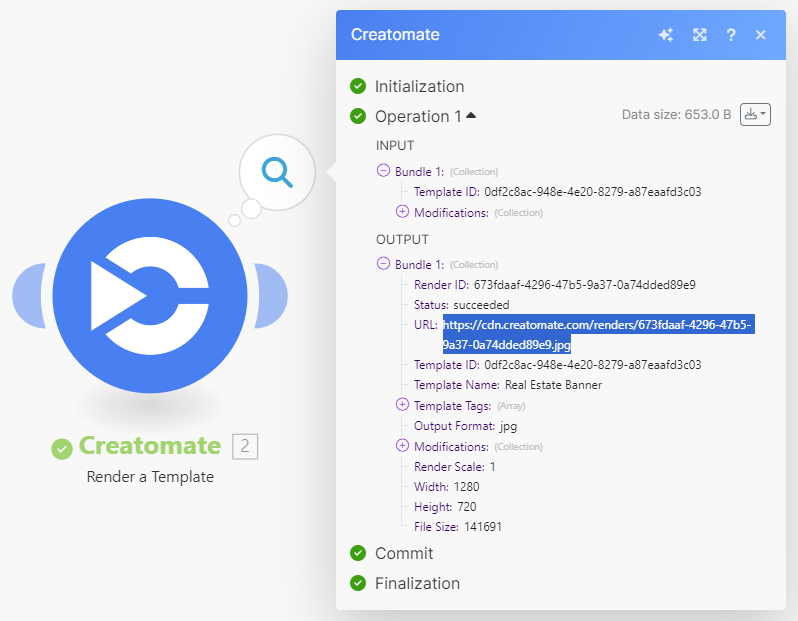
Let's move on to the next step.
4. Get the image file
To share the image on Facebook, we need the actual image file, not just the URL. This step will fetch it for us.
Note: Certain app integrations in Make, like "Facebook Pages", take a file as input, whereas others, such as "Instagram for Business", expect a URL. If you use an app that requires a URL, you can skip this "HTTP - Get a file" step and use the URL that was returned in the Creatomate module directly. Check out this tutorial as a reference (step 4).
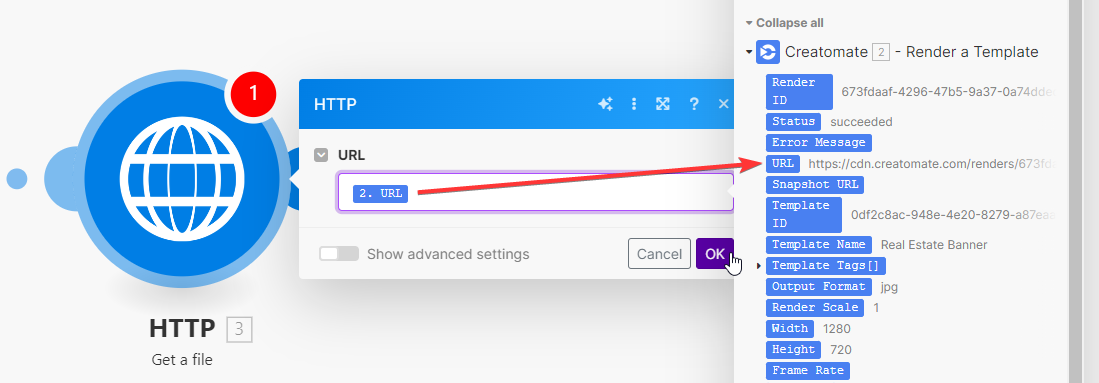
Click + to add another module. Search for and choose HTTP as the app and Get a file as the action.
In the URL field, select Creatomate - Render a Template -> URL. Then click OK:
5. Process the image
Lastly, in this final step, I’ll show you how to share the image on Facebook.
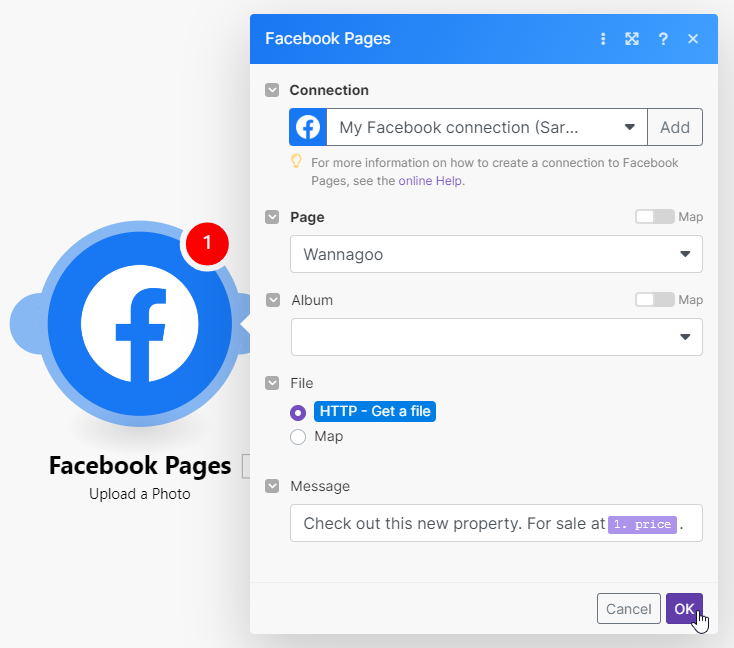
Click + to add another module. Search for and choose Facebook Pages as the app and Upload a Photo as the action.
Choose your account or create a connection, then pick your page. In the File field, you'll notice that HTTP - Get a file has been pre-selected. If you wish, you can include a description in the Message field. When you're done, click OK:
Click Run once one last time. Once you've set up this step correctly, the image will be posted on your Facebook page:

What's next for image creation with Make (Integromat)
And there you have it! Throughout this tutorial, we've built a simple scenario that shows you how to create images using Make and Creatomate. By now, you should be able to set up a custom workflow tailored to your specific needs.
Consider using these triggers:
- New products, articles, or customers in Shopify
- New or updated records in Airtable
- New responses in Google Forms
And explore these actions for using the generated images:
- Create a photo post in Instagram for Business
- Send an email in Gmail
- Upload a file to platforms like Dropbox, Google Drive, or Slack
While images work well for marketing, video content tends to perform even better. The exciting part is that producing videos using Make and Creatomate is just as straightforward as creating images. Check out our video creation tutorial next, and you'll be generating videos in no time.
You might also like these tutorials


Start automating today
Start with a full-featured trial with 50 credits, no credit card required.
Get started for free →