How to Automatically Create Real Estate Listing Videos

Learn how to automate real estate videos using a simple spreadsheet that turns property listings into short videos for social media.
We live in a world where social media is everywhere. So when it comes to finding our dream house, what better place to start looking than on one of these platforms? For real estate agents, this is an excellent way to reach potential clients, build trust, and market properties.
There's no doubt that video content performs better than static content. So realtors should use video to get people interested in their listings. This seems like a lot of work, right? The good news is that video automation can help. By using a reusable template and some data like images, addresses, prices, and other details, you can automatically create social media videos from property listings – in a matter of minutes. Better yet, you can use Zapier or Make to post these videos directly to your Facebook, Instagram, YouTube and LinkedIn accounts (optional). This tutorial shows you how to do it.
We're going to create videos like this. However, you should also check out the gallery with ready-made templates and the editor if you want to create your own designs.
Looking for a completely hand-free method of producing real estate videos? Also check out this guide that explains how to automate real estate social media videos using Zapier.
How to auto-generate real estate videos?
To follow along, you'll need a Creatomate account. You can create a free account here.
The first thing we'll do is make a video template in Creatomate. This design will serve as the foundation for our listing videos. Next, we'll create a feed. In essence, it's a spreadsheet that generates videos based on our template and details about each property.
Once the listing videos have been created you might want to share them on social media. This can be done manually by downloading the videos, but it's also possible to automate this process as well (see optional steps 4 to 6 in the outline). I'll show you how to automatically post the generated videos to social media using Zapier and Make. These steps are optional, you can skip them.
Let's get started!
1. Create a template in Creatomate
Log in to your account and navigate to the Templates page. Click the + New button to browse the template gallery. You can pick any template you like or design your own from scratch. For this tutorial, I'll go with the Real Estate Detailed template from the Real Estate category. Select a size based on the type of video you want to post. Take the 1:1 Square size for instance, and click Create Template to open it in the editor:
In the left-side panel, we can find the elements that make up the template. An important thing to know about templates is that elements can be marked as dynamic. This just means that it's a placeholder that we'll later replace with our listing data. In our template, the address, details, photos and realtor information are all dynamic:
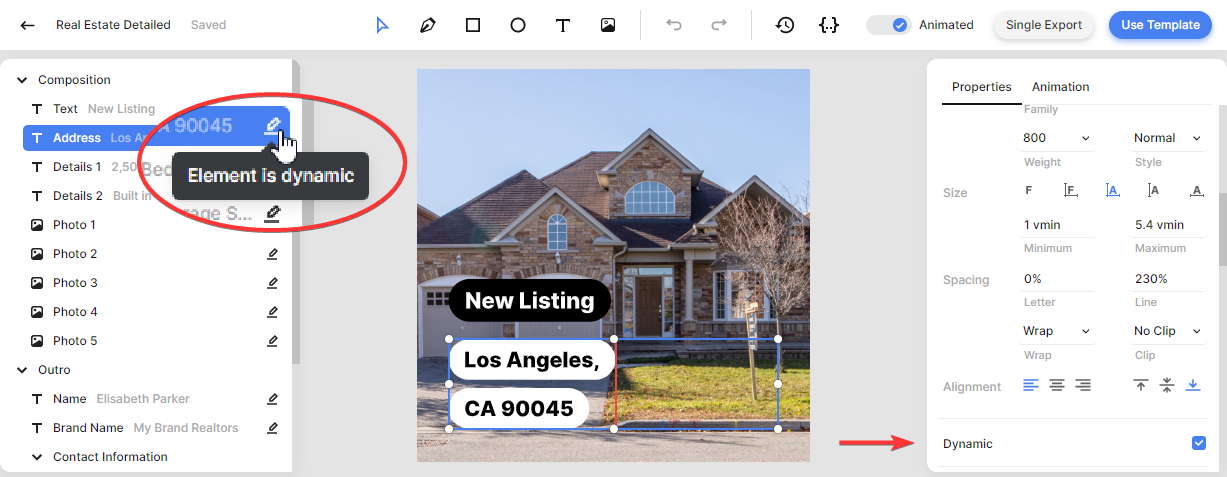
If you want to make an element dynamic or non-dynamic, simply select it and check the Dynamic property from the right side panel, as shown above.
To keep things simple, I'm going to use the template as is, but you can customize it however you want. Let's move on to the next step: creating a feed.
2. Create a feed for your property listings
Click the Use Template button at the top right of the template editor. Click on Spreadsheet to Video and select Create new feed. After clicking Continue, we'll be taken to our newly created feed:
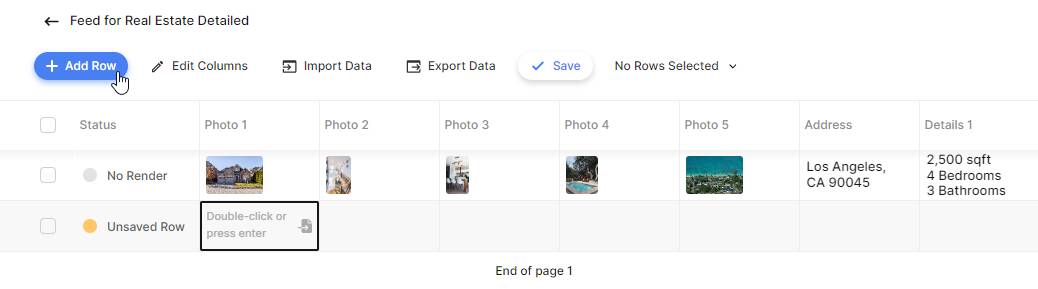
Think of the feed as a spreadsheet based on a video template. As you can see, the template's dynamic elements are mapped to the columns of the feed; Address, Details, Photos, etc. As a result, each row will create a unique video since we'll enter different text values and images for each listing.
Let's insert some property listing data into the feed by clicking Add row. A preview of the video is shown on the right side of the table.
- Photo Columns: upload an image from your computer or enter a URL to a public image.
- Text Columns: provide listing information for each value.
You can add as many rows as you need. When you're done, click Save. After saving, the status column updates from Unsaved Row to No Render. This means your data is saved, but no video has been made yet (which is called a render).
Tip: Alternatively, you can import assets and data as a CSV file using the Import Data button rather than entering every row by hand.
Now let's make some videos.
3. Generate and download the videos
The right side shows a preview of the final video for each row. If the preview looks as desired, click Create render to generate this video. The video is complete when the status is Rendered:
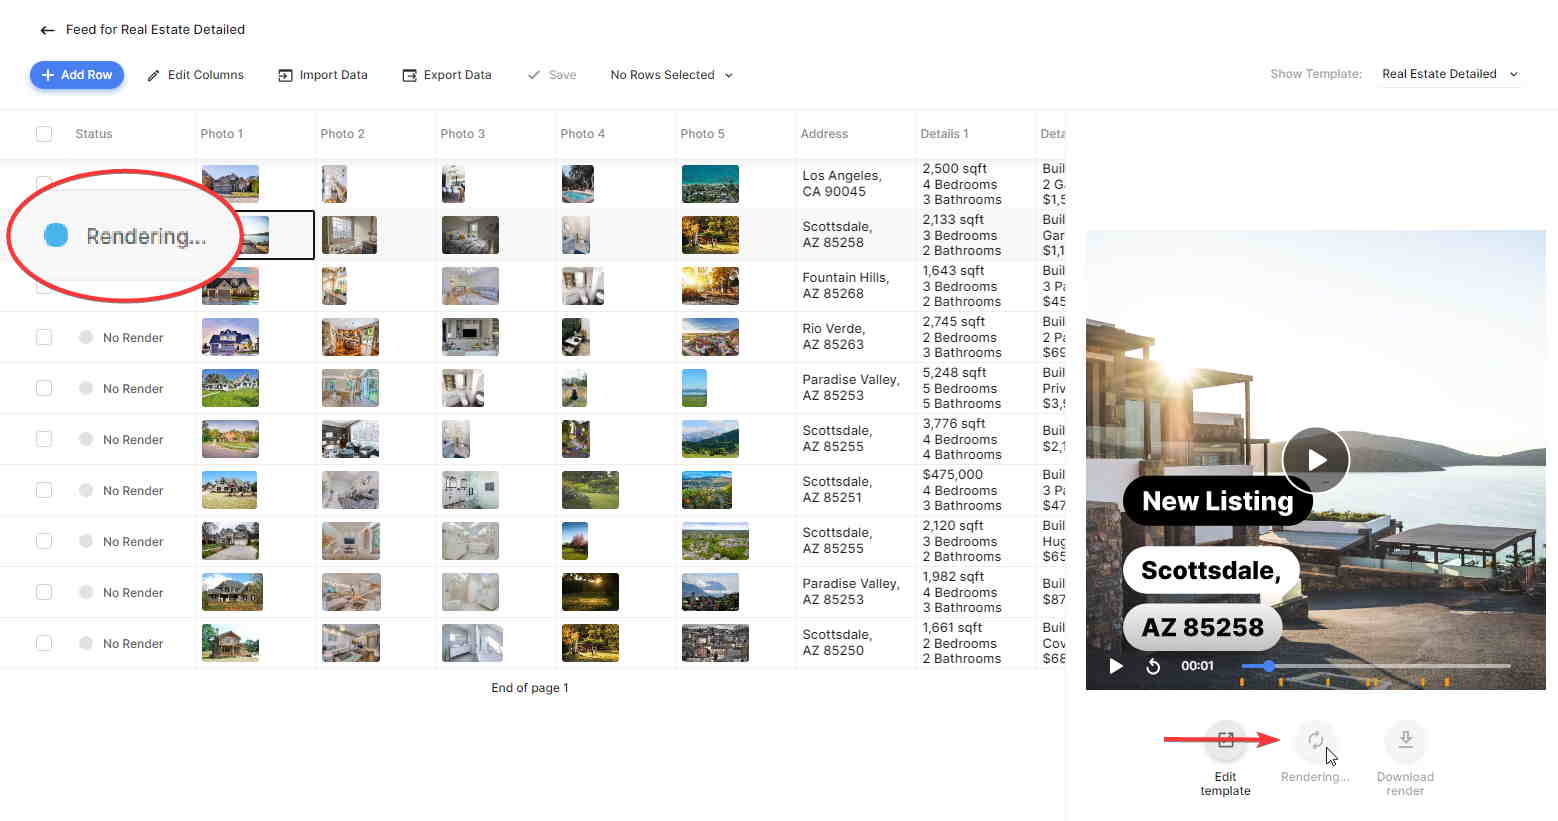
It's also possible to render multiple rows at once. This can be done by selecting some rows, clicking × Rows Selected, and clicking Create Renders:
As soon as our videos are rendered, we can download them to our computer. We'll click × Rows Selected and click Download Renders. It's recommended to select a text column to name your files, like Address. We'll get a ZIP file with the videos after clicking Download:
Tip: A single video can be downloaded by clicking the Download render button under its preview.
Now you can use the videos wherever you want.
The tutorial ends here when there is no need to automate the workflow any further. However, in the next steps, I'll show you how to use Make and Zapier to automatically post the videos to social media.
4. Optional: Add columns to the feed
The following steps are only necessary if you want to automate your workflow even further.
Instead of manually posting each video on social media, it's more efficient to set up an automated workflow for this. That's what we'll do in the upcoming steps of this tutorial. This workflow will post the videos to YouTube, Facebook, Instagram or LinkedIn, once they are created with our feed. So, when we click the Create render button, the workflow will start. In that case, we need a way to pass along the content of the posts. To accomplish this, we can add additional columns to the feed, which we can then access through our automated workflow.
I'll add two columns for this, but you can do whatever works for you. Click Edit Columns, then click + Add column and give it the name Title. Again, click + Add column and name this one Description. The columns can be reordered as shown in the video below. When done, click OK:
5. Optional: Auto-post the listing videos using Zapier
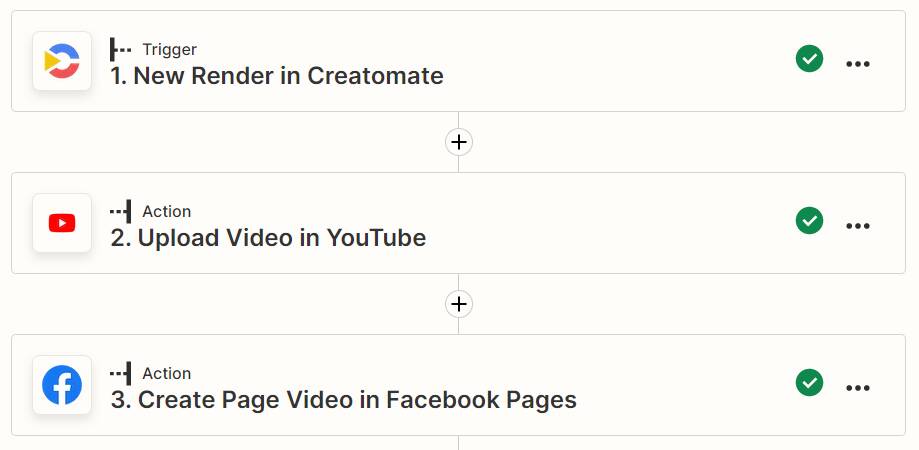
We'll start with Zapier, which is the recommended no-code platform for automating video with Creatomate. It allows auto-posting videos to YouTube and Facebook. So let's make a Zap like this:
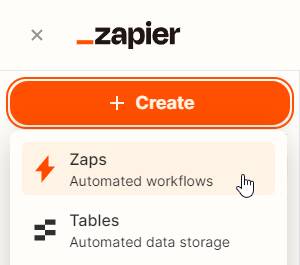
Log in to your Zapier account or sign up for a free account first. From your dashboard, click the + Create button and choose Zaps:
Click the Trigger block. Then, search for the Creatomate app and select the New Render event:
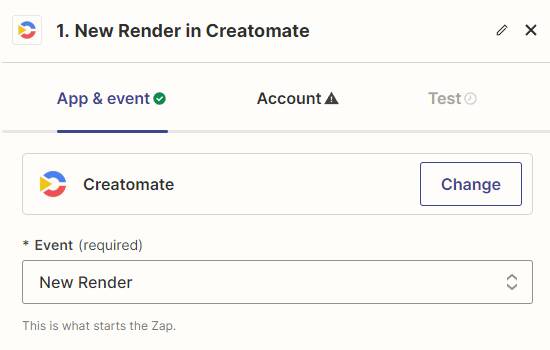
Then, click Continue.
Now, we have to choose our account. We have to sign in with our project's API key. You can find it under Project Settings in your account.
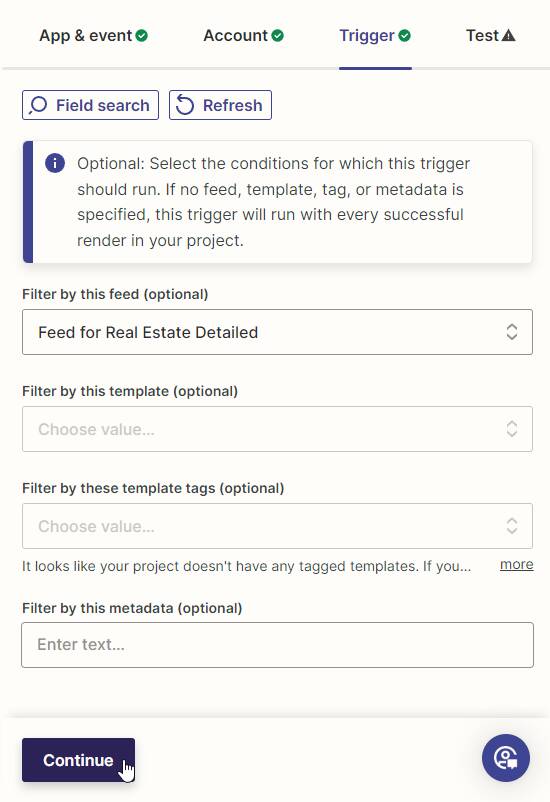
To set up the trigger, we'll select our Feed for Real Estate Detailed in the Filter by this feed field. Then, click Continue:
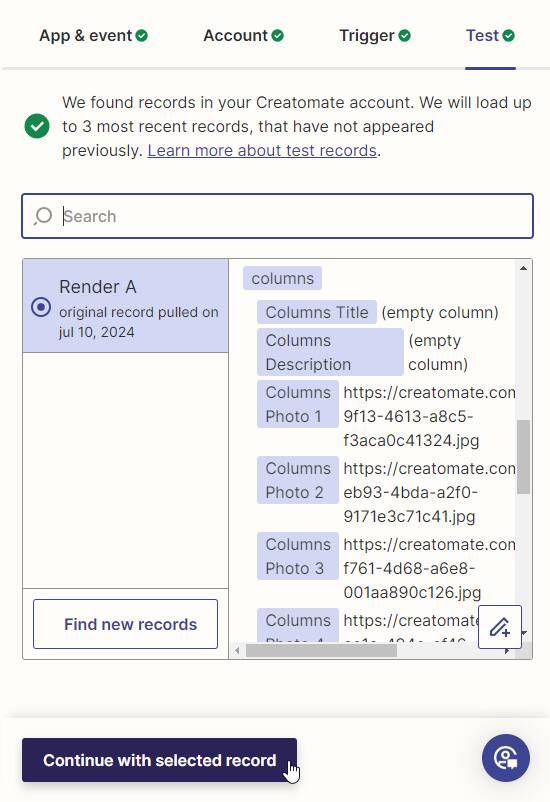
Click Test trigger to make sure Zapier can find a render. The result should include a test video along with corresponding columns. Earlier in this tutorial, we rendered some videos without titles and descriptions, so you'll see 'empty column'. This is fine, because we just need Zapier to find them so we can link to them in our next actions. Once the test is successful, click Continue with selected record:
We can now use this data to set up the rest of our Zap.
Add action: Upload Video in YouTube
Search for the YouTube app and select the Upload Video event. Continue by choosing your account or sign in with Google first. Then, click Continue.
On the Action page, we can specify how we want to post the videos. Let's assign the columns and the video to the required fields:
- Set Title to: Creatomate -> Columns Title
- Set Description to: Creatomate -> Columns Description
- Set Video to: Creatomate -> Url
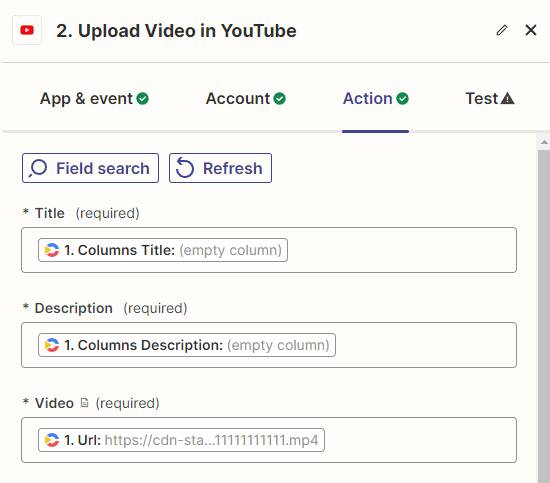
You can set the other options however you want. Once you're done, click Continue. Then, click Test step to make sure it's set up right. You don't actually upload anything to YouTube. It's just a test to see if the data being sent correctly.
Add action: Create Page Video in Facebook Pages
Click + to add the Facebook Pages app and select the Create Page Video event. Continue by selecting your account or signing in first. Then, click Continue.
On the Action page, we can create our Facebook posts. First, select your page. Then add the video by selecting Creatomate -> Url in the Video field. For the Title and Description fields, select the corresponding columns:
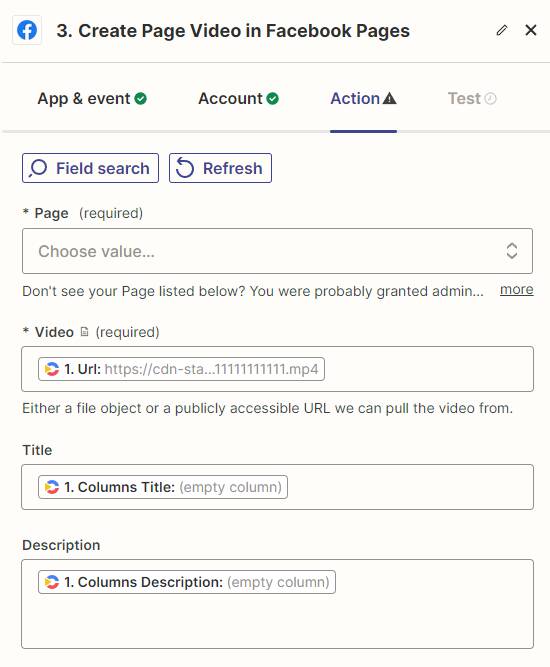
When done, click Continue.
Click Test step to make sure it works. There will be a test video posted to your account right away, so you might want to delete it.
Once you're happy with your workflow, click Publish to activate your Zap.
Next, I'll show you how to auto-post the videos to Instagram and LinkedIn using Make.
6. Optional: Auto-post the listing videos using Make
Make is another no-code automation tool we can use to post videos to social media. Unlike Zapier, Make lets us post videos to Instagram and LinkedIn. Let's set up this scenario:
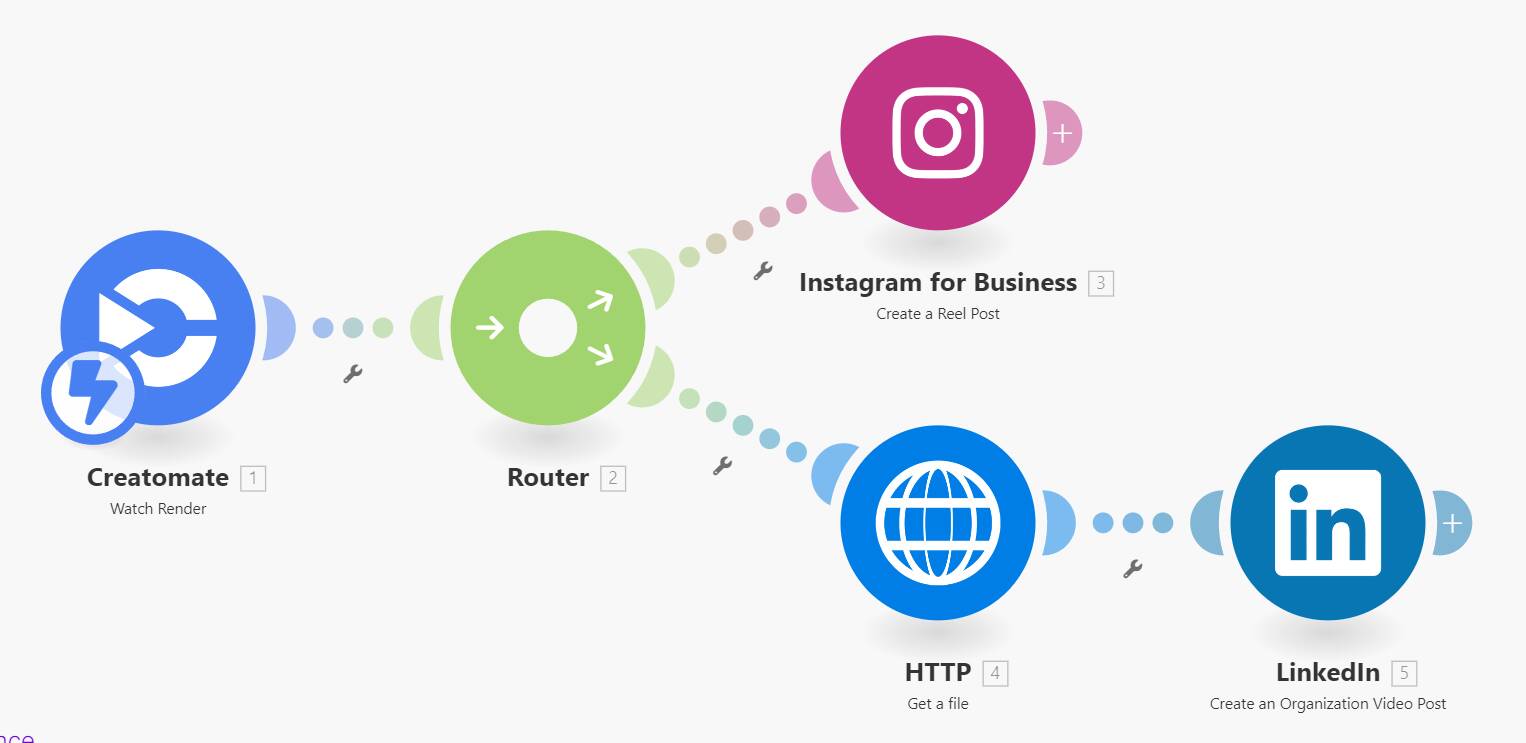
Log in to your Make account or sign up for a free account first. From your dashboard, click + Create a new scenario. Click the big + button, search for the Creatomate app and select Watch Render.
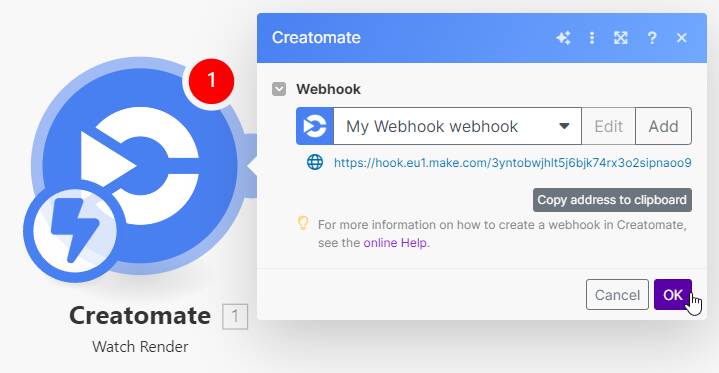
To fetch the videos generated with our feed, we'll have to create a webhook first. You can do this by entering your project's API key, which you can find under Project Settings in your Creatomate dashboard.
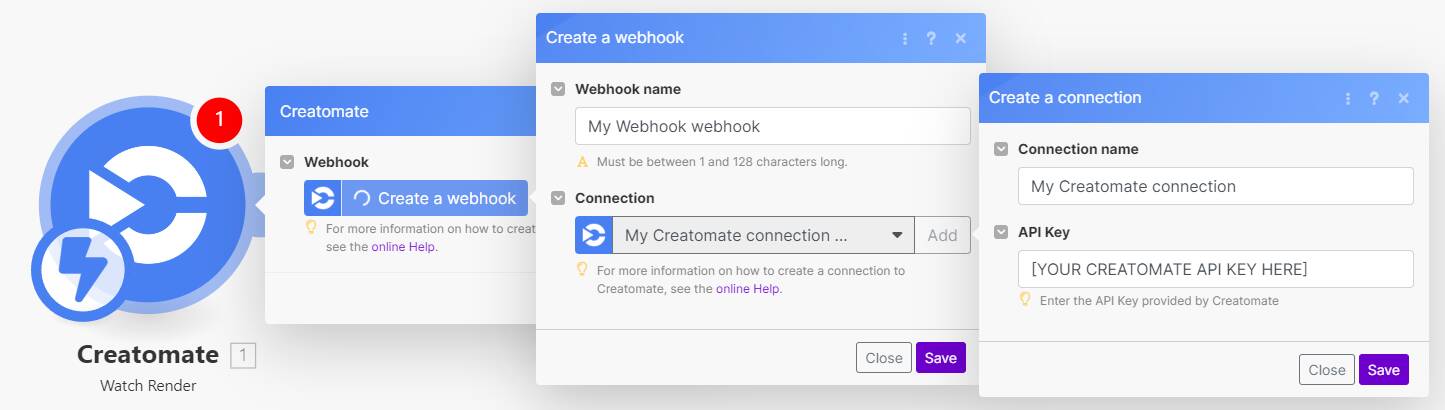
A new webhook is created. Copy it's URL and click OK:
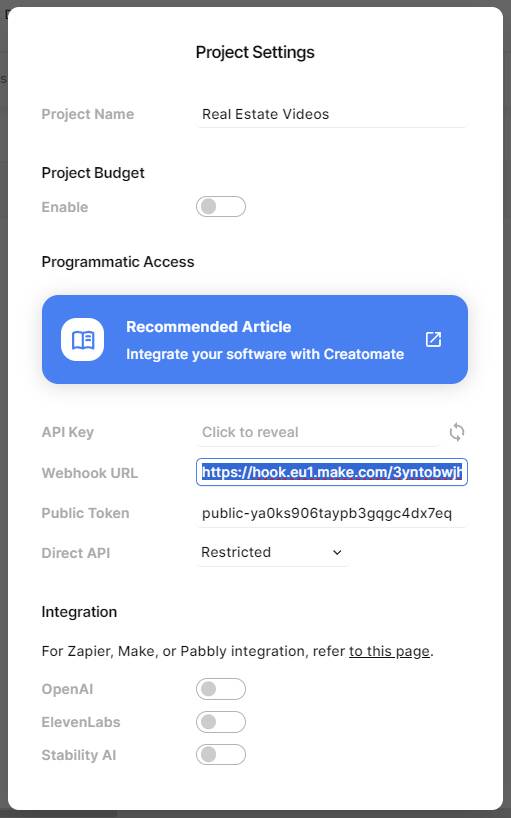
Now, we have to connect the webhook URL to our Creatomate project . In your Creatomate dashboard, click …, and select Project Settings. Then, paste the webhook URL in the corresponding field:
Back in Make, right-click the Creatomate trigger and select Run this module only to test it:
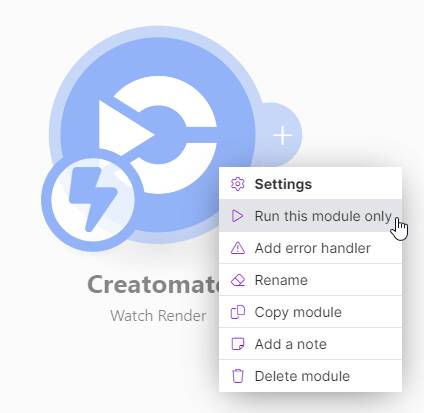
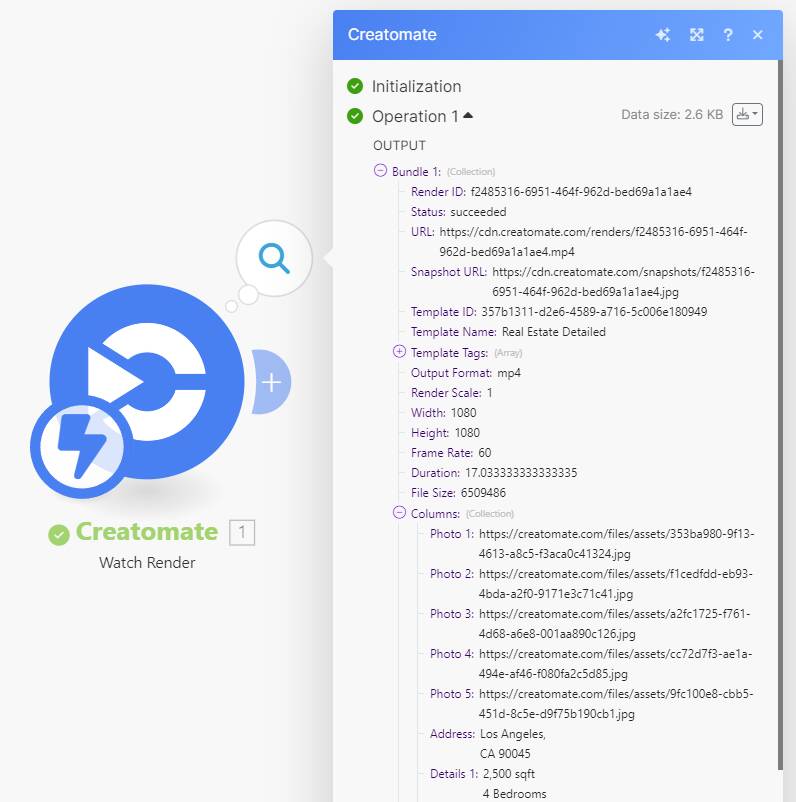
It'll wait for data, so create a render with a test title and a test description using the feed. Once the video is complete, the trigger should now report that it has received data:
The webhook trigger is set up correctly. Next, we're going to post the video to Instagram and LinkedIn.
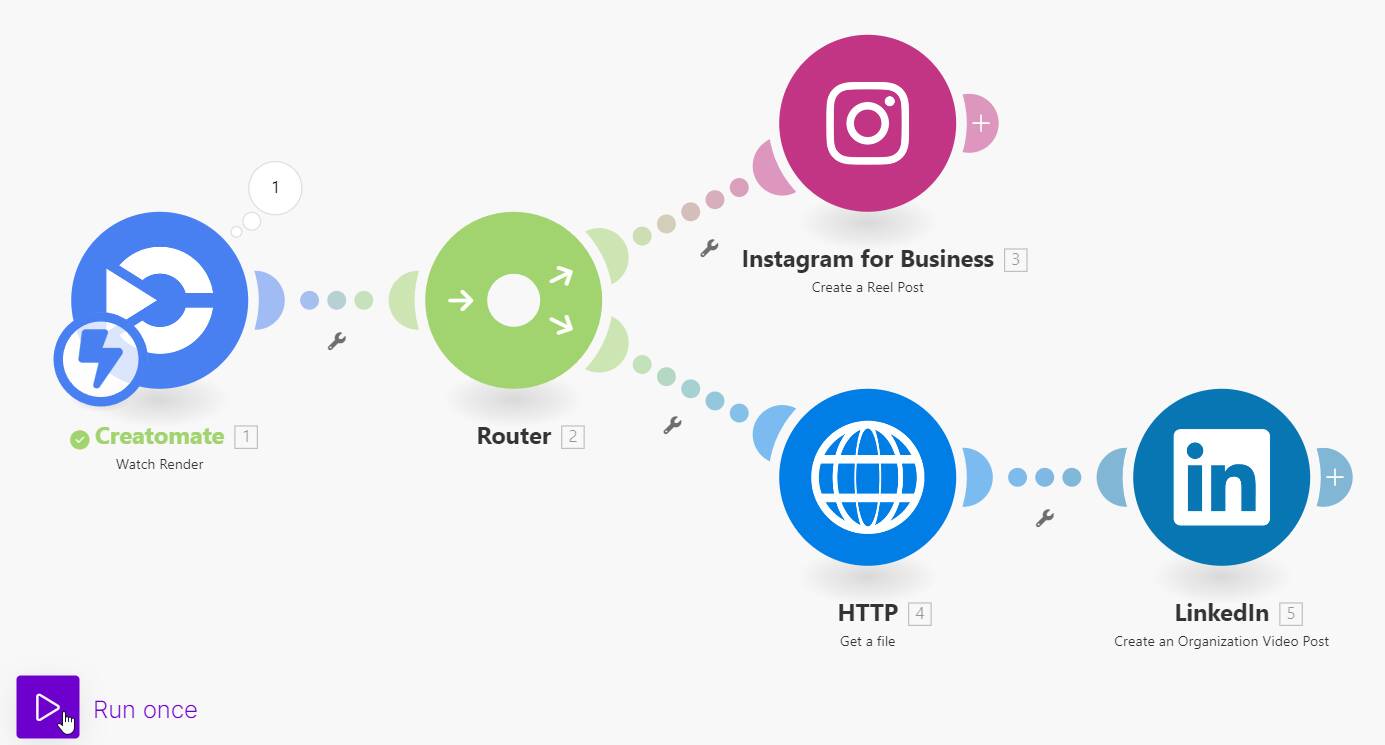
Add module: Router (optional)
Since I'm showing you how to post videos on Instagram and LinkedIn, we're adding a router. We'll be able to link multiple apps to it this way. However, you can skip this step if you're only going to post on one social media platform.
Click + to add another step to your scenario. Search for the Flow Control app and select Router. This will create two routes:

Add module: Instagram for Business - Create a Reel Post
Click the big + at the top. Search for the Instagram for Business app with the Create a Reel Post action.
You have to connect your Instagram for Business account and select your page first. Then, select Creatomate - Watch Render -> URL in the Video URL field:
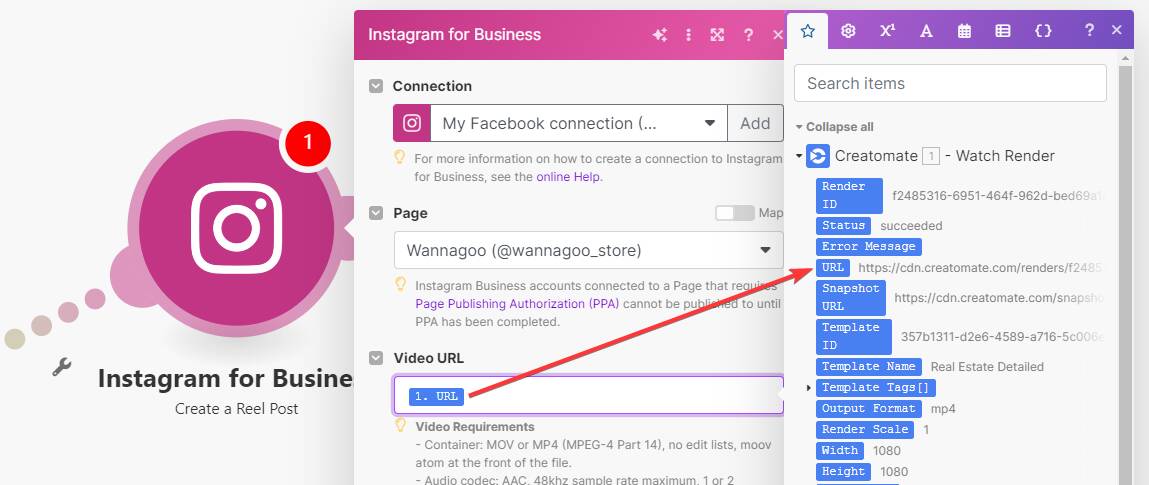
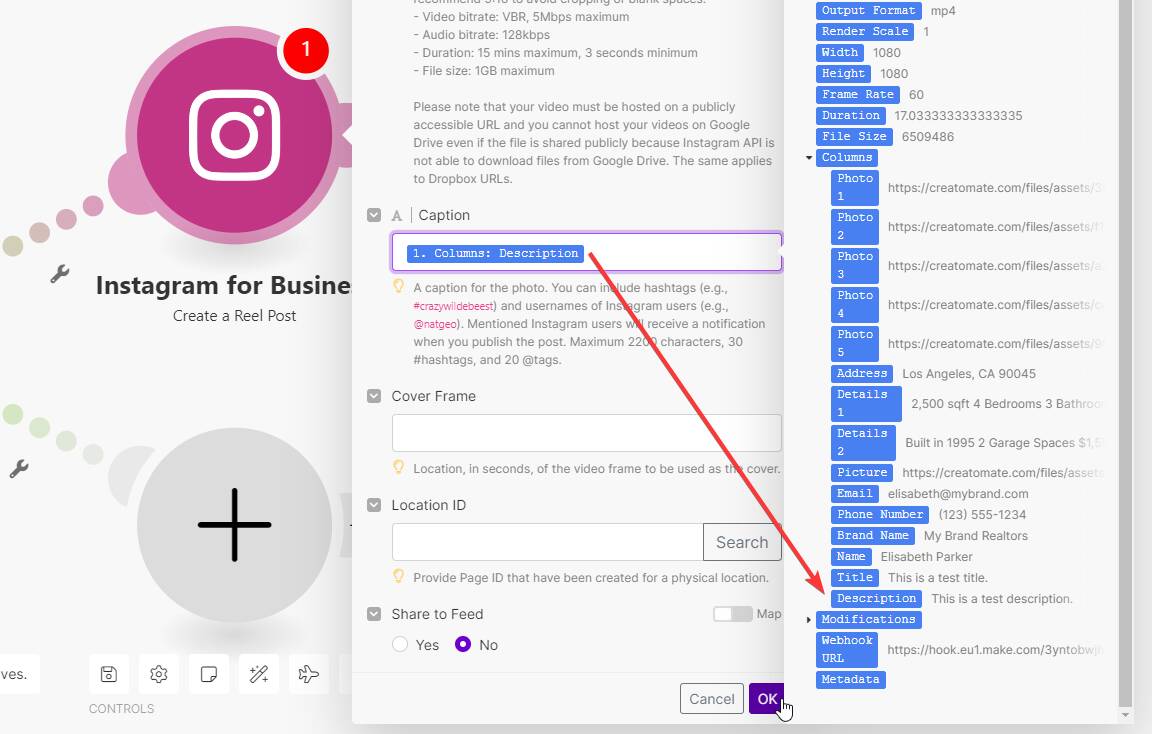
Then, select the Creatomate - Watch Render -> Columns: Description in the Caption field. When done, click OK:
Add module: HTTP - Get a file
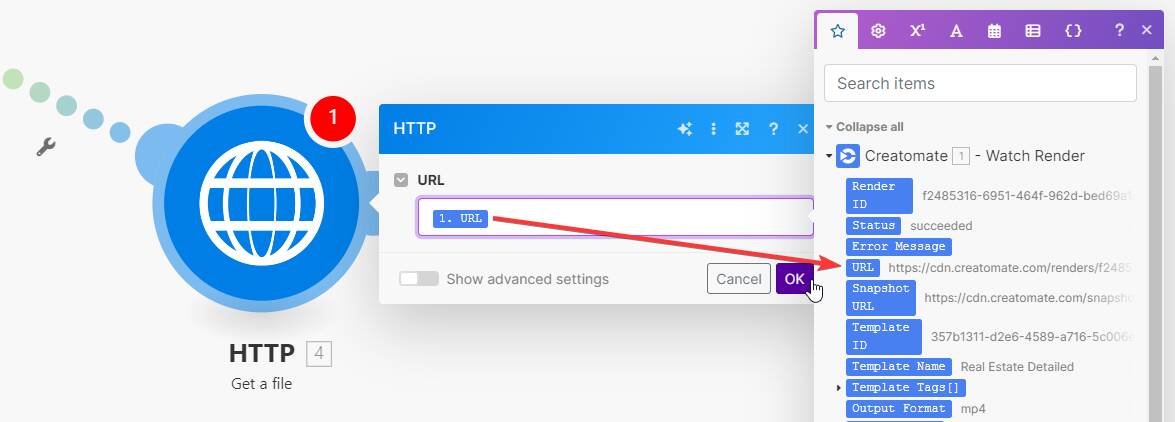
We'll add this module to download the videos. Since LinkedIn expects a file, not a URL, like Instagram, we need to fetch it first.
For the other route, select the HTTP app with the Get a file action. In the URL field, select Creatomate - Watch Render -> URL. Then, click OK:
Note: There's a maximum file size that you can process depending on your Make subscription. Free accounts are limited to 5 MB, so our template might produce too large videos. If so, you can upgrade your Make subscription or use another template that produces smaller videos.
Add module: LinkedIn - Create an Organization Video Post
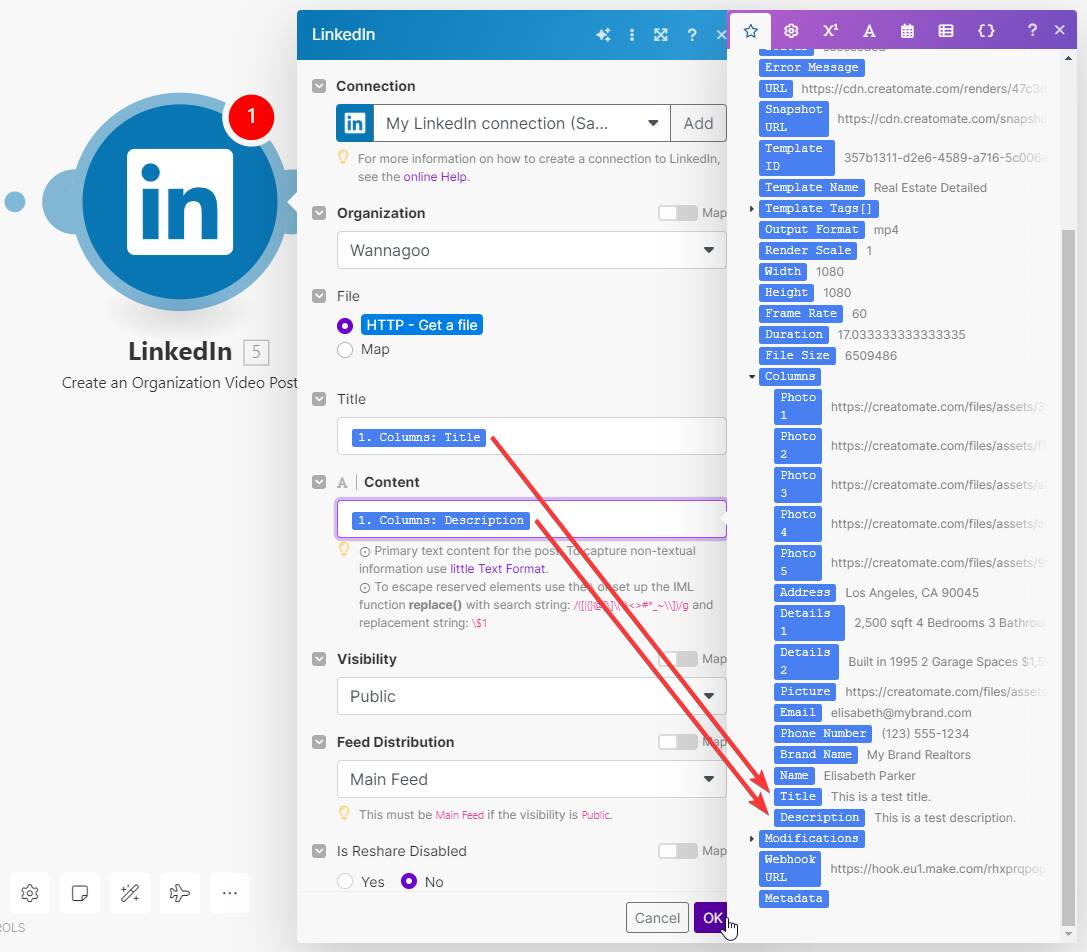
Add the LinkedIn app with the Create an Organization Video Post action. Then, connect your account and select your organization first.
For the File field, make sure to select HTTP - Get a file. For the Title and Content fields, you can link to the appropriate columns. Set the other options however you like and click OK when you're done:
To test if everything is set up correctly, click the Run once button located in the bottom left corner:
Then, return to your feed and create a render. If it works as expected, the video should be posted on your Instagram and LinkedIn accounts.
Once you're happy with your workflow, switch the Scheduling button to ON to activate it.
Wrapping up
Well done! You made it through this tutorial. As you can see, it takes only a few simple steps (steps 1 to 3) to convert your property listings into social media videos. From now on, all you have to do is upload some assets and put some details into the feed. And if you want to go even further, you can automatically post the videos to social media using Zapier or Make (steps 4 to 6).
It's now easier than ever for realtors to promote their listings on social media, engage more potential clients, and ultimately sell more homes, without spending too much time on content creation.
Looking to automate more of your social media marketing? Check out our step-by-step tutorials covering a wide range of use cases. You can find them all on our blog page, or jump straight into one of the most popular ones below:
👉 How to Automatically Create YouTube Shorts using Make
👉 How to Automatically Create and Post TikTok Videos using Zapier
👉 How to Automatically Create Instagram Posts using Make
👉 How to Automatically Add Subtitles to Videos using Zapier
👉 How to use AI to Automate Videos for Shorts, Stories, and Reels
👉 How to Create Videos using Text-to-Speech AI and Zapier
👉 How to Create AI-Generated Videos using ChatGPT and Make.com
You might also like these tutorials


Start automating today
Start with a full-featured trial with 50 credits, no credit card required.
Get started for free →