How to Automate Video Generation using an API

In this tutorial, you'll learn how to use Creatomate, a cloud-based video rendering API, to create videos programmatically.
Are you trying to generate videos with code? If you've looked at low-level tools like FFmpeg or considered building your own video pipeline, you're on the right track. But in most cases, implementing a scalable video workflow this way is both complex and resource-intensive.
Good news: there's a much more efficient solution. Meet Creatomate, a cloud-based REST API for dynamic video creation. It handles all the heavy lifting, so you don't have to worry about servers, infrastructure, or scalability.
You can automate everything from simple image-based slideshows to fully personalized customer videos – all the way to AI-generated social media shorts, complete with voiceovers, subtitles, and visuals. The online template editor lets you design custom layouts and animations exactly the way you want them.
In this quick guide, I'll walk you through the basics of using Creatomate's API, giving you a solid foundation to build on. By the end, you will be able to apply what you have learned here to your own projects and applications.
Prerequisites
To follow along, you'll need a free Creatomate account. If you haven't already, you can create one here. You'll also need a way to interact with the API. Since Creatomate uses a simple REST interface, you can use any API tool such as cURL, Postman, or Insomnia.
Tip: You can also use your favourite programming language or no-code automation platform to invoke the API. Check out one of the tutorials below for detailed, step-by-step instructions:
- How to Automate Video Generation with Python
- How to Automate Video Generation with Node.js
- How to Automate Video Generation with Ruby
- How to Automate Video Generation with PHP
- How to Automate Video Generation with C#
- How to Automate Video Generation with Go
- How to Automate Video Generation with Java
- How to Automate Video Creation with Zapier
- How to Automate Video Creation with Make.com
- How to Automate Video Creation with n8n
How to create videos using an API
There are two main ways to generate videos with the Creatomate API.
The simplest and most common approach is to use a template. You create a video design once using the online editor, and then use the API to insert dynamic data into that template. Each API request generates a new, unique video. That's the method we'll cover in this tutorial.
Another option is to build videos entirely in code. For full control, you can construct videos from scratch using JSON. This allows you to define every element of the video – from layout and animations to timing – directly in the API request. It's perfect for advanced or highly dynamic workflows. If you're interested in this approach, check out the JSON to Video documentation.
Ready? Let's dive in!
1. Create a video template in Creatomate
The first step is to create a video template – a reusable design that will serve as the foundation for all videos you generate with your code.
Log in to your Creatomate account, or sign up for free if you don't have one yet.
Once you're logged in, go to the Templates page and click New to open the template gallery. If you already have a design in mind, you can start from scratch. Otherwise, choose one of the pre-made templates for a faster setup.
For this tutorial, we'll keep it simple and use the Quick Promo template from the Featured category. Select the 9:16 Vertical format, then click Create Template to open it in the editor:
Now let's take a quick look at how the template works.
On the left side of the editor, you'll see all the elements that make up the video. Some – like Video, Text-1, and Text-2 – are marked as dynamic. These are the elements you'll control through the API, allowing you to insert different text and media for each video you generate.
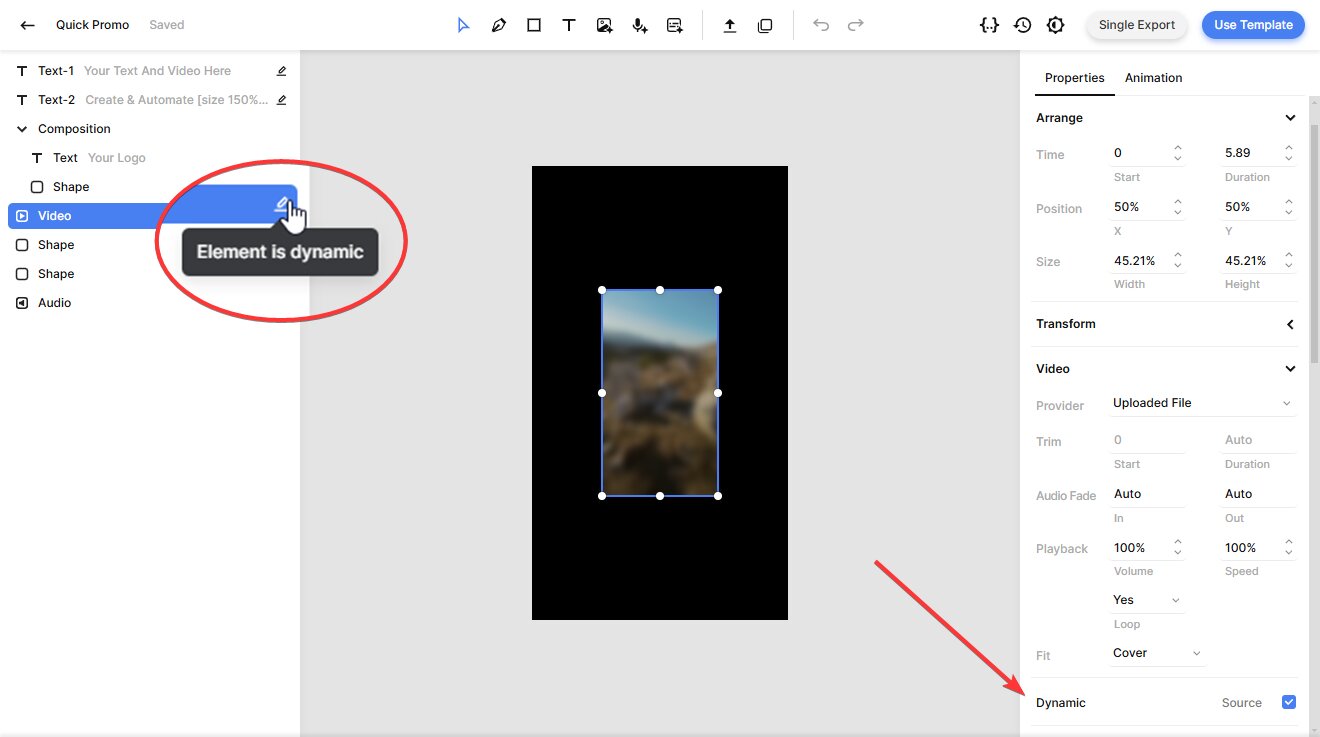
You have full control to customize your template to match your brand, message, and workflow. The editor is both intuitive and flexible – ideal for beginners and experienced video creators alike. Want to learn more? Check out our template editor guide.
Once you're happy with your template, you're ready to move on to the next step.
2. Set up the API call
Once you have a video template, you can easily turn it into an API request. Since Creatomate uses a REST API, there's no need to install anything – just send a request over HTTP. Creatomate provides code snippets in various programming languages, but we'll use cURL in this tutorial.
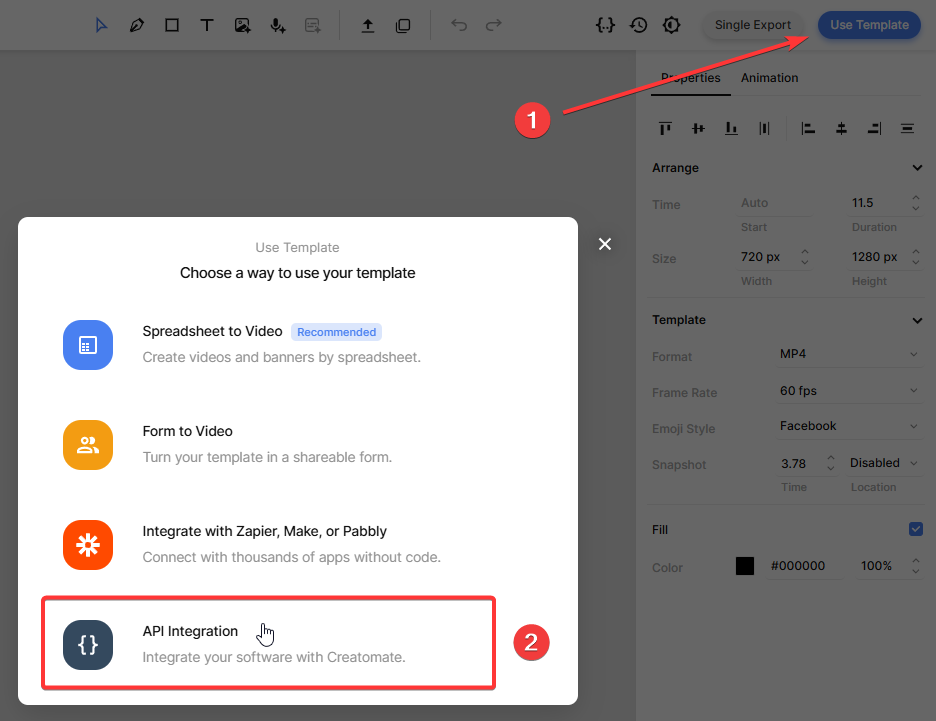
In the template editor, click the Use Template button in the top-right corner, then select API Integration:
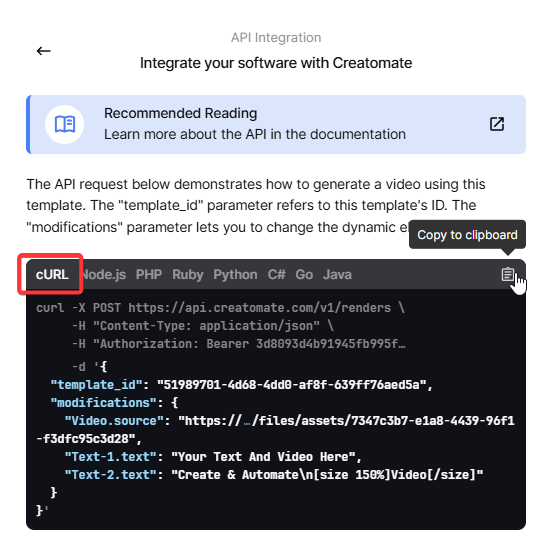
Then, copy the cURL code snippet:
Paste it into your preferred API tool (e.g., Postman, Insomnia, or a terminal using cURL).
In the next step, I'll show you how to insert dynamic data.
3. Change the video content
Each video can be customized using the “modifications” parameter, which lets you insert text, images, video clips, or audio. You can even generate AI voiceovers with animated subtitles. Here's a tutorial on how to do that.
In a real-world setup, this dynamic data would typically come from a database, another API, or user input. But to keep things simple in this tutorial, we'll use some predefined test data.
Copy and paste the following:
1{
2  "template_id": "your_template_id",
3  "modifications": {
4    "Video.source": "https://cdn.creatomate.com/demo/video5.mp4",
5    "Text-1.text": "Hello new users 👋",
6    "Text-2.text": "It is easy to create videos from your own scripts!"
7  }
8}
Replace "your_template_id" with your actual template ID, which you can find on the API Integration page.
4. Call the API to generate the video
Now that everything is set up, it's time to send the API request. I'll use the cURL command-line tool, but you're free to use any API client or write a script in your preferred programming language.
When you call the endpoint, Creatomate will return a JSON response confirming that your video render has been queued. The response will look something like this:
1{
2  "id": "c6ca8eb3-60cc-4900-8167-234a87f56819",
3  "status": "planned",
4  "url": "https://f002.backblazeb2.com/file/creatomate-c8xg3hsxdu/c6ca8eb3-60cc-4900-8167-234a87f56819.mp4",
5  "snapshot_url": "https://f002.backblazeb2.com/file/creatomate-c8xg3hsxdu/c6ca8eb3-60cc-4900-8167-234a87f56819-snapshot.jpg",
6  ...
7}
Now your video is being rendered in the background. Creatomate takes your input data and applies it to the template. The rendering process may take some time, depending on the video length and template complexity.
There are two ways to wait for the video to complete. One is to send a GET request to the API to check if the “status” has changed to “succeeded”. The other – and the recommended method – is to use a webhook. This means Creatomate can make a reverse API call to your application whenever the video is ready.
For this tutorial, we'll keep it simple by manually checking the video. Wait about a minute, then visit the URL provided in the API response. If you see a “Not Found” message, the video isn't ready yet. Just wait a little longer and try again.
Once rendering is complete, the URL will serve the finished video, showing the content you inserted in the previous step:
Now that you have the video link, you can download it or integrate it directly into your automation workflow – whatever suits your needs best.
Tip: On the API Log page in your Creatomate dashboard, you can view all the API requests you've sent. If a video fails to render, you'll find the error message and suggested fixes there.
What's next for video creation using an API
And that's how you create videos using the Creatomate API. Now that you understand the basic process, you can customize it to fit your own projects and workflows.
Curious about AI-generated videos? Think of those faceless shorts popular on YouTube, TikTok, and Instagram. Using simple API calls, you could automate a workflow where ChatGPT generates a story or script based on a topic you choose. A text-to-speech tool (like ElevenLabs) converts that script into an AI voiceover. Creatomate's auto-transcription feature creates animated subtitles, just like the trending social media videos. Visuals or backgrounds can be generated using AI tools such as DALL·E or Stable Diffusion. ChatGPT even helps you craft captions for your posts.
To help you get started, here are some tutorials you might find useful:
👉 How to Create AI Voice Over Videos using an API
👉 Using ChatGPT's API to Auto-Create Social Media Videos by Code
👉 How to Automate AI-Generated Shorts, Stories, and Reels
Video Generation FAQs
How do I get my Creatomate API key?
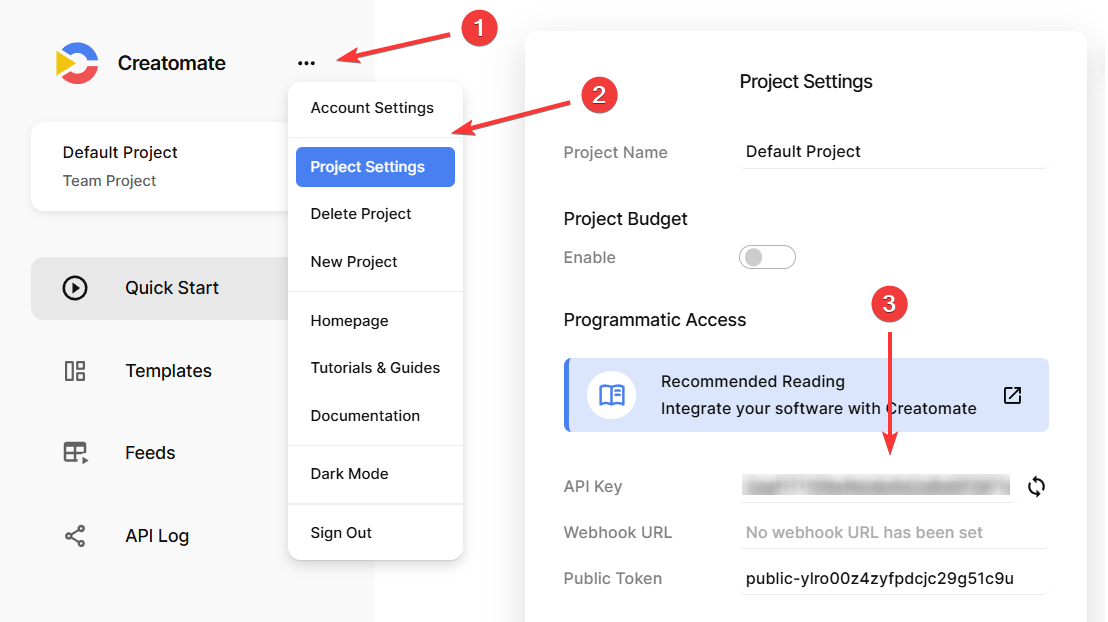
Each of your projects has a unique API key. To find it, log in to your Creatomate account and select the project you want to use. Then click on … (1) and choose Project Settings (2). Go to the API Key field (3) and click to reveal it:
Make sure to include your API key in every request to Creatomate by adding it as a header:
$ Authorization: Bearer YOUR_API_KEY
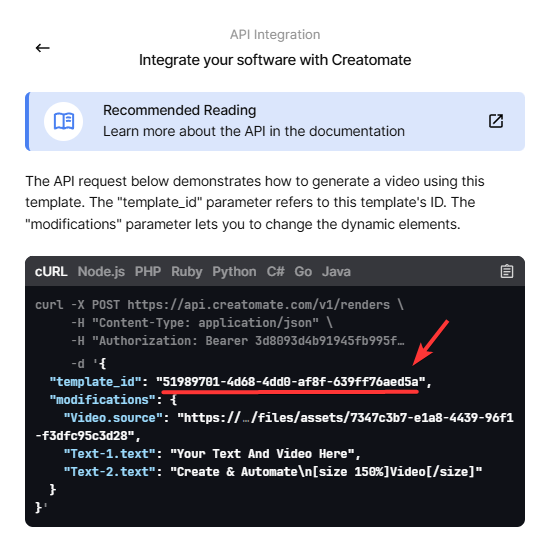
Where do I find my template ID?
Each template has its own ID that you need to include when sending an API request. This tells Creatomate which design to use for applying modifications. To find your template ID, click Use Template in the top-right corner of the editor, then select API Integration. Your template ID will be displayed here:
Can I create my own video templates?
Absolutely! Using the online template editor, you can create video templates tailored specifically to your needs. You can start from scratch or use a pre-designed template from our gallery as a starting point. You can also integrate generative AI tools to add voiceovers, animated subtitles, or background visuals to your videos. Check out our tutorials to learn how to set this up.
How much does the video generation API cost?
The cost depends on the type of video you want to create. It's calculated based on several factors like resolution, frame rate, and duration. You can calculate the exact credit cost using this formula.
For example, on a $54 monthly plan, you get 2,000 credits. That's enough to generate over 550 short social media videos – each 15 seconds long, in 720p resolution at 25 fps.
For a full pricing overview, visit our pricing page.
You might also like these tutorials


Start automating today
Start with a full-featured trial with 50 credits, no credit card required.
Get started for free →