How to Automate Video Generation with Python

In this tutorial, you'll learn how to create dynamic videos through your Python script using Creatomate's video generation API.
If you're looking to create videos using Python, you've likely come across libraries like OpenCV, MoviePy, and FFmpeg. They're great for video processing and basic editing, but when it comes to more advanced video automation – like generating social media videos or integrating AI tools like ChatGPT – they have their limits.
This is where Creatomate, a flexible video generation API, comes in. It offers built-in integrations for AI voiceovers, animated subtitles, and visuals, making it easy to create faceless, AI-generated shorts. In this tutorial, I'll walk you through the basic concepts of video automation with Python – an excellent starting point for building your own workflows. At the end, I'll point you to follow-up tutorials on how to integrate generative AI tools like ElevenLabs, DALL·E, and more.
The example video above gives you a glimpse of what's possible. From simple slideshows to highly dynamic video content, the online editor lets you customize videos exactly how you want them.
Prerequisites
Before getting started, make sure you have:
- Python3 installed. Download it from the official Python website if you don't have it already.
- a Creatomate account. Sign up for a free account if you don't already have one.
- a terminal or code editor. Any environment where you can run Python scripts will work.
How to auto-generate videos using Python?
There are two ways to create videos using Python and Creatomate. The easiest method is to use a template: you create a video design once and then use it in your script to insert dynamic data, generating a unique video each time. This is the approach we'll cover in this tutorial.
Instead of using a video template, you can also create videos entirely in Python. This gives you more flexibility since your videos won't have to follow a specific design. With just a bit of JSON, you can define every part of the video from start to finish, allowing you to create highly dynamic content. If you're interested in this approach, check out our JSON to Video documentation.
Let's get started by setting up a Python project.
1. Set up your Python project
First, create a new directory for your project. Open your terminal or command prompt and run:
$ mkdir video_creation_project
Then, navigate into it:
$ cd video_creation_project
Next, install the necessary dependencies. For this tutorial, we'll use the requests library to interact with the Creatomate API:
$ pip install requests
Now, create a Python file where you'll write your code. You can name it anything, but for consistency, we'll use generate_video.py.
Mac/Linux:
$ touch generate_video.py
Windows:
$ echo. > generate_video.py
With your Python project now set up, we're ready to move on. In the next step, we'll design a template in Creatomate to use for video creation.
2. Create a video template in Creatomate
Log in to your Creatomate account or sign up for free if you don't have one yet.
Navigate to the Templates page and click New to open the template gallery. You can either start from scratch if you have a specific design in mind or use a pre-made template for a quicker setup. To keep this tutorial simple, select the Quick Promo template from the Featured category. Choose the 9:16 Vertical size, then click Create Template to open it in the editor:
Let's take a closer look at the design and how we can use it in our Python script.
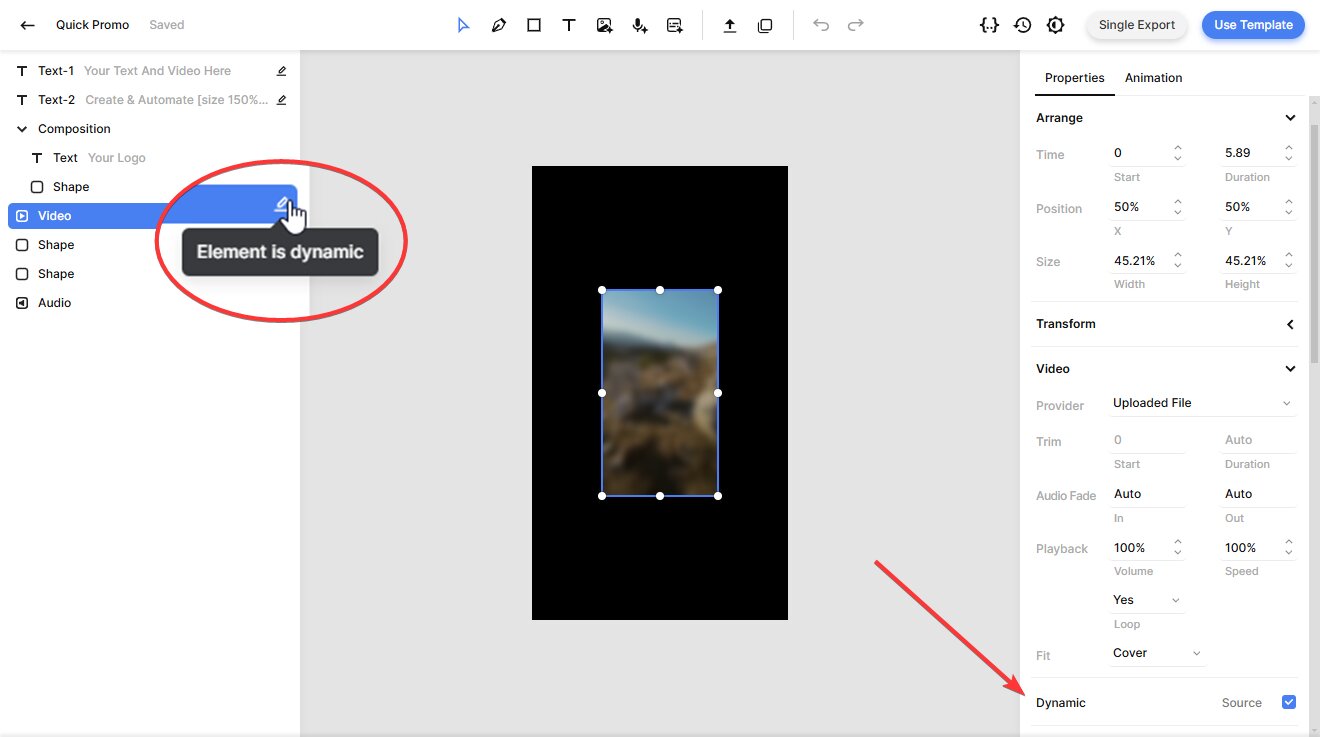
On the left side, you'll find the elements that make up the template. One important thing to note is that some elements can be marked as dynamic, such as Video, Text-1, and Text-2 in this template. This means we can insert different text and media for each video we generate:
You can fully customize a template to fit your exact needs. The editor has lots of customization options and is easy to use for anyone familiar with video editing tools. If you'd like to learn more about how the editor works, refer to this quick guide.
Once your template is ready, let's move on.
3. Generate the Python script
In this step, we'll turn our template into an API request.
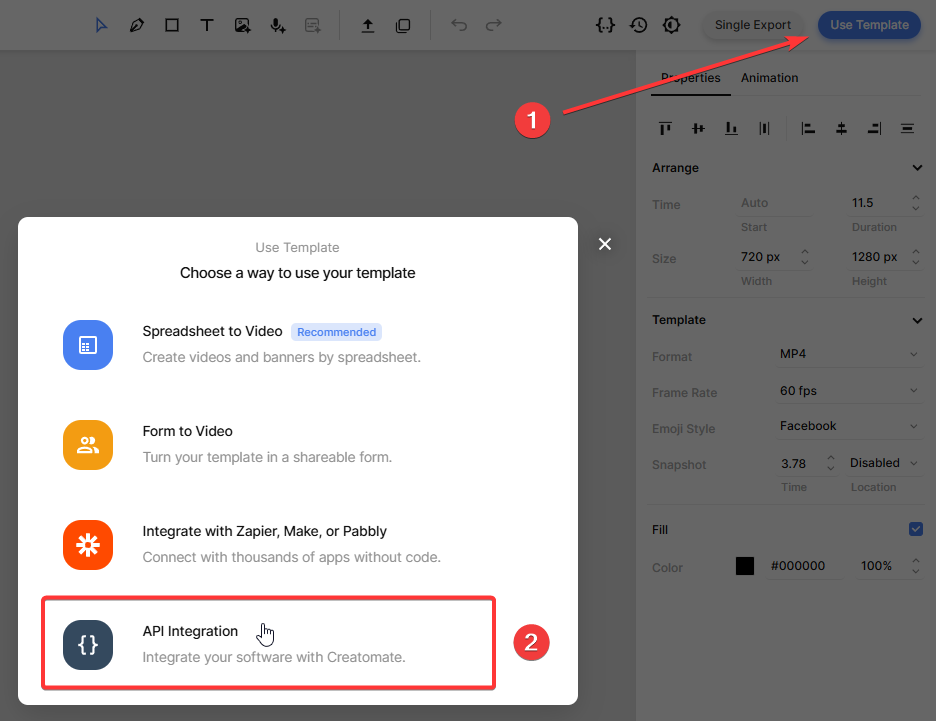
Click the Use Template button in the top-right corner of the template editor, then select API Integration:
Creatomate provides pre-generated code snippets in multiple programming languages. Select Python, then copy the code:
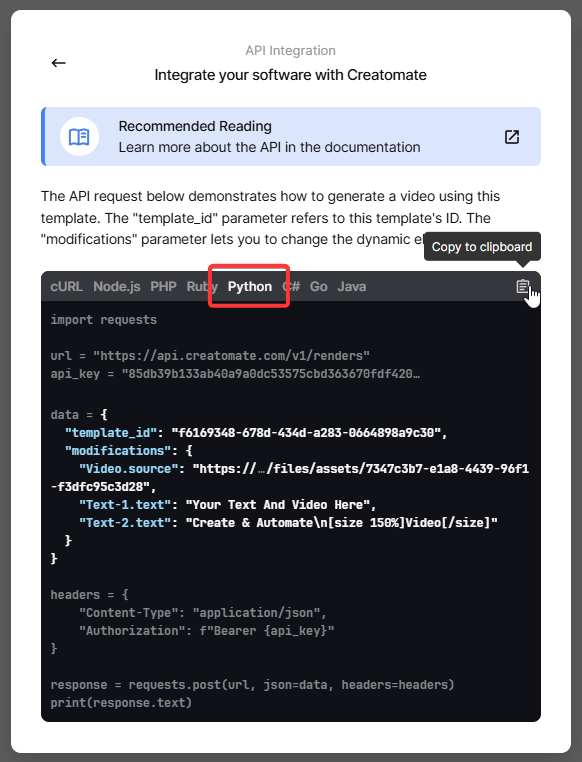
Next, paste that script into the empty file generate_video.py we created earlier. In the next step, we'll pass dynamic data into the video through the Python code.
4. Insert video content
We can now change the content (text, media, etc.) of each video render using the “modifications” parameter.
You can modify this data in any way, including replacing it with dynamic inputs from your own scripts. To keep things simple in this tutorial, we'll use some predefined test data.
Copy and paste this into your script:
data = {

 "template_id": "your_template_id",

 "modifications": {

  "Video.source": "https://cdn.creatomate.com/demo/video5.mp4",

  "Text-1.text": "Hello Python users 👋",

  "Text-2.text": "It's easy to create videos from your own scripts!"

 }

}
Note: Make sure to insert your template ID (your_template_id). This tells the API to generate a video using the template from step 2.
5. Run script to create the video
Now that we've set up the script, it's time to run it:
$ python3 generate_video.py
After making the API call, you'll receive a JSON response confirming Creatomate accepted the request:
1{
2  "id": "6c6eaa69-6583-4797-87e3-8c707801a181",
3  "status": "planned",
4  "url": "https://f002.backblazeb2.com/file/creatomate-c8xg3hsxdu/6c6eaa69-6583-4797-87e3-8c707801a181.mp4",
5  "snapshot_url": "https://f002.backblazeb2.com/file/creatomate-c8xg3hsxdu/6c6eaa69-6583-4797-87e3-8c707801a181-snapshot.jpg",
6  ...
7}
There are two ways to wait for the video to complete. One option is to write a small Python function that checks if the "status" has changed to "succeeded". This approach requires making a separate GET request to retrieve the video's status.
The second, and recommended, approach is to use a webhook. With this method, Creatomate sends a notification (a reverse API call) to your application as soon as the video is ready.
For now, wait a minute, then visit the URL you received from the API request. If you see a “Not Found” message, the video isn't ready yet. Just wait a little longer and try again.
When it's done, the URL will return this video:
Now that you have the video URL, you can use it however you like – whether that's downloading it, sharing it, or integrating it into your automation workflows.
Tip: On the API Log page in your Creatomate dashboard, you can view all the API requests you've sent. If a video fails to render, you'll find the error message and suggested fixes there.
What's next for video creation with Python
And that's how you create videos using Python and Creatomate. Now that you understand the process, you can tailor it to fit your needs and use cases.
What about AI-generated videos? Think of the faceless shorts you see on YouTube, TikTok, and Instagram. With Python, you could write a script that lets ChatGPT generate a story based on a chosen topic. Then, using a text-to-speech tool like ElevenLabs, you can turn that text into AI voiceovers. With Creatomate's auto-transcription feature, you can generate subtitles, complete with word-by-word animations, just like the ones trending on social media. For backgrounds, you could create visuals using DALL·E or Stable Diffusion. And to make posting even easier, ChatGPT can generate captions for you as well.
Here are some tutorials that might help. While they aren't specifically about Python, you should be able to adapt them to your scripts.
👉 How to Create AI Voice Over Videos using an API
👉 Using ChatGPT's API to Auto-Create Social Media Videos by Code
👉 How to Automate AI-Generated Shorts, Stories, and Reels
You might also like these tutorials


Start automating today
Start with a full-featured trial with 50 credits, no credit card required.
Get started for free →