How to Automate Video Creation with n8n

In this tutorial, you'll learn how to automatically generate videos using a simple n8n workflow and Creatomate’s video generation API.
n8n offers a nice mix of code and no-code automation. That makes it a great tool for social media, marketing, and automating videos in general. Especially for more advanced social media automation involving ChatGPT and generative AI, it's more flexible than no-code tools like Zapier or Make.com.
In this article, we will cover the basics of video automation with n8n. I'll show you how to set up a n8n workflow to generate a very basic video, which is an excellent starting point for more advanced workflows – such as completely automated videos with AI-generated storylines, images, voiceovers, and subtitles.
To make a template for the auto-generated video, we'll integrate n8n with Creatomate. This is a video and image API with editing tools that let you create your own designs based on pre-made templates, or from scratch entirely.
Later in this tutorial, we’ll link to other guides that cover more advanced workflows. For now, we’ll start with a simple n8n workflow: generating a video based on dynamic data and then publishing it. To keep things easy to follow, we’ll send the generated video by email. With the same effort, you can also publish the video on social media, for example as a YouTube Short.
How to generate videos using n8n?
To automate video generation, we start by creating a template in Creatomate. This template acts as the blueprint for all videos, with replaceable elements.
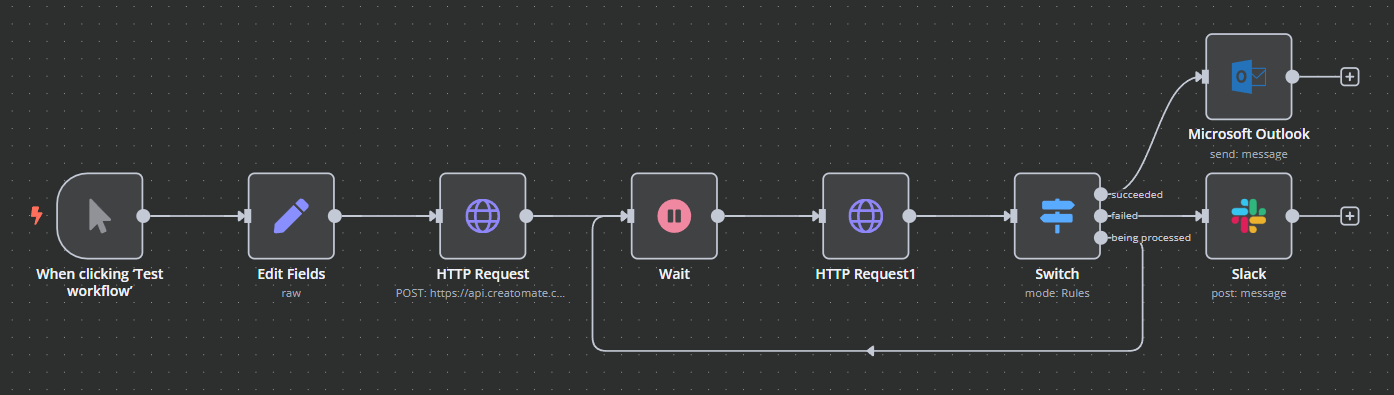
Next, we move to n8n. To keep things simple, we'll use a manual trigger to start the workflow and a Set node (Edit Fields) to define the video content. In real-world scenarios, you can replace this with any trigger and pull dynamic data from other sources.
Then, we use an HTTP Request node to send an API request to Creatomate, instructing it to generate a video based on our template and the provided content. Once the request is sent, we wait a moment before checking the video's status and handling the response; whether it's successfully rendered, still processing, or failed. Instead of Microsoft Outlook and Slack, feel free to use the apps that work best for you.
Tip: Instead of using a video template, you can generate videos entirely from code, giving you complete control over the final result. With JSON, you can define every aspect of the video from start to finish. While this approach is beyond the scope of this tutorial, you can find more information in our documentation.
Let's dive in!
1. Create a video template in Creatomate
Log in to your Creatomate account or create a free account if you don't have one yet.
Go to the Templates page and click New to open the template gallery. If you have a specific design in mind, you can create a template from scratch. For now, let's select the Quick Promo template from the Featured category. Choose the 9:16 Vertical size, then click Create Template to open it in the editor:
Let's see how we can use this template for automation.
On the left panel, you'll find the elements that make up the video design. Some of these elements are marked as dynamic, meaning they can be replaced with different content for each generated video. In our template, Text-1, Text-2, and Video are dynamic elements:
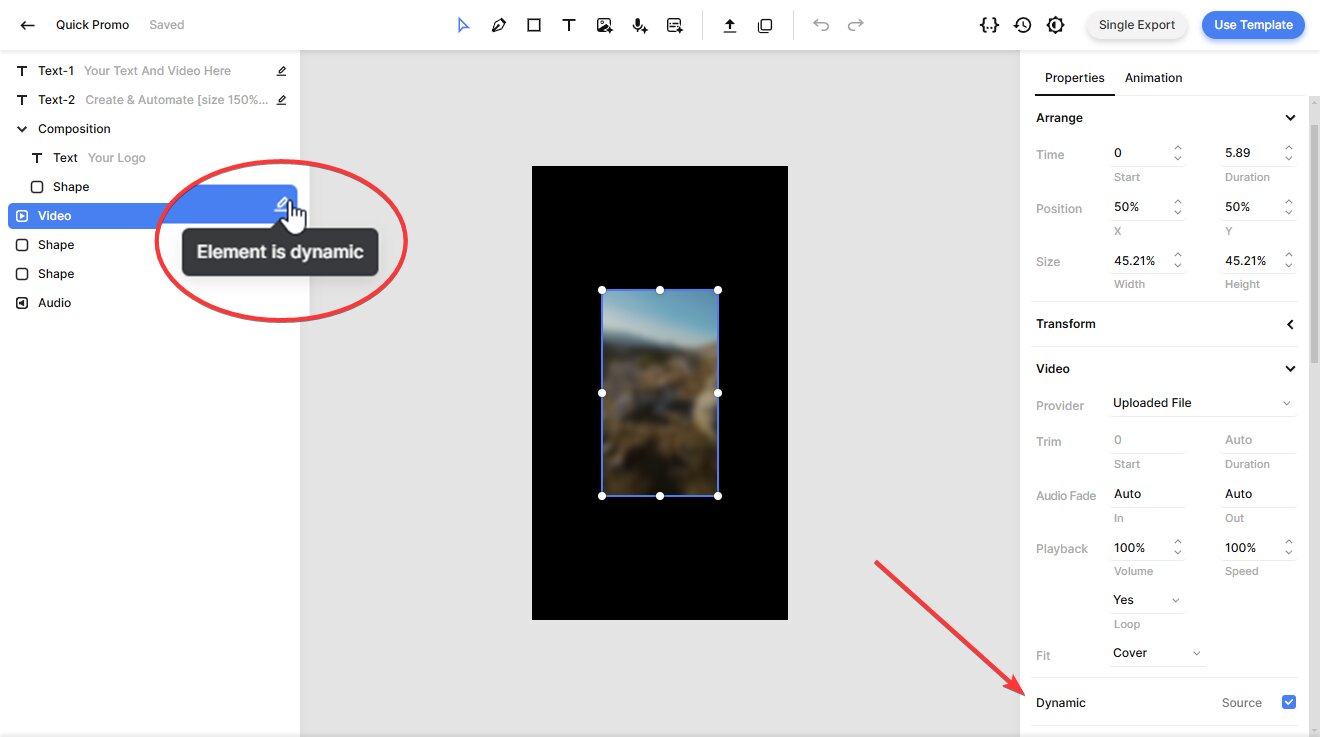
The editor offers many customization options to help you create the perfect video design. For now, we'll use the template as it is. If you'd like to explore the editor further, check out this guide.
Now that the template is set up, let's move on to n8n.
2. Add video content to your n8n workflow
To demonstrate the full video generation process, we'll build a simple workflow. Once you grasp the concept, you can customize it by using a different trigger or method to insert video content. For example, you could pull data from a Google Sheet, an API, or AI-generated text.
In your n8n dashboard, click Create Workflow.
Once you're in the canvas, click the + to add the first step. For this example, select Trigger manually. You'll notice that the When clicking ‘Test Workflow' node is automatically added:
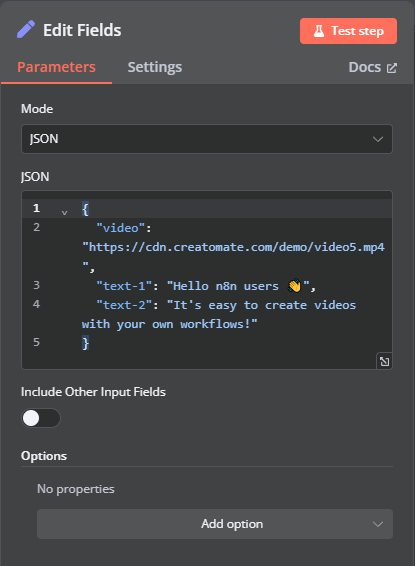
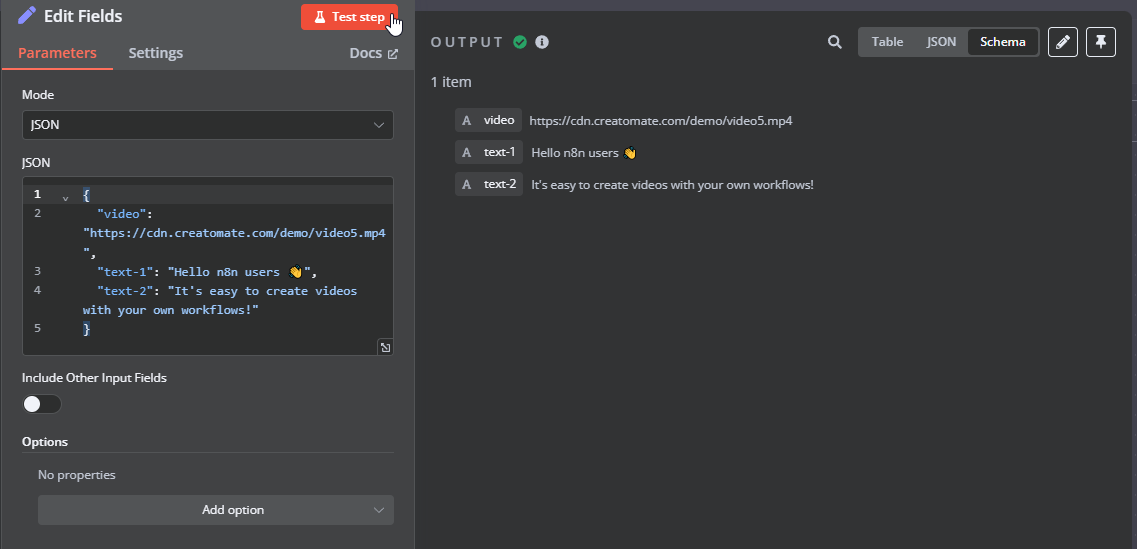
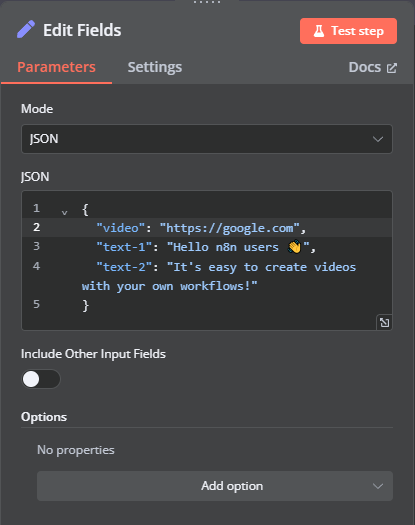
Next, click + again and search for the Edit Fields (Set) node. Under the Parameters tab, set Mode to JSON. Then, copy and paste the following JSON:
{

  "video": "https://cdn.creatomate.com/demo/video5.mp4",

  "text-1": "Hello n8n users 👋",

  "text-2": "It's easy to create videos with your own workflows!"

}
It should look like this:
Click Test step to verify that the data has been added correctly:
3. Generate the video
In this step, we'll generate the video by sending an HTTP request to Creatomate's API. This POST request will reference the template we created earlier and map the video content defined in the previous step.
Add a HTTP Request node to your workflow.
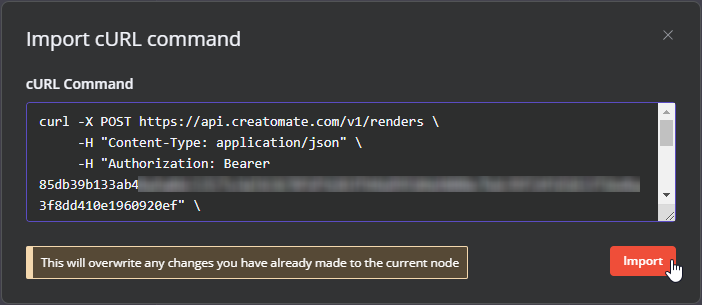
By default, you need to manually configure parameters such as the method, URL, headers, and body. However, there's an easier option: you can import a cURL command directly from Creatomate, which will automatically fill in all the necessary fields for you. To do this, click Import cURL:

Now, head back to the template editor in Creatomate. In the top-right corner, click the Use Template button, then select API Integration. You'll receive a cURL command containing all the necessary information to generate the video. Copy it:
Return to n8n, paste the cURL command, and click Import:
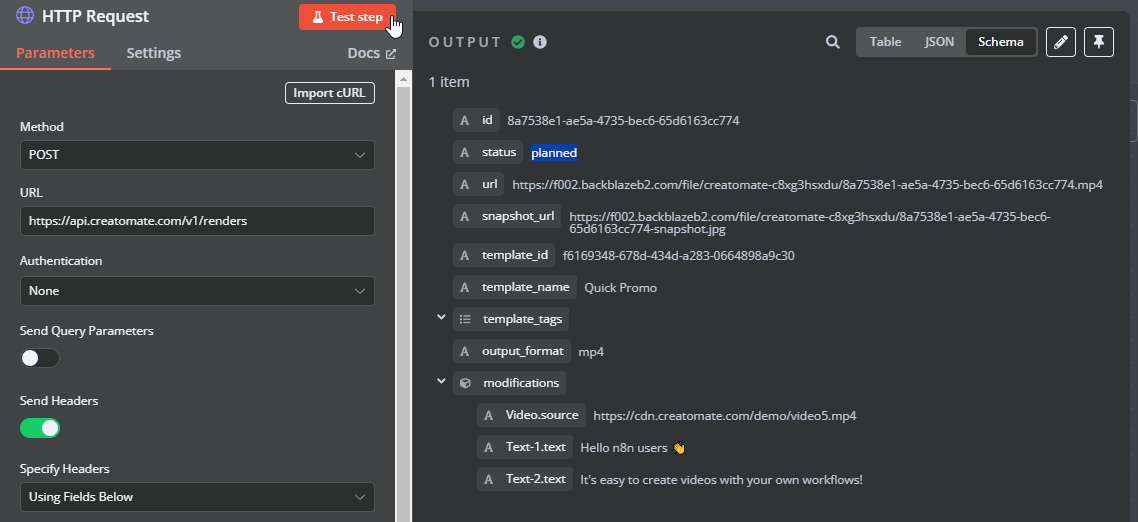
The node is almost ready. The only thing we have to do is map the video content to the template using the modifications parameter.
Scroll down to the JSON code, set it to Expression, and open it in full-screen. Then, drag and drop the items from the previous node into the correct modifications, like this:
- Set Video.source to Edit Fields -> video
- Set Text-1.text to Edit Fields -> text-1
- Set Text-2.text to Edit Fields -> text-2
With the mappings in place, it's time to test. Click Test step to send the request to Creatomate. The output should display a status of "planned", indicating that Creatomate has accepted the request and will process it:
The output also includes a URL where you can access the video once it's ready. If you visit the link right away, you might see a "Not Found" message, which means the video is still being processed. The time it takes to generate a video depends on factors like template complexity, resolution, and third-party integrations (such as ElevenLabs for AI voiceovers).
In the next step, we'll monitor its progress.
4. Wait for the video to complete
If a subsequent node tries to use the video URL before the video is ready, it may cause an error. To prevent this, we'll add a wait node to allow time for the video to generate. We'll also set up a simple polling mechanism with a retry strategy to check the video's status until it's ready.
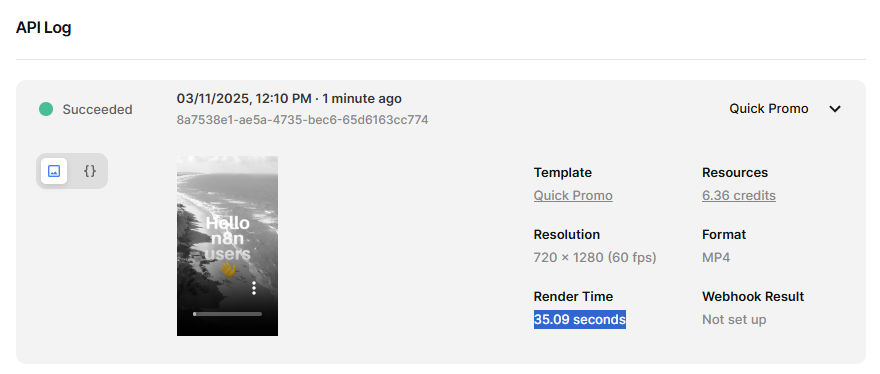
First, go to the API Log page in your Creatomate dashboard. If everything went well, you should see that the test video from the previous step has "succeeded". If not, just wait a moment. You can also see how long the video took to render. In my case, 35.09 seconds:
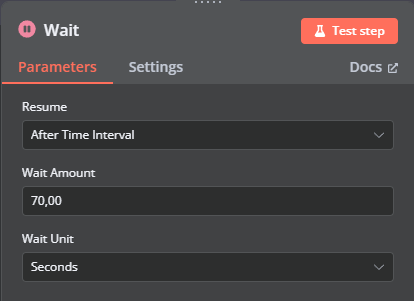
Next, add a Wait node. The workflow needs to wait longer than the render time. As a general rule of thumb, set the wait time to about double the render time. In this case, set it to 70 seconds:
Click Test step and wait for it to finish.
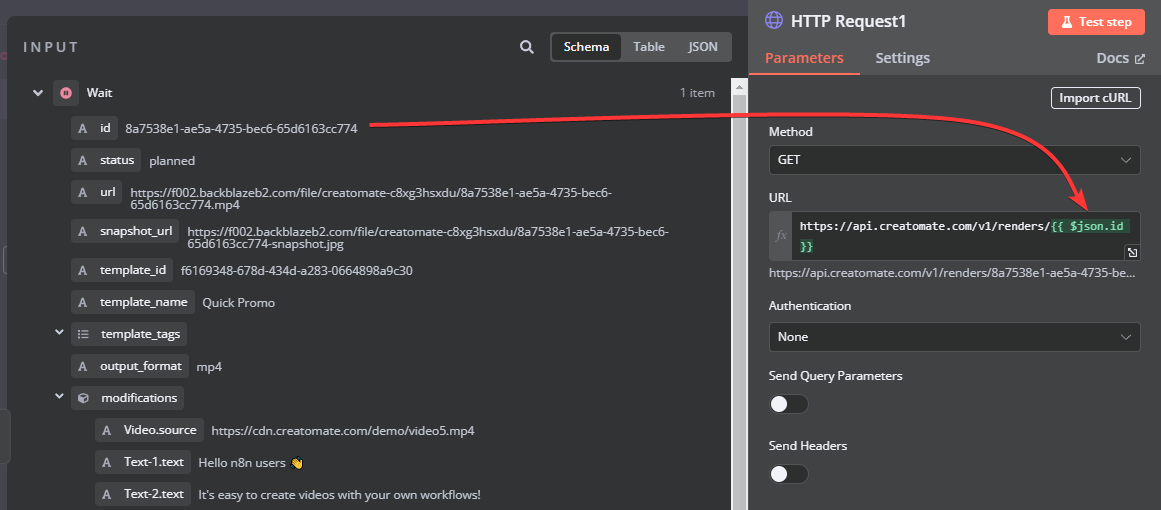
Now, add another HTTP Request node. This time, we can't use the import cURL function, so we'll set it up manually:
- Set Method to GET
- Set URL to https://api.creatomate.com/v1/renders/[ID], replacing [ID] with the 'id' value from the Wait node. Make sure the URL has no spaces.
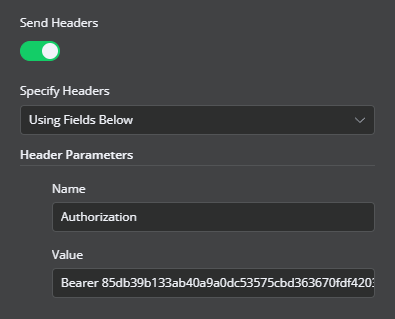
Next, toggle the Send Headers switch. Name the header Authorization and paste your API key. You can find your API key on the API Integration page in Creatomate, where we previously copied the cURL command:
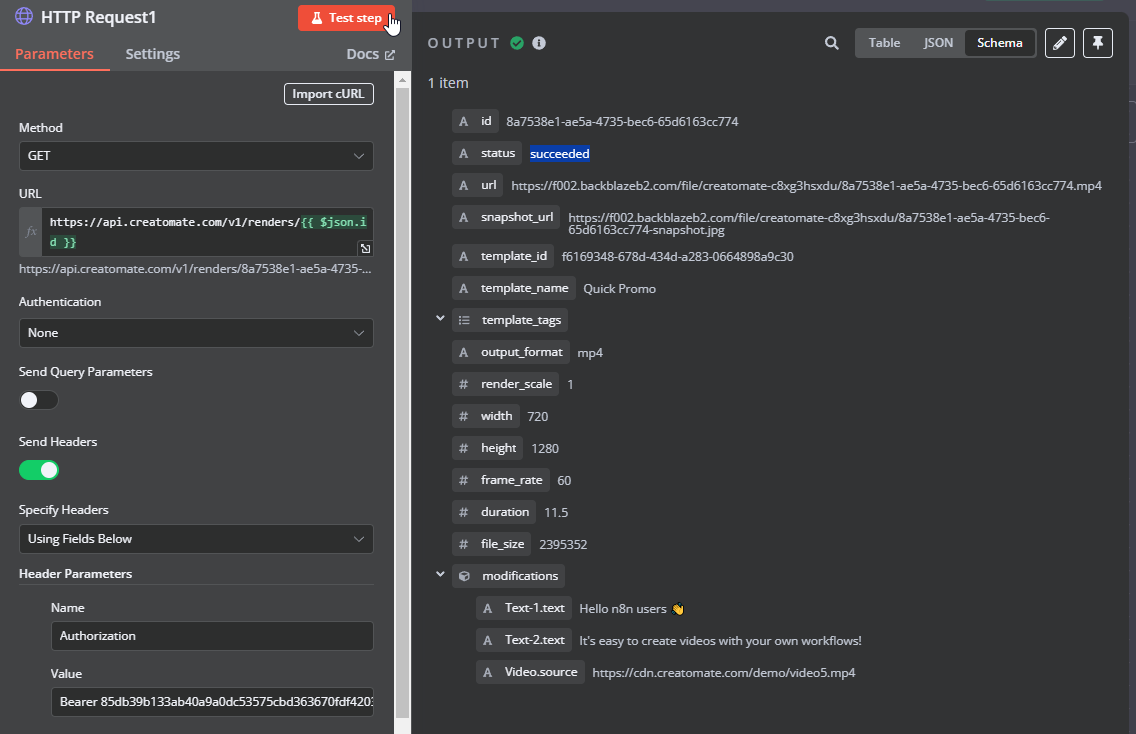
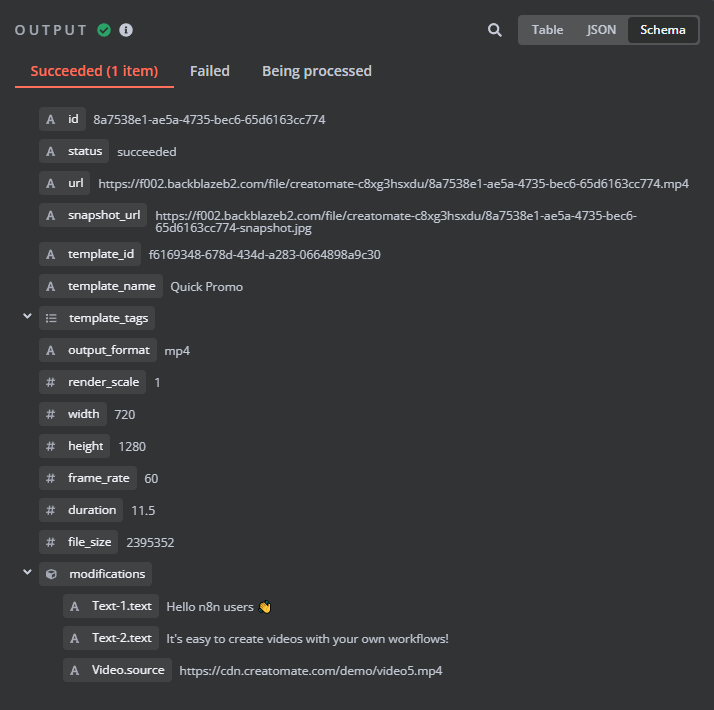
When you click Test step, you'll see that the status is now "succeeded", indicating that the video is ready to use:
While this is the ideal outcome, a video may sometimes need more time to render, or an error may occur. We need to handle each video's status accordingly – whether it has succeeded, is still processing, or has failed. Here's how to do that.
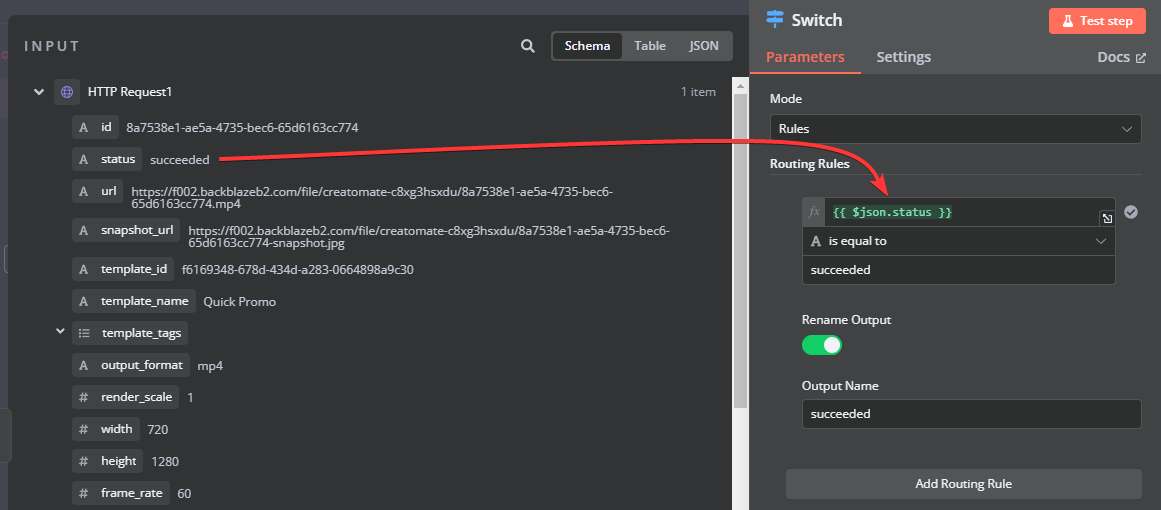
Add a Switch node.
Let's start with successful renders. Create a routing rule where status is equal to succeeded and rename the output to 'succeeded':
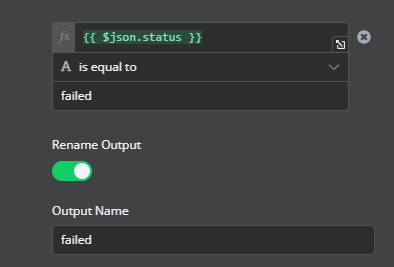
For failed renders, add a routing rule where the status is equal to failed and rename the output to 'failed':
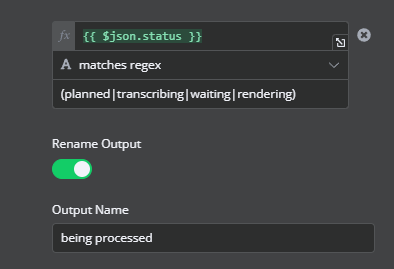
Lastly, there are several statuses that indicate a video is still being processed, not yet completed or failed. Since we want to handle these renders the same way, we can group them into a single route. Add another routing rule, select the status, and set it to matches regex with the following values: (planned|transcribing|waiting|rendering). Then, rename the output to 'being processed':
Next, click Test step, and you'll see that our example moves to the "succeeded" branch:
In the next step, I'll show you how to use the generated video and explain what to do with "failed" and "being processed" renders.
5. Process the generated video
Now that the video has been generated, you can use it however you like. For example, you could share it on your preferred social media platform (like YouTube Shorts) or upload it to cloud storage. To demonstrate, I'll show you how to send it via email.
Following the "succeeded" branch, click + to add your next node.
To use the video, simply map its URL to the appropriate field:
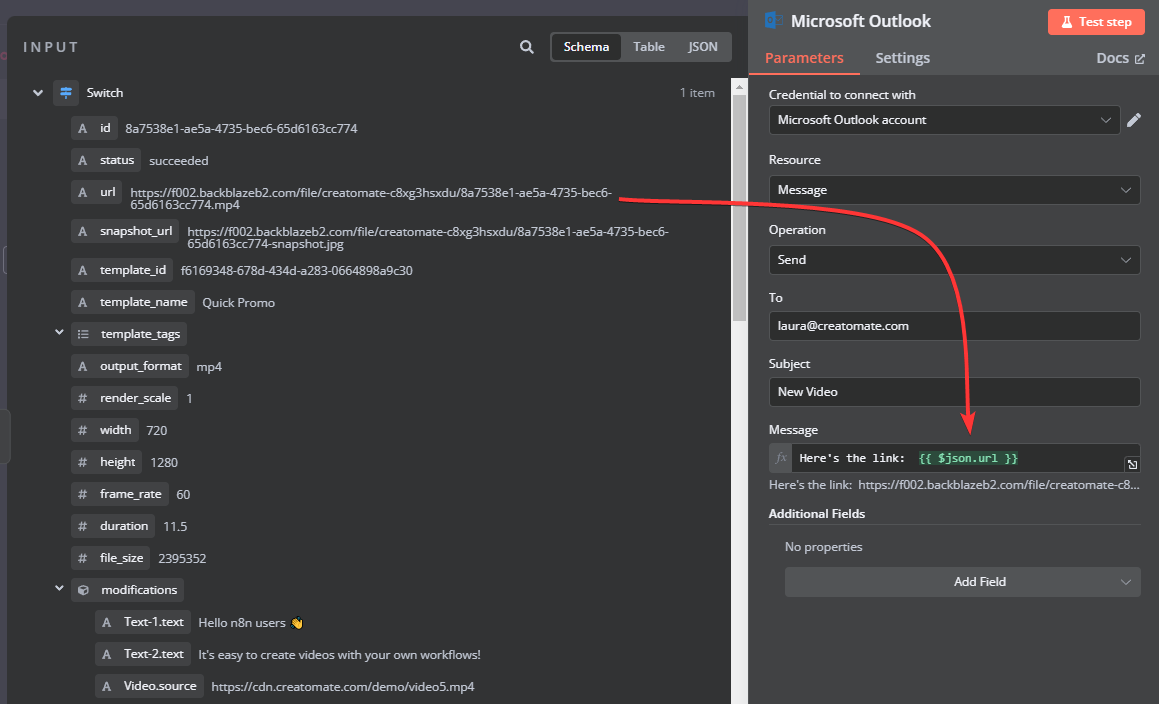
Once you've configured the node, click Test step to process the video. In my case, it was sent directly to my inbox:
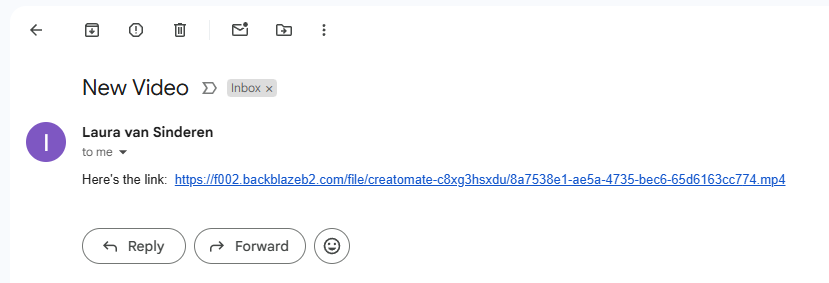
Did it work? Great!
Now, let's move on to the other routes.
If the video hasn't been fully generated after the first check, it will move to the "being processed" branch. If that happens, the workflow should automatically retry for a few cycles using the Wait and Check Status nodes until the video is marked as either "succeeded" or "failed". To set this up, connect the "being processed" branch to the Wait node, like this:
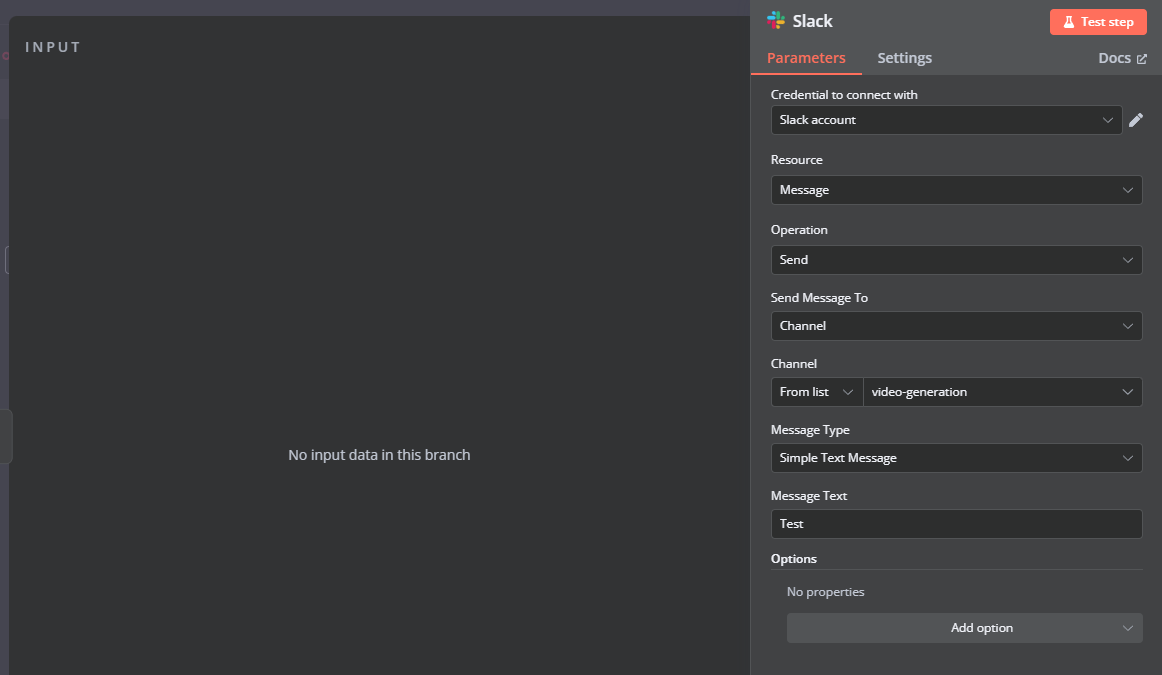
Lastly, we have a route for failed renders. It's recommended to send notifications when a video follows this route. For example, you can send an alert via a communication app like Slack.
After the "failed" branch, add any app of your choice. As you can see, there's no input data available because our test video followed the "succeeded" route. As a temporary solution, use static data so the node can run successfully:
I want you to see what an error looks like and how to use its message in a notification. For this purpose, we'll intentionally create a failed render.
Open the Edit Fields (Set) node and replace the video link with a web page URL, such as https://google.com:
Then, click Test workflow.
Since a web page can't be used for a video element, the video will fail to render. As a result, the item will follow the "failed" route, and we can access the data as input in Slack (or your chosen node). The error message will also appear here. Now, let's configure the node with dynamic data like this:
Oops, something went wrong… An error occurred while rendering your video: [error message]. Please check the API Log in your Creatomate dashboard for more details on how to resolve this.
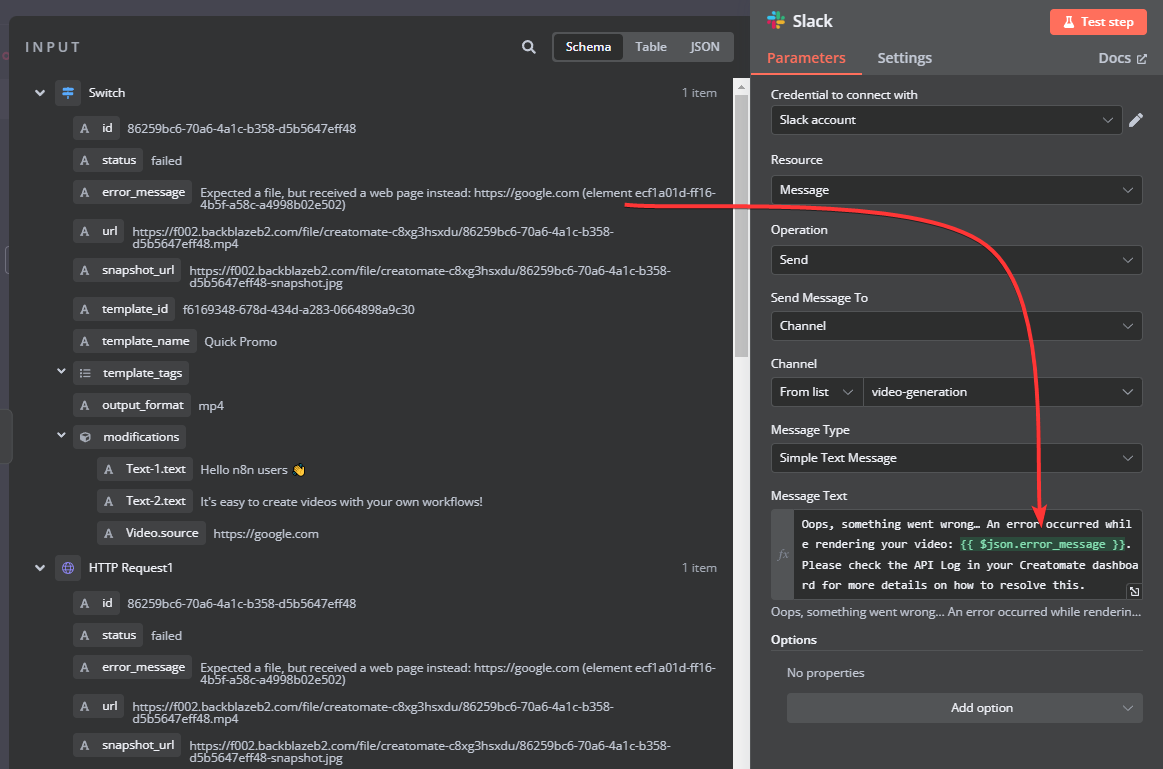
When I click Test step, I get a message in my Slack channel:

And that's it!
What's next for video creation with n8n
Now you know how to create videos within your n8n workflows using Creatomate's video generation API. Pretty straightforward, right?
What we've covered so far are just the basics. Now that you understand how the process works, you can adapt it to your own workflows using the tools and apps that best suit your needs. With the flexibility of n8n and Creatomate, it can handle most video automation scenarios.
For example, have you considered integrating generative AI into your video projects? You could add a voiceover that reads text aloud, include animated subtitles, or even use AI-generated images as video backgrounds. You can achieve this by combining tools like ElevenLabs, Creatomate's auto-transcription feature, and Stability.ai. The best part is that everything can be done directly within the video template, so no extra n8n nodes are needed.
And if you've already worked with tools like ChatGPT or Claude in n8n, you can also use them to generate content for the AI tools mentioned above, making everything even more powerful.
To help you get started, we've written several tutorials on AI integrations like these. While the automations are built using Zapier or Make.com, if you're familiar with n8n, you should be able to adapt the steps and integrate these ideas into your own workflows.
👉 Use ChatGPT to Create Video Content
👉 Use Stability.ai to Create Background Videos and Images
👉 Use ElevenLabs to Create AI Voiceovers
👉 Automate AI-Generated Shorts with Voiceovers, Subtitles, & Images
FAQs
How do I connect Creatomate to n8n?
The easiest way to connect Creatomate is already covered in step 3 of this tutorial: using a cURL command.
But if you want a connection that can be reused across multiple workflows, or if you have more than one Creatomate project, it’s best to create a credential in n8n.
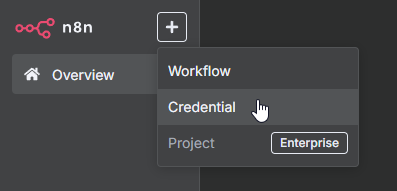
Go to Overview, click +, and choose Credential:
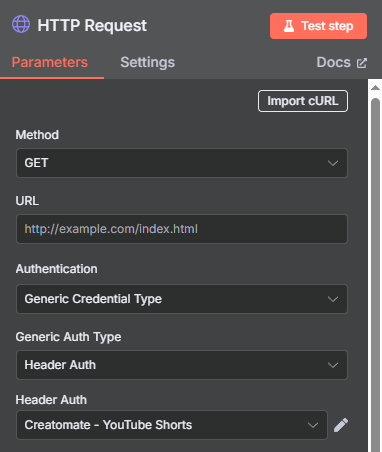
Search for Header Auth and click Continue. For the Name, enter Authorization, and for the Value, enter Bearer [your API key]. Give your credential a descriptive name, like Creatomate – YouTube Shorts, and click Save:
Next, open your HTTP Request node and select this credential under: Authentication → Generic Auth Type → Header Auth -> [your credential]:
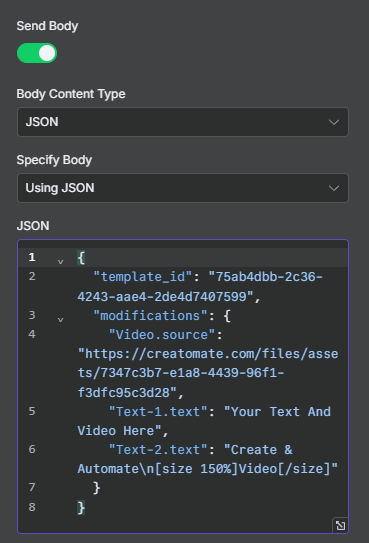
Make sure to set Method to POST and URL to https://api.creatomate.com/v2/renders. Also, toggle Send Body to on, set Body Content Type to JSON, set Specify Body to Using JSON and paste the JSON from the API Integration page, like this:
Finally, make sure to map your input video content to the dynamic template fields. For more details on creating the correct API call, see step 3 of this tutorial.
What kind of videos can I create with n8n?
Almost any type of video can be automated using Creatomate and n8n – the possibilities are endless. Think YouTube Shorts, personalized videos, or even video ads. You can also integrate generative AI into your workflows if you want.
Video automation works through templates that define the look and structure of your videos. As long as your videos follow a consistent format, automation is simple and reliable.
Check out our tutorials for step-by-step examples and popular use cases.
Can I design my own video templates?
Yes, absolutely! Creatomate comes with a full-featured online editor that lets you design almost any type of video layout.
You can either start with a template from the gallery and adapt it to your workflow, or create a template from scratch if you already know exactly what you want. Once created, these templates can be reused in your n8n workflows for fully automated video production.
For a deeper dive into the editor – including advanced options like auto arrangement, which dynamically adjusts the video duration based on your content (for example, AI-generated voiceovers) – take a look at the Editor section in the documentation.
Can I use AI to create videos with n8n?
Yes, you can! n8n is a great tool for AI-based video creation, especially if you want more control over how your data flows through the process.
You can connect n8n to tools like OpenAI (ChatGPT) using either built-in nodes or a simple HTTP request. This allows you to generate video scripts, voiceover text, or image prompts, which can then be sent directly to Creatomate.
Creatomate integrates with services such as ElevenLabs for voiceovers and Stability.ai for image and video clip generation. This makes it easy to combine multiple tools in a single workflow without extra overhead.
A common setup is to trigger a workflow from a webhook or database, generate the content with AI, and then let Creatomate render the video automatically. This works well for repeatable formats like faceless videos for YouTube Shorts, TikTok, or Instagram.
Creatomate can even generate animated, word-by-word subtitles using its auto-transcription feature. Subtitles can be created automatically from audio files, including AI-generated voiceovers. For a practical example, check out our n8n tutorials, which walks you through the full process step by step.
You might also like these tutorials


Start automating today
Start with a full-featured trial with 50 credits, no credit card required.
Get started for free →