How to Automate Instagram Stories (No-Code Tutorial)

In this tutorial, you'll learn how to build an automation system that creates, schedules, and publishes Instagram Stories using Zapier, Buffer, and Creatomate.
Stories, along with Reels and feed posts, play a crucial role in a successful Instagram marketing strategy. As the popularity of these types of content continues to grow, so does the need to constantly create engaging visuals. The good news is that you can easily automate the entire process of creating, scheduling, and posting Instagram Stories. This tutorial will show you how.
To set up the automated workflow, we'll only use no-code tools, so you don't need to have any technical skills to follow along.
By the end of this tutorial, you will have created a Zapier workflow that automatically generates Instagram Stories from text and media, similar to the one below. But this quote video is just an example. With Creatomate's template editor, you can design almost any type of Instagram Story, whether it's a video or an image. So if you have a different concept in mind, keep reading!
Prerequisites
While Zapier does have an Instagram integration, we won't be using it here because it only supports publishing image posts and not stories. Fortunately, there are other great options available, such as using a social media management tool like Buffer. One major benefit of using Buffer is that it not only automates posting but also allows you to schedule when your Instagram Stories should go live. So, although this might seem like an inconvenience at first, it's actually a big plus for Instagram automation.
These are the tools we'll use:
- Creatomate: to create a template and generate stories.
- Buffer: to schedule and post them on Instagram.
- Zapier: to automate the entire process.
This tutorial will focus exclusively on automating Instagram Stories. However, you can easily automate Instagram feed posts and Reels as well. Check out our tutorials for Zapier or Make.com to learn how.
💡 AI tip: Did you know you can also use AI-generated content to create Instagram videos? For example, you can start with an AI text generator like ChatGPT to write a video script on any topic. Then, use image generation tools such as DALL·E or Stability (Stable Diffusion) to create captivating background visuals. To add a professional touch, you can use a text-to-speech tool for voice overs, and Creatomate's auto-transcription feature can automatically generate animated subtitles for your videos.
Implementing generative AI is beyond the scope of this tutorial, but you can find detailed, step-by-step guides on our blog page.
How to automatically create and post Instagram Stories?
To automate Instagram Stories, our first step is to create a schedule in Buffer. After that, we'll set up a template in Creatomate, which serves as the design for all our Instagram Stories.
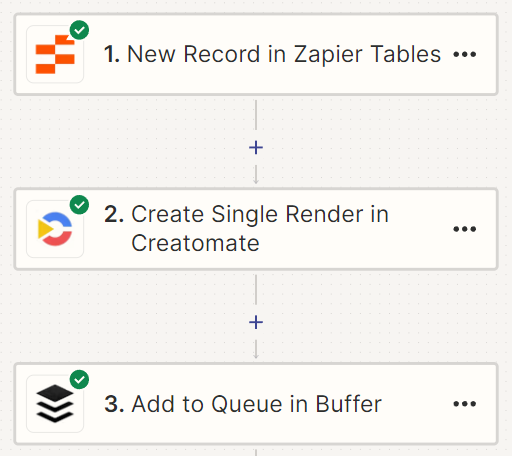
Once that's done, we'll tie everything together using Zapier. To keep things straightforward for this tutorial, we'll start by creating a simple table and inputting the content for our story. In a real-life scenario, you will likely use an app such as Google Sheets or Airtable for this purpose. After Creatomate generates the story, it will be sent to Buffer for further processing:
Let's get started!
1. Create a schedule for Instagram Stories in Buffer
Buffer is one of the most well-known social media scheduling tools on the market. There are similar products, such as HootSuite and SocialBee, which also let you schedule and post Instagram Stories. But we're going to use Buffer because it's very user-friendly and integrates nicely with Zapier. Plus, it offers a free plan that includes everything we need for this tutorial.
In this step, we're going to create a Buffer account, connect our Instagram channel, and set up a schedule for our stories.
Note: To schedule Stories for automatic publishing, you need an Instagram Business account. You can easily convert your personal profile to a professional account (with the Business type) by following the steps outlined on this Buffer documentation page.
Create a free Buffer account or sign in if you already have one.
Once in the dashboard, click Connect Instagram from the left side menu:

Then, click Authenticate with Facebook:
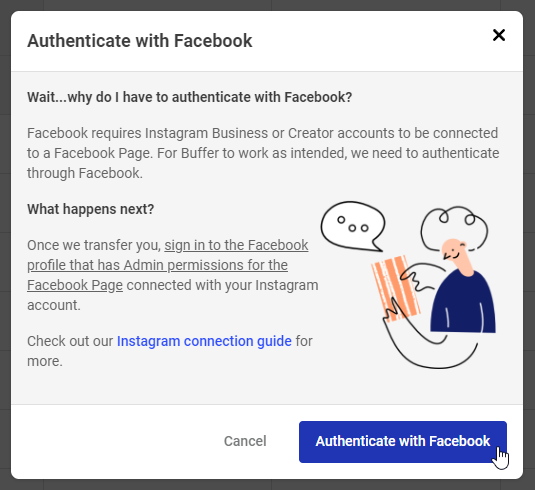
Next, sign in to your Facebook account and authorize Buffer to access it. If Buffer finds the Instagram account you want to use, click Start Connecting:
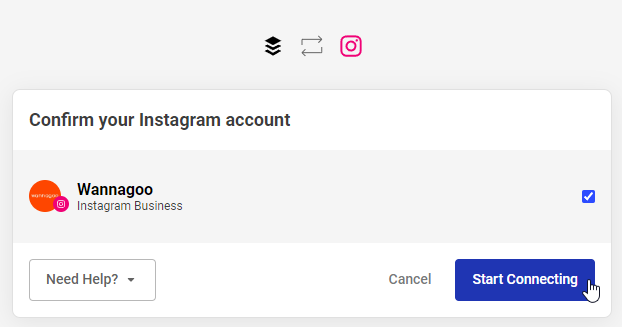
Your Instagram account has been connected to Buffer.
Having trouble connecting your Instagram account? Visit Buffer's documentation page for step-by-step instructions.
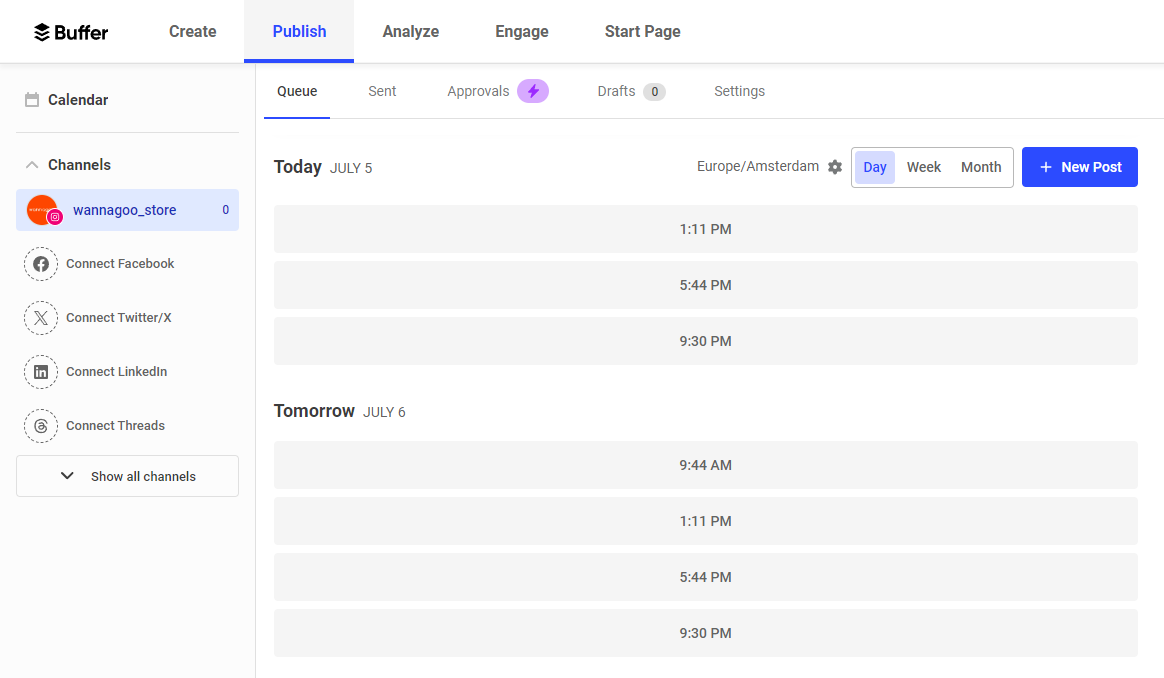
Now let's set up our Instagram Stories posting schedule. Here's how it works: you can choose specific times when you want your stories to be published. Each time you add to your posting schedule becomes a slot in your queue. When configuring the Buffer module in Zapier later on, we can set it up so that stories are added to the queue and scheduled for the next available time slot.
Click on your Instagram channel from the left side menu. You'll be taken to the Queue page, which has a pre-set schedule created by Buffer. To keep it simple, I'll use these time slots, but you can customize the schedule to suit your needs. You can find more information about posting schedules on Buffer's documentation page.
For now, that's all there is to Buffer. We'll get back to it when setting up the action in Zapier (step 5).
2. Create a template in Creatomate
In this step, we'll set up a template for our Instagram Stories. Whether you want to create static images or short video clips, Creatomate's template editor allows you to create both video and image designs.
Log in to your Creatomate account or create a free account if you don't already have one.
Navigate to the Templates page and click the New button to open the template gallery. You can choose from many pre-designed templates to use right away, or you can create your own designs from scratch. For this tutorial, let's go the the Marketing category and select the Image w/ Quote On Top template. Since Instagram Stories have a vertical aspect ratio, choose the 9:16 Vertical size, and click Create Template to open it in the editor:
This template generates videos, but you can also produce images using the Format setting. To find this setting, make sure no element is selected, then look in the properties panel on the right:

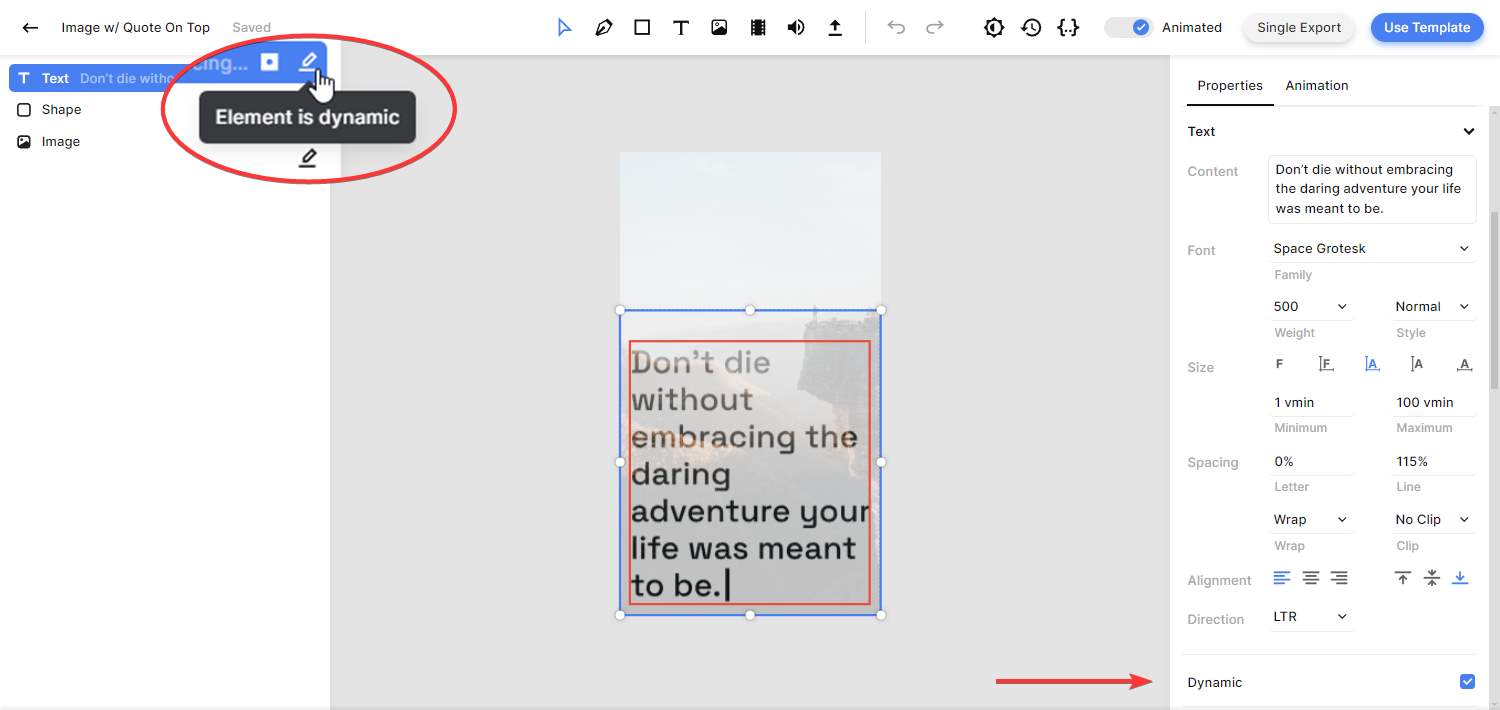
Now, let's look at our story's design in more detail and how we can use it for automation. In the left side panel, you'll see that our template consists of three elements: Text, Shape and Image. Also notice that the Text and Image elements are marked as dynamic. This means we can replace that content with different text and images using our automated Zapier workflow:
You can further customize your template if you like, but we won't cover that in this tutorial. Refer to this quick guide if you want to learn more about how the editor works.
That's all you need to know for now. Our template is set up and ready to use. Let's move on to the next step: setting up the automation.
3. Trigger the automated workflow
Every Zapier workflow begins with a "trigger." A trigger is the event that starts the automation process. It could be something as simple as a specific time each day, a new row in Airtable or Google Sheets, or a new product in Shopify, for example. With over 6,000 app integrations available, you can choose the one that best fits your needs. The data received by this trigger will then be used to automatically generate your Instagram Stories.
I'll demonstrate how to use a Zapier Table to provide content for our stories. Once you get the hang of it, feel free to use any other app that works for you.
Sign up for a free Zapier account or log in if you already have one.
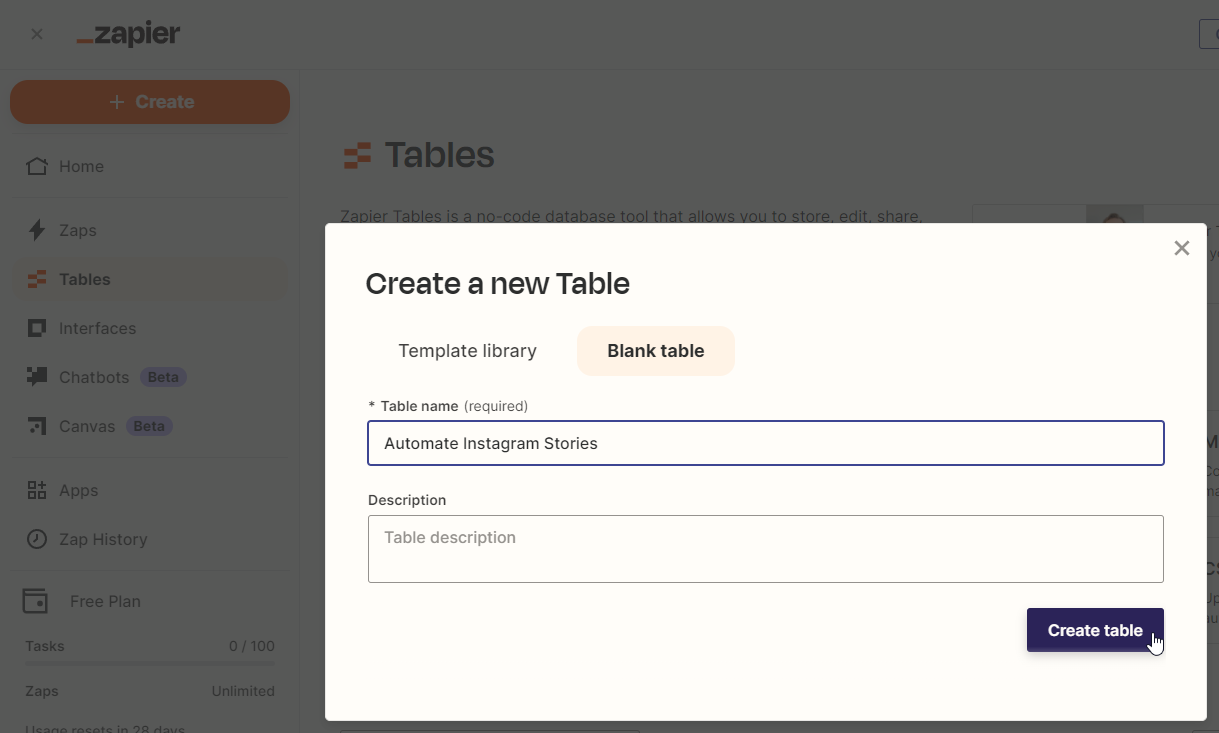
From the left menu, navigate to the Tables page. Click the Create blank table button, enter a name, and hit Create table:
Let's create a table with two text fields: Image and Quote. Then, insert the following data for the first record:
- Image -> https://cdn.creatomate.com/demo/mountains.jpg
- Quote -> The future belongs to those who believe in the beauty of their dreams.

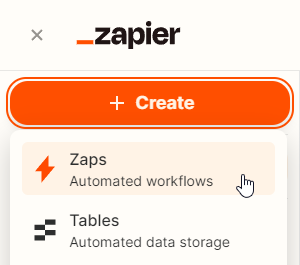
Once your table is set up, return to your Zapier dashboard. Then, click Create and choose Zaps:
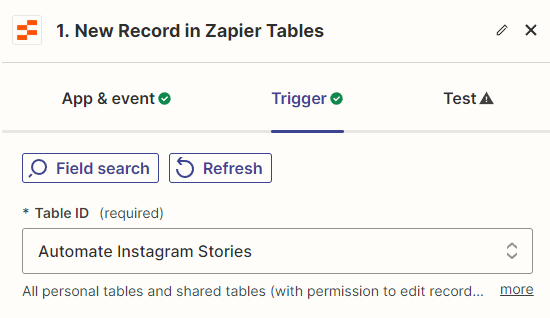
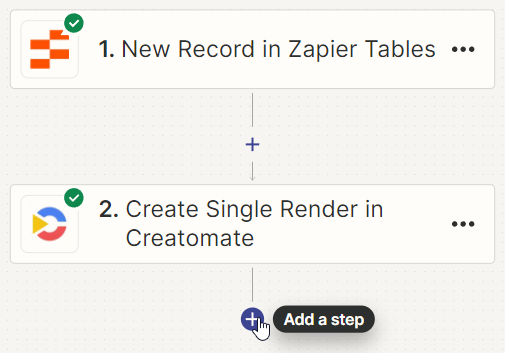
We're now in the workflow editor, where we'll build our Zap. First, click on the Trigger block. Search for and select Zapier Tables as the app, and choose New Record as the event. Then, click Continue.
In the Table ID field, select the table you just created:
Then, click Continue.
Click Test trigger to see if Zapier can find our sample record. Once the test is successful, click Continue with selected record:
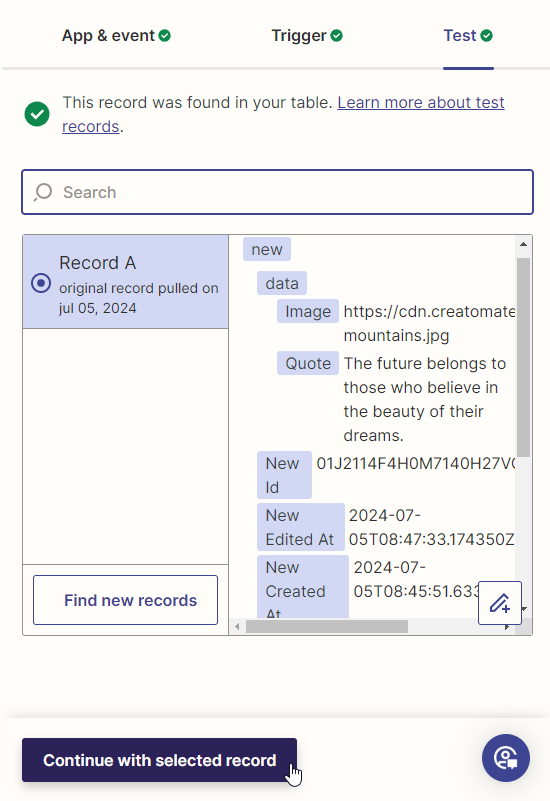
We can now use this data to set up the rest of our Zap.
4. Auto-generate the stories
In this step, we'll set up a Creatomate action to generate Instagram Stories. We'll connect the data from our trigger to the dynamic elements of our template.
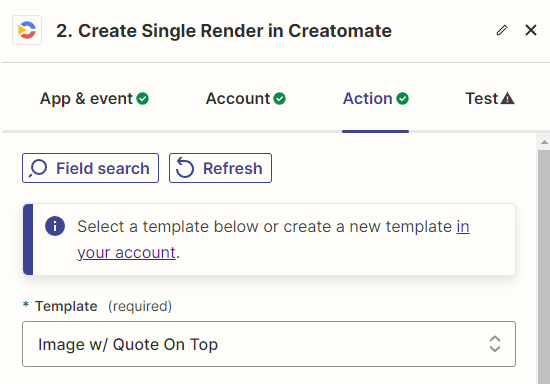
Search for and select the Creatomate app with the Create Single Render event. Then, click Continue.
If you haven't connected Creatomate to Zapier before, sign in using your project's API key. You can find this key in the Project Settings section of your Creatomate dashboard.
Select the Image w/ Quote On Top template in the Template field first:
Zapier will now pull in the dynamic elements and list them under Modifications. Let's connect the quote and image from our trigger as follows:
- Set Image to Zapier Tables -> Image
- Set Text to Zapier Tables -> Quote
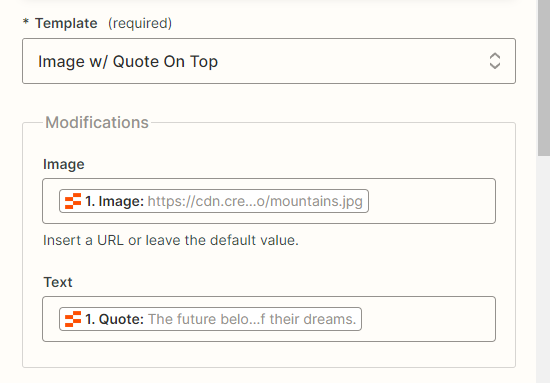
Then, click Continue.
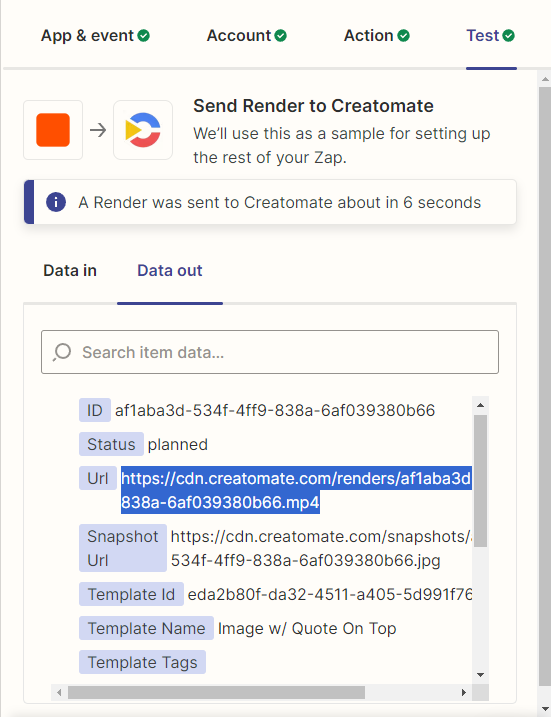
Click Test step to send a request to Creatomate. It will now insert the image and quote into our story template.
If you want, you can preview the generated story by visiting the URL provided in the test result. Note that the video generation process may take a few seconds to complete, so you might see a ‘Not Found' message at first. Just wait a bit and try refreshing the page. This only occurs during Zap setup. Once the workflow is activated, it will wait for the video to finish before moving on to the next step.
5. Publish on Instagram (via Buffer)
Last but not least, we'll send the Instagram Story to Buffer to schedule it for automatic publishing.
Click + to add a step to your Zap:
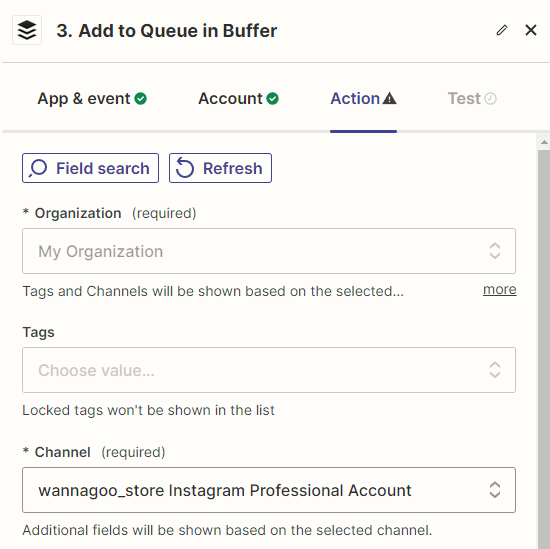
Add the Buffer app with the Add to Queue event. Continue by signing in to your Buffer account and then click Continue.
Select your Organization and Channel first:
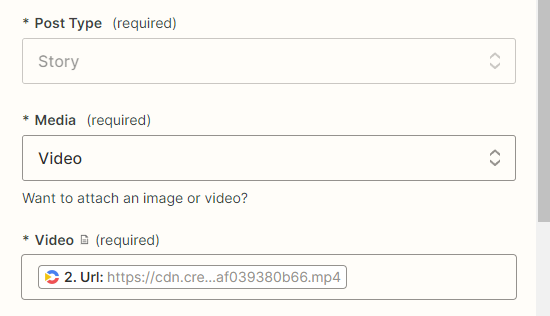
Next, set Post Type to Story. Choose Video or Image as Media, depending on your template's format. To add the generate story, select Creatomate -> Url in the Video field (or Image field if the media type is set to Image):
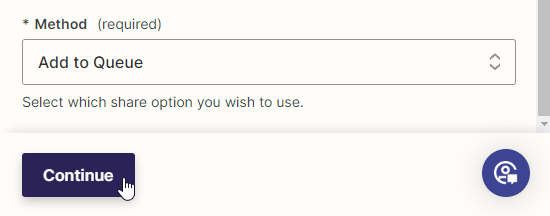
Under Method, select Add to Queue to schedule the story for the next available time slot. Then, click Continue:
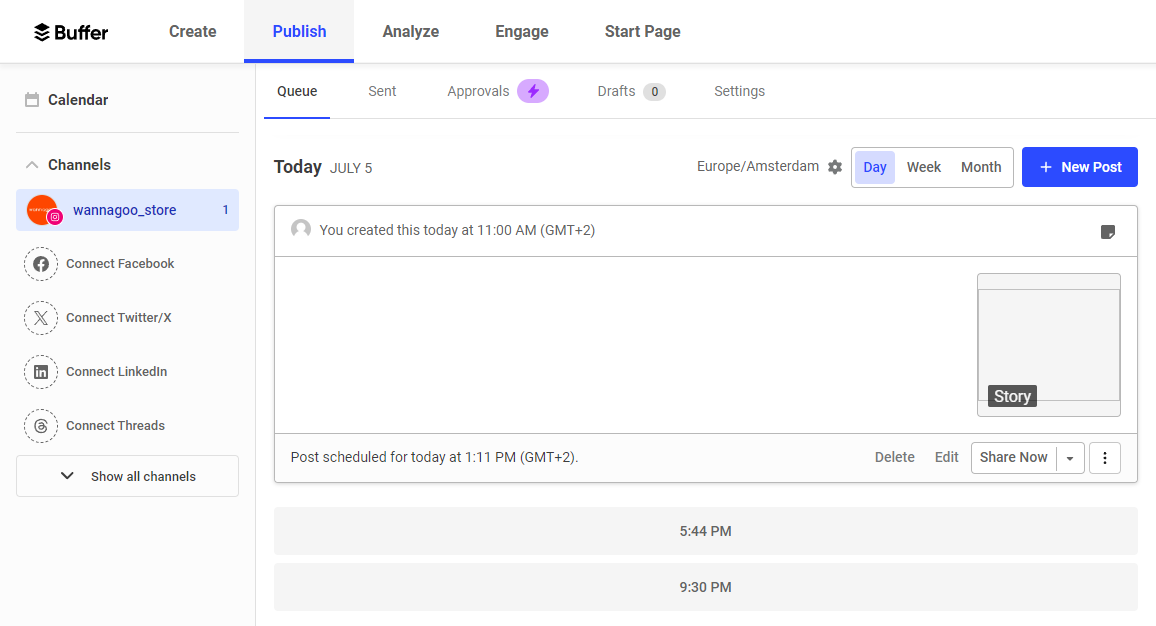
Finally, click Test step to make sure it works. Once the test is successful, go back to your Buffer dashboard to check if the story has been scheduled:
Once you're happy with your workflow setup, all you need to do is click Publish to activate your Zap.
What's next for Instagram automation?
And that's how you automatically create, schedule, and post Instagram Stories using only no-code tools. Easy peasy, isn't it?
Stories aren't the only part of Instagram marketing. Good news for you, Creatomate and Zapier make it possible to auto-generate Instagram posts and Reels as well. To automate feed posts with images, you can use Zapier's Instagram for Business integration. For Reels, you can use Buffer as shown in this tutorial, or alternatively, use SocialBee. Check out this tutorial for step-by-step instructions.
Would you like to automate more of your social media marketing? These tutorials are also worth checking out:
👉 How to Automatically Create and Post YouTube Shorts using Zapier
👉 How to Automatically Create and Post TikTok Videos using Zapier
👉 How to Automatically Create Facebook Posts using Zapier
👉 How to Create Videos with AI Voice Overs using Zapier
👉 Using AI and Automation to Create Social Media Videos Every Day
You might also like these tutorials


Start automating today
Start with a full-featured trial with 50 credits, no credit card required.
Get started for free →