Auto-Generate Videos & Images in Multiple Languages with Zapier

In this tutorial, you'll learn how to use OpenAI's ChatGPT to translate text for automated, multilingual video and image creation.
Expanding into international markets opens up exciting business opportunities, but it also brings a new challenge: creating content in multiple languages. Imagine running a marketing campaign across several countries – you'd need videos and images in each language. That sounds like a lot of manual translation and editing, right? Fortunately, there's a much more efficient solution, and in this tutorial, you'll learn how.
AI and automation are everywhere these days, and they're ideal for creating multilingual videos and images too. This tutorial will show you how to use ChatGPT to translate text into different languages and create visuals using Creatomate, a video & image generation API. We'll streamline the entire process with Zapier, a no-code automation platform, making everything scalable and consistent.
Let's take a travel and tourism company targeting international audiences as our example. Don't worry if you're in a different industry – this approach can work for almost any business. By the end of this tutorial, you'll have an automated workflow that generates content like this:
Although this tutorial focuses on video content, the process for creating images is very similar. So even if you have a different concept in mind, keep following along. There's an online editor to create custom video and image designs exactly the way you want.
Prerequisites
Here are the tools we'll use:
- Airtable: for inputting the original content (in English) and storing links to our translated videos.
- ChatGPT: for translating the English text into different languages.
- Creatomate: for creating designs and generating videos.
- Zapier: for automating the entire process.
How to automatically translate text to create multilingual content?
To automate the creation of multilingual videos or images, the first step is to create a template in Creatomate. This template will serve as the design for all videos or images we'll make. Next, we'll set up an OpenAI account to access ChatGPT and create an Airtable base for organizing our content.
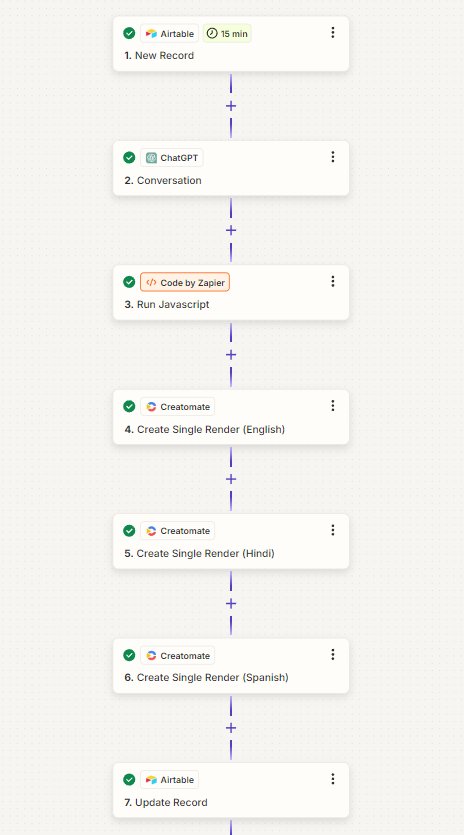
Following that, we'll set up our automated workflow using Zapier. We'll build a Zap that triggers whenever a new record appears in our designated Airtable view. ChatGPT will then translate our English content into the chosen languages. These translations will be parsed and linked to our template, allowing Creatomate to generate the videos. Finally, the translated videos will be sent back to our Airtable base. Here's how our Zap will look:
Let's get started!
1. Create a template in Creatomate
Log in to your Creatomate account or create a free account if you don't have one yet.
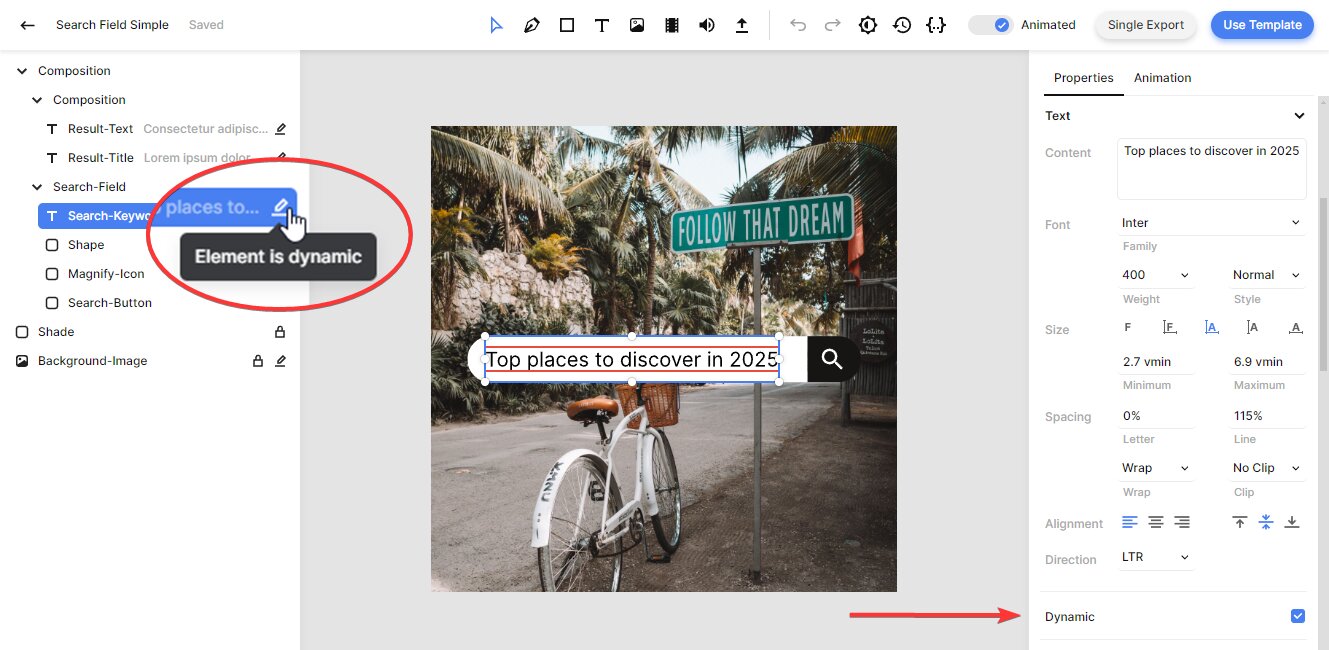
Navigate to the Templates page and click the New button to open the template gallery. You can choose from a number of templates, including both animated and static designs, or start from scratch by creating your own. For this tutorial, we'll use the Search Field Simple template from the Marketing category. The default 1:1 Square size works perfectly, so click Create Template to open it in the editor:
Let's take a closer look at our template and how it fits into our automation plans. In the left side panel, you'll find the elements that make up our template. The key thing to note is that certain elements, like Result-Text, Result-Title, Search-Keywords, and Background-Image, are marked as dynamic. This means these elements can be automatically replaced with different text and images using the Zapier workflow we're about to set up. In our case, the translations generated by ChatGPT, along with an image from Airtable, will be inserted to create unique videos in different languages.
If you want, you can customize the template to your liking. For now, we'll keep things simple and use the template as it is. You can always come back later to make changes. If you'd like to learn more about how the editor works, check out this quick guide.
Now that we have our template ready, let's move on to the next step: creating an OpenAI account and obtaining an API key.
2. Set up an OpenAI account for ChatGPT
We'll be using ChatGPT for translation later in this tutorial (in step 5). For now, let's set up an OpenAI account and get the API key ready for when we need it.
Create a free OpenAI account or sign in if you already have one. Then, go to the API section:
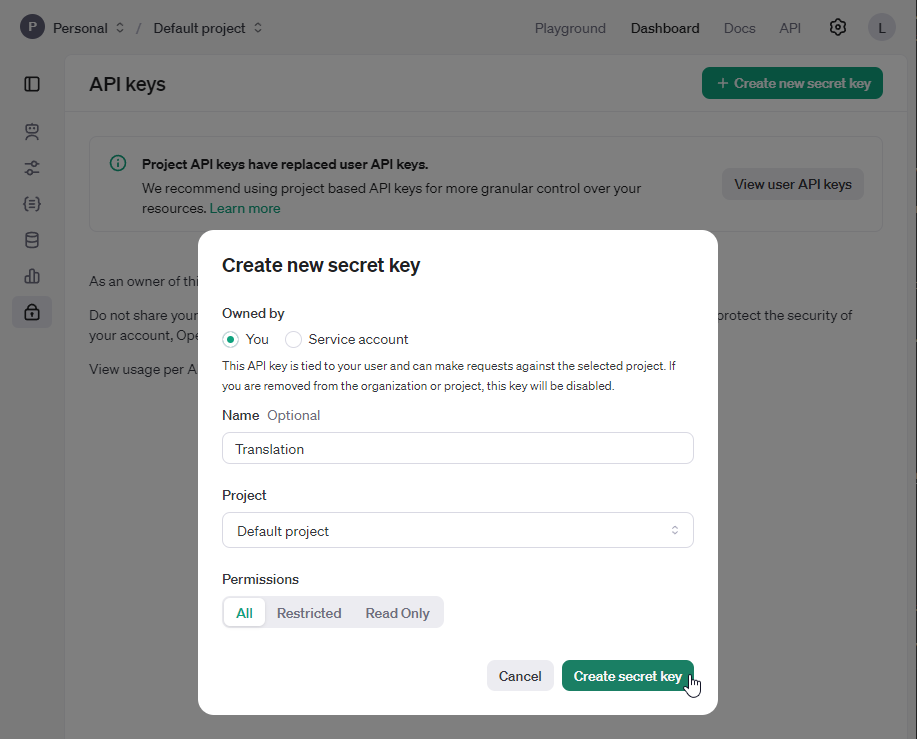
Next, go to your dashboard and click on the lock icon in the left side menu. Then, click Create new secret key, provide a name, and click Create secret key:
Keep your API key handy, as you'll need it in step 5.
3. Add video content to Airtable
In this step, we'll set up an Airtable document to store video content in English, our primary language. We'll also create fields to store the translated videos. For example, we'll produce three versions of a video: one in English, one in Hindi, and one in Spanish. However, you can choose to create videos in any language you need. Additionally, we'll configure a special view that will trigger our Zapier workflow.
Go to Airtable.com, and sign up for free. Or sign in if you already have an account.
Let's create a new base from scratch: Multilingual Video Content. On Table 1, set up the following fields:
- A Single line text field: Destination
- A Single line text field: Title
- A Long text field: Text
- An Attachment field: Image
- A Checkbox field: Ready?
- An URL field: Video-EN
- An URL field: Video-HI
- An URL field: Video-SP
Your table should look like this (click on the screenshot to open it full screen):

Now, let's create a dummy record that we'll use to set up the rest of our automation. You can use the following data to populate the first record:
- For Destination, insert: Why Should You Visit London?
- For Title, insert: Charming with Modern Vibes
- For Text, insert: From iconic landmarks like Big Ben and the Tower of London to vibrant neighborhoods and world-class cuisine, London offers an unforgettable journey through culture and time.
- For Image, you can upload one from your computer or insert the image downloaded from this URL: https://cdn.creatomate.com/demo/london-eye.jpg
- For Ready?, check the box (✅)
- Leave the three Video fields blank for now. We'll update them with the video links in step 8.

Next, we'll create a new view to use as a Zapier trigger for starting our automation. Click the + next to Grid, then rename the new view to Ready to Translate and click Create new view:
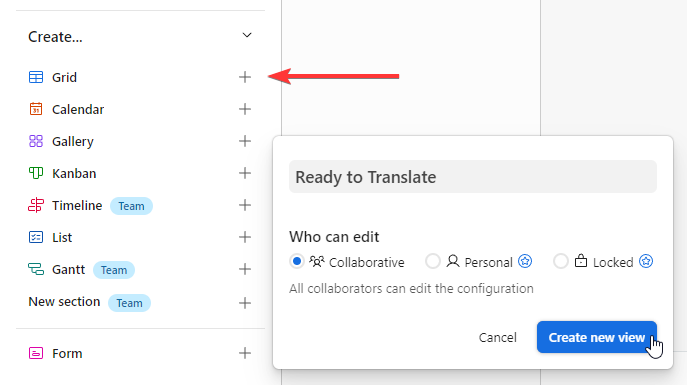
We want records to appear in the Ready to Translate view only if the checkbox is ticked. This allows us to review and verify the content is correct before using it. Once a record is ready, we can check the box, which will move it to the Ready to Translate view and trigger our Zapier automation. To set this up, we'll add a filter with the following condition: show only records “Where Ready? is checked (✅)”.
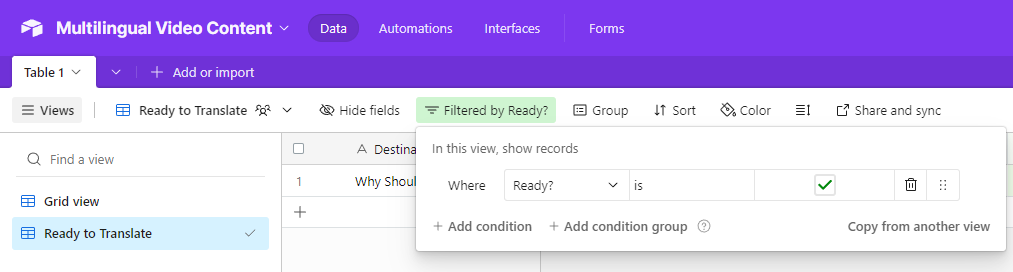
If everything went according to plan, you should see our dummy record appear in the Ready to Translate view.
Did it work? Awesome! Now, let's move on to Zapier.
4. Set up a Zapier trigger
Here's where it all comes together. We'll build a Zap that pulls data from Airtable, translates it using ChatGPT, processes the translations, generates three videos in different languages, and then uploads those videos back to Airtable.
Let's start by setting up our trigger.
Log in to your Zapier account or create a free account if you don't have one yet.
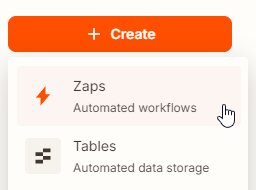
From your dashboard, click Create, then choose Zaps:
Once in the Zap editor, click the Trigger block. Search for and select the Airtable app with the New Record trigger event.
Then, we need to select our Airtable account. To do this, click Sign in and enter your Airtable credentials. If you've used Airtable with Zapier before, simply click Select, then Create a new connection. Click Add a base, search for the Multilingual Video Content base, and click Grant access:
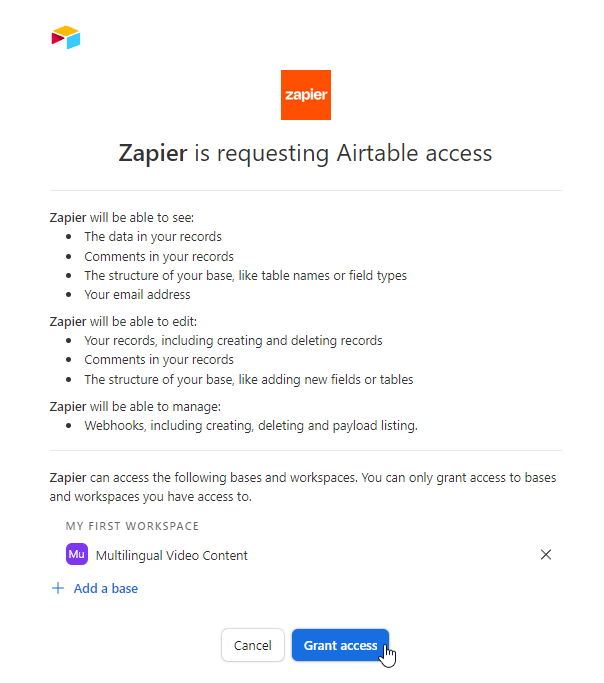
Your Airtable account should be connected and you're able to click the Continue button.
Next, configure your trigger as follows:
- Set Base to Multilingual Video Content
- Set Table to Table 1
- Set Limit to View to Ready to Translate
- Set Include file contents? to False
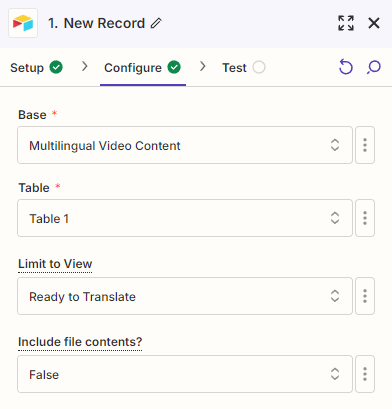
Then, click Continue.
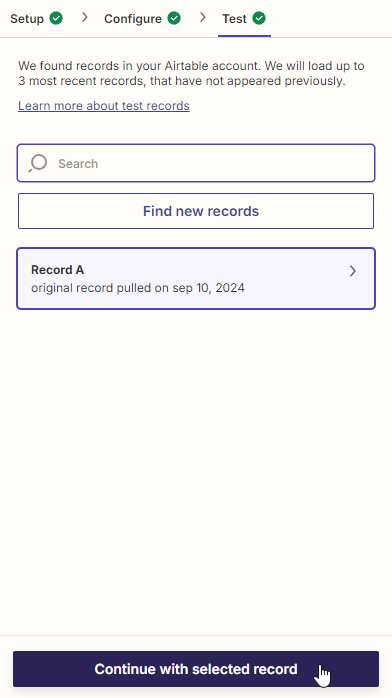
To make sure Zapier can find our test record, click Test trigger. Once the test is successful, click Continue with selected record and move on to the next step:
5. Create translations with ChatGPT
In this step, we'll set up an action for ChatGPT to translate our English texts into Hindi (Indian) and Spanish.
Search for and select the ChatGPT app with the Conversation action event. Then, create a connection with your OpenAI account using the API key from step 2. When done, click Continue.
Then, in the User Message field, copy and paste the following prompt:
Translate "[Destination]", "[Title]", and "[Text]" into Hindi (HI) and Spanish (SP).
Return only valid JSON with the following structure. Remove any JSON formatting, so the output is on a single line and in its most compact form, as follows:
{"Destination-HI":"", "Destination-SP":"", "Title-HI":"", "Title-SP":"", "Text-HI":"", "Text-SP":""}
Make sure to replace [Destination], [Title], and [Text] with the Airtable values, like this:
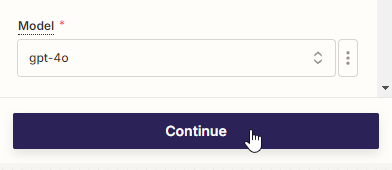
Choose the Model you want to use, such as gpt-4o. You can leave the other settings as they are or adjust them if needed. When you're finished, click Continue:
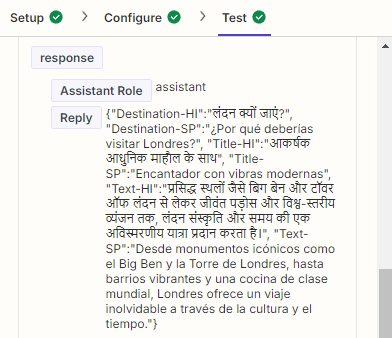
To test if ChatGPT can translate our input text, click Test step. If the test is successful, a response is generated and stored in the "Reply" field:
However, the response is in a format that Zapier can't process directly, so we need to convert it before proceeding. That's what we'll do next.
6. Parse the translation
This step is simple but essential. We'll break down the JSON response from ChatGPT into individual items. This will allow us to link the translation to our video template in the next step.
Click + to add a new step to your Zap. Search for the Code by Zapier app, and select the Run Javascript action event:
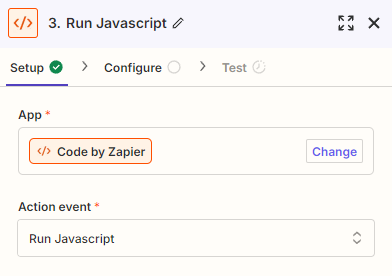
Then, click Continue.
Type response in the Input Data field, and select ChatGPT -> Reply. Then, in the Code field, copy and paste the following:
1output = JSON.parse(inputData.response);It should look like this:
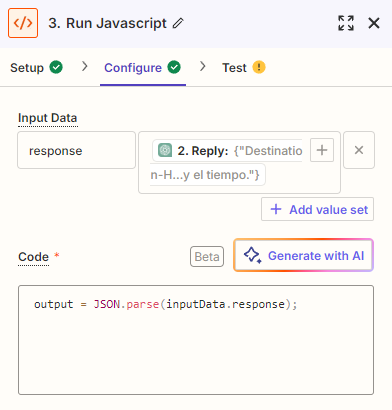
When done, click Continue.
To verify it works as expected, click Test step. If the test is successful, you'll see the ChatGPT response broken down into individual items; Destination HI, Destination SP, Title HI, and so on:
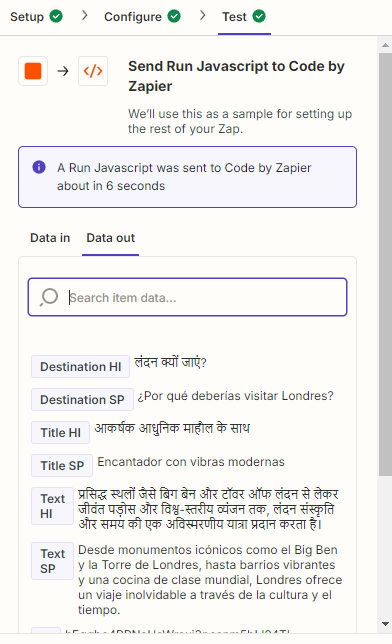
We can now use these translations to create videos.
7. Generate the videos
Since we're creating videos in three different languages, we'll need to set up three Creatomate modules.
English video
For the first video, the English version, add the Creatomate app with the Create Single Render action event. Then, create a connection using your project's API key, which you can find under Project Settings in your Creatomate dashboard.
Also, click the pen icon in the top to rename this step. I recommend naming it "English" to make it easier to match the video with the correct Airtable field in the next step:

Then, click Continue.
Next, select the Search Field Simple template in the Template field. Zapier will then pull in the dynamic elements and list them under Modifications.
Let's map the English content from Airtable to the template as follows:
- Set Background-Image to Airtable -> Image Url
- Set Search-Keywords to Airtable -> Destination
- Set Result-Title to Airtable -> Title
- Set Result-Text to Airtable -> Text
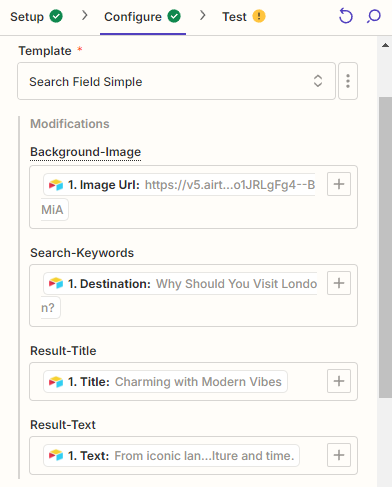
When done, click Continue.
To make sure Creatomate can generate our English video, click Test step. Once the test is successful, let's create the other two videos too.
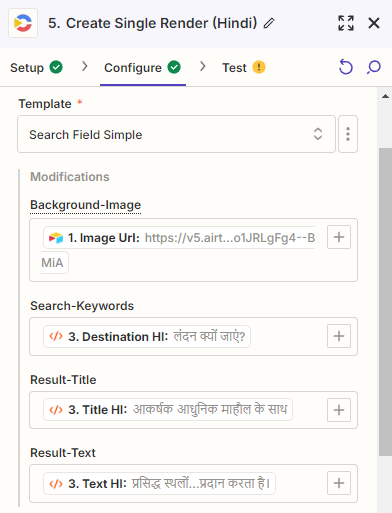
Hindi video
Add another Creatomate module with the Create Single Render action event. Use the same connection as before, and rename this step "Hindi".
Again, select the Search Field Simple template. The mapping will be slightly different this time because this video uses the ChatGPT translation, which has been split by the JavaScript step. Here's how to set it up:
- Set Background-Image to Airtable -> Image Url
- Set Search-Keywords to Code by Zapier -> Destination HI
- Set Result-Title to Code by Zapier -> Title HI
- Set Result-Text to Code by Zapier -> Text HI
Test this step as well, just like we did with the previous Creatomate module.
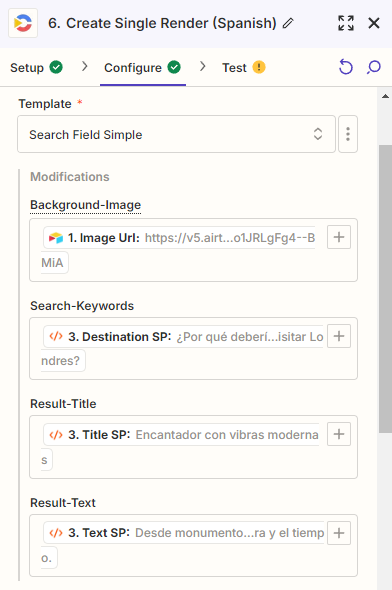
Spanish video
You've probably got the hang of it now. To create the Spanish video, add another Creatomate - Create Single Render module. Rename this step to "Spanish". Select the same account and template as before, but this time link it to the Spanish translation:
- Set Background-Image to Airtable -> Image Url
- Set Search-Keywords to Code by Zapier -> Destination SP
- Set Result-Title to Code by Zapier -> Title SP
- Set Result-Text to Code by Zapier -> Text SP
Test this step too. Once the test is successful, we can proceed to the final step of the tutorial.
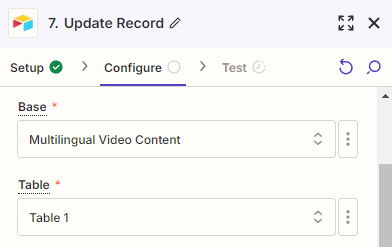
8. Send the translated videos back to Airtable
Now that all three videos are created, we can update our Airtable base with the video links.
Add the Airtable app with the Update Record action event. Select the same Airtable account you used for the trigger. When done, click Continue.
To configure the action, choose the same Base and Table:
Note: You might see a warning about a "Possible Zap loop detected". To prevent this, we've set up a special view to trigger our Zap. This module updates records in the Grid view, not the Ready to Translate view, so it should work without any issues.
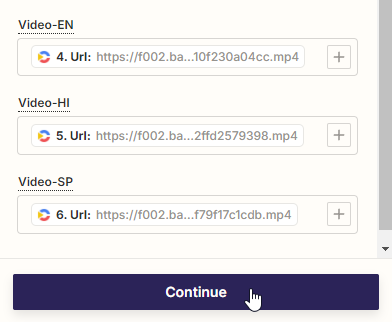
And to add the videos to the correct record, select Airtable -> ID from the Custom tab in the Record field:
Next, map each video link to the corresponding field as shown below. When done, click Continue.
- Set Video-EN to Creatomate (English) -> Url
- Set Video-HI to Creatomate (Hindi) -> Url
- Set Video-SP to Creatomate (Spanish) -> Url
Test this step to ensure Zapier updates the correct record with the right video links. Once the test is successful, return to your Airtable base to confirm everything works as expected:

You can watch the videos by clicking the links.
What's next for automated multilingual videos and images
And that's it! With this automation, all you need to do is add a record to Airtable whenever you want to create videos (or images) in multiple languages. Within minutes, the translated visuals will automatically appear in your Airtable base, ready for you to download and use as needed.
If you want to automate more of your social media marketing, check out these tutorials next:
👉 How to Automate YouTube Shorts with AI-Generated Videos
👉 How to Automatically Create and Post TikTok Videos using Zapier
👉 How to Automatically Create Instagram Posts using Zapier
👉 How to use AI to Automate Videos for Shorts, Stories, and Reels
You might also like these tutorials


Start automating today
Start with a full-featured trial with 50 credits, no credit card required.
Get started for free →