How to Create Video Slideshows using Zapier

In this tutorial, you'll learn how to set up an automated no-code workflow to create slideshow videos from images using Zapier, Airtable, and Creatomate.
Slideshow videos can be used for all kinds of occasions. It's an attractive way to display static content. For instance, video slideshows are great for transforming photo albums into videos, telling stories with images, showcasing products, etc.
What's better than that? Auto-generated video slideshows! In this tutorial, you'll learn the basics of how to set up an automated workflow in Zapier that turns images into slideshow videos using Creatomate.
Let's create an engaging video slideshow using three images, like the one below. Even so, you can customize your slideshow design with the editor to make it exactly how you want it. You can put your logo on it, add audio, (animated) text, and even video content.
Prerequisites
To follow along, you'll need these tools:
- Zapier: to set up the automated workflow.
- Creatomate: to turn the images into a video slideshow. Sign up for free.
- Any app that lets you store media: such as Airtable, Google Drive, etc.
Tip: I'll use Airtable in this tutorial, but it's just an example. Replace it with apps that work for you.
How to create slideshow videos with Zapier?
The first thing we're going to do is create a template in Creatomate. This template will be the basis for the slideshow videos. We'll use a pre-made template that has different effects for each image. It's optional to customize this template or design your own.
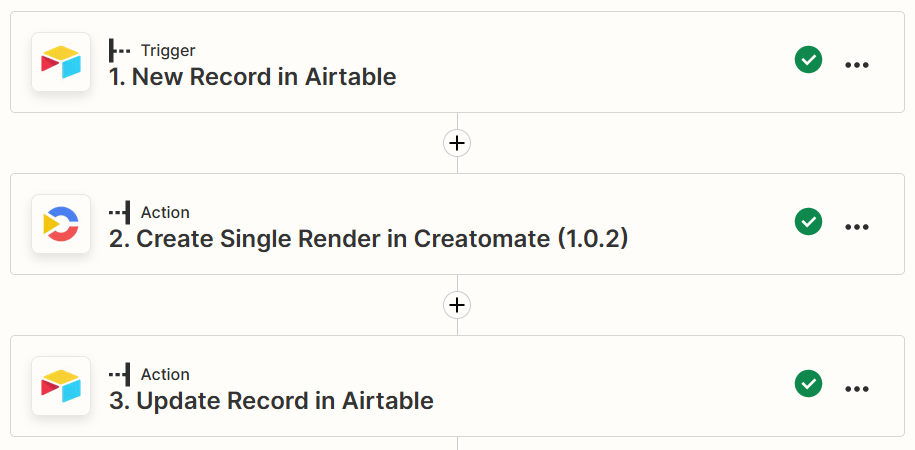
Next, we'll create a Zap that gets triggered by new records in Airtable, then turns the images into a slideshow video using Creatomate, and uploads the slideshow video back to Airtable. Here's how our Zap looks:
1. Create a slideshow template in Creatomate
Log in to your account, go to the Templates page and click + New. In the template gallery, go to the Fundamentals category and select the Image Slideshow (3 images) template. We'll go with the 1:1 square size and click Create Template:
The left menu in the template editor shows that our template has four elements, all of them dynamic. That means that these elements can be replaced with other content to make completely unique slideshow videos.
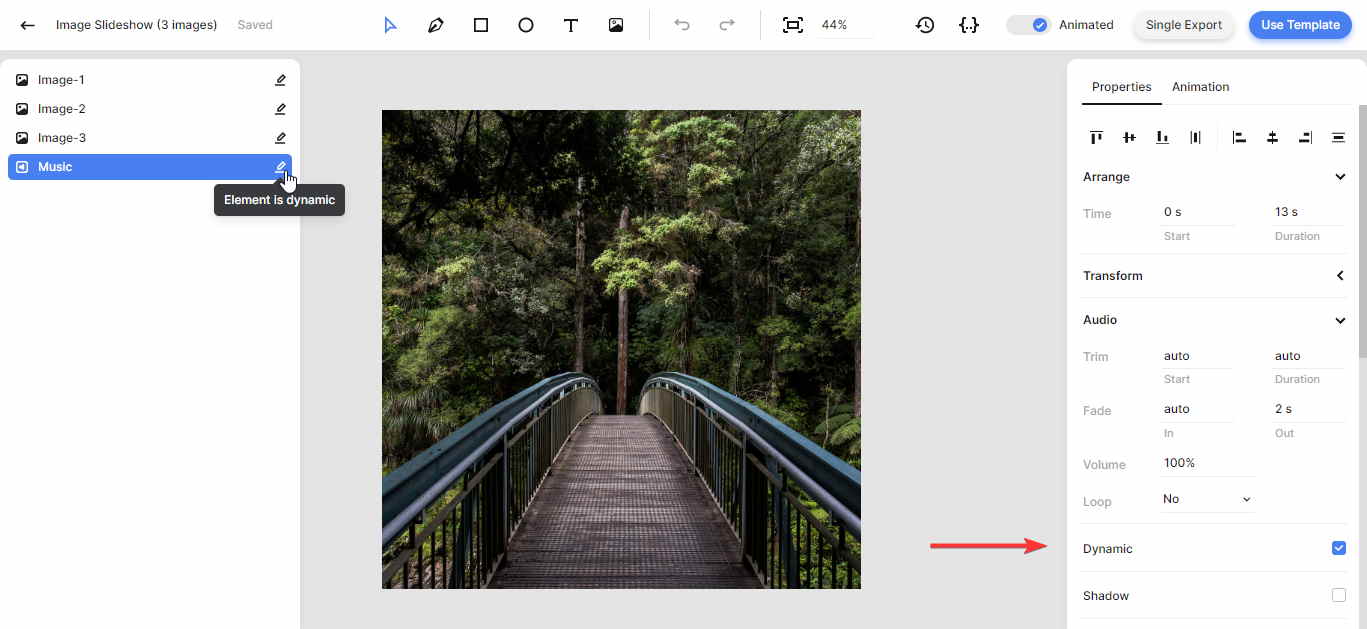
Make any changes you want to the template to make your slideshows more interesting. You could add your logo, change the transition animations or add (animated) text. For simplicity, I'll only remove the Music element and use the template that way.
Tip: If the platform where your images come from (the trigger app in Zapier) also contains text, you can use it in your slideshows too. Just add one or more text elements to your template, make them dynamic, and rename them. You can connect them in step 3.
If you want a slideshow with more than three images, just copy and paste one or more of the image elements onto the timeline. Select the first new slide, go to the Animations tab, and choose Transitions. Just pick one of the preset animations and it'll connect smoothly to the previous slide. Don't forget to rename your image elements so they match the order. Right-click the image element in the left menu, select Rename and name it Image-4, Image-5, etc:
Once you're happy with your slideshow design, we'll set up our Zap.
2. Add Trigger: New Record in Airtable
To start our Zap, we need an app that provides the images for our slideshows. You can use any app you want, but I'll show you how to use Airtable. For this tutorial, I made a simple table with three fields for input images and one field for uploading the slideshow video:

Log in to your Zapier account and click + Create Zap. Search for the Airtable app and select the New Record event. Then, click Continue. If you've used Airtable with Zapier before, you can select your account from the list. Otherwise, sign in with your Airtable API Key first. Click Continue.
On the set up trigger screen, select the Base and the Table. Click Continue:
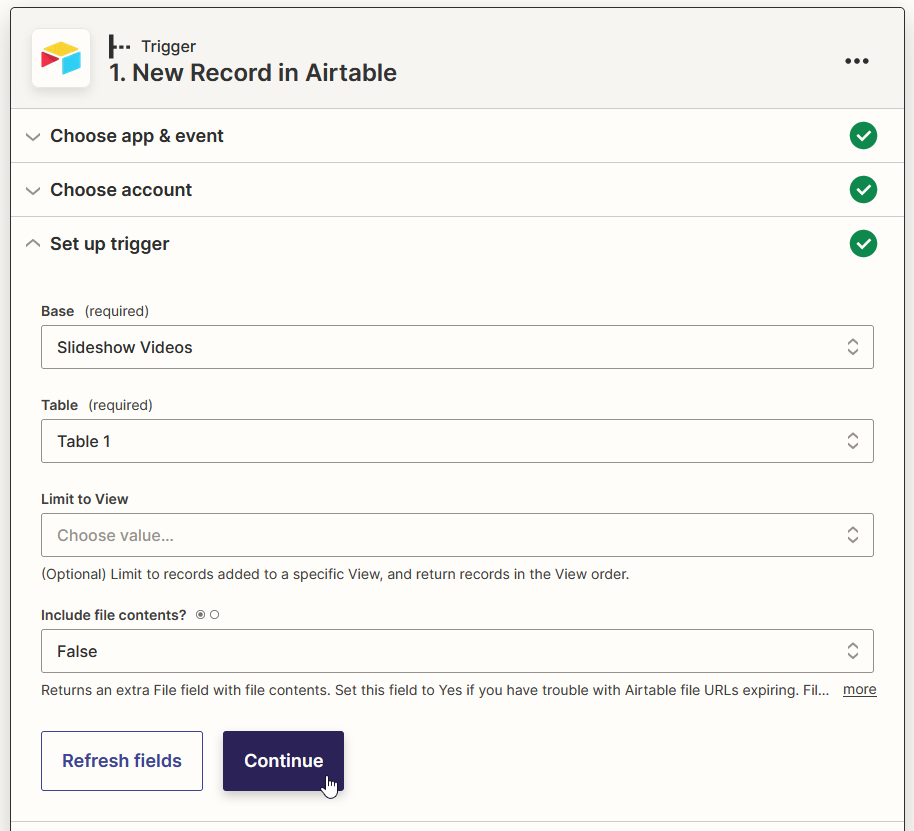
Lastly, click Test Trigger to make sure Zapier is able to find the record in Airtable. Click Continue when the test is successful.
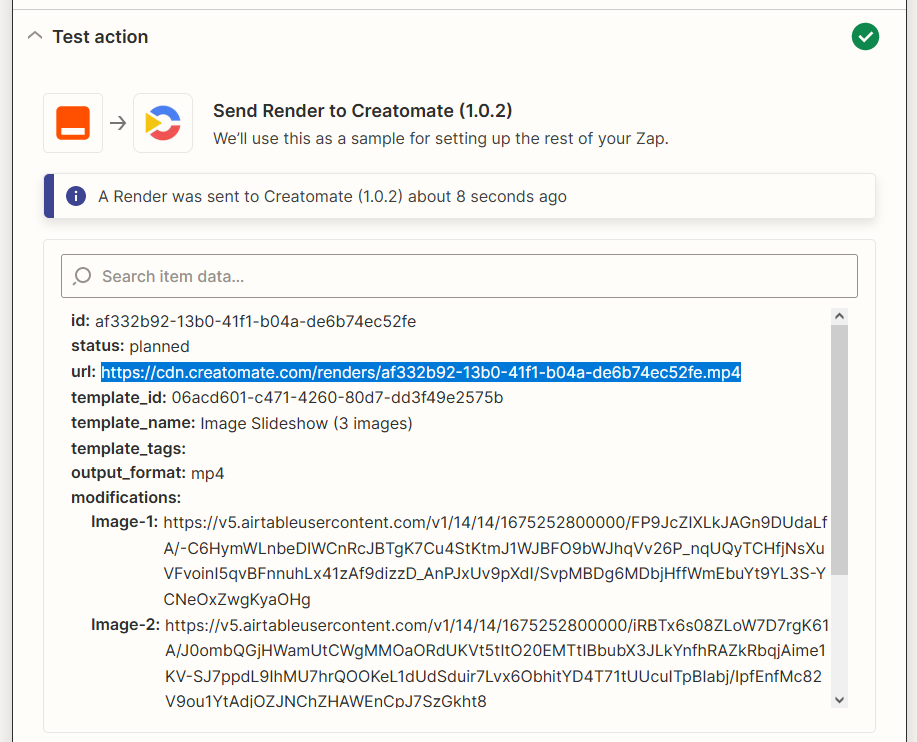
3. Add Action: Create Single Render in Creatomate
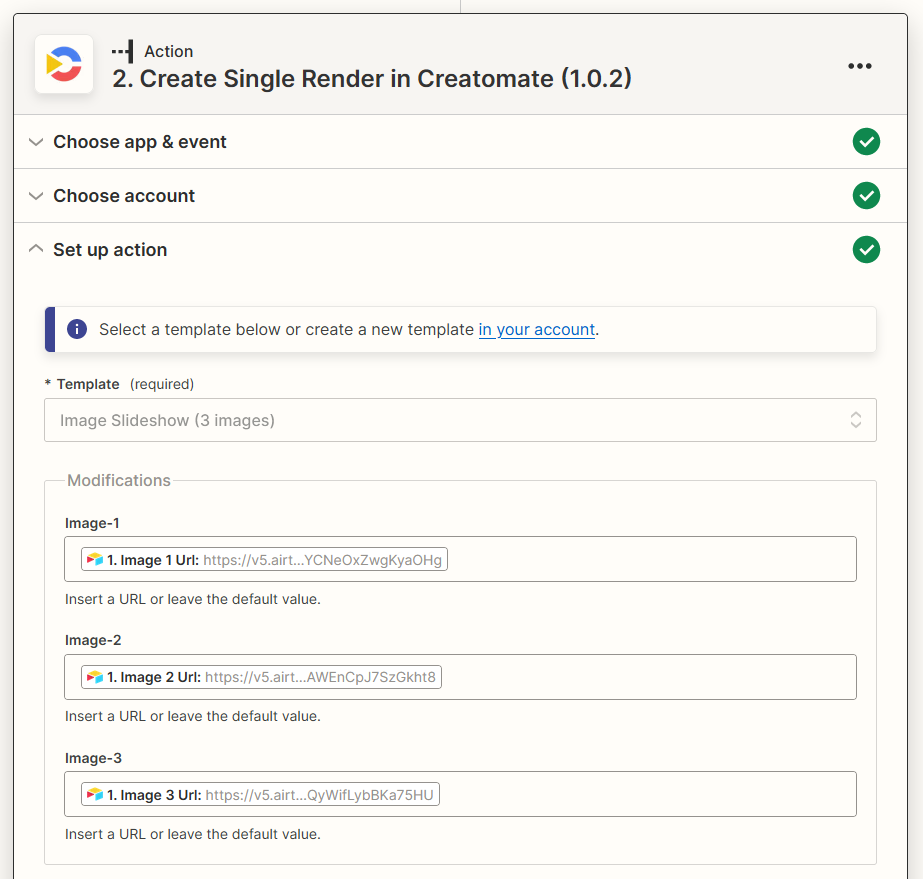
Search for the app Creatomate and select the Create Single Render event. Continue by choosing your account from the list or signing in with your Projects API key first. Then, click Continue.
It's time to set up the action that turns our images into a video slideshow. Let's select our Image Slideshow (3 images) template in the Template field first. Then, connect the Airtable images to our template as follows:
- Set Image-1 to: Airtable -> Image 1 Url
- Set Image-2 to: Airtable -> Image 2 Url
- Set Image-3 to: Airtable -> Image 3 Url
When done, click Continue:
Click Test step to make sure Creatomate can create a slideshow using your trigger images. You can watch the video at the URL. It takes a moment to render, so if you get a Not Found page, refresh the page. It's only while testing; after the Zap's published, the next action waits for the video to finish.
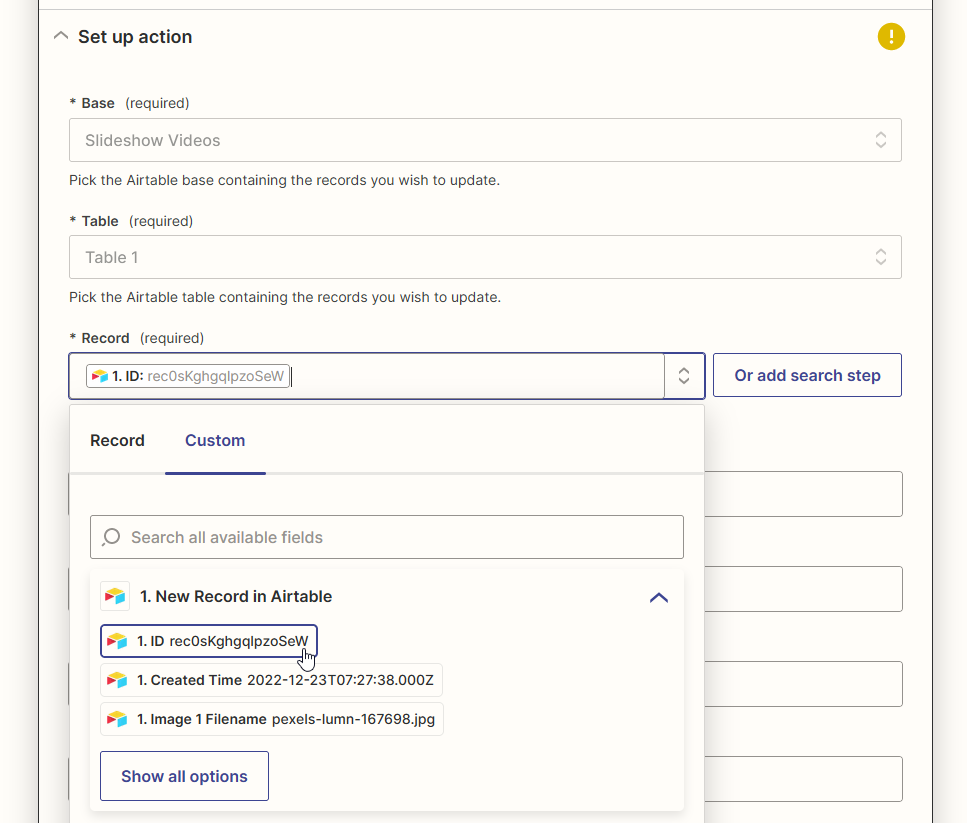
4. Add Action: Update Record in Airtable
The slideshow videos can be processed with any app that works for you. For instance, you can upload them to Google Drive or YouTube, share them on Facebook or Twitter, or send them by mail using Gmail or Email by Zapier. However, I'll show you how to upload them back to Airtable.
Click + to add the Airtable app and select the Update Record event. Continue by selecting the same Airtable account as before. Click Continue.
On the set up the action screen, select the same Base and Table as we did with the trigger. You can update the same record where the input images are from by selecting Airtable -> ID from the Custom tab in the Record field:
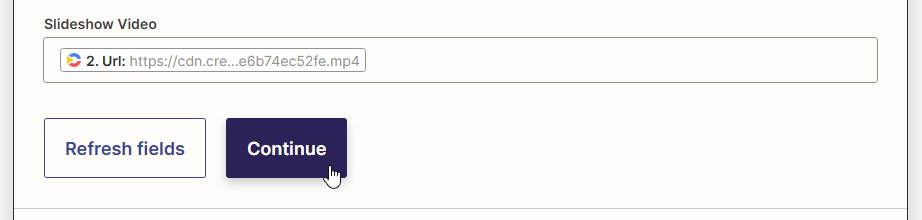
Select the Creatomate -> Url in the Slideshow Video field to update the record with it. When done, click Continue:
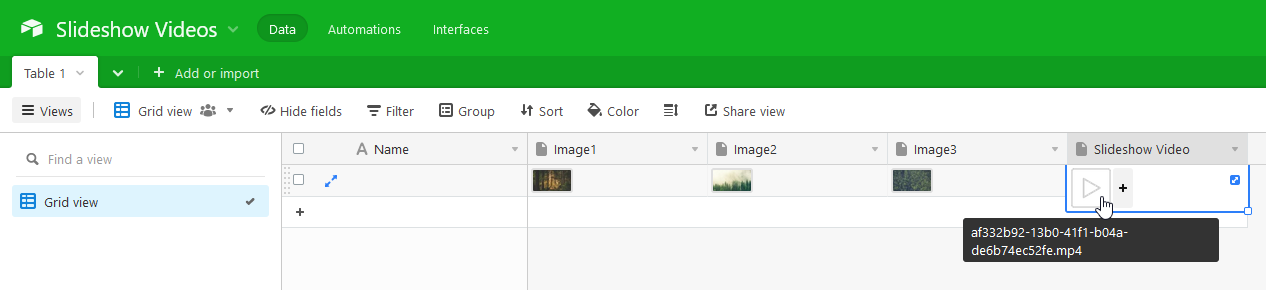
Last but not least, click Test step to make sure Zapier is able to update the Airtable record with our slideshow video. My Airtable table shows that the video has been successfully uploaded:
Once you're happy with your workflow, click Publish Zap to activate it.
Wrapping up
That's it! You now know how to turn images into slideshow videos using Zapier and Creatomate - automatically. Just adapt this workflow to your own situation and you'll have your own automated slideshow maker.
You might also like these tutorials


Start automating today
Start with a full-featured trial with 50 credits, no credit card required.
Get started for free →