How to Generate Videos from JSON using an API

In this step-by-step tutorial, you'll learn how to create dynamic videos from JSON using Creatomate's video generation API.
Need to generate videos whose content and structure adapt to your data? With Creatomate’s video generation API and RenderScript, you can define scenes, elements, animations, and transitions in JSON. Send that description to the API, and Creatomate renders the video and returns a URL for the finished MP4. Your data can determine the text and images, but also the number of scenes, their layout, and their timing.
In this tutorial, we'll first use a simple animated text video to learn the API workflow, from sending the request to retrieving the finished MP4. Then we'll render the multi-scene example shown below. The same approach can be used for many types of dynamic video, including real estate listings, product videos, event announcements, personalized messages, and social media content.
The JSON below produces this video:
curl -X POST https://api.creatomate.com/v2/renders \
     -H "Content-Type: application/json" \
     -H "Authorization: Bearer YOUR_API_KEY_HERE" \
     -d '{
  "output_format": "mp4",
  "width": 720,
  "height": 1280,
  "elements": [
    {
      "type": "composition",
      "track": 1,
      "time": 0,
      "duration": 4.5,
      "fill_color": "rgba(243,207,86,1)",
      "elements": [
        {
          "type": "text",
          "text": "This example video is entirely generated through code.",
          "track": 1,
          "time": 0,
          "width": "95.2506%",
          "height": "32.6602%",
          "x_alignment": "50%",
          "y_alignment": "50%",
          "font_family": "Inter",
          "font_weight": "700",
          "line_height": "100%",
          "fill_color": "rgba(0,0,0,1)",
          "color_filter": "hue",
          "animations": [
            {
              "easing": "linear",
              "type": "scale",
              "fade": false,
              "scope": "element",
              "start_scale": "70%"
            },
            {
              "time": 0,
              "duration": 1,
              "easing": "back-in-out",
              "type": "text-scale",
              "split": "letter",
              "track": 0
            }
          ]
        }
      ]
    },
    {
      "type": "composition",
      "track": 1,
      "time": 3.5,
      "duration": 4.5,
      "fill_color": "rgba(73,128,241,1)",
      "animations": [
        {
          "time": 0,
          "duration": 1,
          "transition": true,
          "type": "circular-wipe"
        }
      ],
      "elements": [
        {
          "type": "text",
          "text": "Define your entire video in code: scenes, layers, animations, audio, and timing.",
          "track": 1,
          "time": 0.5,
          "width": "79.7626%",
          "height": "37.8471%",
          "x_alignment": "50%",
          "y_alignment": "50%",
          "font_family": "Inter",
          "font_weight": "700",
          "line_height": "100%",
          "fill_color": "#ffffff",
          "animations": [
            {
              "easing": "linear",
              "type": "scale",
              "fade": false,
              "scope": "element",
              "start_scale": "70%"
            },
            {
              "time": 0,
              "duration": 1,
              "easing": "back-in-out",
              "type": "text-scale",
              "split": "letter",
              "track": 0
            }
          ]
        }
      ]
    },
    {
      "type": "composition",
      "track": 1,
      "duration": 4.5,
      "fill_color": "rgba(60,174,163,1)",
      "animations": [
        {
          "time": 0,
          "duration": 0.87,
          "transition": true,
          "type": "circular-wipe"
        }
      ],
      "elements": [
        {
          "type": "text",
          "text": "Build fully automated video pipelines driven by JSON.",
          "track": 1,
          "time": 0.5,
          "width": "79.7626%",
          "height": "37.8471%",
          "x_alignment": "50%",
          "y_alignment": "50%",
          "font_family": "Inter",
          "font_weight": "700",
          "line_height": "100%",
          "fill_color": "#ffffff",
          "animations": [
            {
              "easing": "linear",
              "type": "scale",
              "fade": false,
              "scope": "element",
              "start_scale": "70%"
            },
            {
              "time": 0,
              "duration": 1,
              "easing": "back-in-out",
              "type": "text-scale",
              "split": "letter",
              "track": 0
            }
          ]
        }
      ]
    }
  ]
}'
The two meanings of JSON in video generation
In video automation, JSON can refer to two different things:
- Content JSON: contains the information you want to show, such as product details, a property listing, event information, or personalized text.
- RenderScript JSON: describes how the finished video should look and behave, including its scenes, elements, timing, and animations.
Content JSON can come from almost anywhere: a CRM, CMS, database, form submission, spreadsheet, or external API. In a template-based workflow, you design the layout once and map these values to dynamic text, images, and other elements. For most video automation workflows, this is the easiest starting point.
With direct RenderScript, your application or no-code workflow builds or adjusts the complete video description before sending it to the API. For example, a customer name from a CRM can become the text of a title element, while an image URL from a product feed can become the source of an image element. This approach is useful for more complex use cases where your data also determines the video's structure, such as the number of scenes, their layout, or their timing.
This tutorial focuses on that direct RenderScript approach. We'll send a complete video description to the API without using a template. For the template-based workflow, see How to Automate Video Generation using an API.
Prerequisites
To follow this tutorial, you'll need:
- A Creatomate account. You can create one for free if you don't have one yet.
- A way to send HTTP requests. You can run the cURL command in a terminal, use one of the Node.js, Python, PHP, or Ruby examples below, or send the request with an API client such as Postman or Insomnia.
How to turn JSON into videos with Creatomate's API
First, you'll get your Creatomate API key. Next, you'll send a complete RenderScript request, check the render status, and open the finished MP4. Finally, you'll try a multi-scene example to see how more advanced video structures can be defined entirely in JSON.
The examples include complete, ready-to-run RenderScript, so you don't need to create or save a separate JSON file. This tutorial focuses on sending JSON through the API. To learn how to create RenderScript in Creatomate's visual editor, see How to Create Videos from JSON. For more advanced structures and real-world examples, see JSON-to-Video: Practical Examples.
Let's get started!
1. Get your API key
Log in to Creatomate. Open the project menu in the top-left corner, select Project Settings, and go to the API tab. Then copy your API key:
You'll use this key to authorize the request in the next steps. When you're logged in, Creatomate may already insert your key into the API quick-start examples. If the code still shows YOUR_API_KEY_HERE, replace that placeholder with the key you just copied.
2. Send your first API request
The request below sends a complete RenderScript directly to the /v2/renders endpoint. It creates a simple animated text video, so you can focus on how the API request works.
Choose your preferred language in the code block and run the request:
curl -X POST https://api.creatomate.com/v2/renders \
     -H "Content-Type: application/json" \
     -H "Authorization: Bearer YOUR_API_KEY_HERE" \
     -d '{
  "output_format": "mp4",
  "width": 1280,
  "height": 720,
  "elements": [
    {
      "type": "text",
      "track": 1,
      "width": "75%",
      "height": "25%",
      "x_alignment": "50%",
      "y_alignment": "50%",
      "text": "This video is generated from JSON data! 👋",
      "font_family": "Noto Sans",
      "fill_color": "#ffffff",
      "animations": [
        {
          "time": 0,
          "duration": 1,
          "easing": "quadratic-out",
          "type": "text-slide",
          "scope": "element",
          "split": "line",
          "distance": "200%",
          "direction": "right",
          "background_effect": "disabled"
        }
      ]
    }
  ]
}'
The request contains everything Creatomate needs to generate the video:
- output_format, width, and height define a 1280-by-720 MP4.
- elements contains everything that appears in the video. This example has one text element.
- type specifies that this is a text element.
- track places the element on track 1 of the timeline. When multiple elements use the same track, Creatomate arranges them one after another.
- width and height define the size of the text box, while x_alignment and y_alignment center the text inside it.
- text, font_family, and fill_color define the message and its appearance.
- animations defines how the text enters the screen.
This example uses only a small selection of the available RenderScript properties. For a complete reference, see the RenderScript documentation.
Immediately after submitting the request, the API returns a render object similar to this:
1{
2  "id": "471ff2f0-92ec-451e-bd25-b1069b5cf0de",
3  "status": "planned",
4  "url": "https://f002.backblazeb2.com/file/creatomate-c8xg3hsxdu/471ff2f0-92ec-451e-bd25-b1069b5cf0de.mp4"
5}
The planned status means that Creatomate has accepted the request and is waiting to process it. Although the response already contains a url, the finished video becomes available there only after the status changes to succeeded.
Copy the render id from the response. You'll use it in the next step to check the render status and retrieve the finished video.
3. Check the render status and retrieve the video
Use the render ID from step 2 to retrieve the latest status:
1curl -X GET https://api.creatomate.com/v2/renders/RENDER_ID \
2  -H "Authorization: Bearer YOUR_API_KEY_HERE"
Replace RENDER_ID with the ID returned by the POST request, and use the same API key as before.
If the response still shows planned or rendering, wait a few seconds and run the request again. When the render is complete, the response will look similar to this:
1{
2  "id": "471ff2f0-92ec-451e-bd25-b1069b5cf0de",
3  "status": "succeeded",
4  "url": "https://f002.backblazeb2.com/file/creatomate-c8xg3hsxdu/471ff2f0-92ec-451e-bd25-b1069b5cf0de.mp4"
5}
When the status is succeeded, open the url to view or download the finished MP4:
If the status is failed, check the error_message in the response to find out what went wrong.
You can also verify the render visually in your project's API Log. Find the request you just submitted and open it to inspect its status and submitted data:
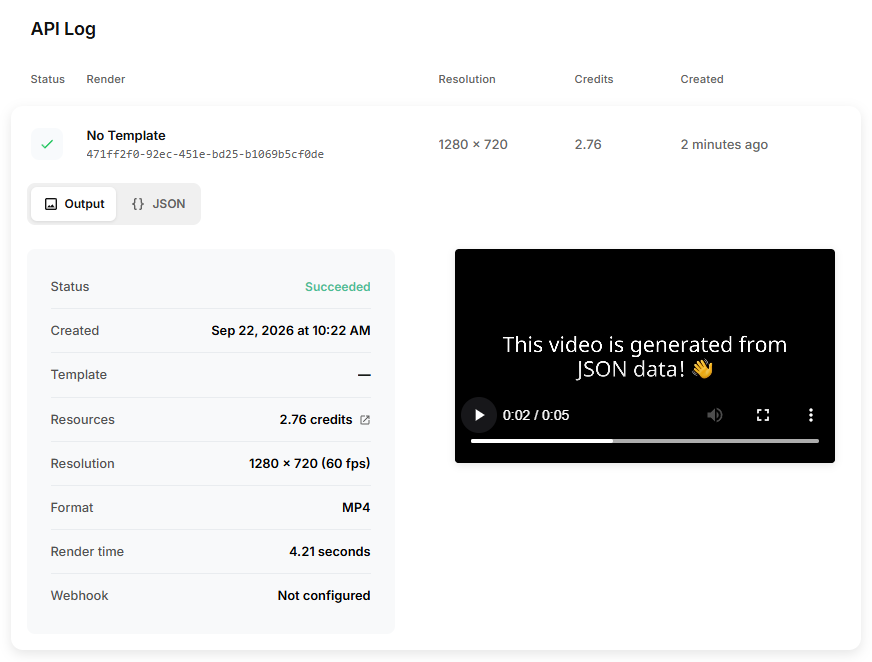
The output URL can now be used in the rest of your workflow – for example, to store the MP4, publish it, or pass it to another application.
Tip: For this example, you can check the status manually. In an automated workflow, use a webhook so Creatomate can notify your application when a render succeeds or fails.
4. Create a multi-scene video with JSON
Now that you've completed the API workflow with a simple video, let's render the multi-scene example shown at the beginning of this tutorial.
Choose your preferred language and run the request just as you did in step 2:
curl -X POST https://api.creatomate.com/v2/renders \
     -H "Content-Type: application/json" \
     -H "Authorization: Bearer YOUR_API_KEY_HERE" \
     -d '{
  "output_format": "mp4",
  "width": 720,
  "height": 1280,
  "elements": [
    {
      "type": "composition",
      "track": 1,
      "time": 0,
      "duration": 4.5,
      "fill_color": "rgba(243,207,86,1)",
      "elements": [
        {
          "type": "text",
          "text": "This example video is entirely generated through code.",
          "track": 1,
          "time": 0,
          "width": "95.2506%",
          "height": "32.6602%",
          "x_alignment": "50%",
          "y_alignment": "50%",
          "font_family": "Inter",
          "font_weight": "700",
          "line_height": "100%",
          "fill_color": "rgba(0,0,0,1)",
          "color_filter": "hue",
          "animations": [
            {
              "easing": "linear",
              "type": "scale",
              "fade": false,
              "scope": "element",
              "start_scale": "70%"
            },
            {
              "time": 0,
              "duration": 1,
              "easing": "back-in-out",
              "type": "text-scale",
              "split": "letter",
              "track": 0
            }
          ]
        }
      ]
    },
    {
      "type": "composition",
      "track": 1,
      "time": 3.5,
      "duration": 4.5,
      "fill_color": "rgba(73,128,241,1)",
      "animations": [
        {
          "time": 0,
          "duration": 1,
          "transition": true,
          "type": "circular-wipe"
        }
      ],
      "elements": [
        {
          "type": "text",
          "text": "Define your entire video in code: scenes, layers, animations, audio, and timing.",
          "track": 1,
          "time": 0.5,
          "width": "79.7626%",
          "height": "37.8471%",
          "x_alignment": "50%",
          "y_alignment": "50%",
          "font_family": "Inter",
          "font_weight": "700",
          "line_height": "100%",
          "fill_color": "#ffffff",
          "animations": [
            {
              "easing": "linear",
              "type": "scale",
              "fade": false,
              "scope": "element",
              "start_scale": "70%"
            },
            {
              "time": 0,
              "duration": 1,
              "easing": "back-in-out",
              "type": "text-scale",
              "split": "letter",
              "track": 0
            }
          ]
        }
      ]
    },
    {
      "type": "composition",
      "track": 1,
      "duration": 4.5,
      "fill_color": "rgba(60,174,163,1)",
      "animations": [
        {
          "time": 0,
          "duration": 0.87,
          "transition": true,
          "type": "circular-wipe"
        }
      ],
      "elements": [
        {
          "type": "text",
          "text": "Build fully automated video pipelines driven by JSON.",
          "track": 1,
          "time": 0.5,
          "width": "79.7626%",
          "height": "37.8471%",
          "x_alignment": "50%",
          "y_alignment": "50%",
          "font_family": "Inter",
          "font_weight": "700",
          "line_height": "100%",
          "fill_color": "#ffffff",
          "animations": [
            {
              "easing": "linear",
              "type": "scale",
              "fade": false,
              "scope": "element",
              "start_scale": "70%"
            },
            {
              "time": 0,
              "duration": 1,
              "easing": "back-in-out",
              "type": "text-scale",
              "split": "letter",
              "track": 0
            }
          ]
        }
      ]
    }
  ]
}'
This creates the following video:
Here's how this RenderScript builds on the first example:
- The top-level elements array contains three composition elements. Each composition contains a text element and acts as one scene in this video.
- All three compositions use track: 1 and have a duration of 4.5 seconds. The first starts at time: 0; the second starts at time: 3.5, overlapping the first by one second. Creatomate positions the third automatically because it has no time value.
- fill_color on each composition sets its background color. The nested text elements have their own fill_color and animations.
- The second and third compositions use transition: true with circular-wipe to transition from the previous scene.
This request always creates three scenes. To make the number of scenes depend on your data, an application or no-code workflow could create one composition for each product, property, or other item, add those compositions to elements, and send the resulting RenderScript to the same API endpoint.
Tip: You don't have to write complex RenderScript entirely by hand. Open a template in Creatomate's editor and click Source Editor in the top-right corner to view its underlying RenderScript. The code updates as you make visual changes, making it easier to understand how designs, animations, and timing are represented in JSON. For a step-by-step explanation, see How to Create Videos from JSON.
What's next for video automation using JSON
You've now sent a complete video description as JSON, generated an MP4 through the API, checked its status, and seen where dynamic content can be inserted. From here, you can add media, audio, animations, or build the RenderScript from data in your own application or automation.
Here are some resources to help:
- How to Create Videos from JSON shows how to build and inspect RenderScript in Creatomate's visual editor.
- JSON-to-Video: Practical Examples demonstrates more advanced video structures.
- How to Create Videos from JSON using n8n applies the same idea in a no-code workflow.
- The RenderScript documentation is the reference for elements and properties.
Common Questions
Can I send any JSON object and get a video?
Not directly. Creatomate's API expects JSON that describes a valid render. When you generate a video without a template, that JSON must use Creatomate's RenderScript format and describe the output format, dimensions, elements, timing, and other video properties.
General content data, such as a product record, property listing, or event object, does not contain those video instructions yet. Your application or automation first maps that data to RenderScript properties. For example, a product name can become the text of a title element, while an image URL can become the source of an image element. The resulting RenderScript is then sent to the API.
Do I need to create a template first?
A template is optional. You can define the complete video in RenderScript and send it directly to the API, as shown in this tutorial.
However, a template is useful when every video follows a reusable design and you only need to replace selected text, images, or other elements. Direct RenderScript is useful when your application needs to control or generate the structure itself, such as the number of scenes, their layout, or their duration.
Do I have to write all RenderScript by hand?
No. You can create a design in Creatomate's visual editor and inspect the RenderScript behind it. That gives you a working JSON structure that you can use as a starting point in your application or automation.
Writing a small example by hand can help you understand how RenderScript works, but you do not need to manually code every layout, animation, or element. A common workflow is to design visually first, then let your application change or generate the parts that need to be dynamic.
Why doesn't the output URL show the video immediately?
Video rendering happens asynchronously. The API first accepts the request and returns a render object, usually with the status planned. The response may already include an output URL, but the video file at that URL is not ready until rendering has finished.
Use the render ID to check the status with the GET /v2/renders/RENDER_ID endpoint. When the status changes to succeeded, the URL points to the finished video. For automated workflows, use a webhook to receive the render result as soon as it succeeds or fails. A failed render also includes an error_message to help identify the problem.
Can every video have different content or a different number of scenes?
Yes. Each API request can contain a different RenderScript. Your application can change individual values such as text, colors, and media sources, or generate an entirely different scene structure for every video.
For example, one property listing could produce three scenes while another produces six, depending on the number of available images. The application builds the appropriate elements structure, sends it to the same API endpoint, and Creatomate renders the resulting video.
Related articles
Start automating today
Start with a full-featured trial with 50 credits, no credit card required.
Get started for free →