How to Create Videos from JSON using n8n

In this tutorial, you'll learn how to automate video generation using structured JSON, Creatomate's video rendering API, and n8n.
Creating videos from JSON is a flexible, programmatic approach to video production. Instead of editing videos manually, you describe everything in a structured format: scenes, text, images, audio, animations, and timing. Think of it as source code for video, where you have full control over how everything is put together.
Creatomate takes this JSON and turns it into a finished MP4 file. Normally, you would send this JSON to the API using a programming language. With n8n, you can do the same using an HTTP request within your automation workflow. Once the video is rendered, n8n can automatically handle the next steps, for example, posting it to social media, sending it via email, or uploading it to cloud storage.
By the end of this tutorial, you'll know how to build an n8n workflow that generates videos from JSON using Creatomate's RenderScript, its JSON-based format for describing video content.
curl -X POST https://api.creatomate.com/v2/renders \
     -H "Content-Type: application/json" \
     -H "Authorization: Bearer YOUR_API_KEY_HERE" \
     -d '{
  "output_format": "mp4",
  "width": 720,
  "height": 1280,
  "elements": [
    {
      "type": "composition",
      "track": 1,
      "time": 0,
      "duration": 4.5,
      "fill_color": "rgba(243,207,86,1)",
      "elements": [
        {
          "type": "text",
          "text": "This example video is entirely generated through code.",
          "track": 1,
          "time": 0,
          "width": "95.2506%",
          "height": "32.6602%",
          "x_alignment": "50%",
          "y_alignment": "50%",
          "font_family": "Inter",
          "font_weight": "700",
          "line_height": "100%",
          "fill_color": "rgba(0,0,0,1)",
          "color_filter": "hue",
          "animations": [
            {
              "easing": "linear",
              "type": "scale",
              "fade": false,
              "scope": "element",
              "start_scale": "70%"
            },
            {
              "time": 0,
              "duration": 1,
              "easing": "back-in-out",
              "type": "text-scale",
              "split": "letter",
              "track": 0
            }
          ]
        }
      ]
    },
    {
      "type": "composition",
      "track": 1,
      "time": 3.5,
      "duration": 4.5,
      "fill_color": "rgba(73,128,241,1)",
      "animations": [
        {
          "time": 0,
          "duration": 1,
          "transition": true,
          "type": "circular-wipe"
        }
      ],
      "elements": [
        {
          "type": "text",
          "text": "Define your entire video in code: scenes, layers, animations, audio, and timing.",
          "track": 1,
          "time": 0.5,
          "width": "79.7626%",
          "height": "37.8471%",
          "x_alignment": "50%",
          "y_alignment": "50%",
          "font_family": "Inter",
          "font_weight": "700",
          "line_height": "100%",
          "fill_color": "#ffffff",
          "animations": [
            {
              "easing": "linear",
              "type": "scale",
              "fade": false,
              "scope": "element",
              "start_scale": "70%"
            },
            {
              "time": 0,
              "duration": 1,
              "easing": "back-in-out",
              "type": "text-scale",
              "split": "letter",
              "track": 0
            }
          ]
        }
      ]
    },
    {
      "type": "composition",
      "track": 1,
      "duration": 4.5,
      "fill_color": "rgba(60,174,163,1)",
      "animations": [
        {
          "time": 0,
          "duration": 0.87,
          "transition": true,
          "type": "circular-wipe"
        }
      ],
      "elements": [
        {
          "type": "text",
          "text": "Build fully automated video pipelines driven by JSON.",
          "track": 1,
          "time": 0.5,
          "width": "79.7626%",
          "height": "37.8471%",
          "x_alignment": "50%",
          "y_alignment": "50%",
          "font_family": "Inter",
          "font_weight": "700",
          "line_height": "100%",
          "fill_color": "#ffffff",
          "animations": [
            {
              "easing": "linear",
              "type": "scale",
              "fade": false,
              "scope": "element",
              "start_scale": "70%"
            },
            {
              "time": 0,
              "duration": 1,
              "easing": "back-in-out",
              "type": "text-scale",
              "split": "letter",
              "track": 0
            }
          ]
        }
      ]
    }
  ]
}'Tip: If you're new to video automation, we recommend starting with the template-based approach explained this tutorial. For most use cases, reusable templates work perfectly. When you need more flexibility or dynamic layouts, you can always switch to RenderScript later.
How to turn JSON into videos with n8n
n8n offers hundreds of native app integrations, giving you many ways to generate JSON for your videos. To keep things simple, we'll start with a ready-made JSON example. This JSON will be sent to the Creatomate API, where it will be rendered into a video. We then wait a moment before checking the video's status and handling the response – whether it's successfully rendered, still processing, or has failed.
This workflow is fully customizable. You can generate the JSON in any way you like – such as from a database, a spreadsheet, or other apps connected through n8n. In this tutorial, we'll send the generated video via Microsoft Outlook and notify ourselves via Slack if something goes wrong, but you can easily replace this with any other app.
Let's start by retrieving your Creatomate API key.
Note: This tutorial focuses on sending JSON to Creatomate and rendering a video through its API. It does not cover how to generate the JSON itself. If you want to learn how to create valid JSON for your videos, check out our other tutorials: How to create videos from JSON and JSON-to-Video: Practical Examples. These guides show how to use the template editor and real-world use cases to structure your JSON effectively. For more details on JSON structure and properties, see the RenderScript documentation.
1. Get your Creatomate API key
To connect Creatomate with n8n, you'll need your API key. Let's take a moment to see where to find it.
Sign in to your Creatomate account, or create a free account if you don't have one yet.
From the left-hand menu, click ... and go to Project Settings. Under Programmatic Access, you'll see the API Key field. It's hidden by default, so click to reveal it:
Keep this key handy – we'll use it later in step 3.
2. Add video content to your workflow
In real-world scenarios, this JSON would typically come from a database, spreadsheet, webhook, or any other app that works for you. For simplicity, we'll simulate this using an "Edit Fields" node.
In your n8n dashboard, click Create Workflow.
Once you're in the canvas, click the + to add the first step. For this example, select Trigger manually. You'll notice that the When clicking ‘Test Workflow' node is automatically added:
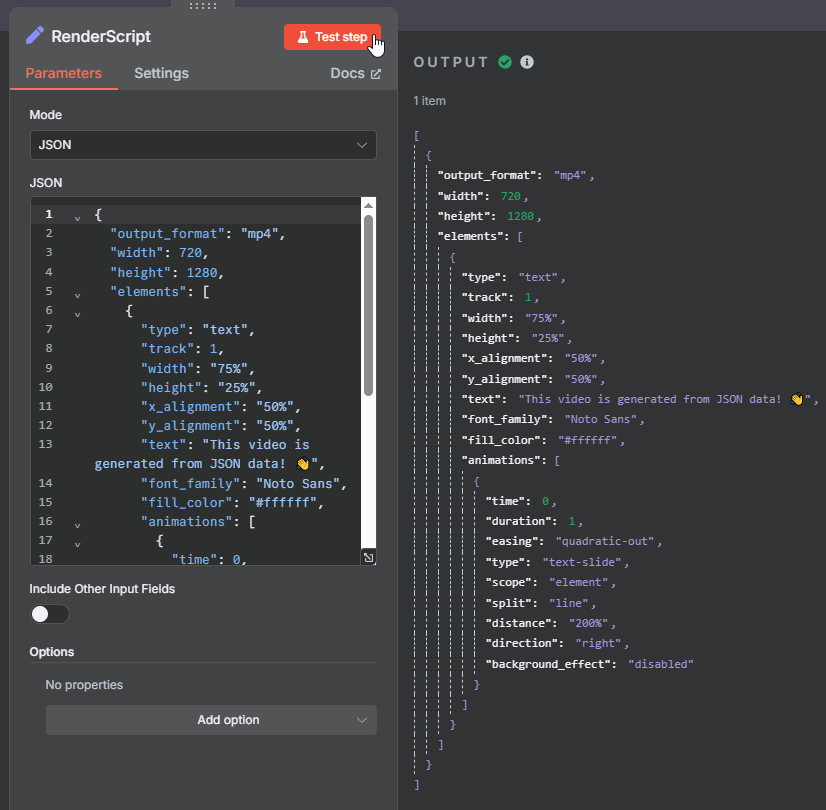
Next, click + again and search for the Edit Fields node. Under the Parameters tab, set Mode to JSON. Then, copy and paste the following JSON:
{
  "output_format": "mp4",
  "width": 720,
  "height": 1280,
  "elements": [
    {
      "type": "text",
      "track": 1,
      "width": "75%",
      "height": "25%",
      "x_alignment": "50%",
      "y_alignment": "50%",
      "text": "This video is generated from JSON data! 👋",
      "font_family": "Noto Sans",
      "fill_color": "#ffffff",
      "animations": [
        {
          "time": 0,
          "duration": 1,
          "easing": "quadratic-out",
          "type": "text-slide",
          "scope": "element",
          "split": "line",
          "distance": "200%",
          "direction": "right",
          "background_effect": "disabled"
        }
      ]
    }
  ]
}
This JSON defines a simple vertical video with one animated text element. Key properties include:
• "output_format" → the video file format
• "width" / "height" → video resolution
• "elements" → objects rendered in the scene (in this case, a text element)
• "track" → layer order
• "animations" → entrance animation for the text
Tip: For a complete list of available properties, refer to the RenderScript documentation.
Now, click Edit Fields and rename the node to RenderScript. This will make it easier to refer to this JSON in the next step.
Finally, click Test step:
We can now use this RenderScript to generate a video.
3. Render the video
In this step, we'll send the JSON to Creatomate's API to render the video.
Click + and search for the HTTP Request node.
- Set Method to POST
- Set URL to https://api.creatomate.com/v2/renders
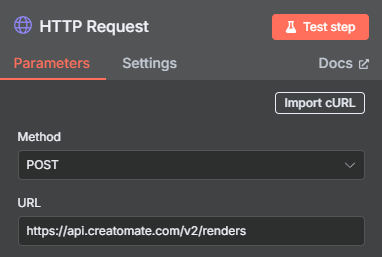
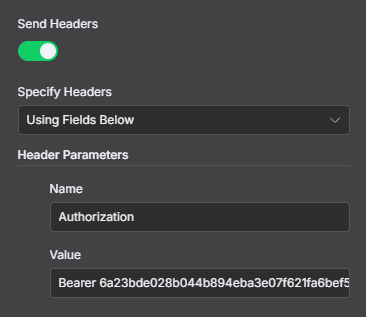
Next, enable the Send Headers option. Set Specify Headers to Using Fields Below, and add the following header parameter:
- Name: Authorization
- Value: Bearer [YOUR API KEY HERE]
Make sure to replace [YOUR API KEY HERE] with your own Creatomate API key. You can find it as shown in step 1.
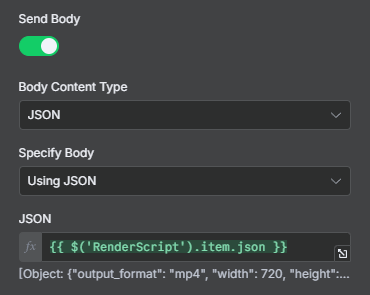
Then, enable Send Body.
- Set Body Content Type to JSON
- Set Specify Body to Using JSON
- Link JSON to the RenderScript from previous node: {{ $('RenderScript').item.json }}
The node is now fully configured. Click Test step to verify that Creatomate can generate the video.
If everything is set up correctly, the output will show a status of "planned". This means that Creatomate has accepted the request and will start processing the video soon.
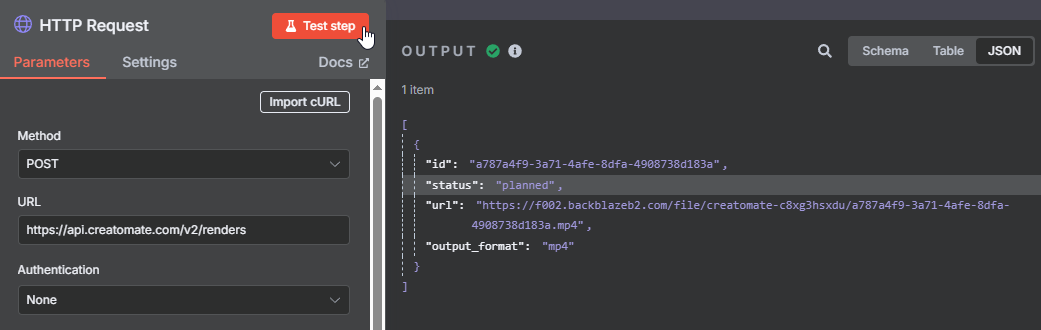
The response will also include a URL where you can access the video once it's ready. If you visit this link immediately, you may see a “Not Found” message – this simply means the video is still being processed.
In the next step, we'll monitor the render progress.
4. Wait for the video to finish rendering
Before using the video URL in the next steps, we need to make sure the video is fully rendered. If you try to use the URL too early, it may cause errors.
To handle this properly, we'll add a delay and implement a simple polling mechanism to check the render status until the video is ready.
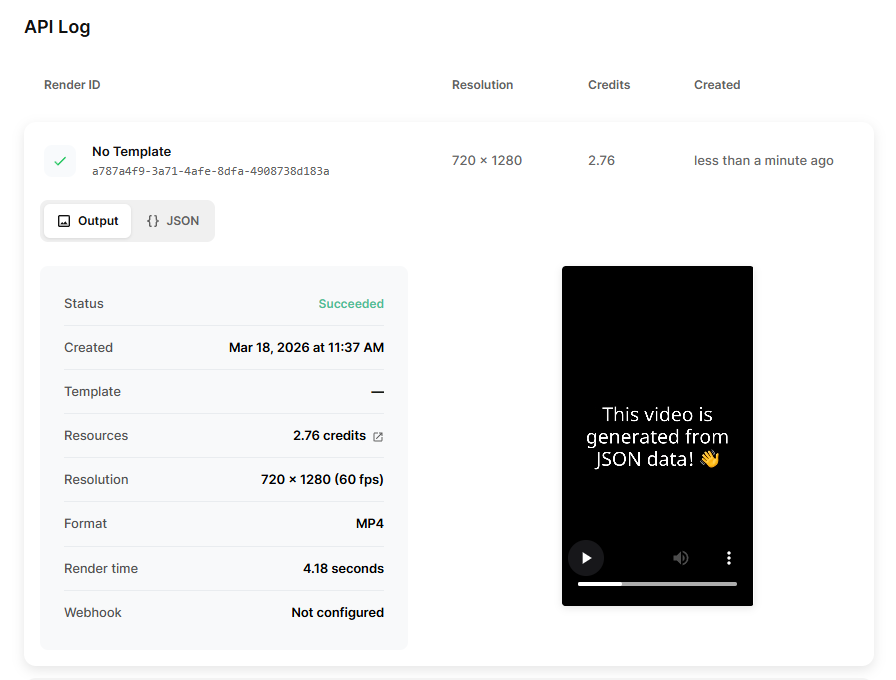
Start by opening the API Log page in your Creatomate dashboard. If the previous step was successful, you should see your test render with the status "succeeded". If not, give it a moment to finish. You can also check how long the render took.
Add a Wait node to your workflow. Set the wait time to be safely above the average render duration, for example, 15 seconds:
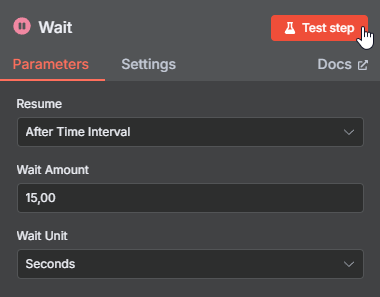
Click Test step and wait for it to complete before continuing.
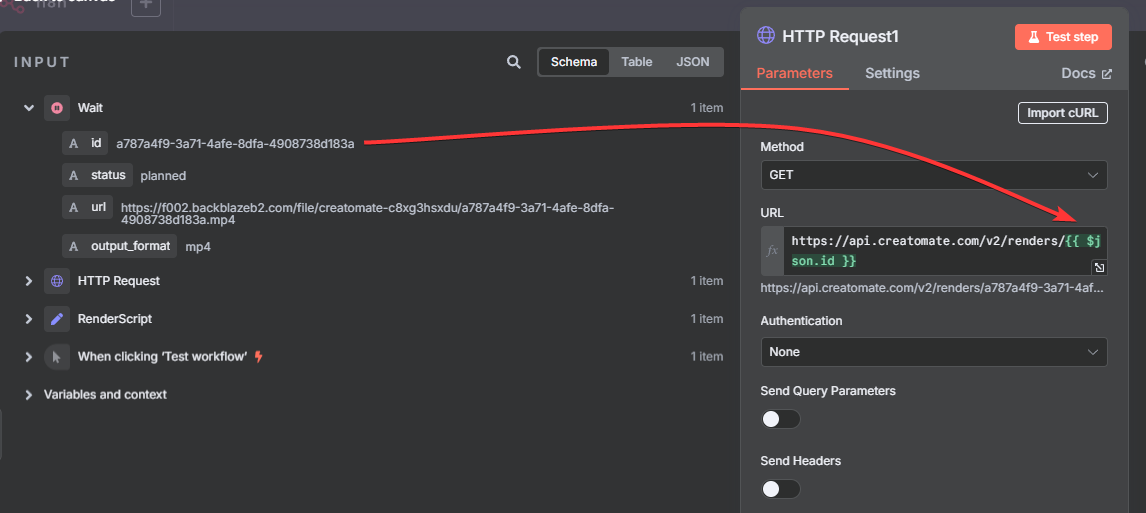
Next, add another HTTP Request node to check the render status. Configure it as follows:
- Set Method to GET
- Set URL to https://api.creatomate.com/v2/renders/[ID]
Replace [ID] with the id value returned from the previous step. Ensure that there are no spaces in the URL.
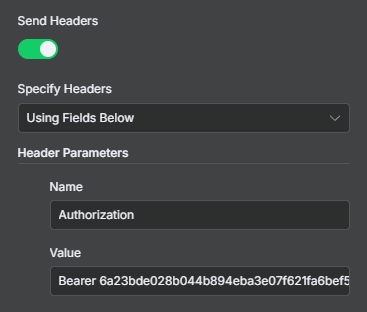
Enable Send Headers and add the following header parameter:
- Name: Authorization
- Value: Bearer [YOUR API KEY HERE]
Remember to replace [YOUR API KEY HERE] with your own Creatomate API key from step 1.
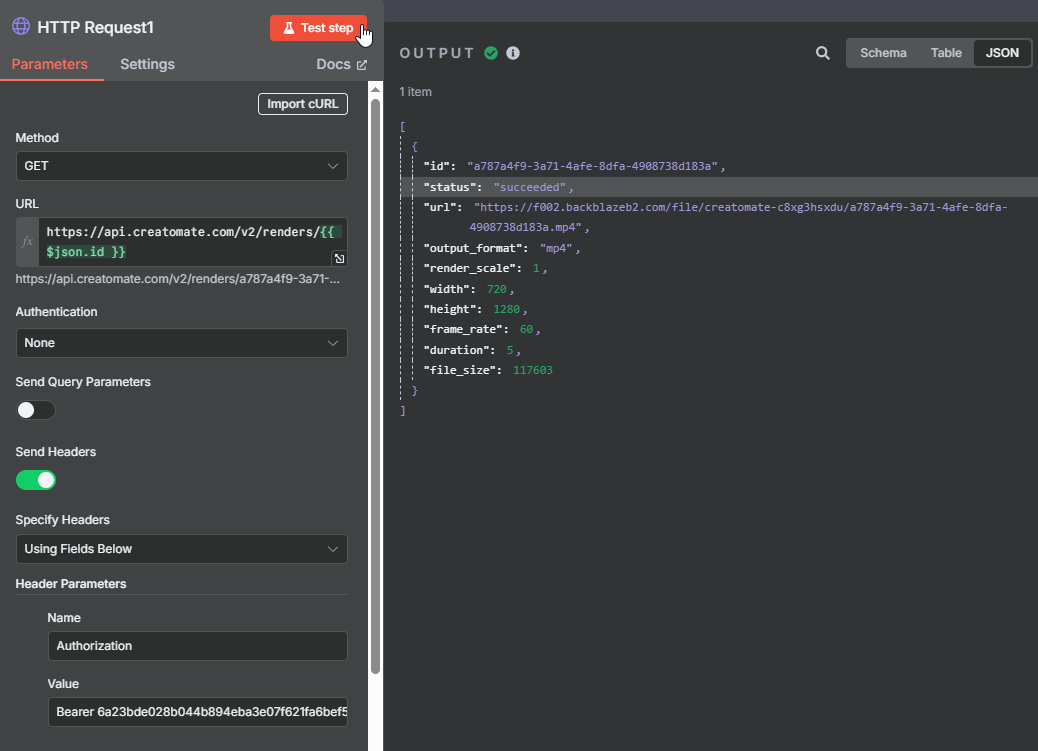
When you click Test step, you'll see that the status is now "succeeded", indicating that the video is ready to use:
In practice, a render may take longer than expected or even fail. To handle different outcomes, we'll route the workflow based on the render status.
Add a Switch node to route the workflow.
Let's start with successful renders. Create a routing rule where "status" is equal to succeeded, and rename the output to succeeded:
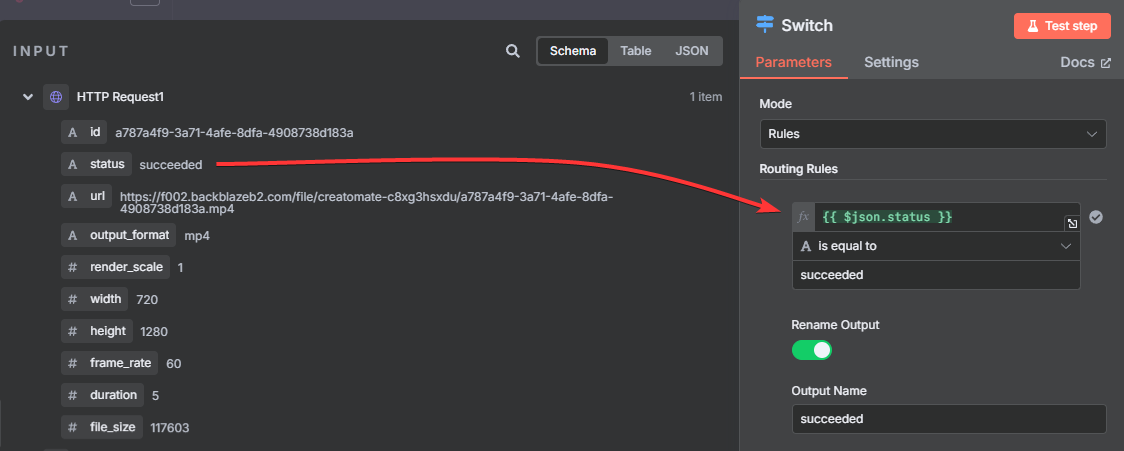
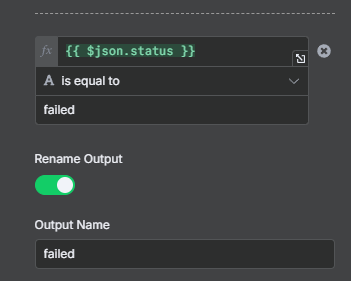
For failed renders, add a routing rule where the "status" is equal to failed, and rename the output to failed:
Lastly, some statuses indicate that a video is still being processed rather than completed or failed. Since we want to handle these in the same way, we can group them into a single route. Add another routing rule, select "status", and set it to matches regex with the following values: (planned|transcribing|waiting|rendering)
Then rename the output to being processed. This route will capture all renders that are still in progress:

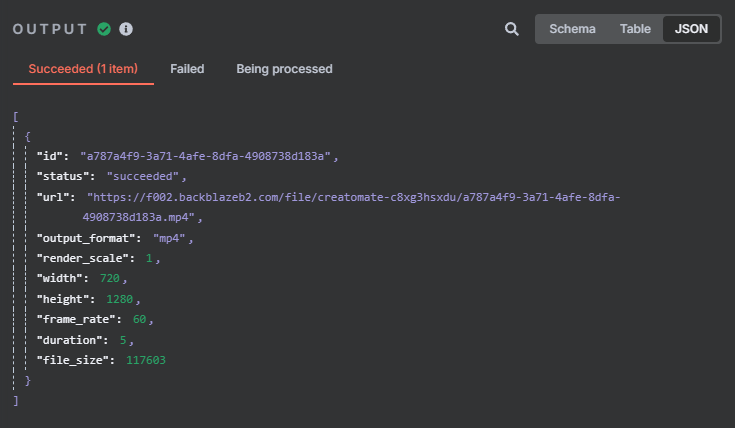
Next, click Test step. You should see that the example now moves to the “succeeded” branch:
In the next step, we'll show how to use the generated video and how to handle renders that are “failed” or “being processed”.
5. Process the generated video
Now that the video has been generated, you can use it in any way you like. For example, you could share it on your favorite social media platform (such as YouTube Shorts) or upload it to cloud storage. To illustrate, we'll show how to send the video via email.
Follow the “succeeded” branch and click + to add a new node.
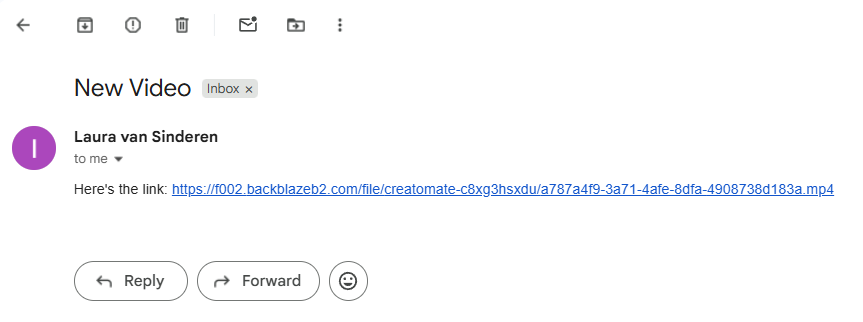
To use the video, simply map the video URL from the previous step to the appropriate field in your node. For example, you can add it as a link or set it to download, depending on the integration you're using.
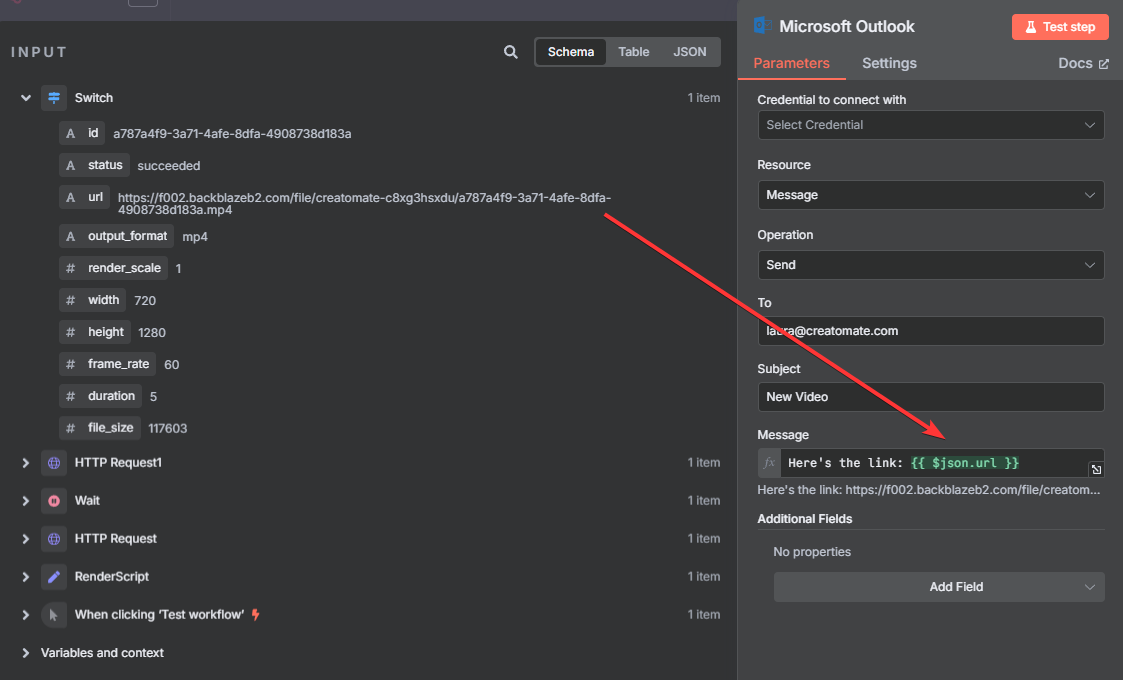
After configuring the node, click Test step to verify the result. If everything is set up correctly, the video should be delivered – for example, it may appear in your inbox.
If the video isn't ready after the first check, it will follow the “being processed” branch. To handle this, we'll set up a retry loop.
Connect the “being processed” output back to the Wait node. This setup allows the workflow to pause and then check the status again, repeating the process until the render either completes or fails.
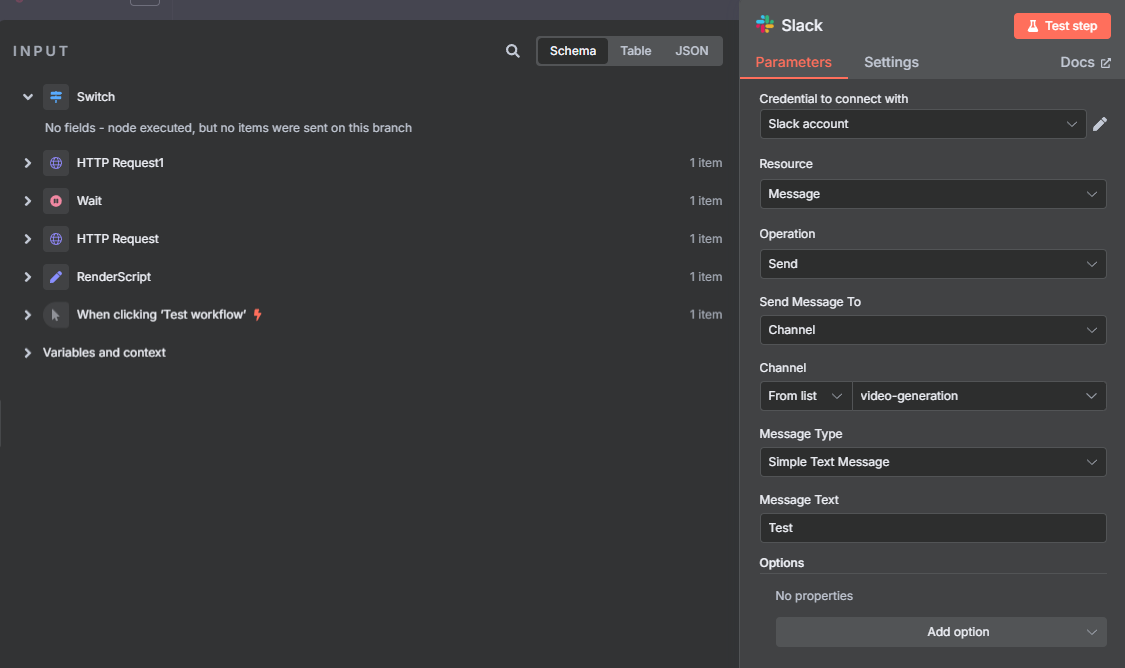
It's good practice to notify yourself when a render fails.
From the “failed” branch, add a notification node using your preferred tool, such as Slack or email.
At this point, you may not see any input data yet, as our test run followed the “succeeded” path. To configure the node, you can temporarily use static data so the workflow can execute.
To better understand how errors are handled, you can intentionally trigger a failed render.
Go back to your Edit Fields/RenderScript node (or wherever you define your input) and replace the JSON with an invalid RenderScript, such as:
{
  "output_format": "mp4",
  "width": 720,
  "height": 1280,
  "elements": [
    {
      "id": "d612245a-44d6-45c8-99f4-8eb9c8144146",
      "name": "Video-1",
      "type": "video",
      "track": 1,
      "source": "https://..."
    }
  ]
}
Next, close this node without clicking "Test step", and instead click the Test workflow button to run the entire workflow.
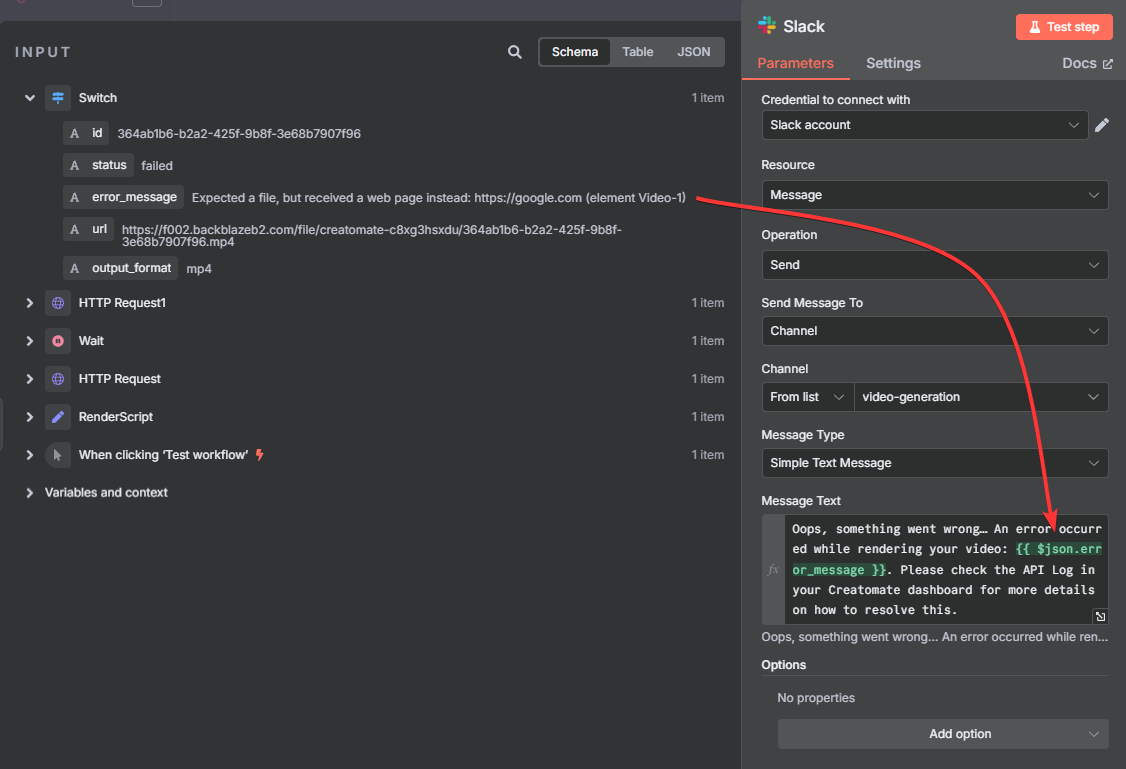
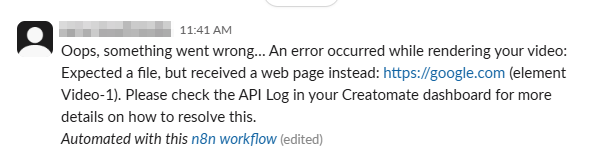
Because a web page cannot be used as a video element, the render will fail. As a result, the item will be routed to the “failed” branch. From there, you can use the output data as input in Slack (or any node you prefer), including the error details.
Now, configure your node to include dynamic data, for example:
Oops, something went wrong… An error occurred while rendering your video: [error message]. Please check the API Log page in your Creatomate dashboard for more information on how to resolve this issue.
After setting this up, click Test step to confirm that your notification is sent correctly:
And that's it! Your workflow now handles successful renders, retries unfinished ones, and alerts you when something goes wrong.
What's next for JSON to video with n8n
From here, you can explore further: customize your JSON for more complex layouts, connect different triggers, or use additional apps to process and share your videos.
Start simple. Use a basic template to experiment with scenes, text, and animations. Open a template in the editor and press F12 to inspect the generated JSON – it's a quick way to see how visual changes translate into structured code.
For more practical examples and real-world workflows, check out our other tutorials:
👉 How to create videos from JSON
👉 JSON-to-Video: Practical Examples
For a complete reference, the RenderScript documentation covers every element, property, and option you can use.
You might also like these tutorials


Start automating today
Start with a full-featured trial with 50 credits, no credit card required.
Get started for free →