How to Create AI-Generated Shorts with GPT Image and n8n
Learn how to build an n8n workflow that creates faceless Shorts with GPT Image and Creatomate, complete with a voiceover and animated subtitles.
AI image generators can produce original visuals for almost any story, but turning those separate images into a finished video still takes work. They need to be generated in the right style, placed in sequence, timed to the narration, and combined with subtitles.
In this step-by-step tutorial, we'll automate that process with n8n. The workflow starts with four ready-made image prompts and matching voiceover files. Creatomate sends each prompt to GPT Image through its native OpenAI integration, places each generated visual in the corresponding scene, transcribes the voiceovers into animated subtitles, and renders everything as a vertical video.
By the end of this tutorial, you'll have a four-scene MP4 like the example above, ready to download and publish as a YouTube Short, TikTok video, or Instagram Reel.
Want to make the video design your own? Creatomate's online template editor gives you full control over how the generated visuals are presented, including their animations and the transitions between scenes. You can also design the subtitles exactly the way you want, from fonts and colors to placement and animation.
Tip: We've provided the voiceover files for this tutorial so we can focus on generating the visuals with GPT Image. If you'd like to generate the voiceovers yourself, check out our tutorial on creating videos with AI voiceovers using ElevenLabs and n8n.
Prerequisites
These are the tools we'll use:
- Creatomate: to customize the video template and render the video.
- OpenAI: to generate the visuals with GPT Image.
- n8n: to build the automated workflow.
To generate the images, you'll need an OpenAI API key with API billing set up. API usage is billed separately from ChatGPT, so a ChatGPT subscription doesn't include API credits.
How to automate video creation with GPT Image
We'll begin in Creatomate by connecting OpenAI and importing a ready-made video template. The template contains four scenes, each with its own image, voiceover, and animated subtitles.
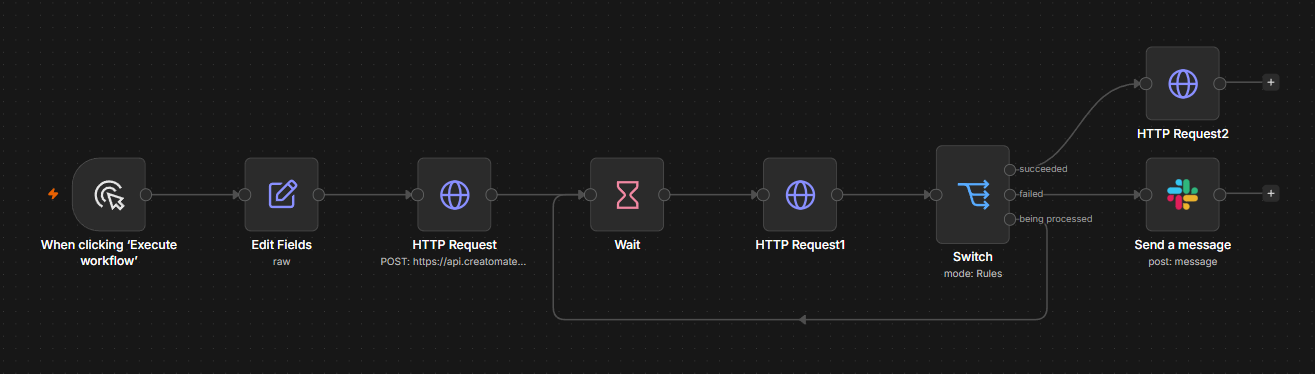
Next, we'll build the n8n workflow. A Manual Trigger starts the workflow, while an Edit Fields node provides four pairs of sample voiceover URLs and image prompts. n8n sends these values to Creatomate, which generates the four visuals, places each one in the corresponding scene, uses the voiceovers to determine the scene durations, and transcribes the audio into animated subtitles.
Because generating the images and rendering the video takes some time, the workflow waits and checks the render status. Renders that are still being processed loop back for another check, successful renders continue to the MP4 download, and failed renders can trigger a Slack notification.
Once the MP4 has been downloaded, you can save it to Google Drive for review, upload it to YouTube as a Short, send it to another social platform, or pass it to any other app supported by n8n. We'll end this tutorial with the downloaded video file so you can adapt the final part of the workflow to your own publishing process.
Why generate the images in Creatomate instead of n8n
n8n includes an OpenAI integration with a "Generate an Image" action that lets you create visuals with GPT Image. However, this action returns each generated image as file data, while the source property of a standard Creatomate image element expects a publicly accessible URL. To use those files in a video template, you would typically upload them to a storage service such as Cloudinary or Amazon S3 first, then map the resulting URLs to Creatomate.
When a Creatomate image element is configured to use OpenAI, its source property works differently: instead of a file URL, it accepts an image prompt. This allows us to send the prompts directly to the dynamic image elements in the template. During rendering, Creatomate sends each prompt to OpenAI, receives the generated image, and inserts it into the corresponding scene.
Generating images in n8n can still be useful if you need the files for other steps in your workflow. In this tutorial, however, every image is created specifically for one scene in the final video. Sending the prompts directly to Creatomate avoids extra nodes and storage while keeping image generation and video rendering in one streamlined process.
Let's get started!
1. Set up your video template
Log in to your Creatomate account or sign up for free if you don't have one yet.
Before importing the template, let's connect OpenAI. Creatomate will use this connection to send our image prompts to GPT Image during rendering.
If you don't have an OpenAI API key yet, sign in to the OpenAI Platform and create one from the API Keys page. Before continuing, make sure API billing is active for your account.
In Creatomate, click your project in the top-left corner and choose Project Settings. Open the Integration tab, switch OpenAI on, enter your API key, and click Confirm:
The OpenAI integration is now ready to use.
For this tutorial, we'll use the Faceless Shorts - GPT Image template. Click the banner below to add it directly to your Creatomate project:

After importing it, Creatomate opens the template in the editor. The template defines the design and scene structure, while the n8n workflow supplies the variable content for each render. The canvas may initially look mostly empty because the images and voiceovers are added, and the subtitle text is generated when the workflow runs.
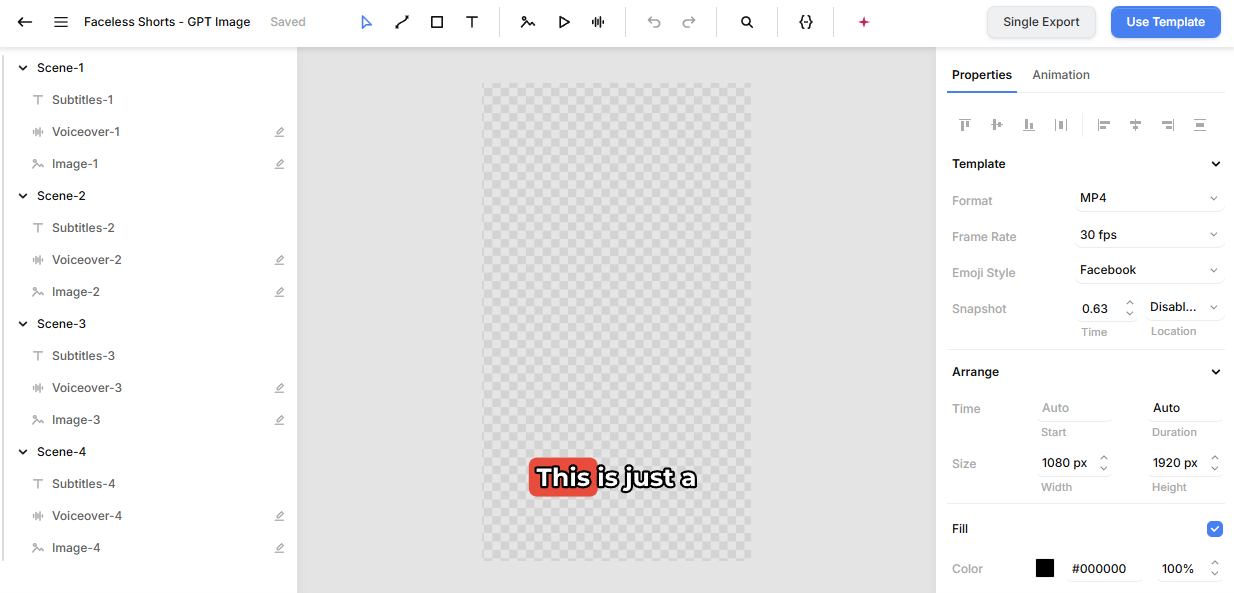
The template consists of four scenes arranged one after another on the timeline. Each scene contains the same three types of elements:
- Image-1 to Image-4: dynamic image elements. These will receive image prompts from n8n, which Creatomate uses to generate the visual for the corresponding scene.
- Voiceover-1 to Voiceover-4: dynamic audio elements. These will receive voiceover URLs from n8n.
- Subtitles-1 to Subtitles-4: subtitle elements. These are linked to the corresponding voiceovers. During rendering, Creatomate transcribes the audio and displays the narration as animated captions. You can fully customize their appearance in the editor, including the font, colors, placement, and animation.
Each scene automatically adapts to the duration of its voiceover, so the four scenes don't need to be equally long. This keeps every generated image on screen for the part of the narration it was designed to illustrate.
To see the image-generation settings, select Image-1 in the element panel. You'll see that it uses OpenAI as the Provider, GPT Image 2 as the Model, 1024 × 1536 (portrait) as the Size, and Medium as the Quality. Its Source property is marked as dynamic, allowing the workflow to supply a different prompt for each render:
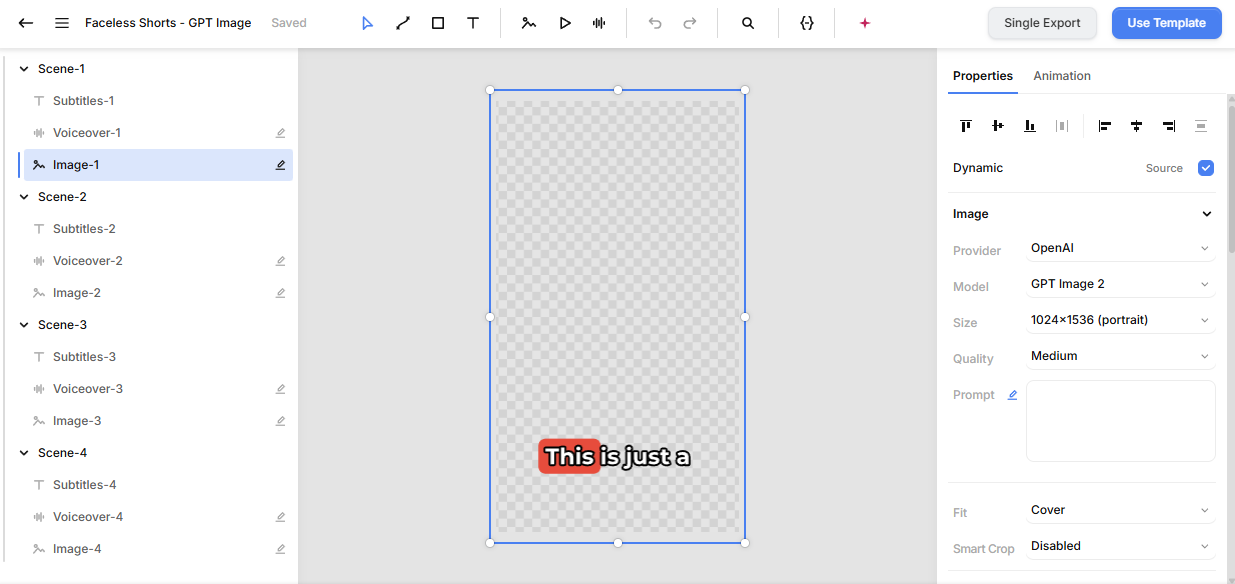
The video template itself uses a vertical 1080 × 1920 (9:16) format. Because the generated images have a slightly wider aspect ratio and the image elements are set to Cover, Creatomate crops them on both sides to fill the scene. Keep the main subject near the center and leave some space around it to prevent important details from being cut off. The output dimensions are controlled by the template, so you don't need to include an aspect ratio in every prompt.
No changes are required for this tutorial, but any design changes you make in the editor will be reflected in future videos generated from the template. Next, we'll build the n8n workflow and add the image prompts and voiceover URLs for the four scenes.
2. Add the voiceovers and image prompts in n8n
For this tutorial, we'll use a Manual Trigger and an Edit Fields (Set) node to provide four voiceover URLs and four image prompts. In a production workflow, you can replace the Manual Trigger with a schedule or another trigger, and pull the eight fields from a spreadsheet, form, content management system, or another data source.
In your n8n dashboard, click Create workflow.
Click Add first step…, search for Trigger manually, and add it to the workflow:
Next, click the + on the right side of the trigger, search for Edit Fields (Set), and add it to the workflow.
Set Mode to JSON. Select the example content in the JSON field and replace it with the following:
{

  "Voiceover-1": "https://cdn.creatomate.com/demo/voiceover-1.mp3",

  "Voiceover-2": "https://cdn.creatomate.com/demo/voiceover-2.mp3",

  "Voiceover-3": "https://cdn.creatomate.com/demo/voiceover-3.mp3",

  "Voiceover-4": "https://cdn.creatomate.com/demo/voiceover-4.mp3",

  "Image-1": "A 30-year-old man with medium-brown skin, short curly black hair, and a neatly trimmed beard, wearing navy-blue pajamas and sleeping peacefully on his side in a neatly made bed, his head resting comfortably on a pillow, eyes gently closed, relaxed and content expression, cozy modern bedroom with warm wood furniture, beige bedding, and subtle navy accents, a tidy nightstand with no drinks, cups, phones, or other distracting objects, warm bedside lighting, soft moonlight through the window, calm and reassuring nighttime atmosphere, cinematic photorealistic lifestyle photography, natural skin tones, eye-level medium-wide shot, shallow depth of field, face and upper body positioned near the center with enough space for cropping, clean uncluttered lower third for subtitles, no text, no logos",

  "Image-2": "A relaxed 30-year-old man with medium-brown skin, short curly black hair, and a neatly trimmed beard, wearing navy-blue pajamas and sitting comfortably on a beige sofa in a cozy modern living room with warm wood furniture and subtle navy accents, reading a book, a warm cup of tea on the side table, soft ambient lamp lighting, peaceful evening atmosphere, cinematic photorealistic lifestyle photography, natural skin tones, eye-level medium-wide shot, shallow depth of field, balanced centered composition, clean uncluttered lower third for subtitles, no text, no logos",

  "Image-3": "A refreshed 30-year-old man with medium-brown skin, short curly black hair, and a neatly trimmed beard, wearing navy-blue pajamas and opening the curtains in a cozy modern bedroom with warm wood furniture, beige bedding, and subtle navy accents, soft morning sunlight filling the room, calm and organized morning atmosphere, looking well rested, cinematic photorealistic lifestyle photography, natural skin tones, eye-level medium-wide shot, shallow depth of field, balanced centered composition, clean uncluttered lower third for subtitles, no text, no logos",

  "Image-4": "An energetic 30-year-old man with medium-brown skin, short curly black hair, and a neatly trimmed beard, wearing a dark-blue athletic shirt and black running pants, jogging along a peaceful park path surrounded by green trees, natural running stride, relaxed expression, bright daylight, healthy active lifestyle, cinematic photorealistic lifestyle photography, natural skin tones, eye-level medium-wide shot, shallow depth of field, dynamic sense of movement, subject centered in the frame, clean uncluttered lower third for subtitles, no text, no logos"

}
The Voiceover-1 through Voiceover-4 fields contain the public URLs of the four audio files, while Image-1 through Image-4 contain the image prompts.
GPT Image generates each visual independently, so write every prompt as a self-contained description. When writing your own prompts:
- Describe one clear scene that reflects what is said in the corresponding voiceover.
- Repeat important character, setting, and visual-style details in every prompt.
- Keep the main subject near the center and the lower part of the image relatively uncluttered so the subtitles remain easy to read.
- Focus each prompt on one main action and use a consistent camera style across the scenes.
- Avoid written text and logos, as Creatomate adds the subtitles separately.
Keep the field names Voiceover-1 through Voiceover-4 and Image-1 through Image-4 unchanged, as we'll refer to them when mapping the content to the video template.
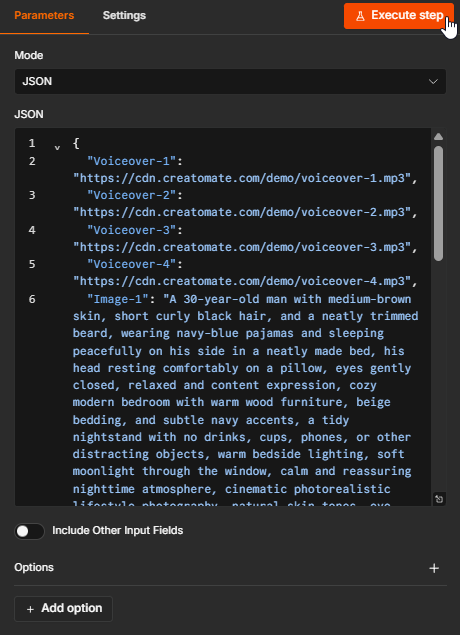
Click Execute step. The output panel should display all eight fields: four voiceover URLs and four image prompts:
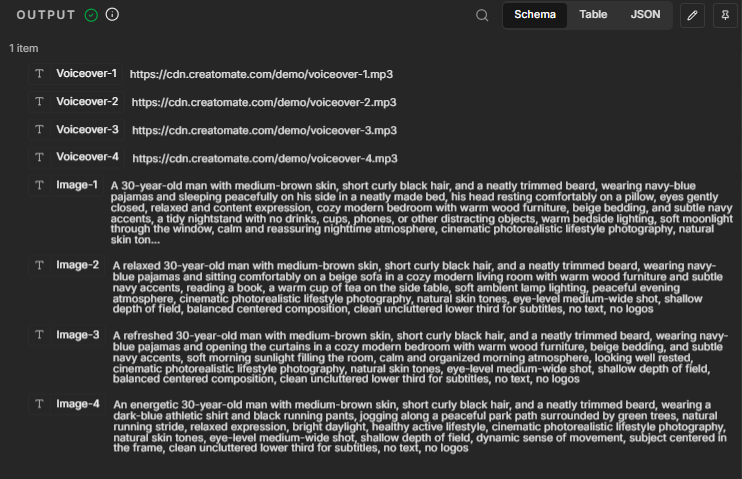
The input data is now ready. Next, we'll map these fields to the Creatomate template and start the render.
3. Render the video with GPT Image visuals
Click the + after the Edit Fields node and add an HTTP Request node. For the easiest setup, choose Import cURL.
Return to the template editor in Creatomate and click Use Template in the top-right corner. Choose Developer API rather than Zapier, Make & n8n, which opens the general platform guides.
The cURL tab contains an API request generated for your imported copy of the template. It includes a template ID and eight empty modification fields: four image sources and four voiceover sources. Copy the entire command:
Return to n8n, paste the command into the import dialog, and click Import:
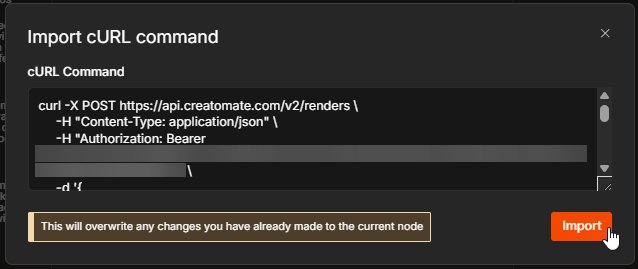
n8n fills in the POST method, the Creatomate API endpoint, Authorization header, and JSON request body automatically.
Security note: Importing the cURL command places your Creatomate API key directly in the node. Don't share or export the workflow while this key is embedded. For a reusable workflow, move the Authorization header into an n8n Header Auth credential.
Before changing the request body, copy its template_id. This ID belongs to the template in your own project, so it will be different from the ID shown in this tutorial.
Clear the JSON body completely, then paste the following:
1{
2  "template_id": "PASTE_YOUR_TEMPLATE_ID_HERE",
3  "modifications": {
4    "Image-1.source": "{{ $('Edit Fields').item.json['Image-1'] }}",
5    "Image-2.source": "{{ $('Edit Fields').item.json['Image-2'] }}",
6    "Image-3.source": "{{ $('Edit Fields').item.json['Image-3'] }}",
7    "Image-4.source": "{{ $('Edit Fields').item.json['Image-4'] }}",
8    "Voiceover-1.source": "{{ $('Edit Fields').item.json['Voiceover-1'] }}",
9    "Voiceover-2.source": "{{ $('Edit Fields').item.json['Voiceover-2'] }}",
10    "Voiceover-3.source": "{{ $('Edit Fields').item.json['Voiceover-3'] }}",
11    "Voiceover-4.source": "{{ $('Edit Fields').item.json['Voiceover-4'] }}"
12  }
13}
Replace PASTE_YOUR_TEMPLATE_ID_HERE with the ID you copied from the imported cURL request.
When you paste the new body into an empty field, n8n should recognize the {{ ... }} expressions and switch the field from Fixed to Expression. If it remains set to Fixed, switch it manually. In Fixed mode, n8n sends the expressions as literal text instead of inserting the prompts and voiceover URLs.
The four Image expressions pull the prompts from the Edit Fields node, while the four Voiceover expressions pull the public audio URLs. The Result preview underneath shows the request exactly as it will be sent. Use the expand icon to open the field in full screen and verify that the template ID, four image prompts, and four voiceover URLs have been inserted correctly:
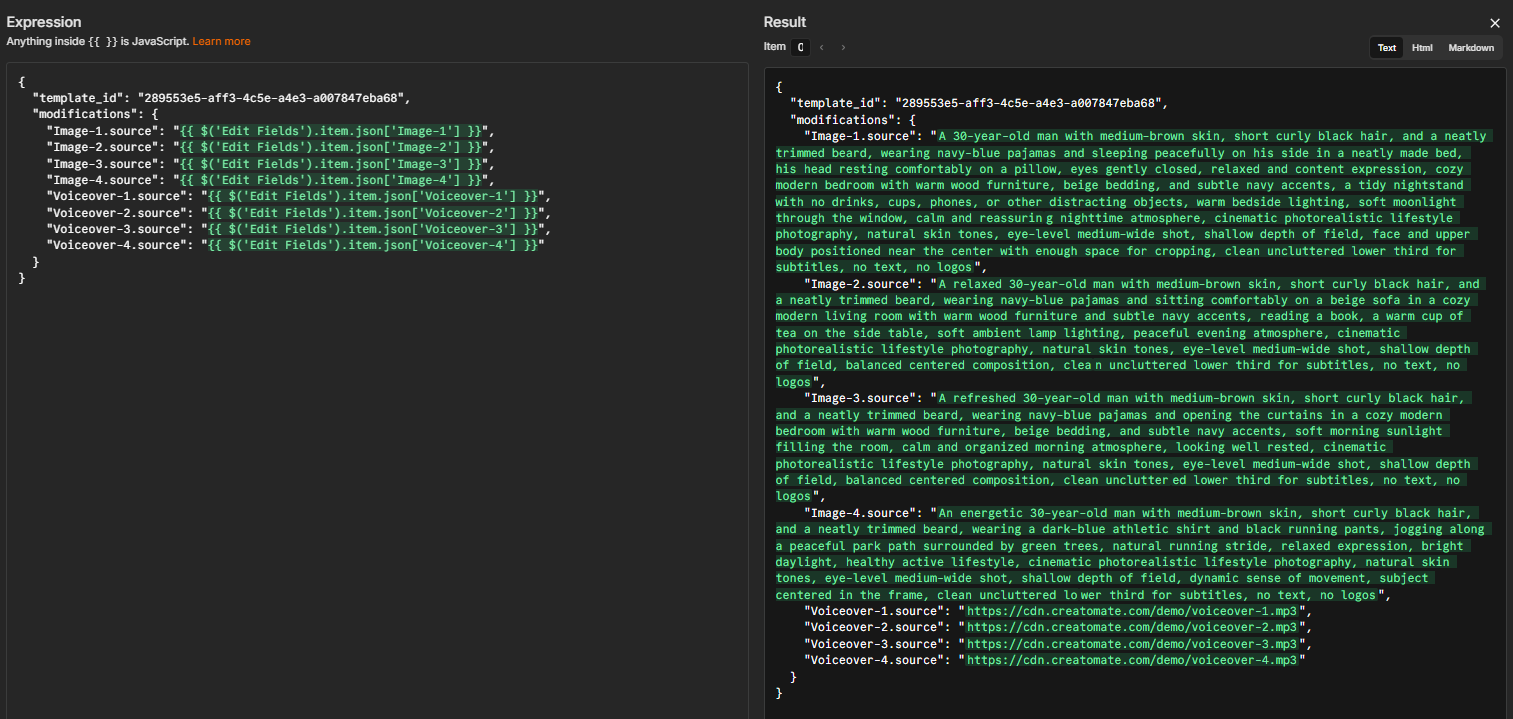
Click Execute step to send the request to Creatomate.
The output should show a status of planned. This means Creatomate has accepted the request and queued the render for processing:
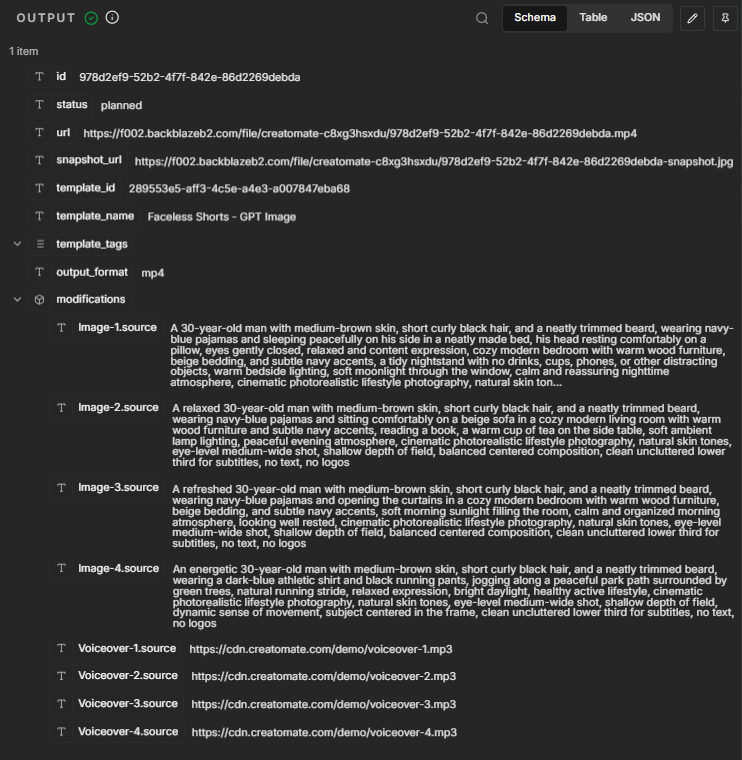
The response also contains a url for the finished video. The file becomes available at this URL once the render has succeeded.
Because this render includes four GPT Image generation requests, it generally takes longer than a render that uses existing images. The exact time depends on the image-generation time, voiceover durations, video resolution, and template complexity.
In the next step, we'll add a wait and status check so the workflow can continue once the video is ready.
4. Wait for the video to complete
If the next node tries to download the reserved video URL too early, the file won't exist yet. To prevent that, we'll add a Wait node and then check the render status.
First, open the API Log page in your Creatomate dashboard. You should see the render request from the previous step. If the test render completed successfully, its status should be
succeeded. If it is still being processed, wait a little longer and refresh the page. The log also shows the render time, Creatomate credit usage, and any error message if the render failed:
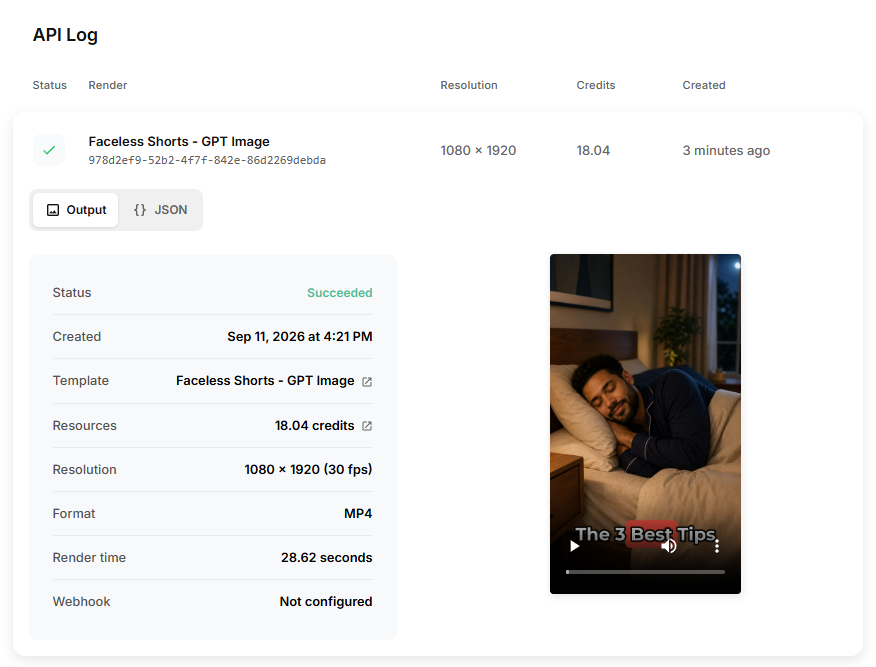
Note: The credit usage shown here only covers the Creatomate render. Generating the four images is billed separately to your OpenAI API account and doesn't appear in the Creatomate API Log. You can find those costs in your OpenAI usage dashboard.
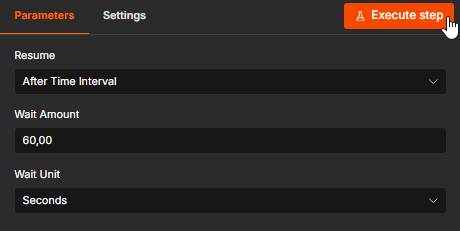
Back in n8n, add a Wait node after the render request and set it to 60 seconds. The exact delay doesn't need to be precise: if the video still isn't ready, the loop we'll create shortly will wait and check again.
Click Execute step and wait for it to complete:
Next, add another HTTP Request node and configure it as follows:
- Method: GET
- URL: https://api.creatomate.com/v2/renders/{{ $json.id }}
- Authentication: use the same Authorization header or Header Auth credential as in the render request.
The Wait node passes the render data through unchanged, so {{ $json.id }} still refers to the render ID returned by the first HTTP Request node. Before continuing, check that the preview shows the actual render ID:
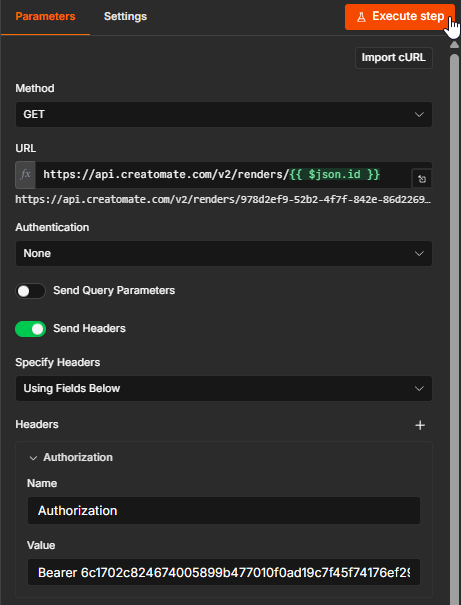
Click Execute step. If the render has finished, the returned status should be succeeded:
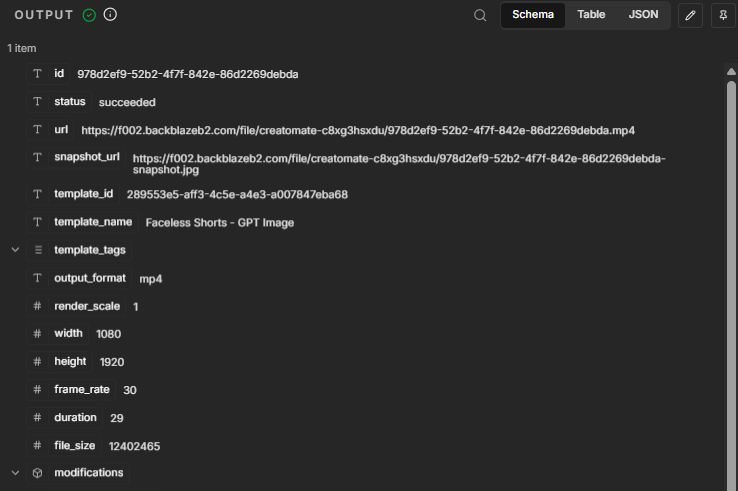
On other runs, the render may still be processing when this status check takes place, or it may have failed. A processing status means the video needs more time, while failed indicates that an error occurred.
To handle all three outcomes, add a Switch node. This node will route succeeded, processing, and failed renders separately. Every routing rule checks the same expression:
{{ $json.status }}
Add these three routes:
- succeeded: use is equal to with the value succeeded, then rename the output to succeeded
- failed: use is equal to with the value failed, then rename the output to failed
- being processed: use matches regex with the value (planned|transcribing|waiting|rendering), then rename the output to being processed
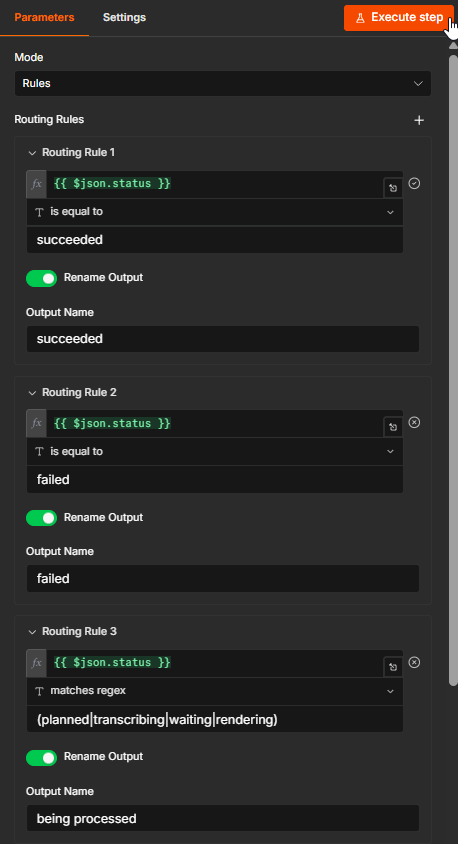
Once all three routes are configured, click Execute step. If your test render has finished successfully, it should leave the Switch node through the succeeded output:
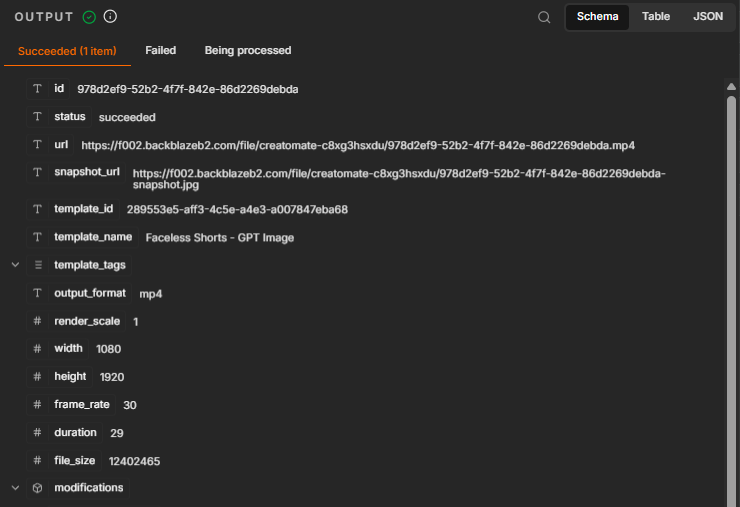
Now connect the being processed output back to the Wait node. The workflow now waits another 60 seconds and checks the status again. This loop ends when the render either succeeds or fails:
For a simple test workflow, the failed route may remain unconnected. In a production workflow, connect a notification node such as Slack or Gmail so rendering errors don't go unnoticed.
For example, add a Slack node to the failed output, choose the Send a message action, and use the following message:
A Creatomate render failed
Render ID: {{ $json.id }}
Error: {{ $json.error_message }}
Check the Creatomate API Log for details.
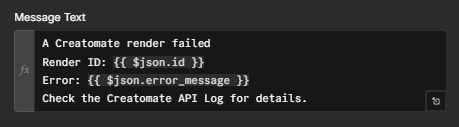
The expressions insert the render ID and error message returned by Creatomate whenever a render follows the failed output. Together with the API Log, these details help you identify the cause, such as a blocked prompt, an OpenAI authentication or billing issue, or an unavailable voiceover.
The render monitoring is now in place. Next, we'll retrieve the finished video from the succeeded output.
5. Retrieve the finished video
Once the render has succeeded, its output contains the public URL of the finished video. If the next n8n node accepts a file URL, map {{ $json.url }} directly to that node and skip the download step.
Other nodes require the actual video file as binary data. For this tutorial, we'll download the MP4 so it can be previewed in n8n or passed to a node that expects a file.
Following the succeeded output, add one more HTTP Request node. This node downloads the completed MP4 from the URL returned by Creatomate.
Configure it as follows:
- Method: GET
- URL: {{ $json.url }}
- Under Options, add Response
- Set Response Format to File
- Leave Put Output in Field set to data
No Authorization header is needed because the completed render is served from its public output URL.
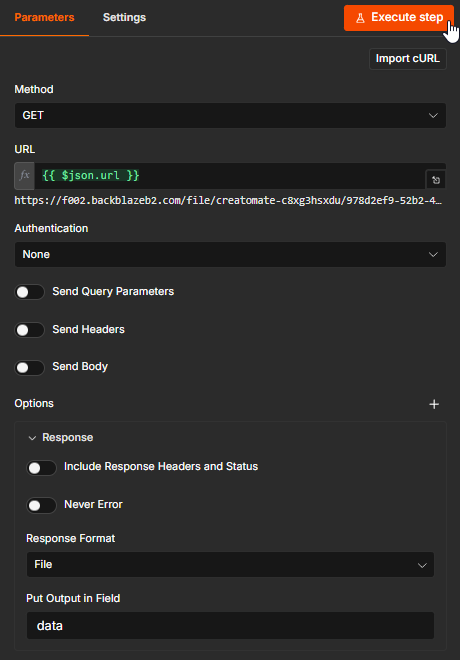
Before executing the node, check that the URL preview resolves to the actual video URL.
Click Execute step. The output should now contain a binary file named data. Open the file preview or use n8n's download option to save the MP4 and view the finished Short:
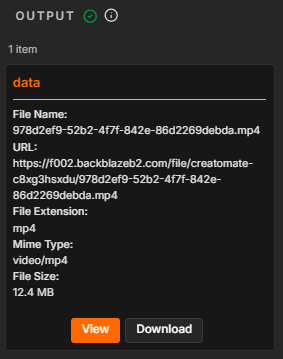
That's it! Your workflow has turned four voiceover files and four image prompts into a complete faceless Short with GPT Image visuals and animated subtitles. From here, you can pass the data file to any node that accepts video files.
If you want to publish the video automatically, add the metadata required by your destination. For YouTube, for example, you could add Title and Description fields to the Edit Fields node or generate them in an earlier step with ChatGPT. You can then map those fields, together with the binary data file, to the YouTube node. For a complete example, follow our tutorial on uploading videos to YouTube Shorts with n8n.
What’s next for GPT Image videos with n8n
This workflow uses four fixed voiceover URLs and four image prompts, making it easy to test. GPT Image may still produce different visuals each time you run it, even when the prompts stay the same.
To turn it into a reusable automation, replace the Manual Trigger with a schedule or another trigger, and replace the Edit Fields node with a data source that provides four voiceover URLs and four matching image prompts. You could pull this content from Google Sheets, Airtable, a form, a content management system, or another n8n workflow. Keep the same field names, or update the template mappings accordingly.
Once your input source and preferred destination are configured, activate the workflow to let it run automatically.
Here are a few ways to expand it:
👉 Generate the voiceovers: Turn supplied text into audio with ElevenLabs by following our tutorial on creating videos with AI voiceovers using n8n.
👉 Review or store the result: Save each generated video to Google Drive or route it through an approval step before publication.
👉 Publish it automatically: Continue the workflow with YouTube, a social media management platform, or any other destination supported by n8n.
👉 Start with a single topic: For a different approach, follow our tutorial on creating faceless Shorts with ChatGPT and n8n. In that workflow, ChatGPT writes the narration, title, and description, while you provide the visuals.
Related articles
Start automating today
Start with a full-featured trial with 50 credits, no credit card required.
Get started for free →