How to Automatically Create YouTube Shorts with n8n

Learn how to automate YouTube Shorts creation using n8n and Creatomate's video generation API.
Consistency is key on YouTube – the algorithm rewards creators who post regularly. The real challenge is keeping up with the nonstop demand for fresh content. That's where automation comes in.
In this tutorial, we'll build an automated YouTube Shorts generator using n8n and Creatomate. This workflow is ideal for repeatable, data-driven formats such as quick-fire trivia or quiz videos, motivational clips, top-10 lists, news updates, repurposed blog content, or even product updates and feature highlights. It's also perfect for faceless AI storytelling videos, like the example below:
The video we'll create – similar to many trending shorts – will include AI voiceovers, subtitles, and a visual background. Our main focus is on automating the video creation process. To keep things simple in this tutorial, we'll use pre-recorded audio files. If you prefer full automation, you can generate the voiceovers with ElevenLabs. We'll also provide our own images, though these could just as easily be replaced with AI-generated visuals. Creatomate will take care of the subtitles automatically.
The video template is fully customizable. In the online editor, you can add scenes, change subtitle styles, or explore various animations – it's completely up to you.
Prerequisites
We'll be using the following tools:
- Creatomate: for generating videos.
- YouTube: for publishing shorts to your channel.
- n8n: for building the automation workflow.
To make the automation more reliable, we'll also add a notification step. This will alert us if something goes wrong during video generation, so we can address the issue quickly. I'll demonstrate this using Gmail, but you can use any app you prefer.
How to create YouTube Shorts with n8n
We'll start by creating a video template in Creatomate. This template will serve as the blueprint for all the YouTube Shorts we generate automatically.
Next, we'll switch over to n8n to set up the automation. For this demonstration, we'll use hard-coded input data for the video. In a real-world scenario, you can replace this with any app that provides video content. Once that's set up, we'll configure the API request to send the data to Creatomate. Because video generation can take some time, we'll also add an automatic polling system to wait until the video is finished.
Finally, we'll download the file, upload it to YouTube, and add a notification step to make sure everything runs smoothly.
Let's dive in!
1. Create a video template in Creatomate
Log in to your Creatomate account, or sign up for free if you don't have one yet.
Go to the Templates page and click + to open the template gallery. From there, you can either select a ready-made design that fits your needs, or create a custom template from scratch if you have a specific idea in mind. For this tutorial, we'll use the Short-Form Voice Over template from the Voice Overs category. Be sure to select the 9:16 Vertical format, then click Create Template to open it in the editor:
Let's take a quick look at how this template works and how we'll use it in our n8n workflow.
On the left, you'll see all the elements that make up the video design. The video is divided into four scenes, each containing a voiceover, subtitles, and image element.
If you press play, you won't hear any voiceovers yet, and the subtitles are still placeholders. This will change once we insert our own voiceover and image files through n8n. The subtitles will then be generated automatically from the voiceover files.
The template is almost ready to use, but there's one important adjustment we need to make. By default, it's set up to generate voiceovers using ElevenLabs, a text-to-speech API. In this tutorial, however, we'll provide pre-recorded voiceover files instead of generating them with AI. If you're interested in using ElevenLabs, you can check out this guide.
Hold Ctrl and select the four Voiceover elements in the left panel. In the properties panel on the right, find the Audio setting. Change the Provider to None. This will allow us to insert publicly accessible URLs to the voiceover files directly through n8n:
That's it!
Optionally, you can customize the styling and animations of the subtitles. This step isn't required, but it's useful to know how it works in case you'd like to adjust the subtitle style later.
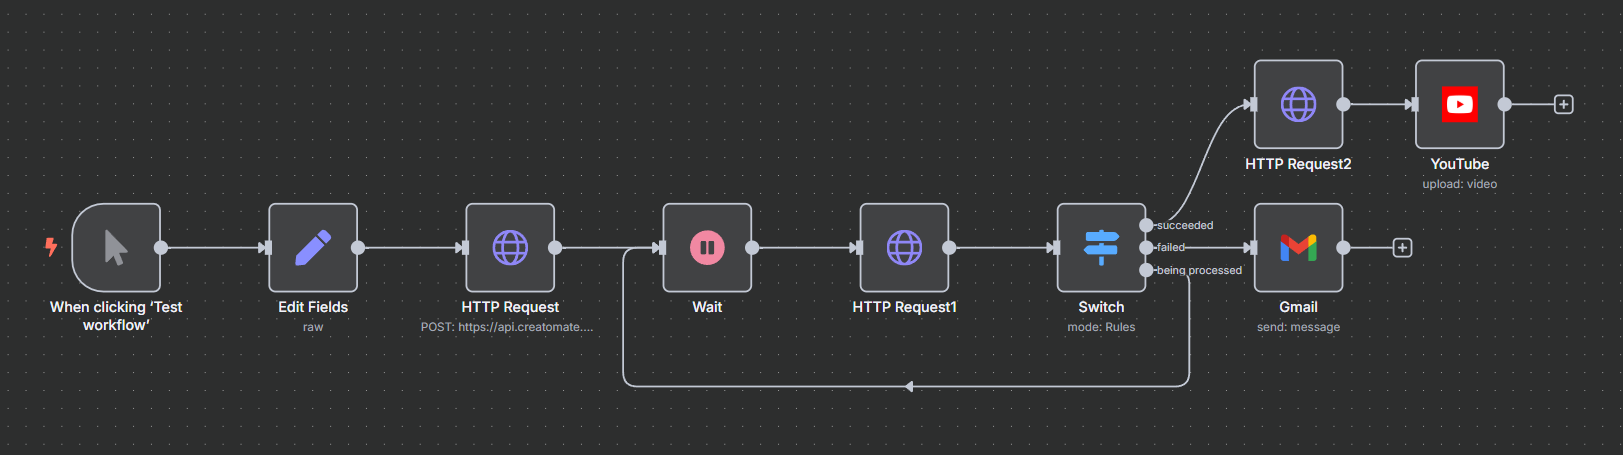
Select the Subtitles-1 element. In the Transcription property, notice that the Source is set to Voiceover-1. This tells Creatomate to transcribe that voiceover file and generate subtitles automatically.
You can use the Style, Color, Fill, and Stroke settings to customize the appearance of the subtitles. For example, if you want subtitles to appear one word at a time – a style popular on YouTube, TikTok, and Instagram – set Max. Length to 1. The template shows a live preview, so feel free to experiment with these settings:
If you've customized the subtitles, you may want to apply those same changes to the second, third, and fourth scenes to keep the video consistent.
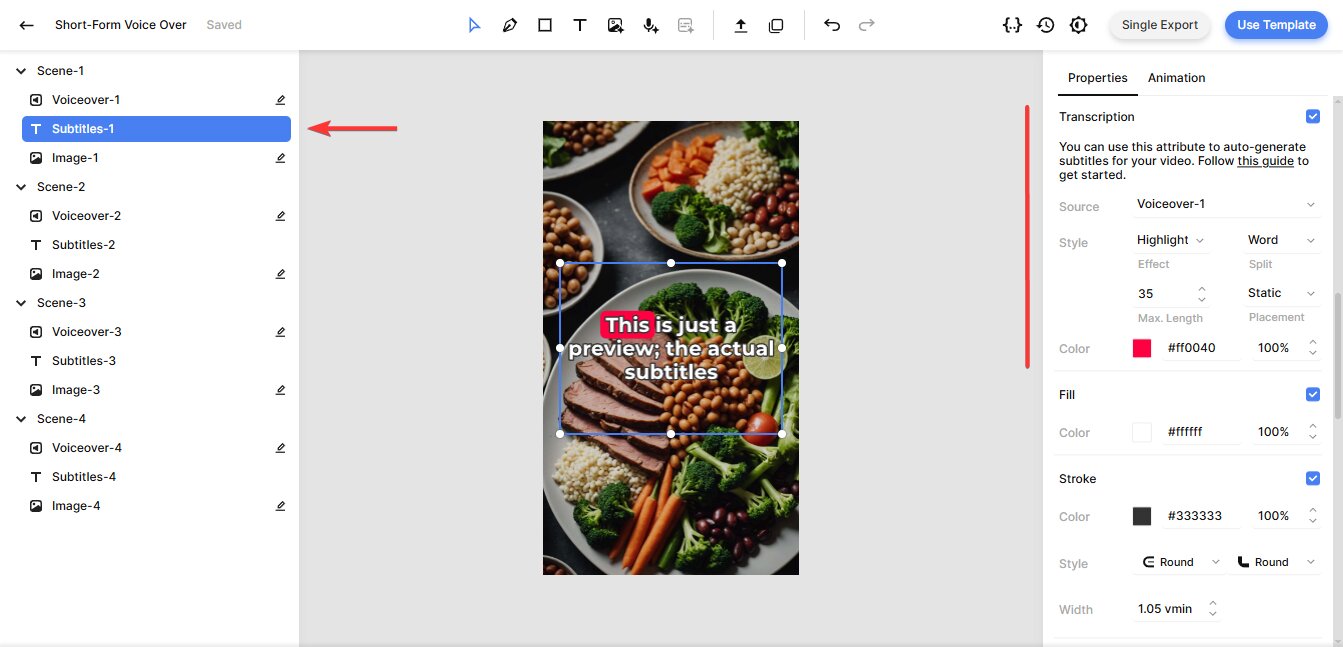
As for the image elements, the key thing to know is that they're dynamic – meaning we can easily replace them with image files provided through n8n:
That's all you need to know about this template! We've covered the essentials, but the editor includes many more customization options. If you'd like to explore further and fine-tune your video design, check out the documentation.
With the template ready, let's move on to setting things up in n8n.
2. Add video content to your n8n workflow
In this step, we'll add pre-made voiceover files and images that will serve as video backgrounds. Since the video will be published as a YouTube Short, we'll also include a title and description.
For simplicity, we'll use a manual trigger and an Edit Fields (Set) node. This is just to demonstrate the concept – you can later swap these out for any other app or trigger that suits your workflow.
In your n8n dashboard, click Create Workflow.
On the canvas, click the + button and choose Trigger manually. You'll now see the When clicking ‘Test workflow' trigger added to your workflow:
Click + again and search for Edit Fields (Set).
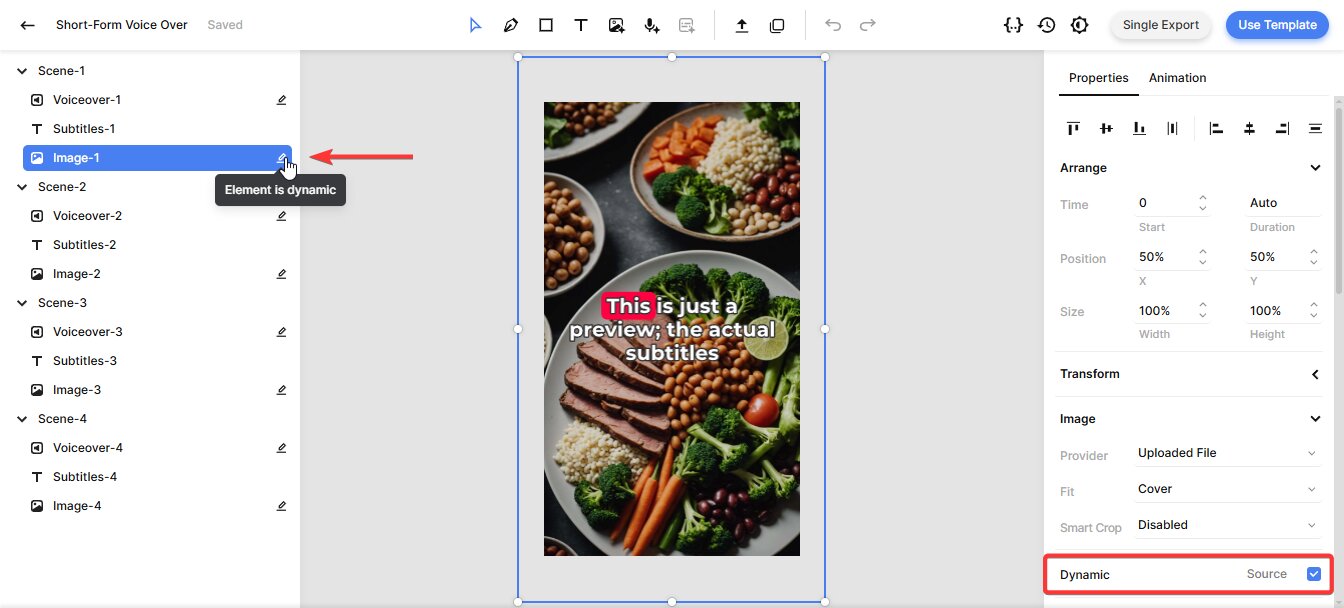
Change Mode to JSON and paste the following sample content into the JSON field:
{

  "Image-1": "https://cdn.creatomate.com/demo/better-sleep-1.jpg",

  "Voiceover-1": "https://cdn.creatomate.com/demo/voiceover-1.mp3",

  "Image-2": "https://cdn.creatomate.com/demo/better-sleep-2.jpg",

  "Voiceover-2": "https://cdn.creatomate.com/demo/voiceover-2.mp3",

  "Image-3": "https://cdn.creatomate.com/demo/better-sleep-3.jpg",

  "Voiceover-3": "https://cdn.creatomate.com/demo/voiceover-3.mp3",

  "Image-4": "https://cdn.creatomate.com/demo/better-sleep-4.jpg",

  "Voiceover-4": "https://cdn.creatomate.com/demo/voiceover-4.mp3",

  "Title": "How to Sleep Better Tonight 🌙💤",

  "Description": "Struggling to get quality sleep? Discover these 3 simple tips that can help you improve your sleep routine. From relaxing bedtime activities to staying active during the day, these strategies will help you wake up feeling refreshed! 🌙💤 #SleepTips #BetterSleep #HealthyLiving"

}
Then, click Test step to confirm the data has been added successfully:
3. Generate the video
Now it's time to send an API request to Creatomate so it can generate the video.
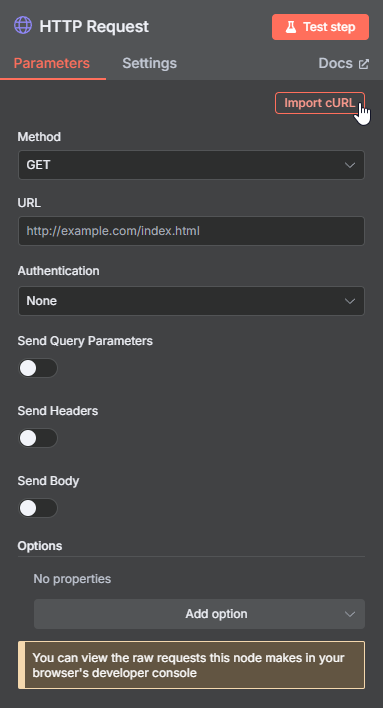
Add an HTTP Request node. For quick setup, click Import cURL:
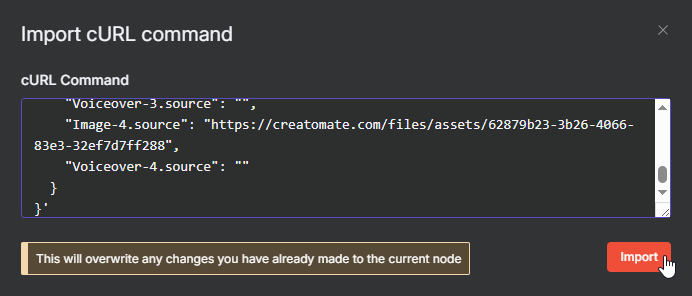
In the Creatomate template editor, click Use Template in the top-right corner. Go to API Integration and copy the generated cURL command:

Paste it into n8n and click Import:
The node is almost ready – now we just need to connect our sample data to the video template.
Scroll down to the JSON field. Switch to Expression mode and open the editor in full screen. Drag and drop the appropriate image and voiceover items onto their matching template elements:
Click Test step to send the request to Creatomate.
If everything worked, you'll see the status “planned” in the output. This means Creatomate has accepted the request and will start the rendering process soon:
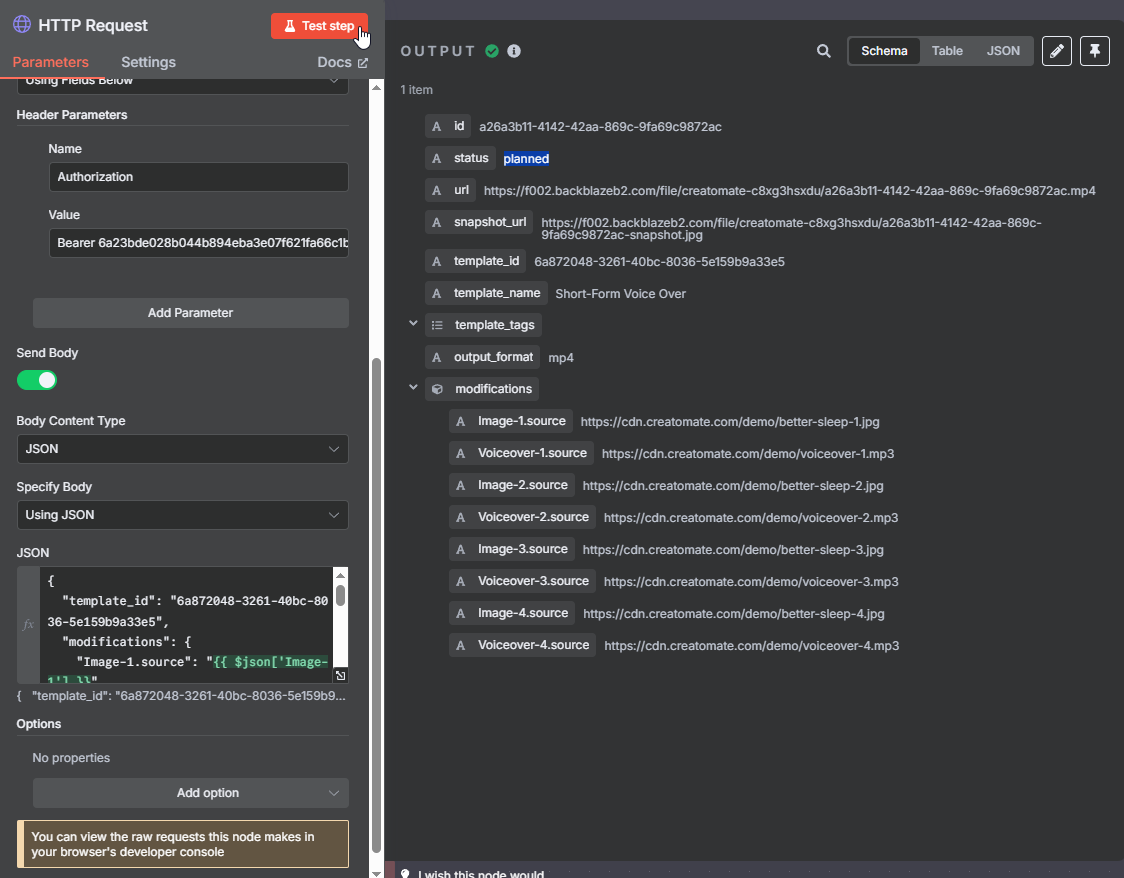
The output will also include a URL where your video will be available once it's ready. If you open it immediately, you may see a “Not Found” message – that just means the video is still processing.
The time it takes to generate a video depends on factors such as video length, template complexity, resolution, and third-party integrations (like ElevenLabs or DALL·E).
In the next step, we'll set up a way to monitor the rendering progress.
4. Wait for the video to complete
Before the next step can use the video URL, we need to make sure the video has finished processing. If the workflow tries to access the URL too early, it could result in an error. To avoid this, we'll add a wait step to pause the workflow temporarily. After the pause, we'll check the video's status and handle each possible outcome appropriately.
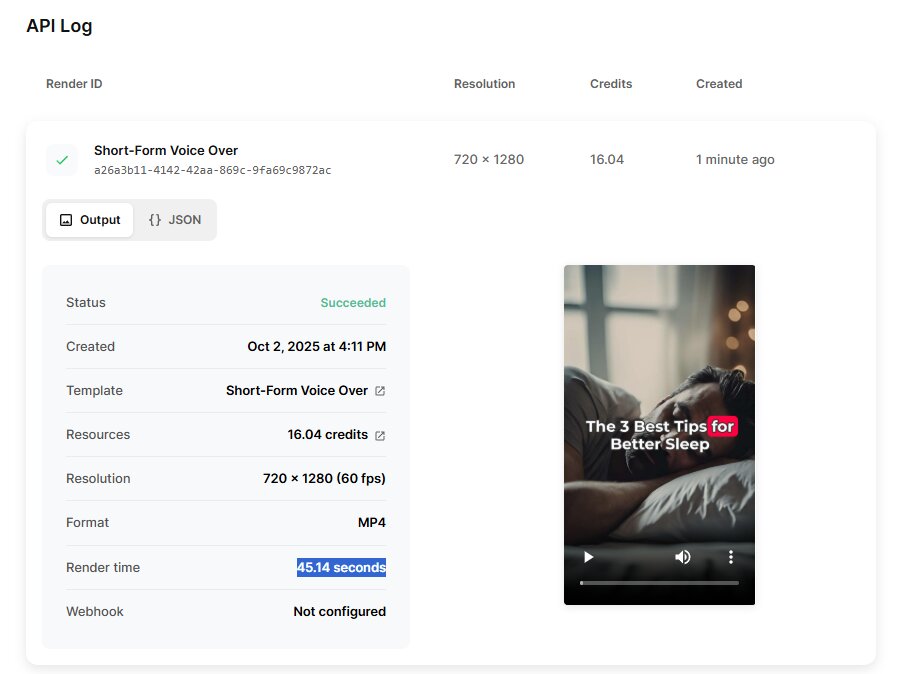
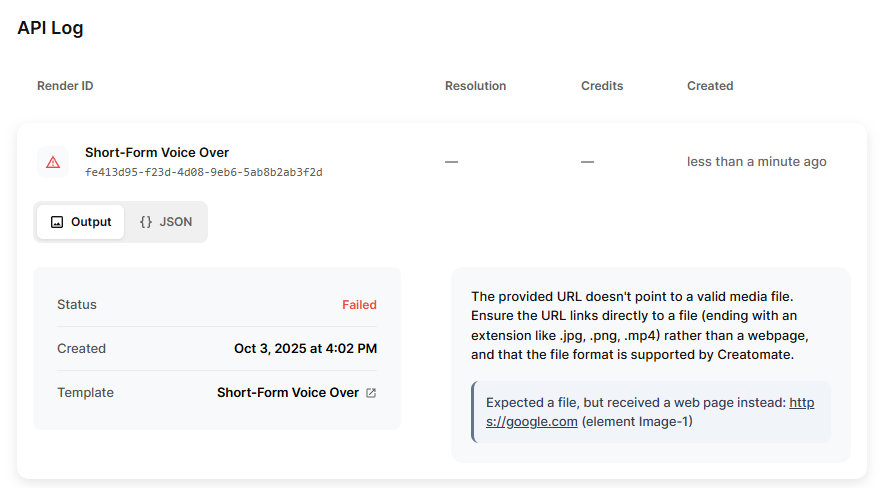
Start by visiting the API Log page in your Creatomate dashboard. Here, you can confirm whether the test video from the previous step has successfully completed (status = succeeded). If it hasn't finished yet, just wait a few moments. You can also see how long the video took to render. For example, my test video rendered in 45.14 seconds:
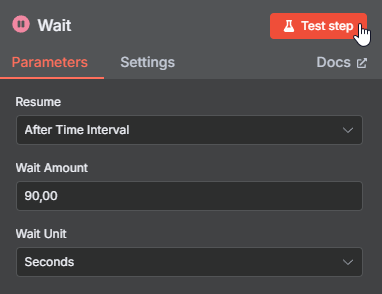
In n8n, add a Wait node and set it to 90 seconds (roughly twice the expected render time) to give the video enough time to complete before moving on:
Click Test step and wait until it finishes.
Next, add another HTTP Request node.
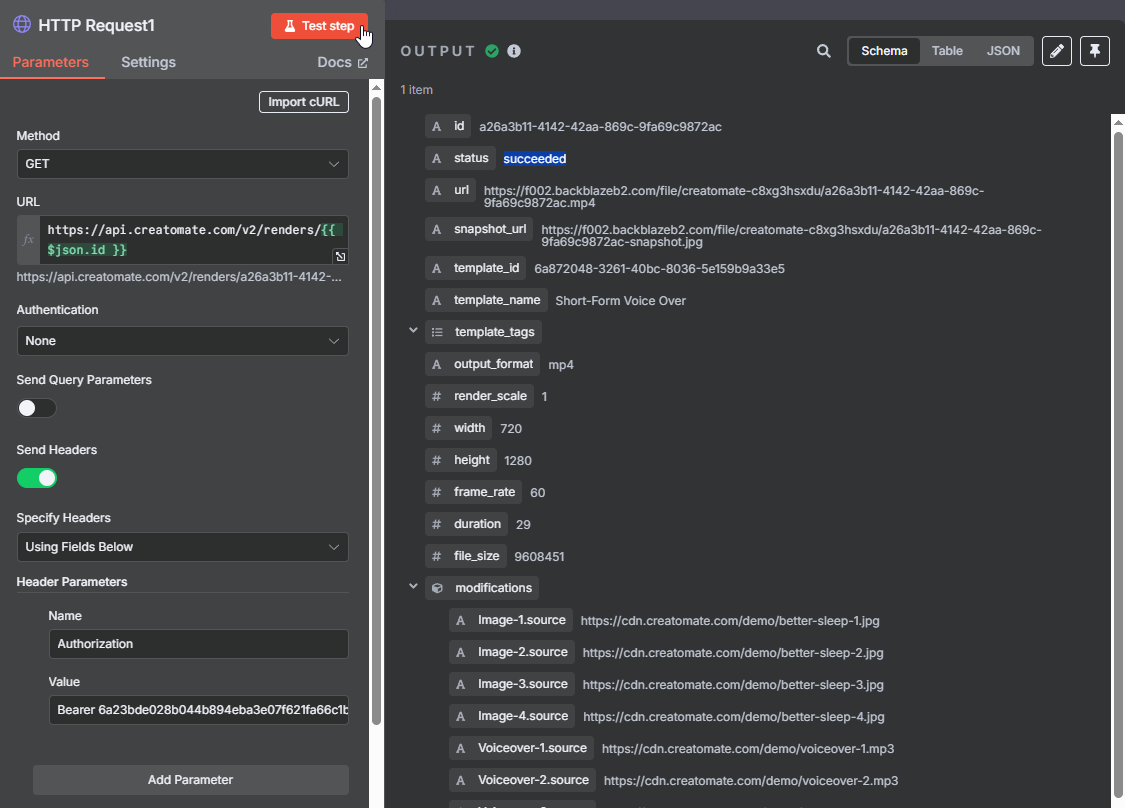
For the setup, select GET as the Method and enter this URL: https://api.creatomate.com/v2/renders/[ID]. Replace the [ID] placeholder with the id value from the Wait node, and be sure not to include any spaces:

Next, enable Send Headers. Add a header called Authorization with the value Bearer [space] your API key. You'll find the key on the API Integration page in Creatomate, where we previously copied the cURL command:

Now, click Test step. If everything worked, the output should show the video status as “succeeded” – meaning the render is complete and the video is ready to use:
That's the result we want. However, videos don't always render instantly – sometimes they take longer, and occasionally an error can occur. To handle this, we need to check the video's status and respond accordingly, whether it has succeeded, is still processing, or has failed.
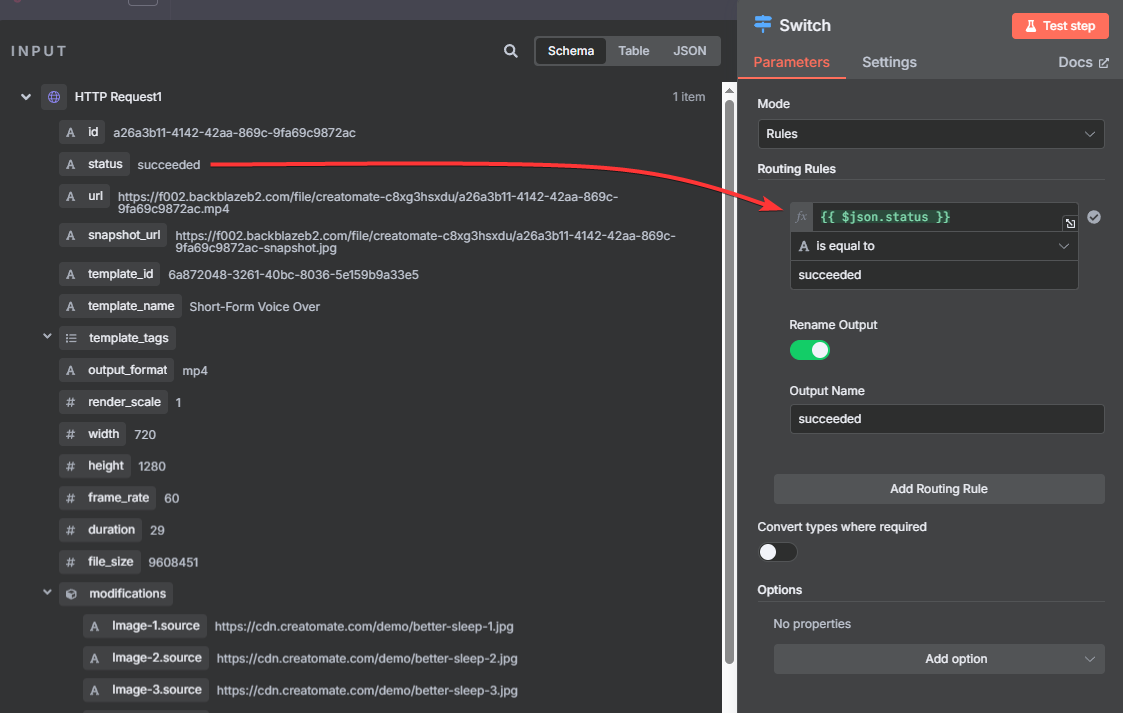
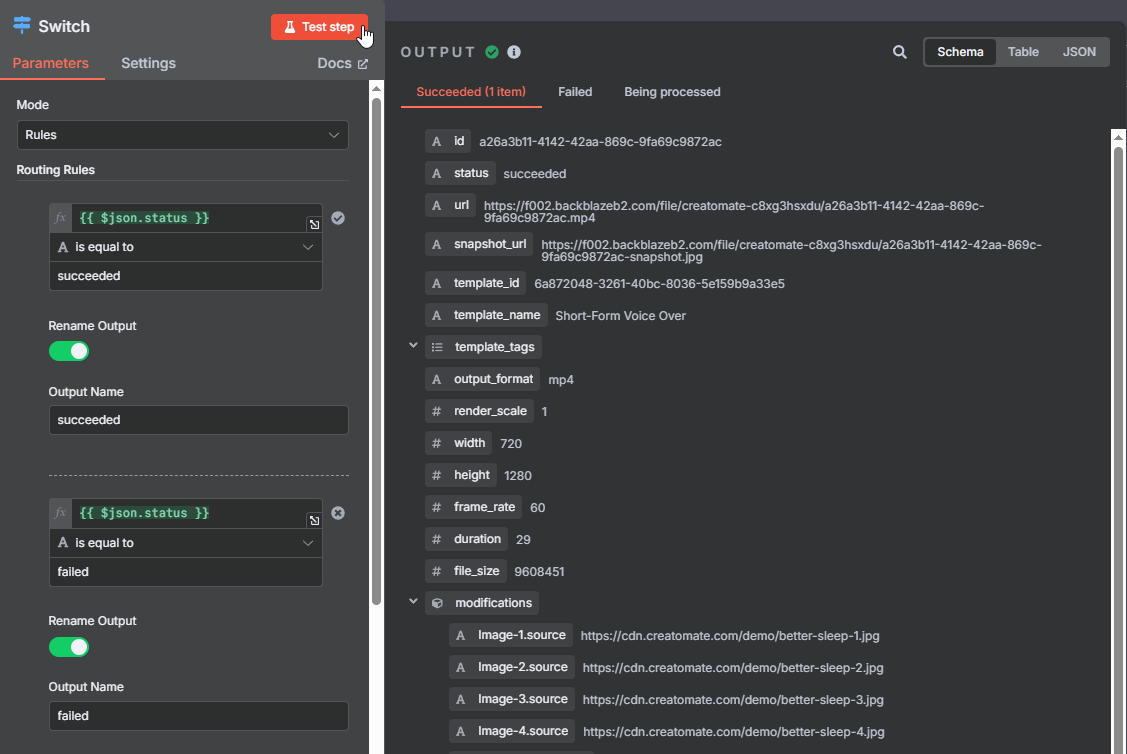
To set this up, add a Switch node.
Start with the success case: create a routing rule where the ‘status' is equal to ‘succeeded', and rename the output to succeeded:
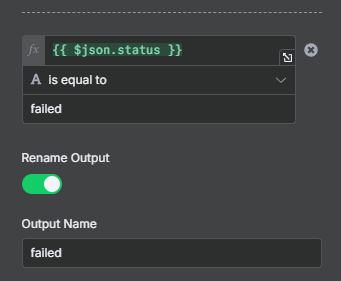
For failed renders, add a routing rule where ‘status' is equal to ‘failed' and rename the output to failed:
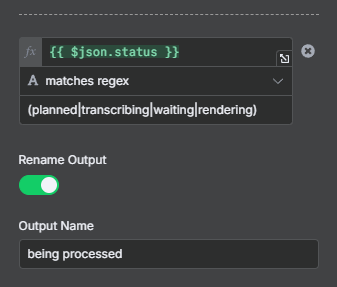
Next, we'll handle cases where the video is still processing. Since there are multiple possible statuses that mean the render isn't finished yet, we can group them into a single route. Add another routing rule, choose ‘status', and set it to matches regex with the following values: (planned|transcribing|waiting|rendering) Then, rename this output to being processed:
When you're finished, click Test step. You should see the test video following the “succeeded” branch:
In the next step, we'll upload the video to YouTube and go over how to handle both “failed” and “being processed” renders.
5. Upload to YouTube
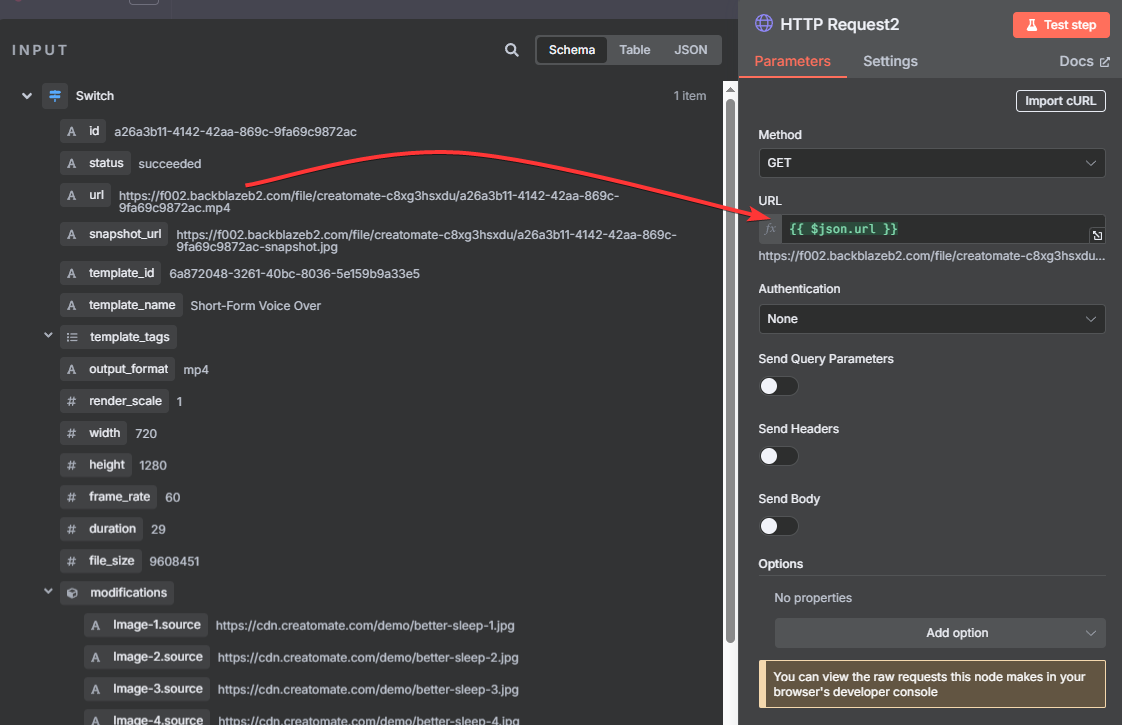
Now that the video has been generated, we can upload it to YouTube. The YouTube node requires the actual video file, not just the URL, so we'll first need to download the video.
To do this, add an HTTP Request node after the “succeeded” branch.
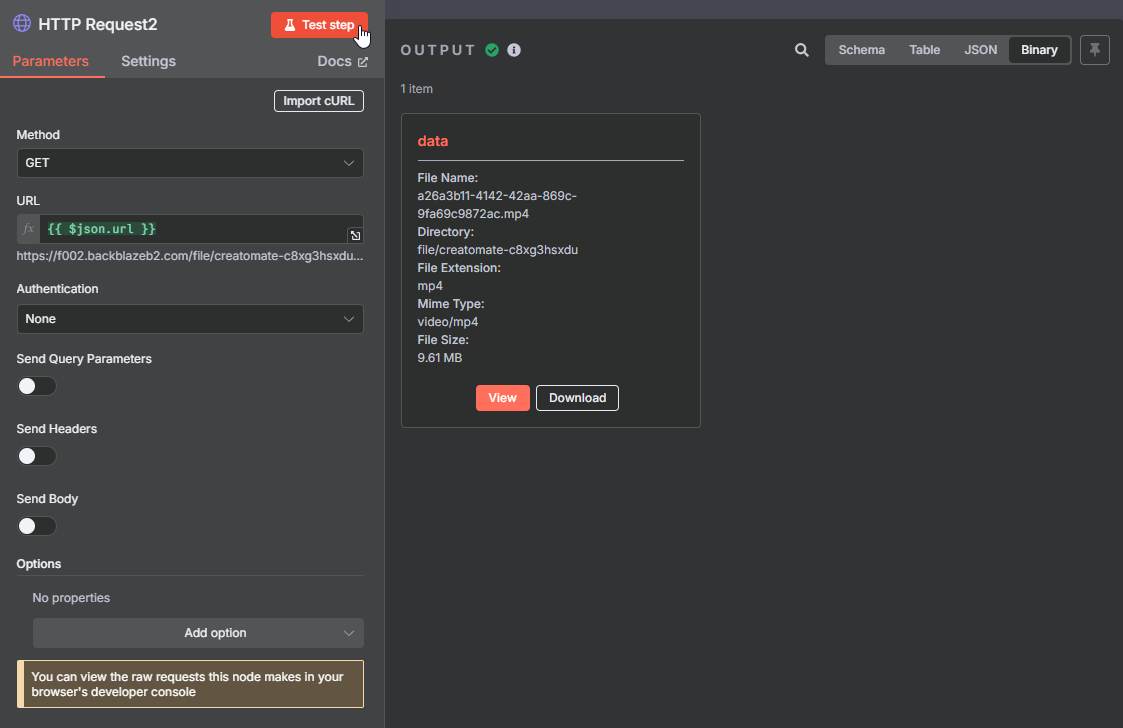
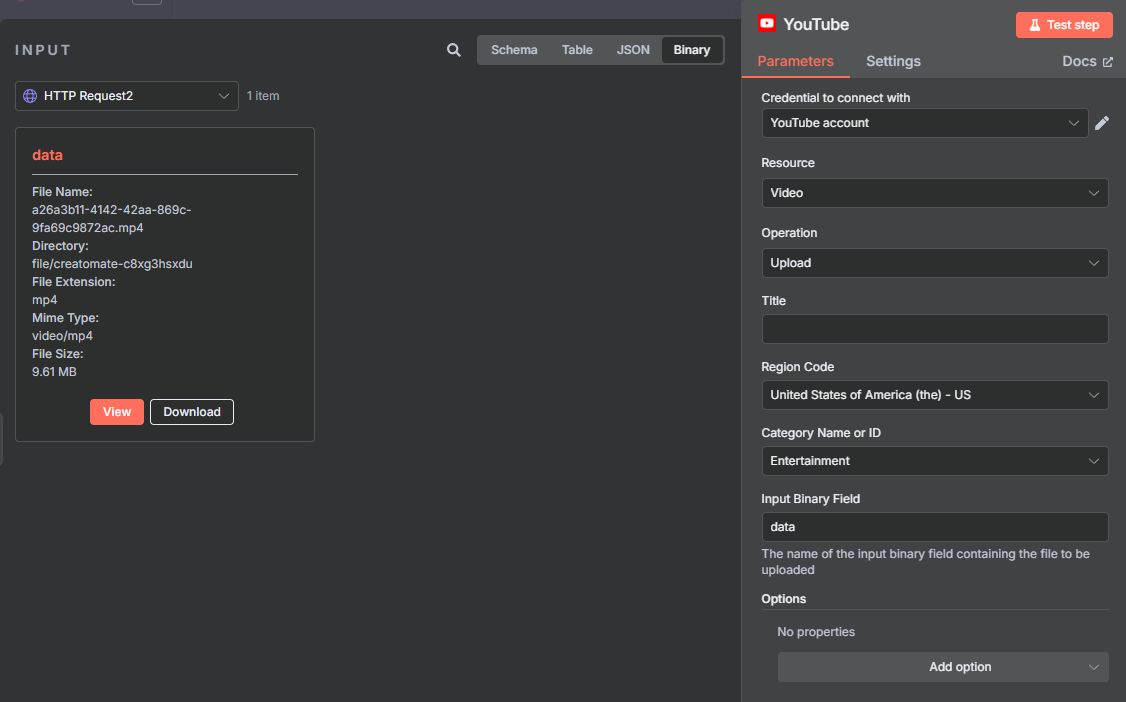
Set the Method to GET, and provide the video URL:
Then, click Test step. This should return a data bundle as the output:
Next, add the YouTube node with the Upload a video action.
Select your account, or create a new connection if you haven't set one up yet. It takes a little configuration, but it's easy enough if you follow the steps. I recommend watching this short video – it walks you through the whole process.
Then, set up the node as follows:
- Resource -> Video
- Operation -> Upload
- Region Code -> Choose a country or region where your audience is based or where you want the video to be categorized (e.g., US).
- Category Name or ID -> Select a category that best fits your video's content (e.g., Entertainment).
- Input Binary Field -> data (this refers to the video we just downloaded)
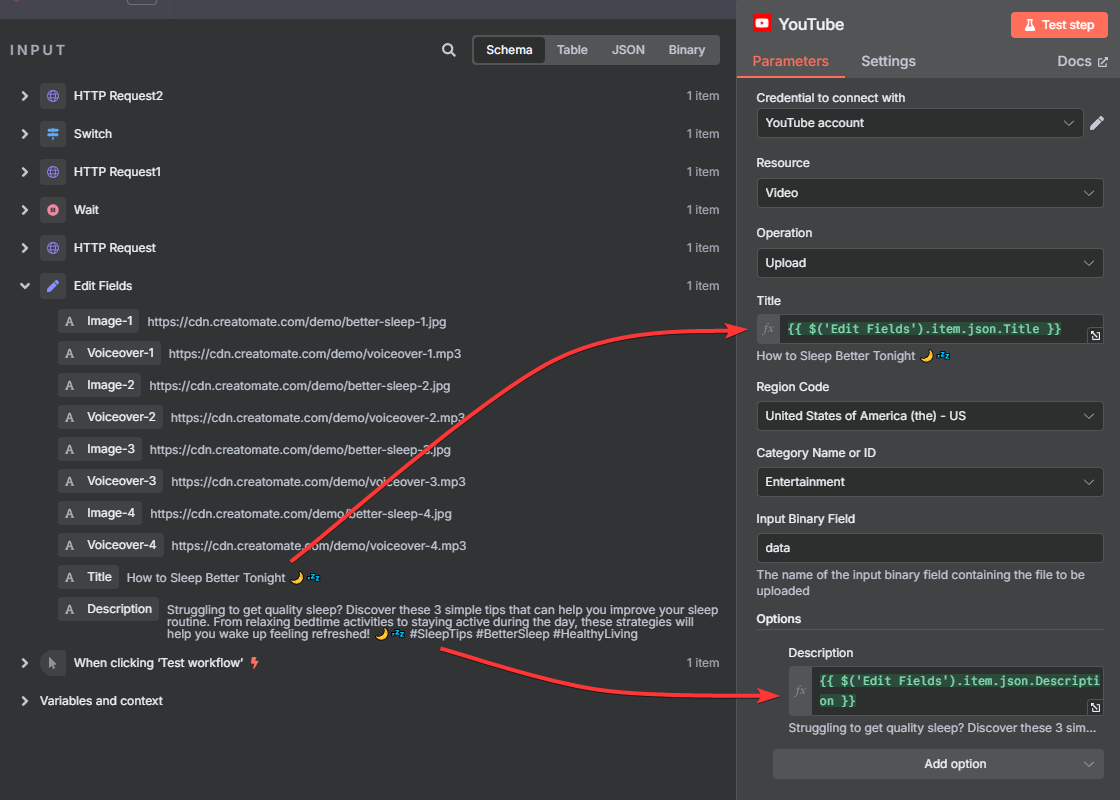
To add a Title, change the input mode to Schema, then select Edit Fields → Title.
If you also want to include a description, click Add option, select Description, and map it to Edit Fields → Description:
Tip: You can also set the privacy status of your video. By default, it will be published automatically. If you want more control – which can be useful for fully AI-generated videos – you can change it to “unlisted” or “private”.
To do this, click Add option, select Privacy Status, and choose the setting you prefer.
This is especially useful if you want to review videos before they go public. For example, you could have the workflow send you a notification when a video is uploaded as “unlisted” or “private”. You can then check the video and, once approved, publish it manually.
Once everything is set up, click Test step to check if it works.
When I visit my YouTube channel's content page, I can see that the short has been successfully published:
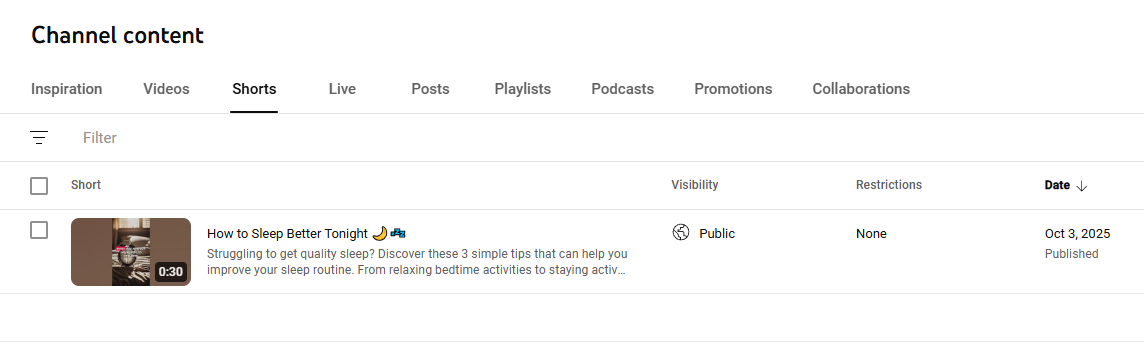
Did it work for you too? Great!
Note: If you're using the self-hosted version of n8n, you might see a “Request failed with status code 400” error. When this happens, the video may still appear on your channel's content page but remain stuck in a pending state.
To fix this, set the environment variable N8N_DEFAULT_BINARY_DATA_MODE=filesystem in your .env file or Docker container.
Another option is to use an HTTP Request node to send an API call directly to the YouTube API. This video is a great reference for how to set it up.
Now let's finish by setting up the other two routes.
As mentioned earlier, if a video isn't ready after the first check, it simply needs more time. To handle this, connect the “being processed” branch back to the Wait node. This creates a loop that keeps checking until the status eventually changes to either “succeeded” or “failed”:
Next, let's deal with failures. When a video fails to render, you'll want to know about it right away. We'll do this by sending ourselves a notification. I'll use Gmail in this example, but you can use any app you prefer.
Set up a notification with a simple message such as:
An error occurred while rendering your video. Check the API Log page in Creatomate for details and possible fixes.
Because our test render followed the “succeeded” branch, you won't see any input data here:

As long as you've entered the correct email address, the notification node should work properly when a video fails to render:
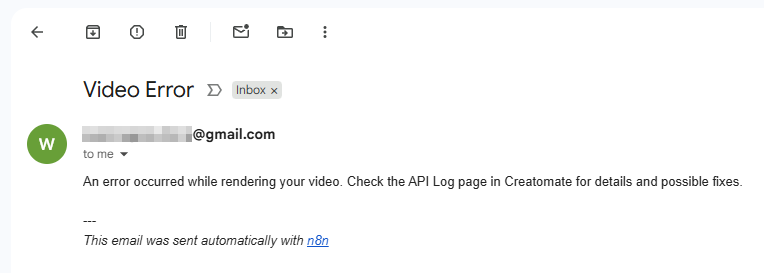
Here's an example of the kind of error message you might see in your API Log:
And that's it!
What's next for YouTube Shorts with n8n
Now that you understand how the video generation process works, you can start adapting it to your own needs and integrating it into your content creation workflow.
A great next step is automating the creation of AI-generated voiceovers. One of the best options for lifelike text-to-speech is ElevenLabs. Once your voiceovers are ready, Creatomate can automatically generate subtitles based on them.
You can learn how to set this up in this tutorial:
You might also like these tutorials


Start automating today
Start with a full-featured trial with 50 credits, no credit card required.
Get started for free →