How to Auto-Create Dynamic Videos from Images using n8n

In this tutorial, you'll learn how to automatically turn a variable number of images into a slideshow video using Airtable, n8n, and Creatomate.
Have you ever tried creating videos from a collection of photos? When every video follows the same structure and uses the same number of images, it's usually quite simple. But what if each video needs a different number of photos – sometimes 5, another time 15, or even 50? Things can quickly get complicated. That's the exact challenge we'll solve in this tutorial.
I'll show you how to build an automation in n8n that generates professional-looking videos from any number of images. We'll use Airtable to organize the visuals and accompanying text for each video. The workflow will then pull in this content, apply custom logic to structure the video, and send everything to Creatomate for rendering.
The best part is that this workflow is highly flexible. Every scene and text element can be customized, so you can adapt it to different types of content. Whether you're creating marketing materials, social media posts, or personalized messages, this system can easily scale and adjust to your needs.
Note: If you only want to create videos with a fixed design and a consistent number of elements, you might prefer following this simpler n8n tutorial. This guide is intended for more advanced scenarios where dynamic content is essential.
Prerequisites
Here are the tools we'll use:
- Creatomate: to define the video scenes and generate the final video.
- Airtable: to store the images and text for each video.
- A communication app (like Gmail or Slack): to send notifications if something goes wrong.
- n8n: to automate the entire workflow.
How to automate video creation from images with n8n
The first step is to create a video template in Creatomate. This template will include multiple scenes, which will be used to build the final video dynamically, depending on how many images need to be included.
Next, we'll set up an Airtable base to store the content for each video. Each record in the table represents one video. You'll upload the images and, optionally, add any text you want to appear in the final result.
From there, we'll move on to n8n, where we'll build a workflow that automatically fetches Airtable records marked as "ready to process". A JavaScript function will analyze each record to check how many images it contains and whether any text is included. Based on that, it will select the appropriate scenes to make sure all your content appears in the final video. Don't worry – I'll provide the exact code, ready for you to copy and paste.
After that, we'll send an API request to Creatomate to generate the video. Since rendering takes a bit of time, the workflow will pause briefly before checking the video's status. Once it's ready, you can use the video however you like. As an example, I'll show you how to update the Airtable record with a link to the finished video.
Finally, we'll add a notification step (via email, Slack, or another app) to alert you if something goes wrong during the process.
Let's get started!
1. Create a video template in Creatomate
Log in to your Creatomate account, or sign up for free if you don't already have one.
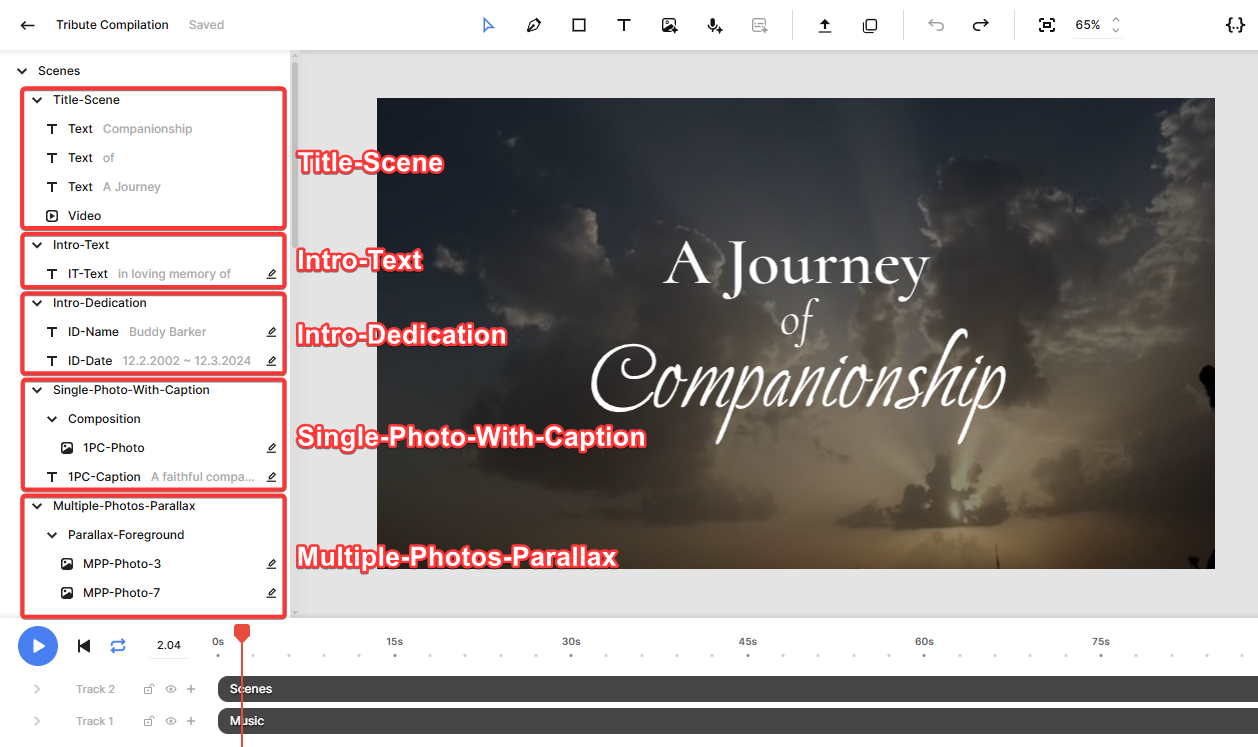
Navigate to the Templates page and click New to open the template gallery. For the purpose of this tutorial, we'll use the Tribute Compilation template from the Featured category. Select the 16:9 Landscape format, then click Create Template to open it in the editor:
Click the play button to preview the template. You'll see that it's made up of multiple scenes – some contain only text, some visuals, and others a mix of both. In the left-hand panel, you'll find the full list of scenes included in this template: Title-Scene, Intro-Title, Intro-Dedication, Single-Photo-with-Caption, and more:
Think of each scene as a reusable block. Later in the workflow, we'll populate these blocks with data from Airtable.
If you've followed our other tutorials, you may be used to the standard method of simply replacing dynamic elements with new content. This time, however, we need a more flexible method. Because we won't know in advance how many images each video will include, we'll use a piece of code to select scenes dynamically based on the image count. This way, each video is custom-built to perfectly match the content of its Airtable record.
If that sounds complicated, don't worry – it'll make sense once we get to that step.
There's no need to modify the template. You can use it as-is.
Let's move on to Airtable.
2. Add video content to Airtable
In this step, we'll set up an Airtable base to hold the content for your videos. This includes fields for uploading images and entering text like the name, date, caption, and a farewell message. We'll also add a field to store the link to the generated video.
Go to Airtable.com to sign up for free, or log in if you already have an account.
Start with a blank app and name it Dynamic Slideshow Videos.
Then, create the following fields:
- Single line text: Name
- Single line text: Full Name
- Single line text: Date
- Single line text: Caption Text
- Long text: Farewell Message
- Attachment: Images
- Checkbox: Ready to Process
- Last modified time: Last Modified
- URL: Video link
Make sure to link the Last Modified field to the “Ready to Process” checkbox. This setup is crucial, as it ensures that n8n can correctly detect when a record is ready to trigger the workflow.
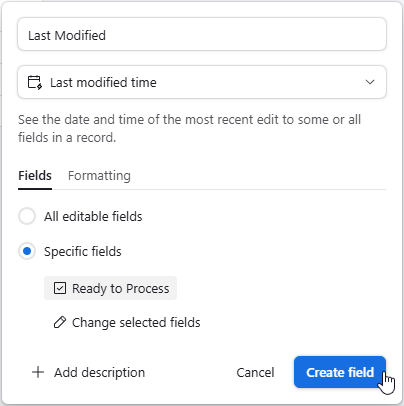
Here's why: without this connection, any edit to the record would trigger the automation. By tying the Last Modified field specifically to the checkbox, the workflow only runs when you mark the record as “Ready to Process”. This lets you freely update the record without accidentally starting the process before it's ready.
At this point, your table should look something like this (click the screenshot to view it in full screen):

Next, let's add some sample data to the first record. You can either follow the example below or use your own details:
- Name -> Whiskers
- Full Name -> Whiskers McFluff
- Date -> 03.14.2017 ~ 04.10.2025
- Caption Text -> A gentle soul whose purrs brought peace and quiet joy...
- Farewell Message -> As moonlight dances on the windowsill, we feel the soft echo of our dear friend's love, gently reminding us they're never truly gone.
- Images -> Upload around 12 images. You can use photos from your device, find free ones on sites like Pexels, or download these example images: tribute-1pa.jpg, tribute-1pc.jpg, tribute-2p-01.jpg, tribute-2p-02.jpg, tribute-3p-01.jpg, tribute-3p-02.jpg, tribute-3p-03.jpg, tribute-mpp-02.jpg, tribute-mpp-08.jpg, tribute-mpp-09.jpg, tribute-mpp-10.jpg, and tribute-spb.jpg.
- Ready to Process -> check the box.
- Last Modified -> this will update automatically with the current timestamp.
- Video link -> leave this blank for now – we'll update this in step 7.
Once that's done, your table should look like this:

The Airtable base is now fully set up, so let's move on to n8n.
3. Trigger the n8n workflow
Go to n8n.io and sign in to your account. If you don't have one yet, you can sign up for a free trial.
From your dashboard, click Create Workflow.
Once you're on the canvas, click the + button to add your first node. Search for Airtable and select On new Airtable event as the trigger.
To configure the trigger, you'll first need to create a connection. I recommend using the Access Token method since it's quick and straightforward to set up. You can follow these instructions if you need help.
Next, under Poll Times, choose how often n8n should check your Airtable base for records marked as “Ready to Process”. The ideal frequency depends on how often you plan to generate videos, so adjust it according to your needs.
For the Base and Table fields, you can select values By ID or By URL. If you have your Airtable base open, you'll find these in your browser's address bar. The Base ID usually starts with app (highlighted in red) and the Table ID with tbl (highlighted in blue), like this:

At this point, your trigger setup should look something like this:

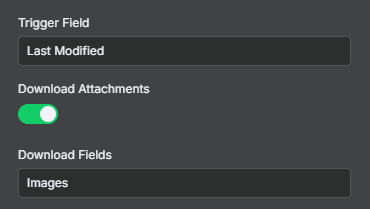
Next, for the Trigger Field, enter: Last Modified
Also turn on the Download Attachments option, and enter Images for Download Fields:
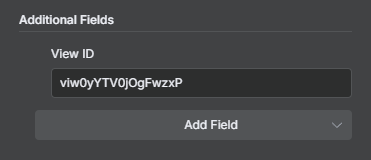
Next, click Add Field under Additional Fields and select View ID. You can find it in your browser's address bar – just like the base and table IDs. The View ID usually starts with viw:
Once everything is configured, click Fetch Test Event. n8n will pull in your test record and display it in the output panel:
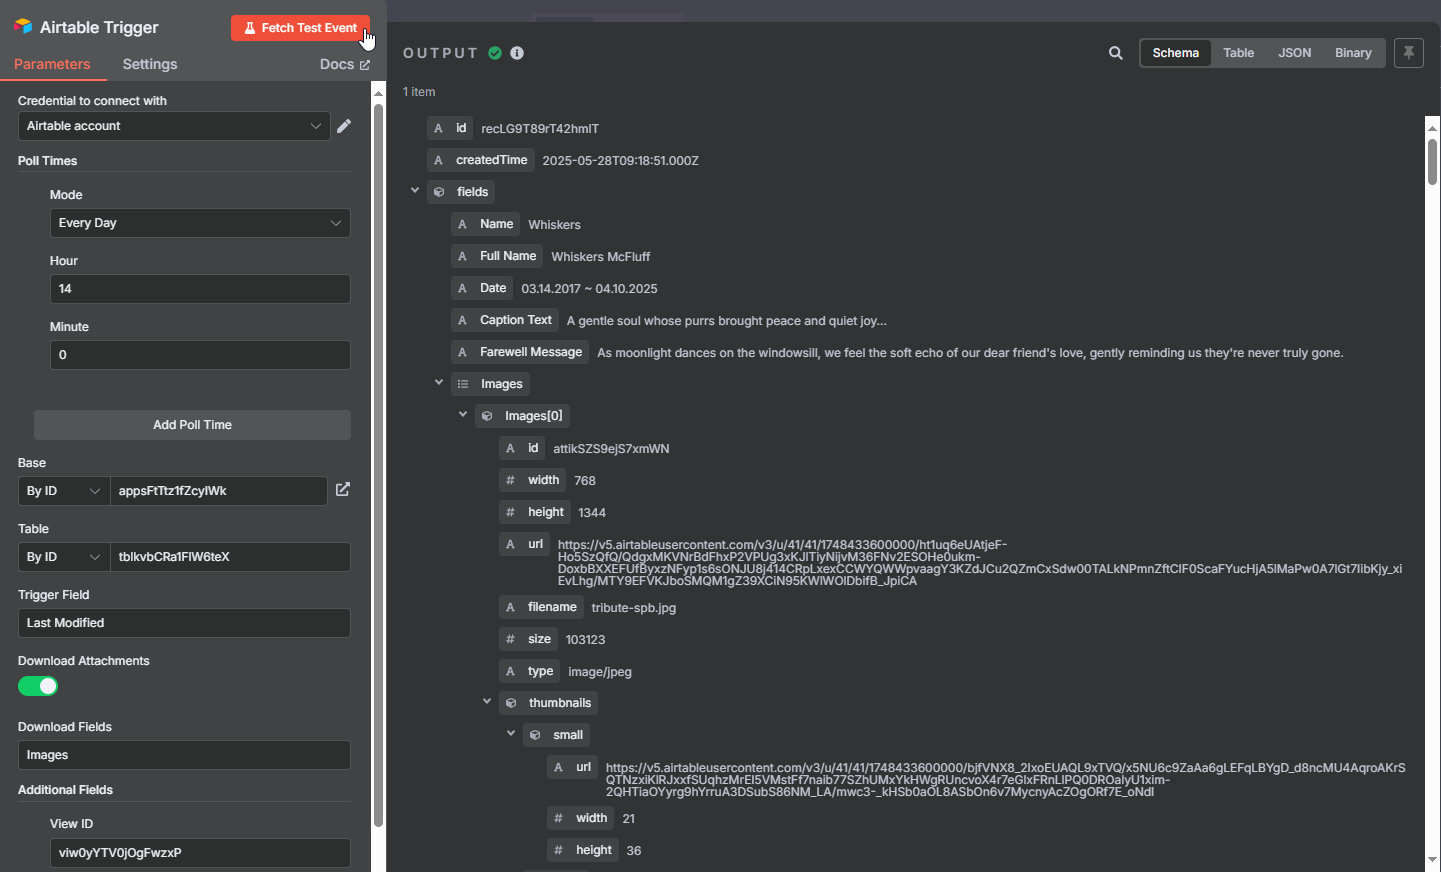
At this point, you should see only one record (1 item) returned, since we've only marked a single record as "Ready to Process". When more records are marked as ready, n8n will handle them all in one run. The code in the next step is already designed to manage multiple records automatically.
Now we're ready to transform the Airtable data into a video script using some code.
4. Generate the render script
To create a video with a dynamic number of slides based on the images in your Airtable record, we'll need to add some custom logic. I've prepared a script that processes the Airtable data, analyzes the number of images, checks for any accompanying text, randomly selects appropriate scenes, and generates a render script for Creatomate.
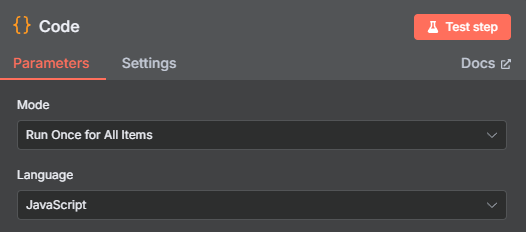
Add a Code node to your workflow.
Set Mode to Run Once for All Items and Language to JavaScript:
Then, copy and paste the following JavaScript code: Click to view.
Once added, click Test step to run the node.
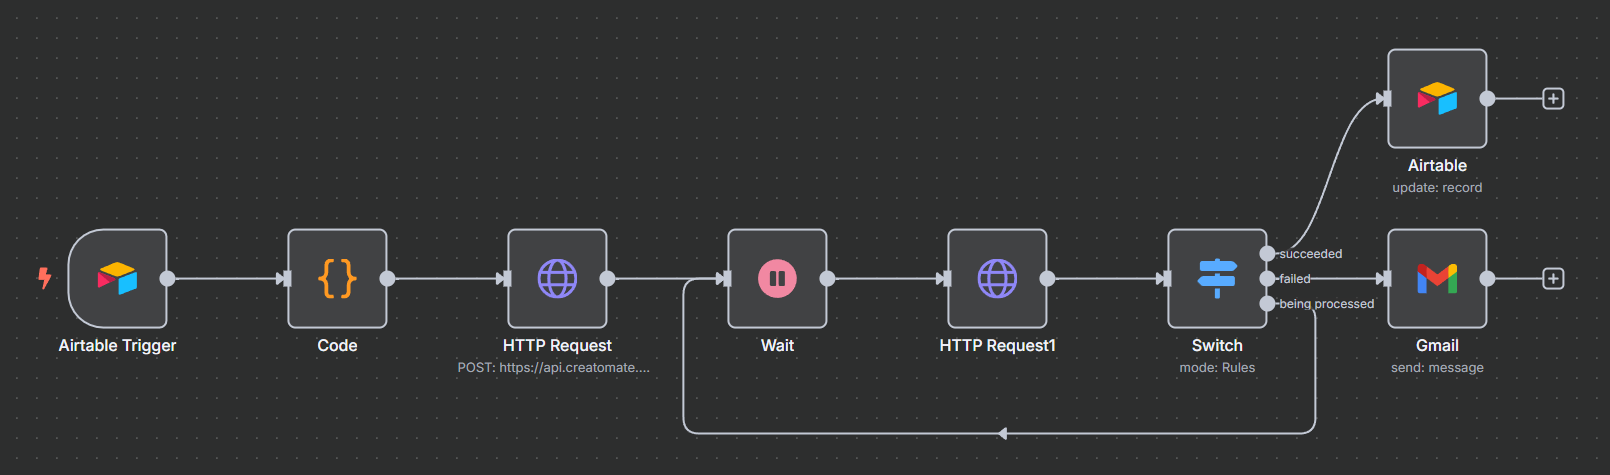
If everything is working correctly, you should see a render script in the output. It will contain a "Scenes.elements" array, which defines the structure of the video based on the input content:
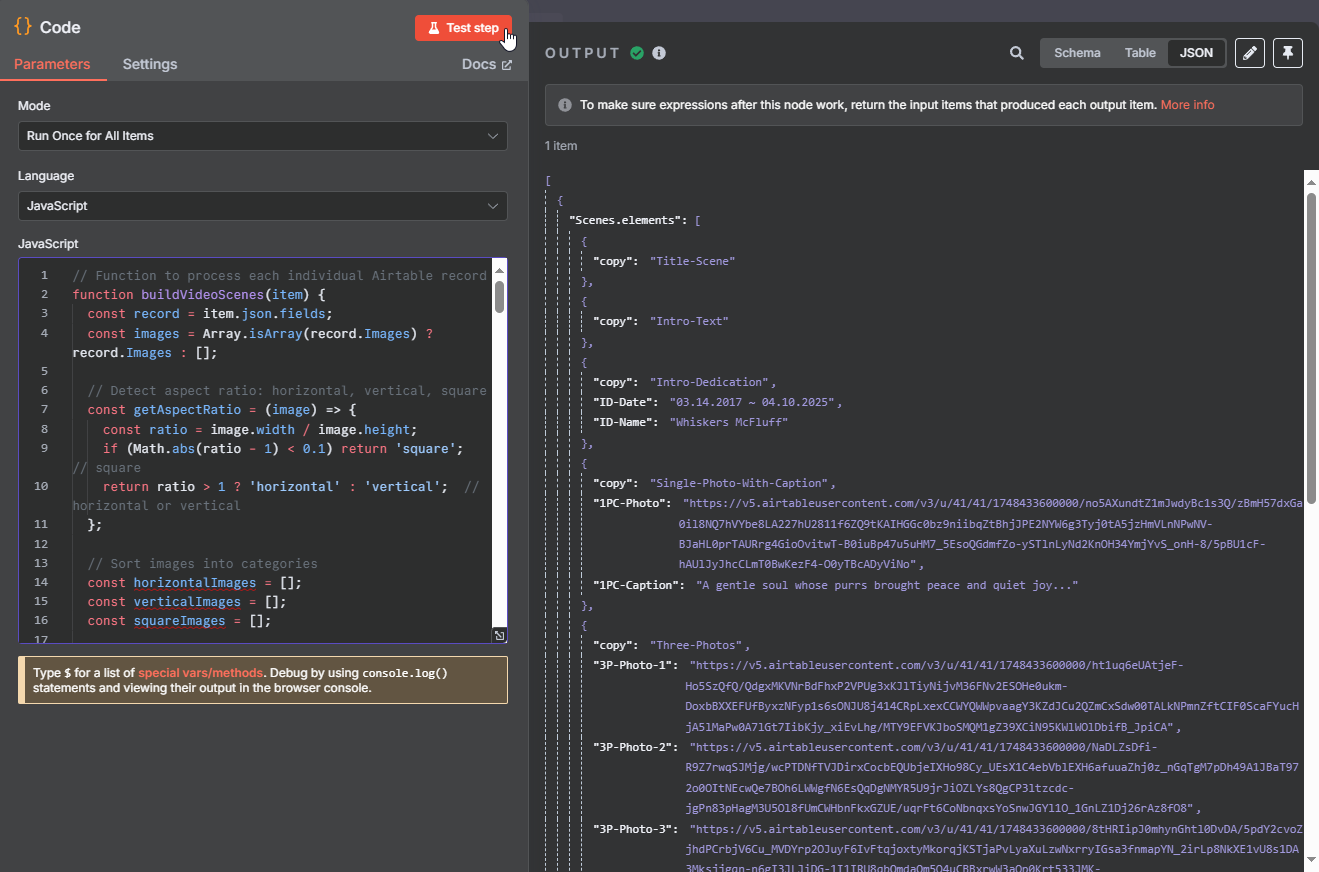
The code ensures each video follows a consistent structure. It always begins with four fixed scenes: Title-Scene, Intro-Text, Intro-Dedication, and Single-Photo-With-Caption. After these, it inserts a randomized selection of image scenes, aiming to match each image's aspect ratio whenever possible. The video then closes with two final fixed scenes: Farewell-Message and Final-Tribute.
If everything is working correctly, you'll see this exact structure in the output. The number of images in the render script should also match the number of images you uploaded to Airtable.
Did it work? Great!
In the next step, we'll use this render script to generate the actual video.
Note: The code automatically considers image aspect ratios when selecting scenes. Some scenes are better suited to vertical images (like Three-Photos and Two-Photos), while others are ideal for horizontal images (such as Multiple-Photo-Parallax and most Single-Photo scenes).
For more variety in your videos, try uploading a mix of vertical and horizontal images. This gives the workflow more flexibility and prevents the same scene types from being repeated. Of course, you can always tweak the code to better match your content or creative style.
5. Render the video
Now it's time to bring everything together. We'll use the render script from the previous step to send an API request to Creatomate to generate your video.
Add an HTTP Request node to your workflow.
Set Method to POST and enter the following URL: https://api.creatomate.com/v1/renders
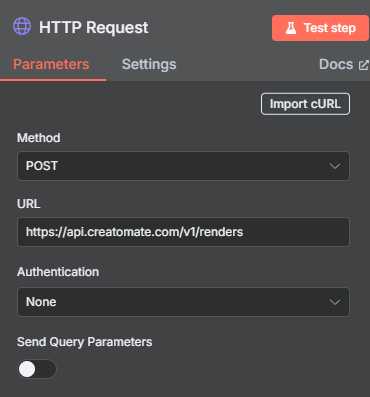
Toggle the Send Headers switch. Set the header name to Authorization, and paste Bearer followed by your API key, making sure there's a space between them. You can find your API key under Project Settings in your Creatomate dashboard.

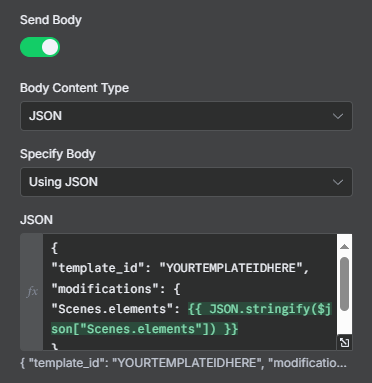
Next, toggle the switch for Send Body. Set Body Content Type to JSON and Specify Body to Using JSON. Then, copy and and paste the following JSON payload:
{

  "template_id": "YOURTEMPLATEIDHERE",

  "modifications": {

    "Scenes.elements": {{ JSON.stringify($json["Scenes.elements"]) }}

  }

}
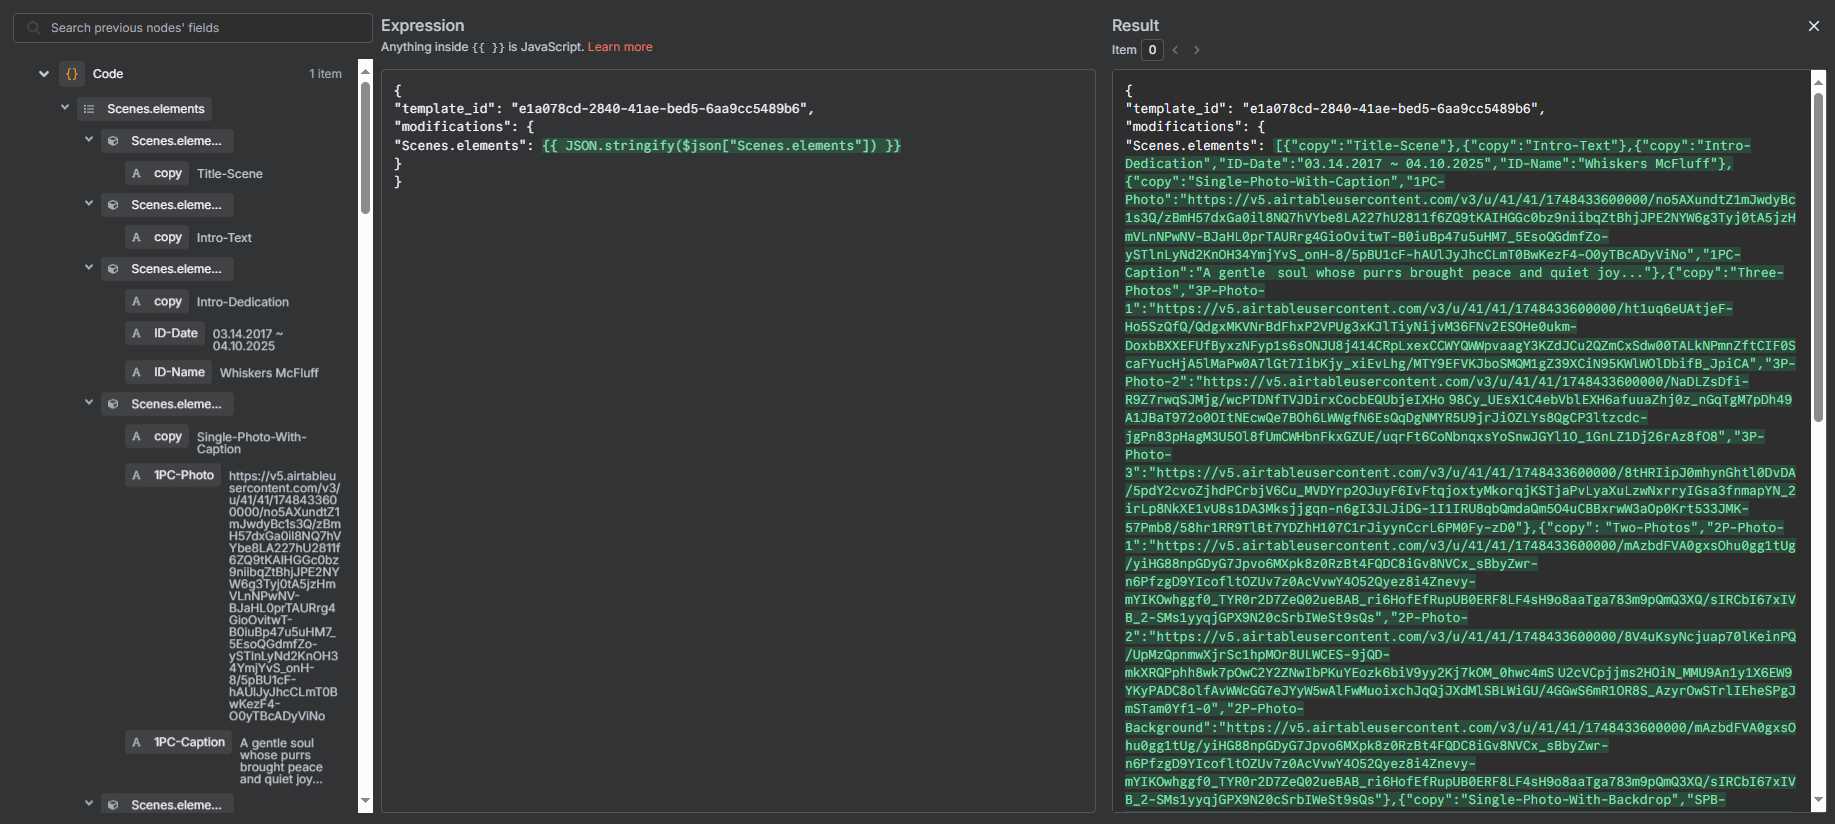
Make sure to replace “YOURTEMPLATEIDHERE” with your actual template ID. You can find this ID in your browser's address bar when the template editor is open:

You should see the render script from the previous step automatically inserted.
When viewed in full screen, it should look like this:
Once everything is set up, click Test step. In the output, you should receive a response with the "status": “planned”. This means Creatomate has accepted your request and is now processing the video:

You'll also find a URL in the response. This is the direct link to your video once rendering is complete. If you try to open the link immediately, you might see a “Not Found” message. That's normal; it simply means the video is still being processed.
The time it takes to generate a video depends on its length and complexity, which varies because the render script is dynamically created from your Airtable data.
Since we can't predict exactly how long the rendering will take, we'll set up a tracking system in the next step to monitor the video's status.
6. Wait for the render to complete
If the next node tries to use the video URL before rendering is finished, it could cause an error. To avoid this, we'll add a Wait node to pause the workflow briefly. After the pause, we'll check the video's status and handle it accordingly.
Add a Wait node.
Set it to resume after a 60-second interval:
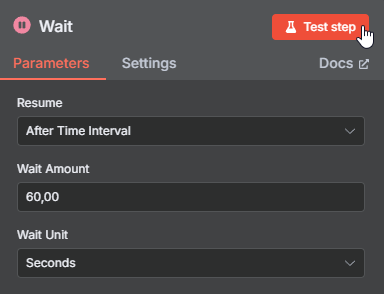
Then, click Test step and wait for it to finish.
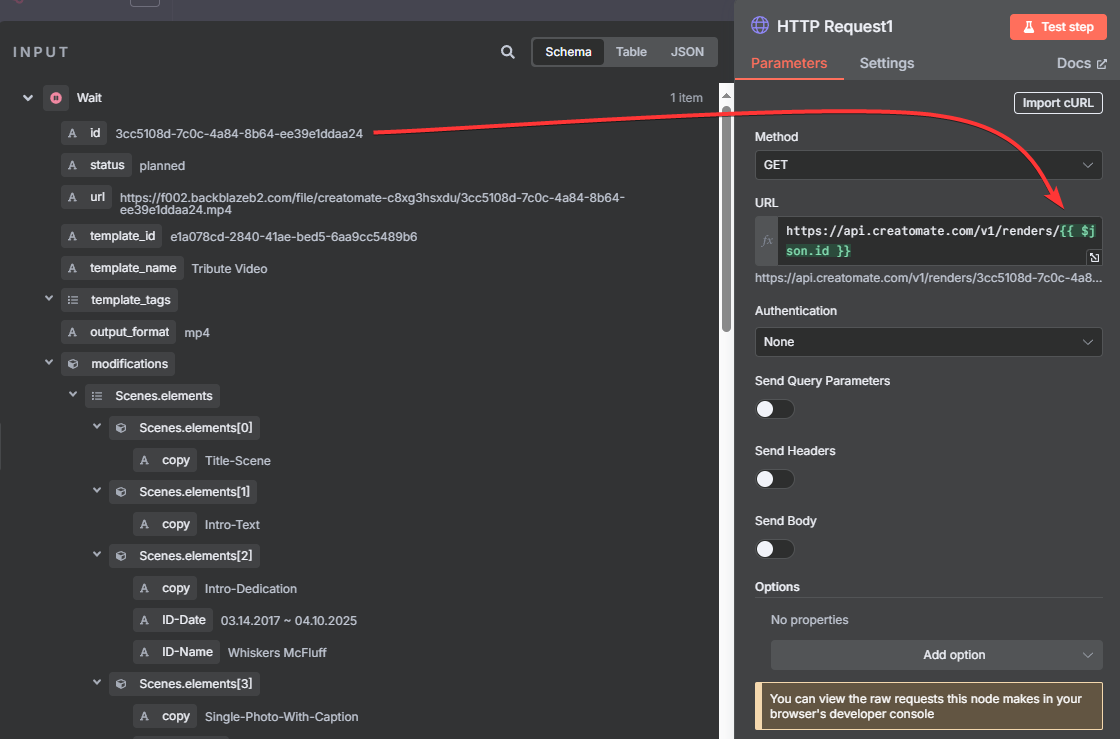
Next, add another HTTP Request node.
Set Method to GET and enter the following URL: https://api.creatomate.com/v1/renders/[ID]
Replace the [ID] placeholder with the id value returned from the previous step, and make sure there are no spaces in the URL:
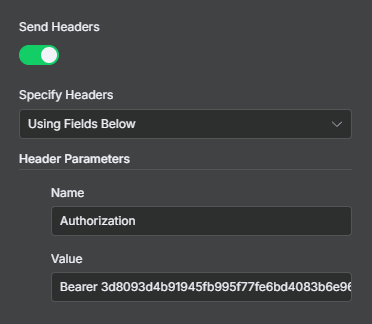
Next, toggle the Send Headers switch. Set the header name to Authorization, and paste Bearer followed by your API key:
Click Test step. If everything is working, the response should show a status of "succeeded", which means the video is ready to use. If it shows "rendering", the video is still being processed. Wait about a minute and test the step again.
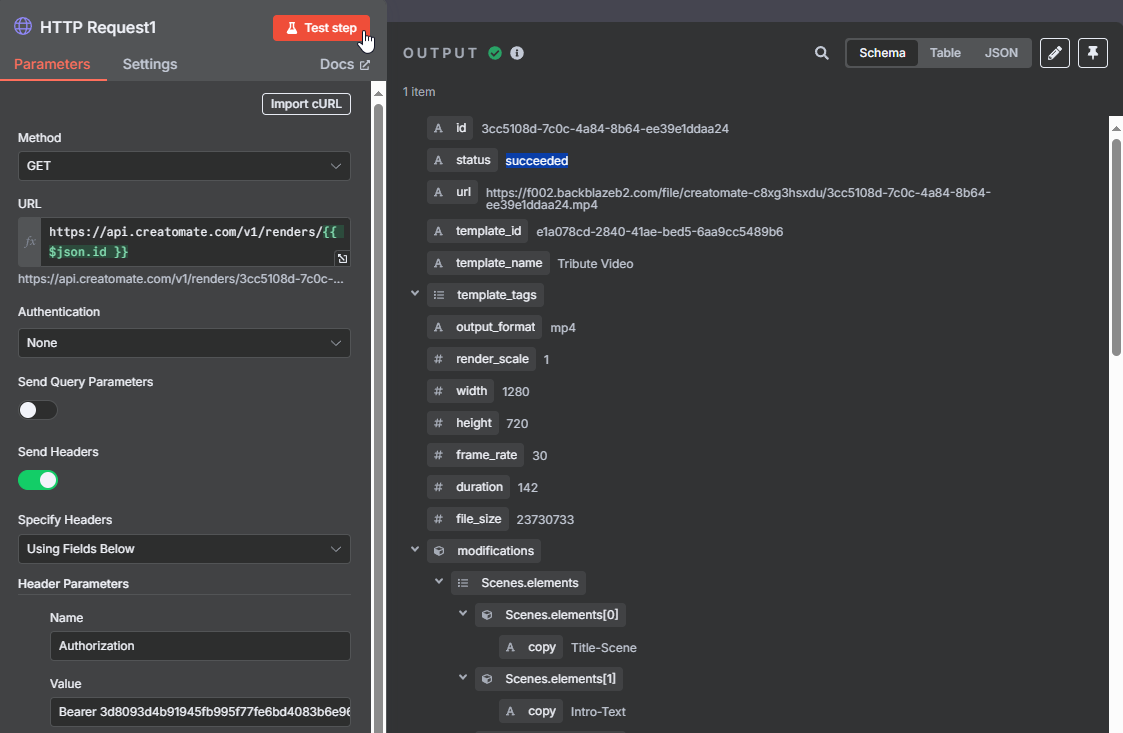
A "succeeded" status is what we're aiming for. However, some videos may take longer to render, or an error could occur during the process. Because the API can return multiple statuses, we need to handle each one properly.
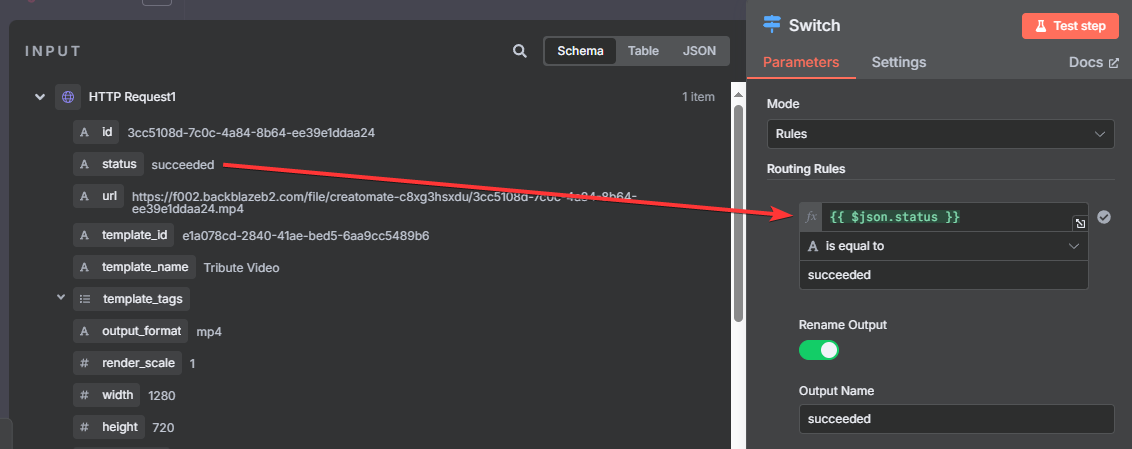
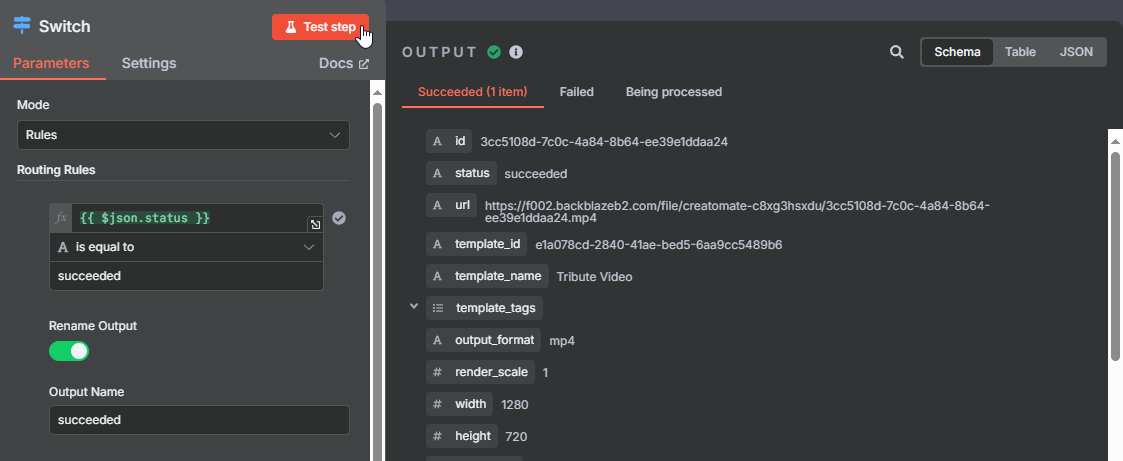
To do this, add a Switch node.
Let's start with the successful renders. Create a routing rule where ‘status' is equal to ‘succeeded' and rename the output to succeeded:
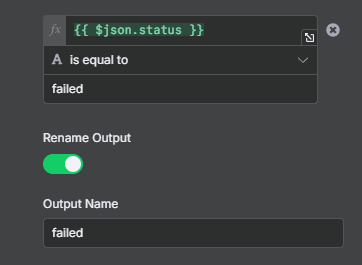
For failed renders, add a routing rule where the ‘status' is equal to ‘failed', and rename the output to failed:
Finally, some statuses indicate the video is still in progress, not yet completed or failed. Since we want to handle these renders the same way, we'll group them into a single route.
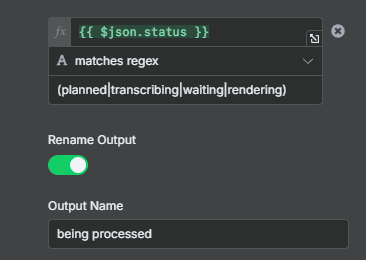
Add another routing rule, select the 'status', and set it to matches regex with the following values: (planned|transcribing|waiting|rendering). Then, rename the output to being processed:
Click Test step. If the render is complete, it will follow the "succeeded" branch:
In the next step, we'll update the Airtable record with the video URL and cover how to handle cases that fall into the "failed" or "being processed" branches.
7. Use the video
Now that your video is complete, let's update the corresponding Airtable record with its link.
Tip: If you want to use the video in a different way, that's no problem – just use its URL wherever you need it. Some services, like YouTube, require the actual video file instead of a link. In that case, you'll need to download the file first. You can find instructions for that in step 6 of this tutorial.
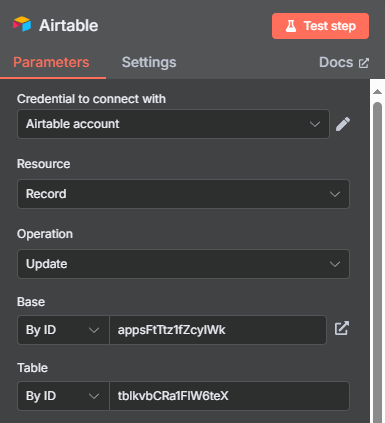
After the “succeeded” branch, add another Airtable node and choose the Update record action.
Use the same Airtable connection you set up for the trigger node.
Set Resource to Record and Operation to Update.
For the Base and Table fields, enter the same values you used for the trigger node:
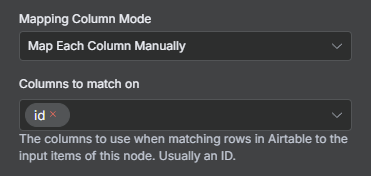
Next, set Mapping Column Mode to Map Each Column Manually. For Columns to match on, choose id:
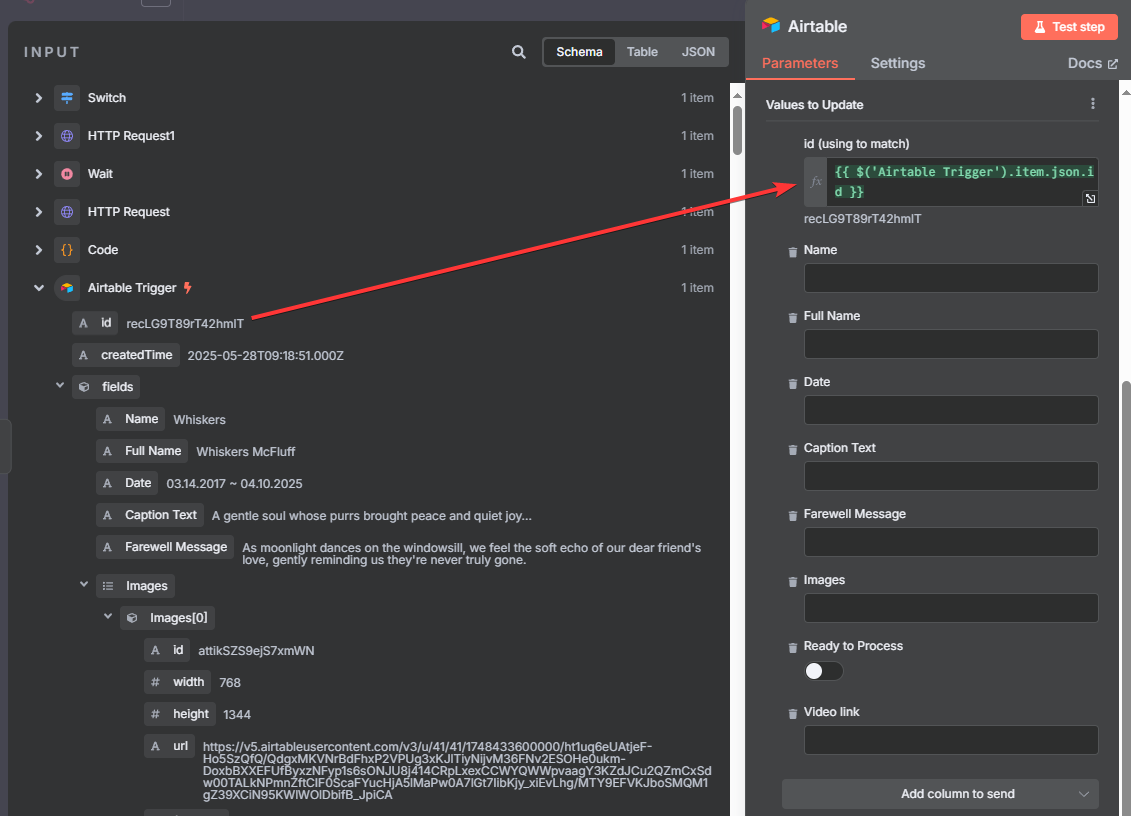
Under Values to Update, map the record id from the Airtable trigger to the id (using to match) field:
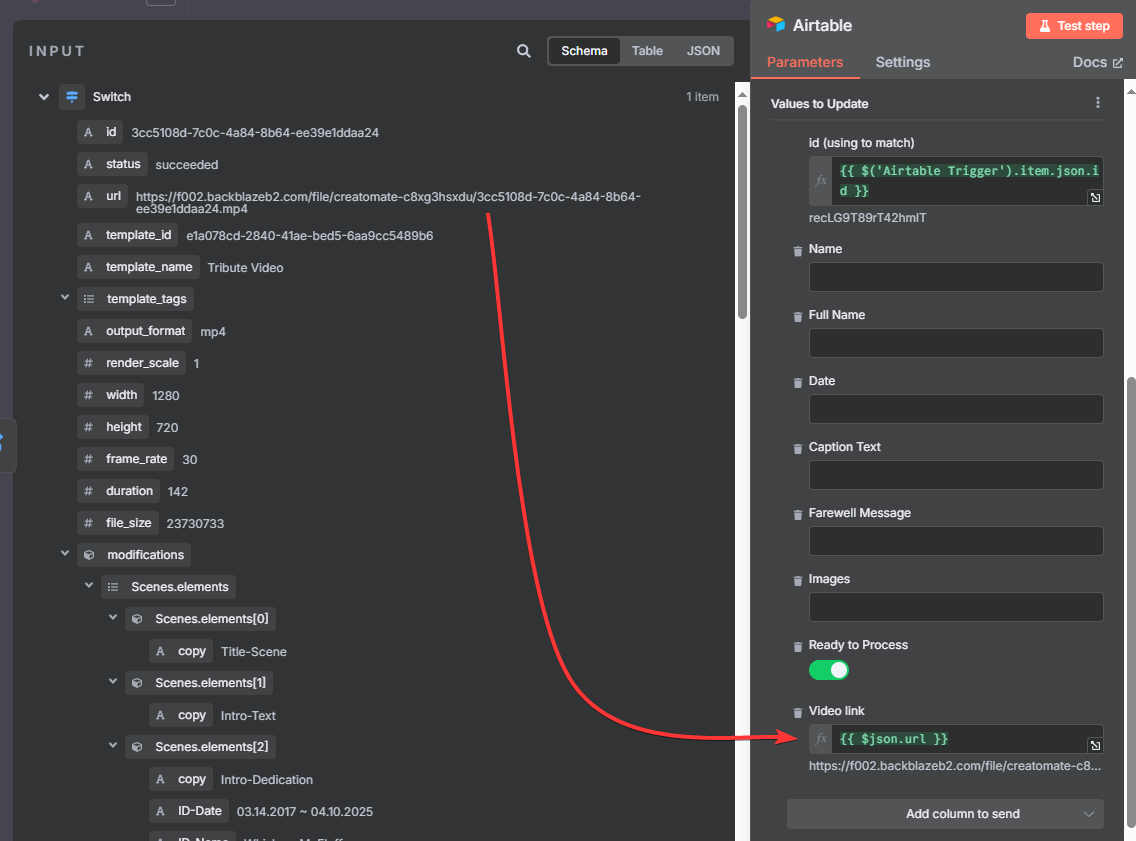
Then, toggle the Ready to Process checkbox to on. This step is important: if you leave it off, the update unchecks the box, which refreshes the Last Modified time. That refresh causes the trigger to run again, creating another video.
And for the Video link field, map the url from the Switch node:
Once everything is mapped, click Test step.
Check your Airtable base to confirm that the record has been updated with the video link.

You can now click on the link to watch your video. Here's mine:
Let's also look at the other two branches.
If the video isn't ready after the first check, it follows the “being processed” branch. In this case, we need it to retry automatically by looping through the Wait and Check Status nodes until the status changes to either "succeeded" or "failed".
To configure this loop, connect the “being processed” branch back to the Wait node:
Finally, let's prepare for situations where a video render fails. Errors can happen – for example, if an image element expects a public image URL but instead receives plain text or a webpage link. In these cases, the video can't be generated, and we'll need a way to get notified so we can fix the issue quickly.
After the “failed” branch, add a notification node. Feel free to use any app you like; here, I'll demonstrate using Gmail with the Send a Message action.
Start by creating a Gmail connection.
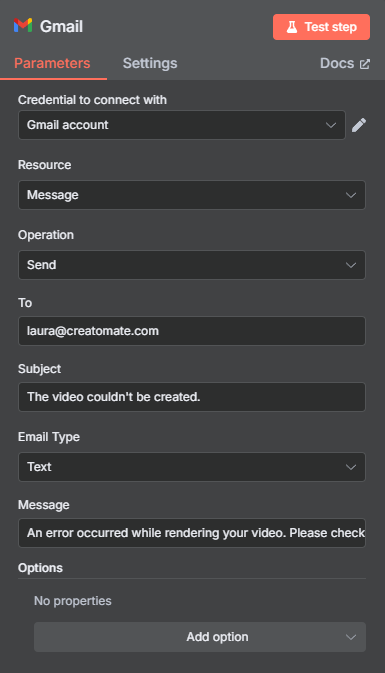
Then, set Resource to Message and Operation to Send.
Enter the recipient's email address, write a clear subject line, and choose the email type. For the message body, you can use something like:
An error occurred while rendering your video. Please check the API Log page in your Creatomate dashboard for details.
You won't be able to test this step right now because there's no test data for the “failed” branch (our test video followed the “succeeded” route).
However, if an error occurs later, you'll see messages like this on the API Log page:
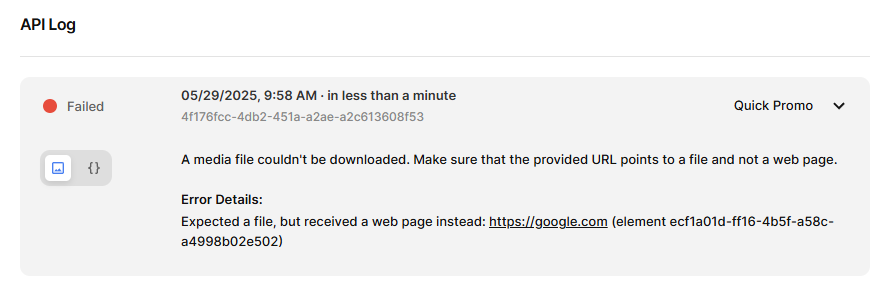
And that's it! Don't forget to save your workflow.
What's next for video creation with n8n
Congratulations – you've completed the tutorial!
Now that you understand how the workflow operates, you can start customizing it for your own projects.
The JavaScript code in step 4 is tailored to the Airtable base we created, using its exact field names. If you want to use a different Airtable base or trigger, you'll need to adjust the code to match your setup. You can also modify the logic to select scenes or apply your own rules for video creation.
Another exciting direction is integrating generative AI into your workflows. For example, you could generate AI voiceovers to narrate your stories and automatically add animated subtitles to your social media videos.
Check out these tutorials to learn more:
👉 How to Automatically Add Subtitles to Videos with n8n
👉 How to Create Videos with AI Voice Overs using n8n
You might also like these tutorials


Start automating today
Start with a full-featured trial with 50 credits, no credit card required.
Get started for free →