How to Create Videos with Airtable

In this tutorial, you'll learn how to set up a workflow with Airtable and Creatomate to automatically generate social media and other marketing videos from your data.
With Airtable, businesses can create custom applications from spreadsheets and databases. With its versatility, the product is suited for a variety of uses, including social media, project management, CRM, blogging, outreach, and more. All these marketing methods rely on video these days, don't they? But leaving Airtable, opening a video editor, creating each video by hand, and uploading them to Airtable is a hassle. Are we really supposed to go through all that?
Definitely not - there's a better way! This is where video automation comes in handy. With the click of a button, you can create social media and marketing videos from your data within Airtable. Therefore, we'll use Creatomate, which is a video generation API to automate and scale video production with code and no-code tools. In this tutorial, you'll learn how to set up a simple workflow that automatically generates videos using Airtable and Creatomate.
Let's make videos like this. But that's just an example. As a basis for your videos, you can pick a pre-designed template from the gallery or use the template editor to create your own video designs.
Tip: It's possible to make videos with spreadsheet tools like Airtable, but we recommend Creatomate's spreadsheet feature instead. There are a lot of extras, like previewing your videos, using multiple templates, making videos in bulk, and more - as it's specifically designed for video creation. Want to know how it works? Check out this tutorial.
Prerequisites
To follow along, make sure you have accounts for these tools:
- Airtable: to add automated video creation to your workflows.
- Creatomate: to auto-generate videos. Don't have an account? Sign up for free.
How to create videos using Airtable?
Our first step is to create a template in Creatomate. This will be the basis for the videos. We'll use a ready-made template from the gallery. But it's optional to customize the template (or design your own from scratch) using keyframes, (text) animations, transitions, and more.
Next, we'll create a simple table in Airtable. We'll add fields for input data and add a script so Creatomate can make videos for us. Don't worry, we've prepared an easy-to-use script for you.
Note: This is just a simple example to show you how it works. Once you get the concept, you can apply it to your own situation.
1. Create a video template in Creatomate
Log in to your account or create your free account first. Go to the Templates page and click the + New button. You can choose a template from the gallery or design your own. For this tutorial, let's go with the Quick Promo template from the Featured category. If you want, you can change the size, then click Create Template:
You can customize the template according to your needs. However, let's keep things simple and use the template as-is.
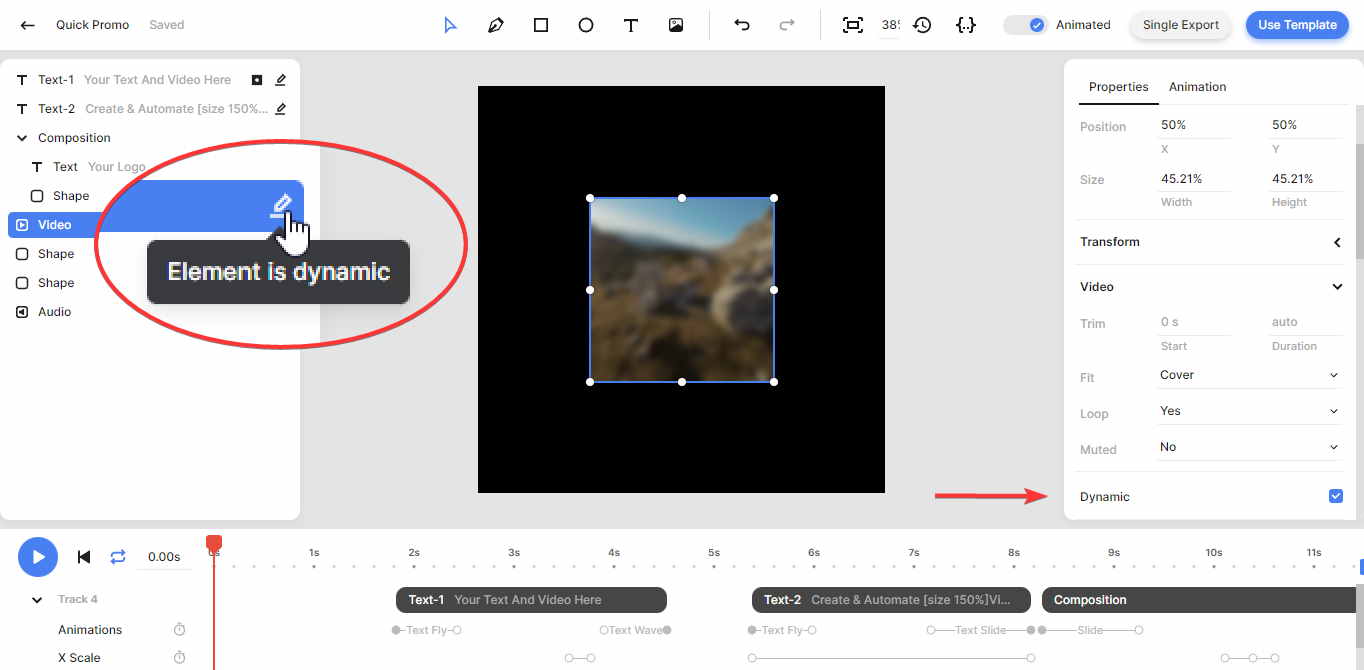
It's important to know that our template has dynamic elements. From the left side menu, we can see that Text-1, Text-2, and Video are dynamic. Almost any element can be (un)marked as dynamic in the properties panel on the right. We can replace the content of these elements with Airtable data to make unique videos. That's exactly what we'll do in the next steps, so let's move on!
2. Create a base and table in Airtable
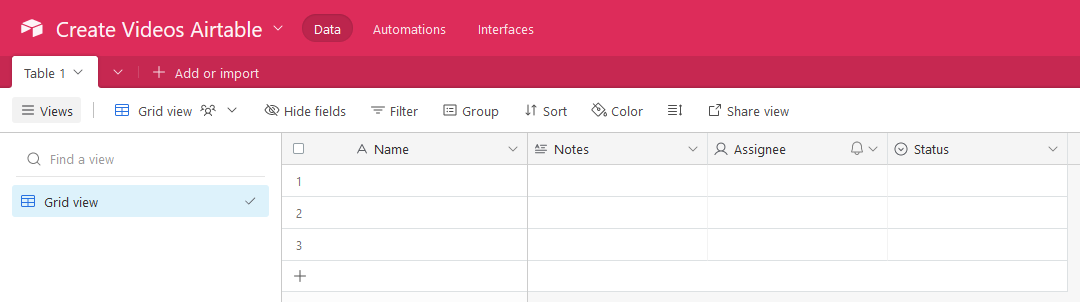
Log in to your Airtable account. Let's create a new base called Create Videos Airtable and a new table called Table 1. Once you understand the concept, you can apply it to existing tables. So here's where we start:
Do you remember the dynamic elements from our template: Text-1, Text-2, and Video? We'll create a field for each. It's necessary to start the field name with a #, so that our script can recognize it and connect it to the template. We'll leave the primary Name field as-is and change the other three. Click the drop down icon and click Edit field to create these fields:
- #Text-1 -> Single line text
- #Text-2 -> Single line text
- #Video -> Attachment

Next, we'll add the script to generate videos. It might sound complicated and technical, but it's just a matter of copying and pasting.
3. Add the video generation script
Here we'll add a field with a Create Video button and a field to put the video back in. A script behind the button instructs Creatomate what video to create and returns a link to the video.
Note: It's important to name the fields exactly like this, as it corresponds to the script.
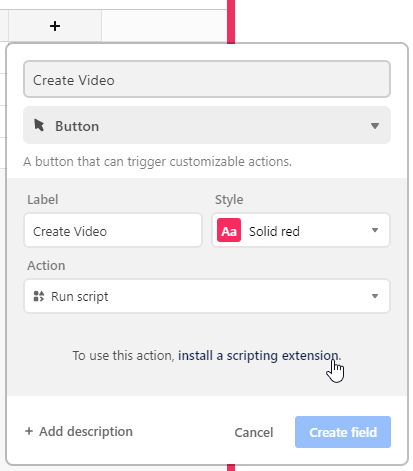
Click + to add another field. Name it Create Video and select the Button field type. Let's set the label to Create Video and choose a style for the button. For the Action, select Run script. Finally, click the install a scripting extension link.
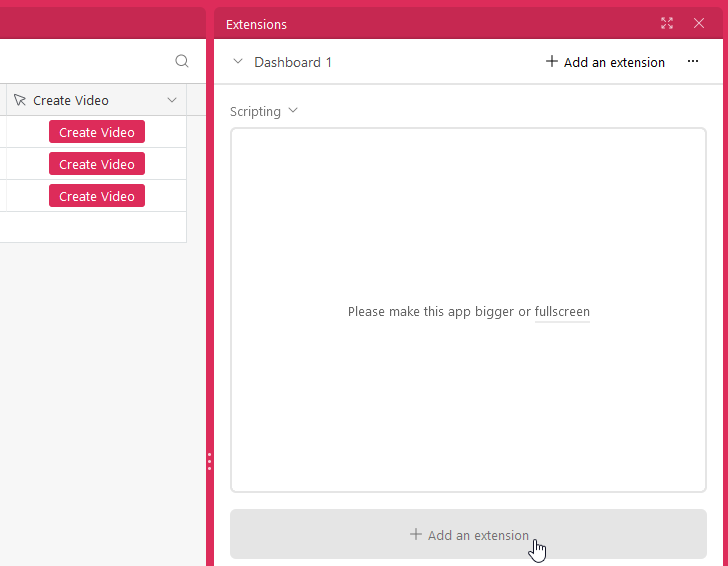
From the pop-up, click Add extension. Then, click Create Field to save it. We can now see that a button has been added to the Create Video field and that an extension area has been added to the right. Let's click + Add an extension:
Go with the Scripting extension on the top right:

Then click Add extension in the next screen to open the script editor. Remove the default code and paste the following script:
1// Insert your own Airtable table name and Creatomate template ID:
2let table = base.getTable("Table 1");
3let templateId = "149a95a7-823c-4999-87c4-32f3215e5ffc";
4
5let dynamicFields = table.fields.filter(field => field.name.startsWith("#"));
6let query = await table.selectRecordsAsync({ fields: dynamicFields });
7
8let record = await input.recordAsync("Select a record to use", table);
9if (record) {
10  let url = `https://api.creatomate.com/v1/direct.mp4?template_id=${templateId}` +
11    `&output_format=mp4&version=${new Date().valueOf()}`;
12
13  for (let field of dynamicFields) {
14    let elementName = field.name.slice(1);
15    let cellValue = record.getCellValue(field);
16
17    if (Array.isArray(cellValue) && cellValue[0].url) {
18      url += `&${encodeURIComponent(elementName)}=${encodeURIComponent(cellValue[0].url)}`;
19    } else if (typeof cellValue === "string") {
20      url += `&${encodeURIComponent(elementName)}=${encodeURIComponent(cellValue)}`;
21    }
22  }
23
24  output.text("Your video is being created. Please wait...");
25
26  await table.updateRecordAsync(record, { "Video URL": "" });
27
28  await fetch(url);
29
30  await table.updateRecordAsync(record, { "Video URL": url });
31
32  output.text('Done.');
33}
In the top section, we will need to ensure that the table name is Table 1, and we need to replace the template ID with our own:

The template ID can be found in the URL from the template editor:

Tip: If you're using multiple scripts in your dashboard, you might want to rename this one. If you do, make sure the right script is connected to the Create Video field!
When done, click Finish editing and then click X in the top right corner:

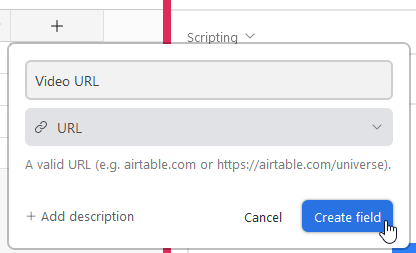
Last but not least, we need to add a field to store the video URL. So click + to add a new field, name it Video URL and select the URL field type. Then click Create field:
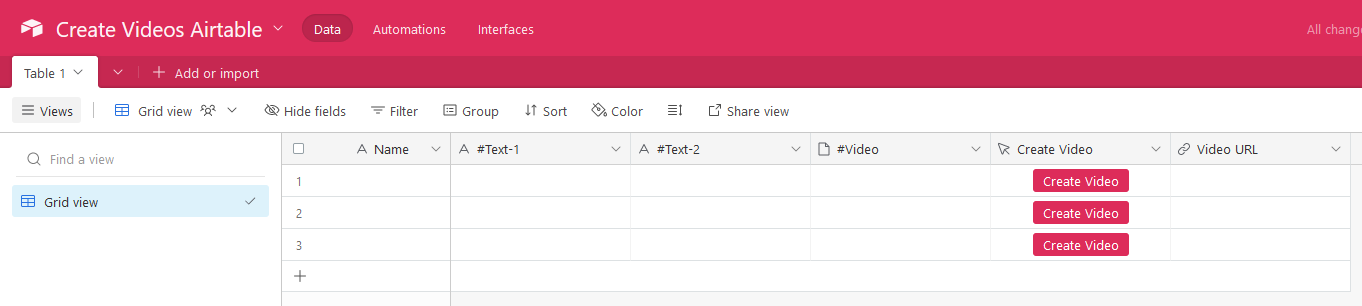
You're still there, right? Great job! The hard part is already done. At this point, our table should look like this:
The table is ready to generate videos, so we'll do that next.
4. Create videos with your Airtable data
Now that we're set up, let's make some videos. For the first record, we'll enter some text in the #Text-1 and #Text-2 fields, and upload a video in the #Video field. Then click the Create Video button:

The extension says Your video is being created. Please wait.... Now Creatomate will generate the video. Once the extension says Done, the video is ready, and a link to the video will appear in the Video URL field. Click that link to view the video:
You can download the video or use it within your Airtable workflows.
Make as many videos as you want. It's just a matter of entering your data and hitting the button. But, you can only create one video at a time. That means you can't make a new video until the previous one is complete.
Wrapping up
That's it, you're done! This is how you make videos with Airtable. But you can create videos much easier by using Creatomate's spreadsheet feature. Since it's specifically designed for generating videos, it has significant advantages over Airtable.
Everything's built-in, so it's much more convenient to generate videos this way. Within a few clicks, a spreadsheet is created based on your templates' dynamic elements. So you don't have to set up a new base and table. Scripts aren't needed here either. You can also import your existing data into this spreadsheet to create videos. Even better, you can preview the videos before creating the final version and you can create videos in bulk. Additionally, you can also process the videos with Zapier and Make workflows.
So, if you love Airtable, it can be used for video creation. Nevertheless, it is worth trying Creatomate's spreadsheet feature as well so you can determine which solution will work best for you. Check out this tutorial and you will see how easy it is.
Happy automating!
You might also like these tutorials


Start automating today
Start with a full-featured trial with 50 credits, no credit card required.
Get started for free →