How To Create Videos From Google Spreadsheets

Learn how to turn Google Sheet data into videos for social media, advertising, personalization, and more using no-code video automation.
Google Sheets is a popular tool among businesses to manage and store various types of data, including leads, products, quotes, tips, facts, etc. You may intend to use some of this data for marketing purposes, such as creating videos for social media, advertising, personalized sales outreach, and so on. Manual video creation, however, can be a really tedious process. So, if you're looking for a more efficient way to generate video content from your Google Sheets data, we have an excellent solution for you.
Marketing videos usually have the same designs, but vary only in content, which makes them ideal for automation. Although this may seem technical, you do not require any technical skills at all. Creatomate is a video generation platform that provides an API and no-code tools to automate and scale video production. By creating a video template that serves as the foundation for your videos, you can effortlessly convert your Google Sheets data into videos within minutes. This tutorial will show you how.
We will create videos like the one below. Do you have anything else in mind? There are a lot of ready-made templates in the gallery that you can use. And try out the editor too, which lets you create your own designs.
Do you want to automate your entire workflow? Check out this tutorial that uses Zapier and Google Sheets to create videos automatically.
How to generate videos with Google Sheets
To follow along, make sure you've got a Creatomate account. You can create your free account here.
The first thing we'll do is download our Google Sheets document. Next, we'll make a video template. This design will serve as the foundation for our videos. We will then create a feed. In essence, this is a spreadsheet that generates videos based on a template and some data. We're going to import our Google Sheets data here. After that, we'll be able to make videos in just a few clicks. The videos can then be downloaded or imported back into Google Sheets.
Let's get started!
1. Download your Google Sheet as a CSV
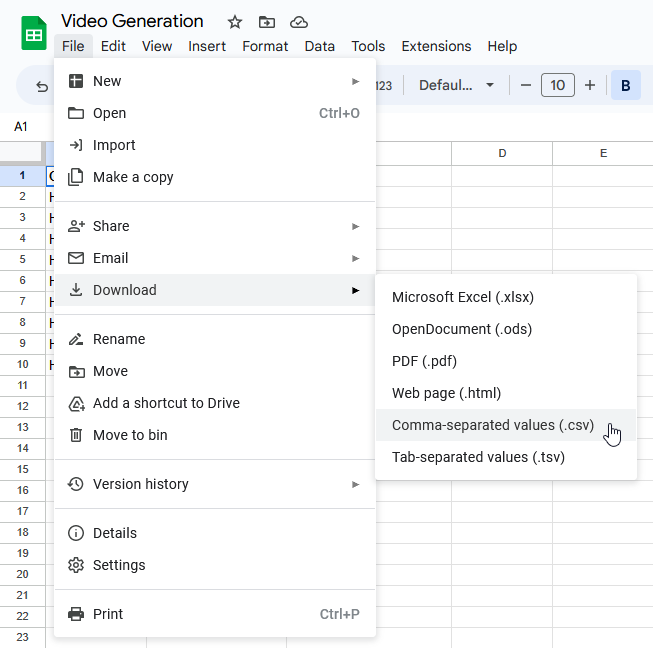
From your Google Sheet document, click File in the top left corner. Then, click Download and select the Comma-separated values (.csv) option:

The CSV file will be downloaded to your computer. We'll use it in a later step. But first, let's create a video template.
2. Create a video template in Creatomate
Log in to your account and navigate to the Templates page. Click the + New button to browse the template gallery. You can choose any template you want or design your own from scratch. But for this tutorial, let's use the Quick Promo template from the Featured category. The 1:1 Square size is fine for now, but you can pick any size you want. Click Create Template to open it in the editor:
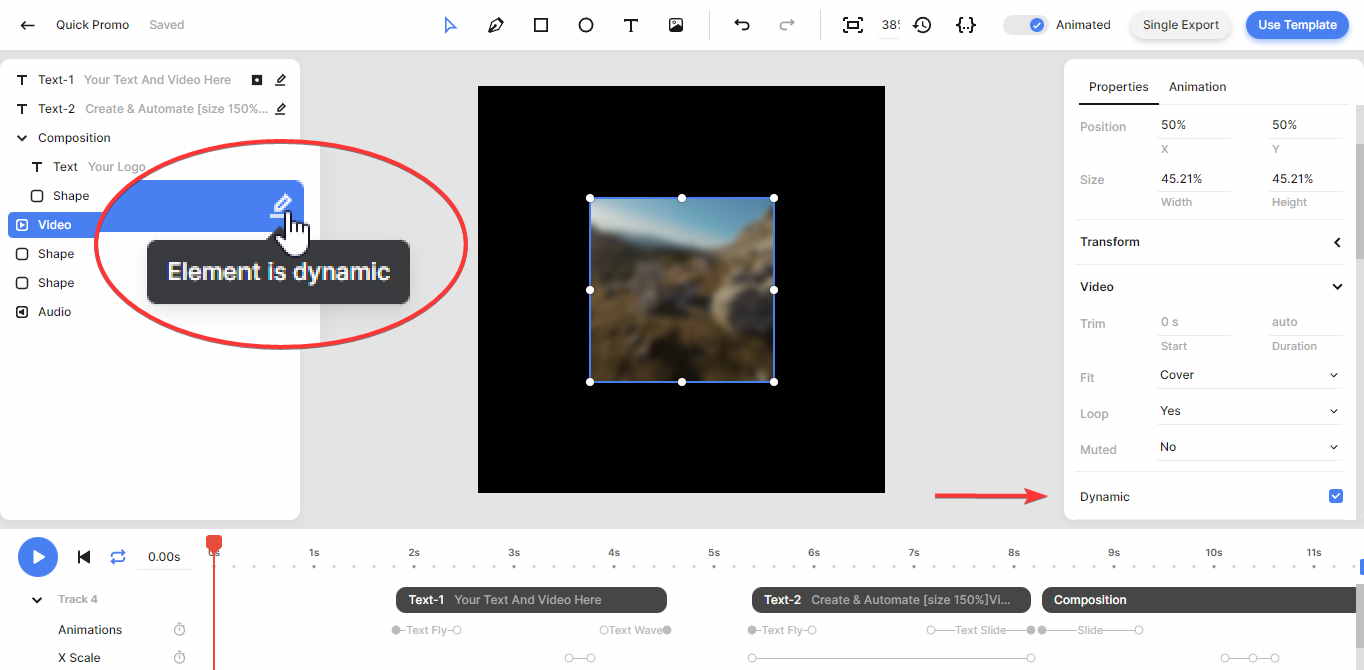
In the left-hand panel, you can see the elements that make up our template. It's important to know that elements can be marked as dynamic. In our template, Text-1, Text-2, and Video are dynamic. This means we can replace its content with text and media from our Google Sheet, using the feed that we'll create in the next step:

You can customize the template to suit your needs. But to keep things simple, I'll use it as-is. Next, let's create a feed.
3. Create a feed
Click the Use Template button at the top right of the template editor. Click on Spreadsheet to Video and select Create new feed. After clicking Continue, we'll be taken to the newly created feed:
Think of the feed as a spreadsheet for generating videos based on a template. As you can see, the template's dynamic elements are mapped to the columns of the feed: Text-1, Text-2, and Video. As soon as we import our Google Sheets data, every row will become a unique video.
Let's click Import Data and upload the CSV you downloaded in step 1. We can now map the columns from our Google Sheet to the columns in the feed. Then, click Continue. It's optional, but recommended, to select a merge column with unique data, like Text-1. Then, click Continue. The summary tells you how many rows will be imported. After you've confirmed this, click Import Data to add your Google Sheets data to the feed:
Note: This example doesn't replace the video element. So all videos contain the template's video clip.
Once your data is imported, make sure to click Save. The status column says No Render. This means your data is saved but no video has been generated (which is called a render). Our next step will be to render and download the videos.
4. Render and download the videos
On the right, you can see a preview of each row's final video. Once you're happy with the results, we'll proceed with rendering the videos. Select several rows, click × Rows Selected, and click Create Renders. When the status indicates Rendered, the videos are ready:
Now there are two ways to get the videos: download them to your computer, or export the entire feed - including data and renders - and import it back into Google Sheets. I'll show you both.
Let's download the videos first. We'll select some rows, click × Rows Selected, then Download Renders. From the popup that appears, select a file name based on one of the columns, and then click Download. A ZIP file will be downloaded to your computer:
Tip: You can also use the Create render and Download render buttons below the preview if you just want to render and download one video.
The other way is to import the feed into Google Sheets. Let's click Export Data and select the columns you want to export. Since we haven't used the Video column, let's uncheck it. Then, click Continue. Make sure our Quick Promo template is selected and click Continue. The summary tells us what we're about to export. Click Export Data to download a CSV file to your computer:
Now, we can import this CSV into our Google Sheets. From your Google Sheets document, click File, select Import, click Upload, and select the CSV file from your computer. Then, on the Import file pop-up, select Insert new sheet(s) as the Import location and click Import Data. A new sheet will be added, which includes a URL to the rendered video for each row:
Now that you have your videos, you can use them wherever you want.
Wrapping up
Thanks to video automation, it is quite easy to create videos from a Google Sheets file. All you have to do is design a reusable template once, then import the Google Sheets data into Creatomate's feed. In just a few clicks, you've got your videos.
If you want even more automation, you can connect Google Sheets to Zapier. This way, you can set up an automated workflow to generate a video every time a row is added to your Google Spreadsheet. You can then update the row with the video URL, or you can post it directly to social media, email it, or save it to Google Drive, for example. Take a look at this article next to find out how it works.