The Timeline in RenderScript
The timeline determines when elements appear in your video. This only applies to MP4 and GIF files – the timeline does not apply when creating JPEG or PNG images.
Each element has its place on the timeline. There are three attributes that define this placement: time, duration, and track. You can omit any of these attributes; in that case, Creatomate will assign these values automatically.
Time and duration
The time and duration properties let you specify exactly when an element appears in your video. In the example below, a text element appears at the 2-second mark and remains visible for 4 seconds:
{
  "output_format": "mp4",
  "width": 1920,
  "height": 1080,
  "elements": [
    {
      "type": "text",
      "time": 2,
      "duration": 4,
      "text": "This element is shown in the video from 00:02 to 00:06."
    }
  ]
}
When you don't specify a time or duration, these values are calculated automatically. For instance, if you have a 5-second input video and want your output video to adapt to this length, you can simply omit the duration parameter:
{
"output_format": "mp4",
"width": 1920,
"height": 1080,
"elements": [
{
"type": "video",
"source": "https://cdn.creatomate.com/demo/5-second-video.mp4"
}
]
}For more information about auto-arrangement, see the template editor documentation.
Tracks
Tracks allow you to arrange elements to play in sequence. When multiple elements share the same track number, they play one after another.
In this example, both videos share the same track, causing the second video to begin immediately after the first one finishes:
{
"output_format": "mp4",
"width": 1920,
"height": 1080,
"elements": [
{
"name": "Video-1",
"type": "video",
"track": 1,
"source": "https://cdn.creatomate.com/demo/video1.mp4"
},
{
"name": "Video-2",
"type": "video",
"track": 1,
"source": "https://cdn.creatomate.com/demo/video2.mp4"
}
]
}
Let's expand this example by adding a text element without specifying a track number. In this case, RenderScript automatically assigns this element to its own unique track:
{
"output_format": "mp4",
"width": 1920,
"height": 1080,
"elements": [
{
"name": "Video-1",
"type": "video",
"track": 1,
"source": "https://cdn.creatomate.com/demo/video1.mp4"
},
{
"name": "Video-2",
"type": "video",
"track": 1,
"source": "https://cdn.creatomate.com/demo/video2.mp4"
},
{
"name": "New-Text-Element",
"type": "text",
"text": "This text element is assigned its own track."
}
]
}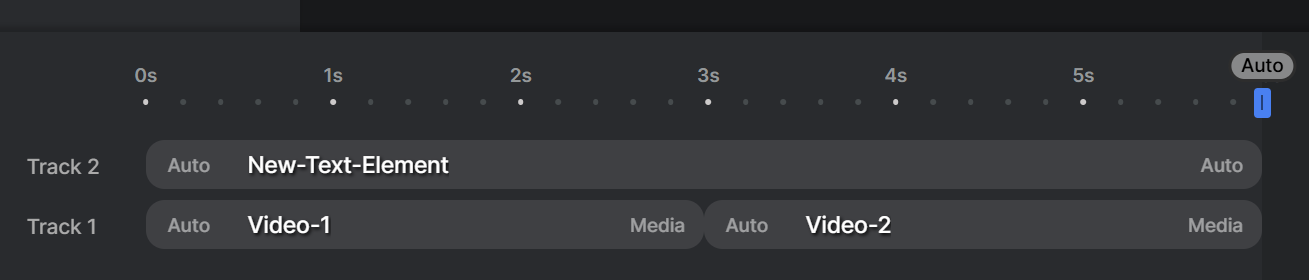
Notice how the text element is automatically positioned on track 2. In this arrangement, the duration of track 2 adapts to match track 1, which in turn spans the combined length of both video elements.
Compositions
Compositions help you organize your timeline by creating self-contained groups of elements. Each composition has its own set of tracks, allowing you to build modular segments in your project.
A practical example is pairing voice-over audio with a background image. Using a composition, you can make sure the image remains visible for exactly as long as the audio plays, without having to manually provide their timing:
{
  "output_format": "mp4",
  "width": 1920,
  "height": 1080,
  "elements": [
    {
      "name": "Scene-1-Composition",
      "type": "composition",
      "track": 1,
      "elements": [
        {
          "name": "Scene-1-Voiceover",
          "type": "audio"
        },
        {
          "name": "Scene-1-Picture",
          "type": "image"
        }
      ]
    },
    {
      "name": "Scene-2-Composition",
      "type": "composition",
      "track": 1,
      "elements": [
        {
          "name": "Scene-2-Voiceover",
          "type": "audio"
        },
        {
          "name": "Scene-2-Picture",
          "type": "image"
        }
      ]
    }
  ]
}
An important aspect of video automation is handling varying input lengths. As shown in the previous examples, RenderScript enables you to create a timeline that automatically adjusts based on its content. See these pages to learn more: