How to Create Videos with AI Voice Overs using Python

Learn how to automate videos with AI voiceovers, animated subtitles, and dynamic visuals using Python, ElevenLabs' text-to-speech API, and Creatomate.
AI voiceovers are a powerful tool for creating videos with spoken content – perfect for social media, product explainers, tutorials, and marketing campaigns. In this guide, you'll learn how to automate the entire process using Python.
Your script will define the text for the voiceover and provide the images or video clips to include. We'll use ElevenLabs to convert the text into natural-sounding speech, and Creatomate to bring everything together into a styled video. Subtitles are handled automatically – Creatomate transcribes the audio and generates animated, word-by-word captions for you.
By the end of this tutorial, you'll have a fully automated workflow that generates videos like this:
Want a different look? Creatomate's template editor lets you fully customize the style, layout, and animations to match your brand or format.
Prerequisites
These are the tools we'll use:
- Python3. Install it from the official Python website if you don't have it already.
- ElevenLabs. For generating AI voiceovers.
- Creatomate. For creating a video design and generating the voiceover videos.
You'll also need a terminal or code editor where you can run Python scripts, such as VS Code, the built-in terminal on your OS, or any IDE you prefer.
How to auto-generate voiceover videos with Python
We'll start with ElevenLabs, where you'll choose a voice for your narration and generate an API key.
Next, we'll move on to Creatomate. First, connect ElevenLabs to Creatomate using the API key. Then, create a template. Think of it as a reusable design for all your voiceover videos. In this template, you can specify the voice and customize the subtitle style if you wish.
After that, we'll set up a Python project. Using the video template, we'll create a script that generates videos automatically. Paste the code into your project, then add your content: the voiceover text and background images.
Finally, run the script to render your video. The process may take a moment, and there are different ways to wait for it to finish. When it's done, you'll get a link to your finished video, complete with voiceovers, animated subtitles, and your chosen visuals.
Ready? Let's begin.
1. Set up ElevenLabs for AI voiceovers
In this step, we'll do two things: choose a voice for the voiceover and generate an API key.
Go to ElevenLabs.io and either sign up for a free account, or log in if you already have one.
In the left menu, click Voices. This will bring you to the library, the Explore tab, with pre-made voices:
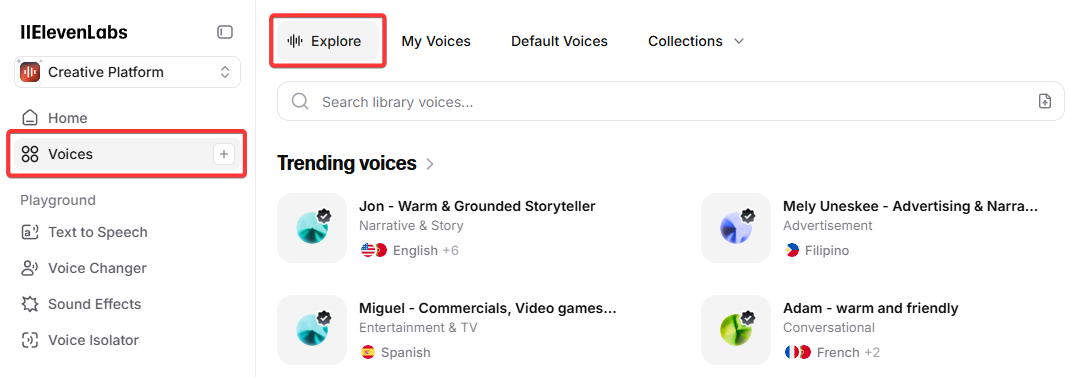
Choose a voice for your videos, and click the + button to add it to your account:
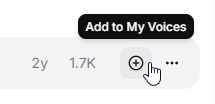
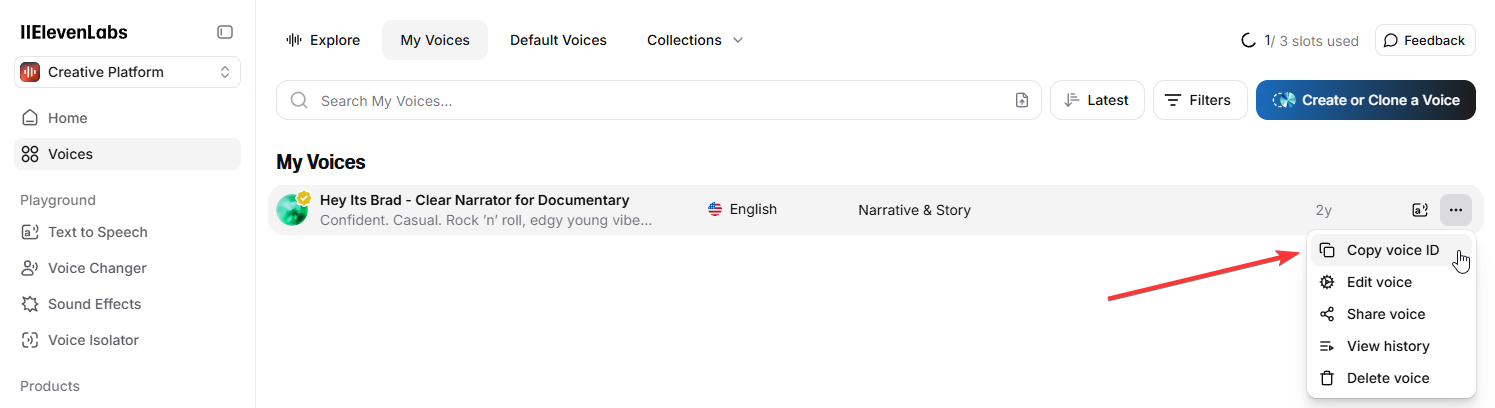
Confirm by clicking Add voice. The voice will appear on your “My Voices” page (accessible from the top bar).
In the next step, you'll need the voice ID. You can find it by clicking the … menu next to the voice and selecting Copy voice ID:
Next, in the bottom left corner, click My Account, then click API Keys:
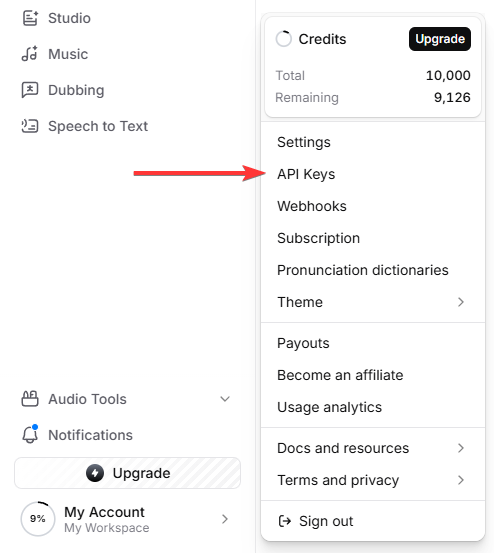
Click Create API Key. Enter a name (optional) and make sure Text to Speech is set to Has access. Then, click Create:
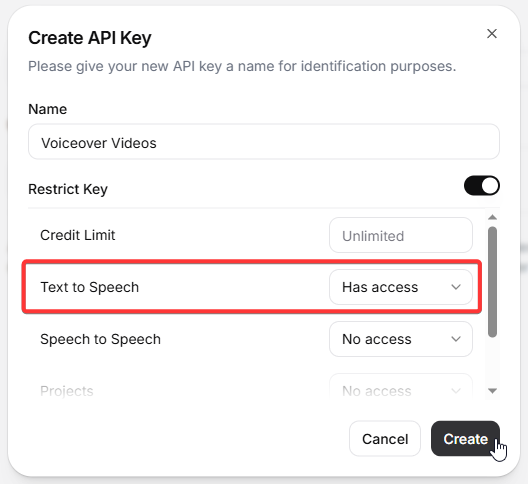
Copy the API key, you'll use it in the next step to connect with Creatomate.
2. Create a video template in Creatomate
Log in to your Creatomate account or sign up for free if you don't have one yet.
Before creating the video template, you'll need to create a connection with your ElevenLabs account. Click the … menu in the top left corner and go to Project Settings. In the Integrations section, toggle ElevenLabs to enable it. Paste your API key and click Confirm to save the integration:
Now it's time to create the design for your voiceover videos. If you already have a specific layout in mind, you can create a template from scratch. For this tutorial, though, we'll keep it simple and use one of the ready‑made templates.
Go to the Templates page and click New. In the template gallery, open the Voice Overs category and select the Short‑Form Voice Over template. Choose the 9:16 Vertical size and click Create Template to open it in the editor:
Let's look at how this template works and how we'll use it in our Python script.
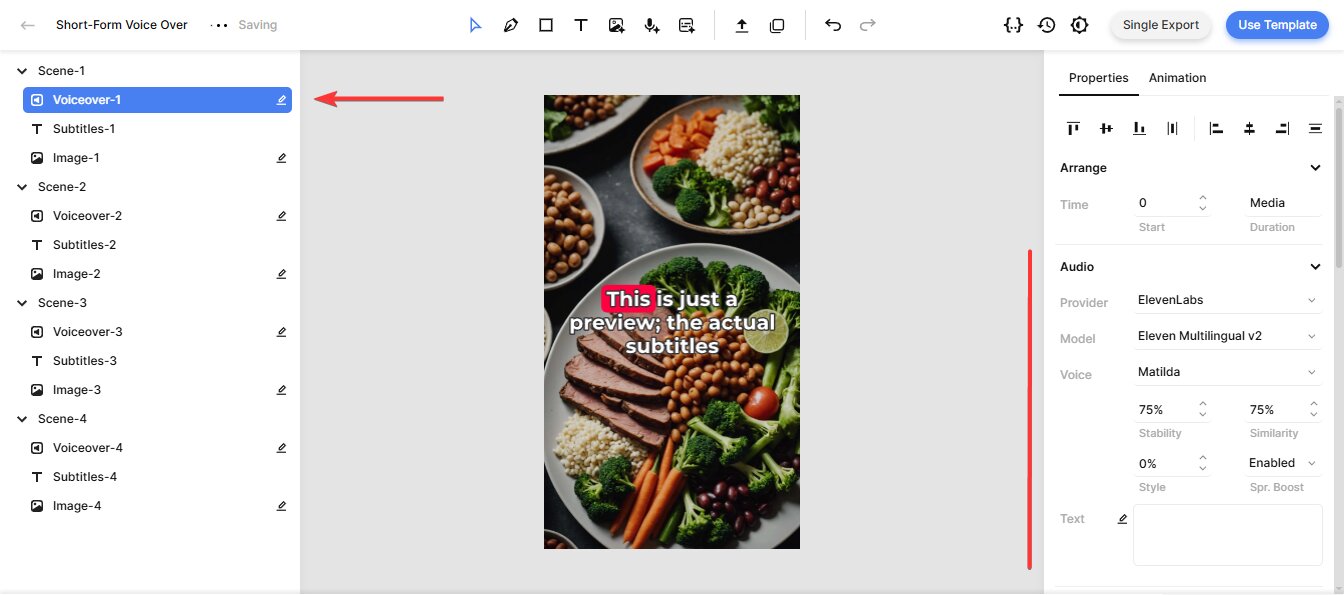
On the left side of the editor, you'll see all the elements that make up the video. The template is divided into four scenes, each containing a voiceover, subtitle, and image element.
If you press play now, you won't hear any voiceovers, and the subtitles will just show placeholders. This is expected because the AI-generated voiceovers are created only when the script runs, and the subtitles are generated afterward.
For the voiceovers and subtitles, let's use the first scene as an example. The same approach applies to the second, third, and fourth scenes, so if you make changes to the first scene, be sure to apply them to the others to keep the video consistent.
Select the Voiceover‑1 element and look at the Audio property on the right panel. Here you can configure the voiceover. The Provider is already set to ElevenLabs. For the Model, you can choose from four text‑to‑speech options; in most cases, Multilingual v2 is the best choice, as it provides high‑quality speech synthesis and supports multiple languages:
By default, the Voice is set to Matilda, a pre‑made voice from ElevenLabs. If you chose a different voice in the previous step, you can specify it here. Click Matilda, scroll up to Custom Voice, replace the voice ID with the one from your selected voice, and click OK:
You can fine‑tune the generated voiceover using parameters like Stability, Similarity, Style, and Speaker Boost. For example, Stability controls how much emotion or variation the voice has. Unless you have a specific reason to adjust these, the default values usually work well. For detailed explanations of each parameter, see ElevenLabs' Voice Settings documentation.
Next, let's look at the subtitles. You don't need to change anything here, but it's useful to know how it works in case you want to customize them later.
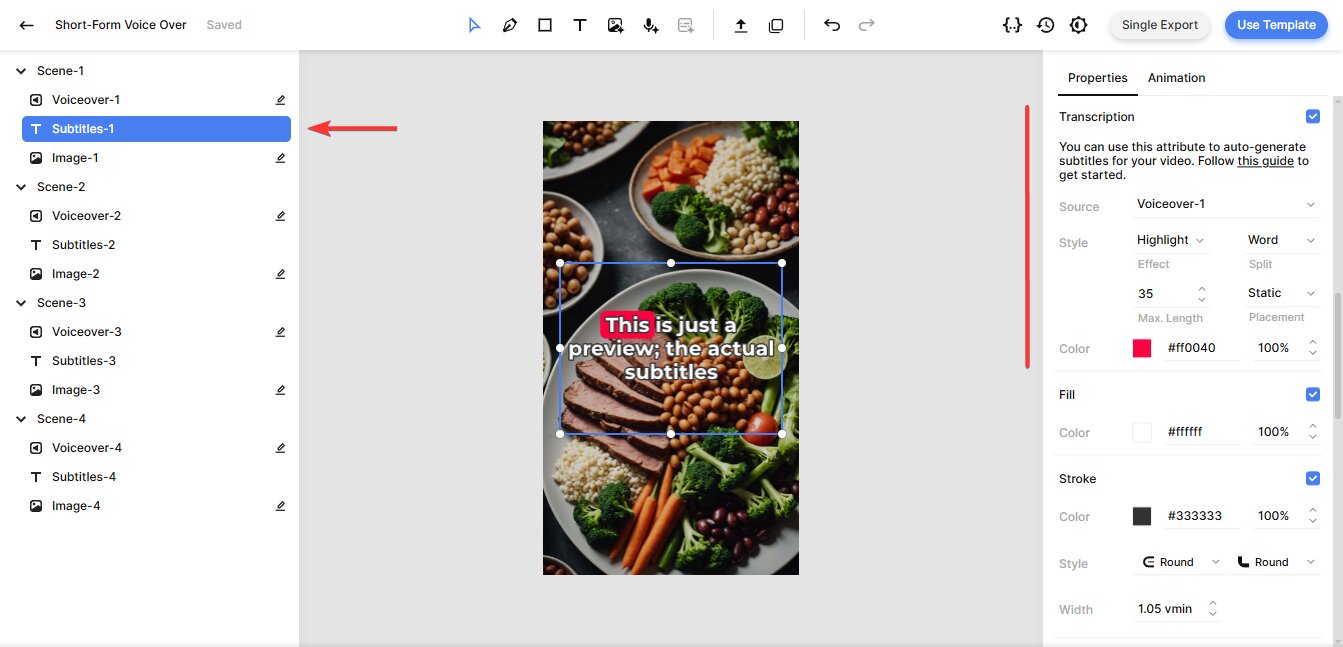
Select the Subtitles‑1 element and find the Transcription property. The Source is set to Voiceover‑1, which tells Creatomate to transcribe that voiceover and generate subtitles automatically. The Style, Color, Fill, and Stroke properties let you further customize the look and feel of the subtitles. For example, to create a popular one‑word‑at‑a‑time style (often used in YouTube Shorts, TikToks, and Instagram Reels), set Max. Length to 1. The template updates in real time, letting you preview adjustments as you make them:
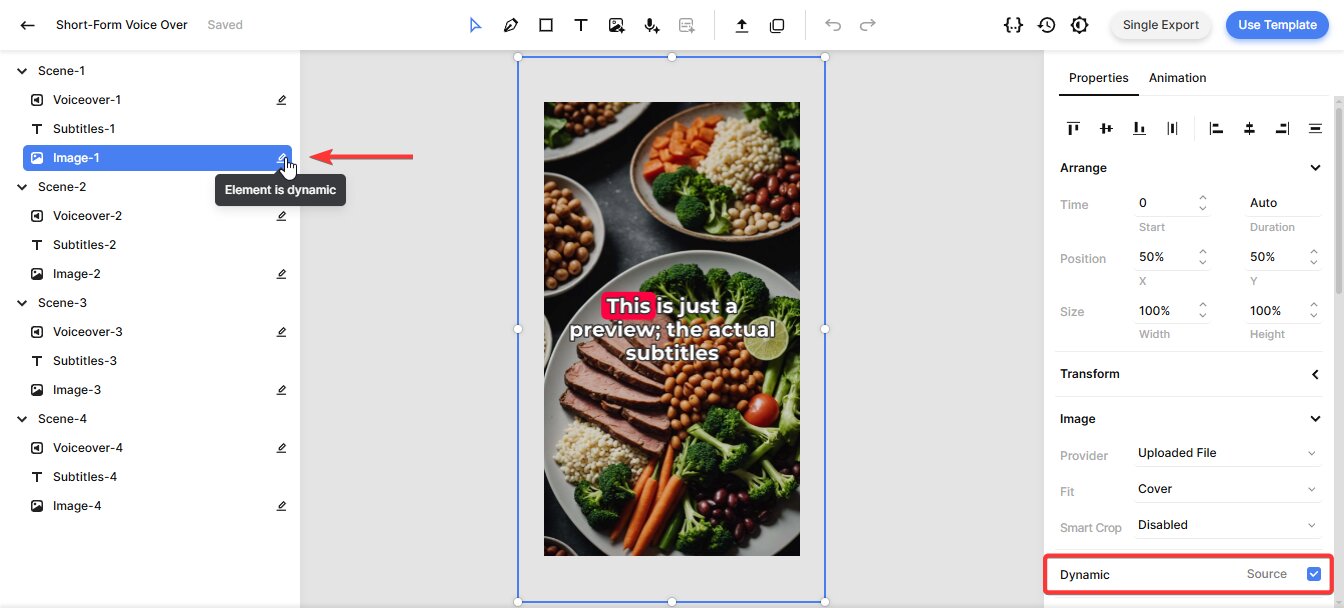
Lastly, for the image elements, you should know that they are dynamic, meaning you can replace them programmatically with any image file you provide in your Python script:
That's all you need to know about this template. We've covered the essentials, but the editor offers many more customization options. If you want to explore and refine your video design further, check out this quick guide.
With the template ready, let's move on to the Python part of this tutorial.
3. Set up a new Python project
Start by creating a new directory for this project. Open your terminal or command prompt and run:
$ mkdir voiceover_video_project
Then, navigate into it:
$ cd voiceover_video_project
Install the required dependencies. In this tutorial, we'll use the requests library to send API calls to Creatomate:
$ pip install requests
Now, create a Python file where you'll write your code. You can name it anything, but for consistency, we'll use generate_voiceover_video.py:
Mac/Linux
$ touch generate_voiceover_video.py
Windows
$ echo. > generate_voiceover_video.py
With your Python project now set up, we can move on. In the next step, we'll turn the template we just created into an API request written in Python.
4. Create your Python script
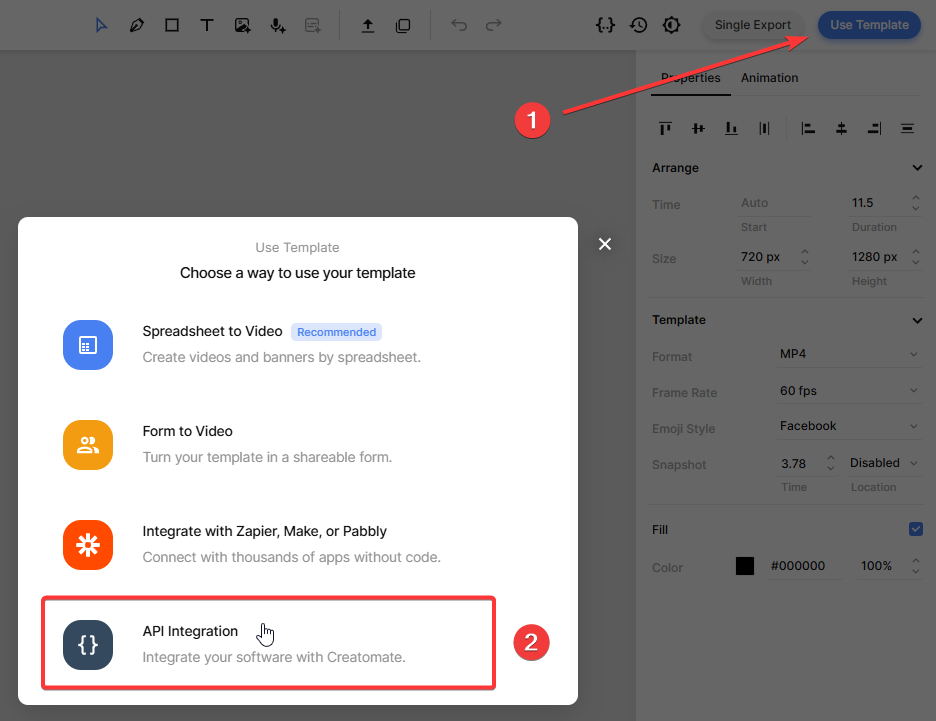
Click the Use Template button in the top-right corner of the template editor, then choose API Integration:
Creatomate provides ready-made code snippets in several programming languages. Select Python, then copy the snippet:
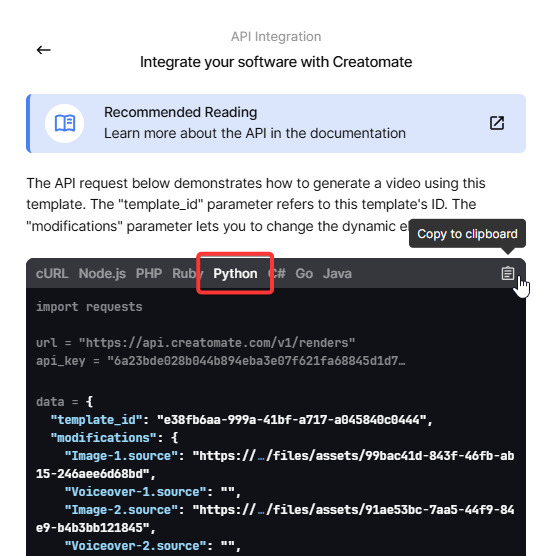
Next, paste the code snippet into the generate_voiceover_video.py file you created earlier.
In the next step, we'll add dynamic content to the video.
5. Add text and image URLs
Now, let's change the video content using the “modifications” parameter. This lets you customize anything in the template – including text, images, colors, video clips, and more
In this example, we'll focus on voiceovers and images. You'll provide the text you want to be spoken, along with publicly accessible URLs for the images you want to display. There's no need to handle subtitles as Creatomate will generate them automatically from the voiceover audio.
For testing, we'll use some sample data. In a real project, though, this content could come from APIs, databases, user input – or any other source that fits your needs.
Paste the following code into your script:
data = {

 "template_id": "your_template_id",

 "modifications": {

  "Image-1.source": "https://cdn.creatomate.com/demo/better-sleep-1.jpg",

  "Voiceover-1.source": "The 3 Best Tips for Better Sleep",

  "Image-2.source": "https://cdn.creatomate.com/demo/better-sleep-2.jpg",

  "Voiceover-2.source": "Create a Relaxing Bedtime Routine: Wind down before bed with activities like reading, taking a warm bath, or practicing relaxation techniques.",

  "Image-3.source": "https://cdn.creatomate.com/demo/better-sleep-3.jpg",

  "Voiceover-3.source": "Maintain a Consistent Sleep Schedule: Go to bed and wake up at the same time every day, even on weekends, to regulate your body's internal clock.",

  "Image-4.source": "https://cdn.creatomate.com/demo/better-sleep-4.jpg",

  "Voiceover-4.source": "Exercise Regularly: Stay active during the day, but avoid vigorous exercise close to bedtime for better sleep quality."

 }

}
Make sure to replace the placeholder with your actual template ID, which you can find on the API Integration page from step 4.
6. Run the script to generate the video
Now that we've set up the script, it's time to run it:
$ python3 generate_voiceover_video.py
After sending the API request, you'll receive a JSON response confirming that Creatomate has accepted it. It looks something like this:
1{
2  "id": "0d013b42-4bd6-4c18-aed4-520fa220d873",
3  "status": "planned",
4  "url": "https://f002.backblazeb2.com/file/creatomate-c8xg3hsxdu/0d013b42-4bd6-4c18-aed4-520fa220d873.mp4",
5  "snapshot_url": "https://f002.backblazeb2.com/file/creatomate-c8xg3hsxdu/0d013b42-4bd6-4c18-aed4-520fa220d873-snapshot.jpg",
6  ...
7}
You'll see that the status is set to "planned". This means Creatomate has accepted your request and will begin processing it shortly.
First, it sends your text to ElevenLabs to generate the voiceovers. Once the audio files are ready, Creatomate transcribes them and creates animated subtitles, styled according to your template design. Finally, the voiceovers, subtitles, and image URLs are combined into a video.
The rendering process may take a moment, depending on the length and complexity of your video. In the next step, I'll show you two ways to wait for the video to finish rendering.
7. Retrieve the voiceover video
The video is ready once the status changes to "succeeded".
You can check this by making a GET request to the API to see if the status has been updated. But a better approach is to set up a webhook. This way, Creatomate automatically notifies your application as soon as the video is ready.
To keep things simple, wait about a minute, then open the URL you received from the API response. If you see a “Not Found” message, the video isn't ready yet. Just wait a bit longer and try again.
Once the video is ready, the URL will display the finished video:
And that's it! You can now use the video in any way you want.
What's next for video creation with Python
You've just learned how to create videos with AI voiceovers using a Python script – but this is only the beginning. There are many ways to take this workflow further.
In our example, we manually entered the voiceover text and image URLs. But with generative AI, you can automate that step entirely. For instance, you could use ChatGPT to generate a video outline from a single topic, break it into scene-by-scene scripts, and have each one read aloud by a voiceover.
When it comes to visuals, tools like Flux, Runway, or Leonardo can create AI-generated images and even short video clips for use as dynamic backgrounds. ChatGPT can also generate the prompts you feed into these tools, making the whole process even smoother.
With just the simple voiceover and subtitle setup from this tutorial, you already have a solid foundation for building much more advanced and fully automated video workflows.
Here are some tutorials that might help. While they aren't specifically about Python, you should be able to adapt them to your scripts.
👉 Using ChatGPT's API to Auto-Create Social Media Videos by Code
👉 How to Automate AI-Generated Shorts, Stories, and Reels
You might also like these tutorials


Start automating today
Start with a full-featured trial with 50 credits, no credit card required.
Get started for free →