How to Automatically Add Subtitles to Videos with Python

Learn how to auto-transcribe video and audio files to add animated captions to social media videos using Python and Creatomate's video generation API.
If you've ever created captions by hand, you know it's a slow and tedious process. Thankfully, modern speech-to-text AI has made transcription faster and far more accurate – accurate enough to fully automate the process without the need to review or edit it.
In this tutorial, we'll build a Python script that takes your video or audio file, uses Creatomate's auto-transcription feature to turn speech into text, and then transforms that text into animated, word-by-word subtitles. The end result? A polished, ready-to-share social media video in your own custom subtitle style.
Video courtesy of Ryan Holiday of The Daily Stoic podcast.
When it comes to captions, social media is full of creative styles – bouncing words, highlighted phrases, karaoke effects, and more. Creatomate supports nearly all of them, and lets you fine-tune animations, fonts, colors, and layouts so your captions match your brand perfectly.
💡 AI tip: In this tutorial, we'll add subtitles to an existing video clip. But you're not limited to that, you can also use AI-generated voiceovers. If you're curious, check out this tutorial on creating voiceovers with ElevenLabs and turning them into a video with animated captions.
Prerequisites
Before you begin, make sure you have:
- Python3 installed. Download it from the official Python website if you don't have it already.
- a Creatomate account. Sign up for a free account if you're new to Creatomate.
- a terminal or code editor. Any environment where you can run Python scripts will work.
How to generate subtitles using Python
We'll start by setting up a Python project where we can write and run our code. Once that's ready, we'll switch over to Creatomate to create a video template that will serve as the foundation for all our videos. Here, we'll choose the video format and customize the subtitles with the styling and animations we want. Next, we'll grab the Python code snippet for our template and paste it into our project. We'll then add the video we want to transcribe and generate subtitles for. Finally, we'll run the script and, once it's finished, we'll get a URL to our newly subtitled video.
1. Set up a Python project
First, create a new directory for your project. Open your terminal or command prompt and run:
$ mkdir subtitle_video_project
Then, navigate into it:
$ cd subtitle_video_project
Next, install the necessary dependencies. For this tutorial, we'll use the requests library to interact with the Creatomate API:
$ pip install requests
Now, create a Python file where you'll write your code. You can name it anything, but for consistency, we'll use generate_subtitle_video.py:
Mac/Linux
$ touch generate_subtitle_video.py
Windows
$ echo. > generate_subtitle_video.py
With the Python project set up, we can move on to the next step – designing a Creatomate template for generating subtitles.
2. Create a transcription template
Log in to your Creatomate account, or sign up for free if you don't have one yet.
Go to the Templates page and click New to open the template gallery. For this tutorial, choose the Highlighted Subtitles template from the Auto-Subtitles category. Then pick a video size, such as 9:16 Vertical, and click Create Template to open it in the editor:
This template is already set up to automatically generate captions from an input file, so it's ready to use right away. You don't need to make any changes to get started, but I'll explain how it works so you can customize it later if you want.
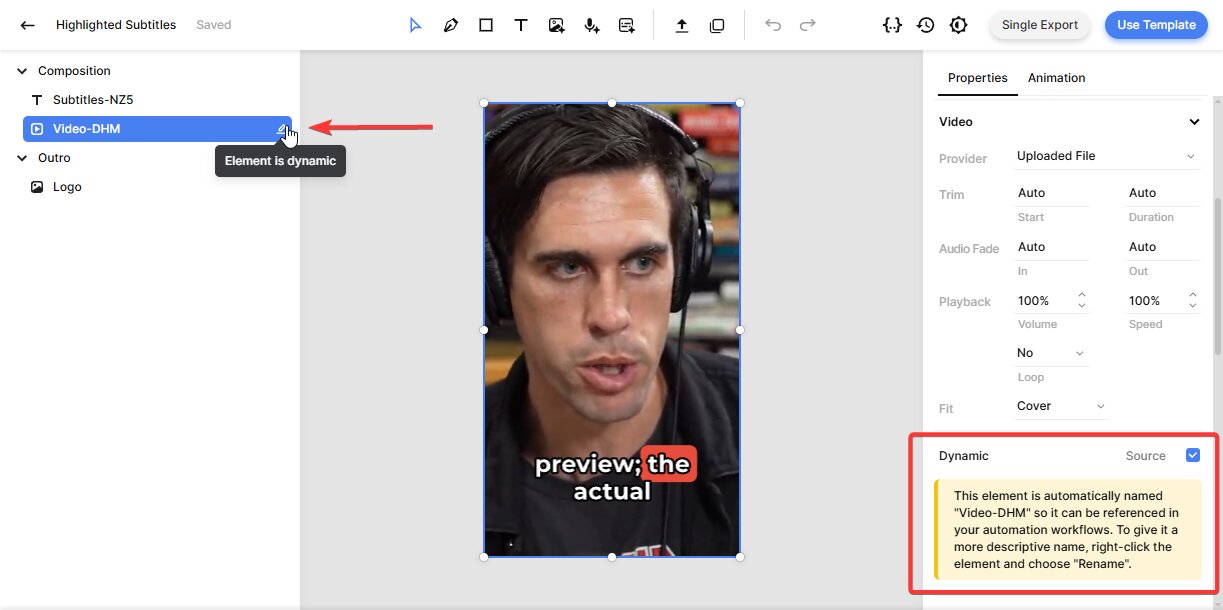
On the left side panel, you'll see all the elements that make up the video design. It's organized into a composition containing subtitles, a video element, and an outro that includes a logo.
One key detail: the Video element is marked as dynamic. This means we can easily swap it out for a different input file each time we run the Python script:

If you play around with the template in the editor, you'll notice that the subtitles are just placeholders. That's because the actual captions are generated only after we insert a video (or audio) file using the Python script.
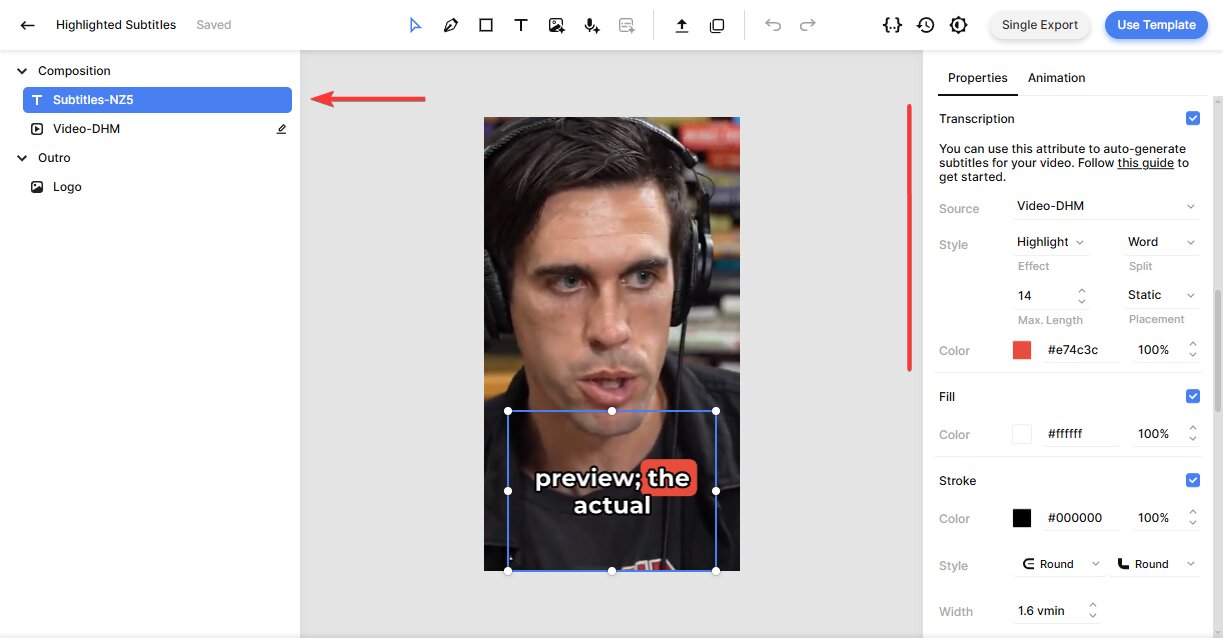
If you want, you can customize the subtitles' look and animation. To do this, select the Subtitles element and look for the Transcription property on the right. You'll see the Source is set to the video element – this tells Creatomate to transcribe that file and generate the subtitles automatically.
From here, you can tweak the style, color, fill, and stroke settings to make the subtitles look exactly how you want them. For example, to show one word at a time – a popular style on YouTube, TikTok, and Instagram – set the Max. Length property to 1. The template updates in real time, letting you preview adjustments as you make them:

The template is fully customizable to fit your specific needs. You can swap out the logo, change colors, fonts, and animations to match your style. To keep things simple and focused on automation, we'll use the default template for now. If you want to explore the editor and build your own template, check out this quick guide.
With our template ready, let's move on to the Python script.
3. Create a Python script
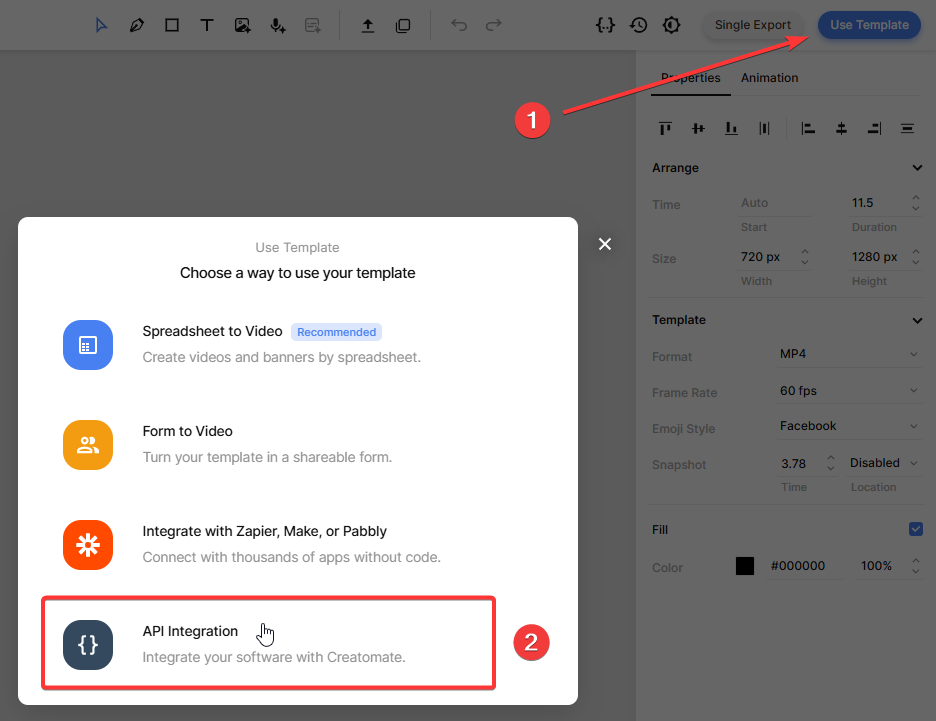
In the top-right corner of the template editor, click the Use Template button. Then choose the API Integration option:

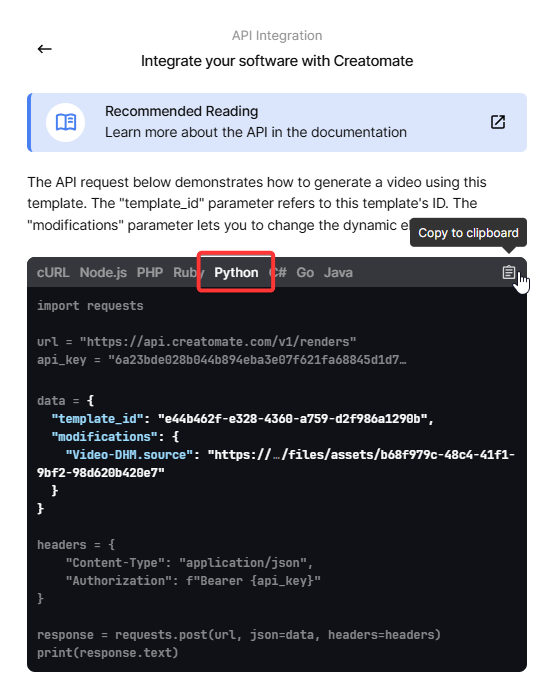
Creatomate provides ready-made code snippets in multiple programming languages. Just select Python, then copy the snippet:

Paste this code in your generate_subtitle_video.py file.
In the next step, we'll insert the video file.
4. Add a video or audio clip
The “modifications” parameter lets us replace the input video or audio file for each final video. Usually, this comes from another API, a database, or user input. But to keep things simple, we'll use an existing video file for this tutorial.
Copy and paste the following into your code:
data = {

 "template_id": "your_template_id",

 "modifications": {

  "Video-DHM.source": "https://cdn.creatomate.com/demo/the-daily-stoic-podcast.mp4"

 }

}
Don't forget to replace "your_template_id" with your actual template ID. This tells the API which template to use for generating your video. You can find your template ID on the API Integration page from the previous step.
5. Run the script to render the video
Now that we've set up the script, it's time to run it:
$ python3 generate_subtitle_video.py
After making the API call, you'll receive a JSON response confirming Creatomate accepted the request:
1{
2  "id": "4c1b10fb-648d-4965-b9e6-b22b853f4e71",
3  "status": "planned",
4  "url": "https://f002.backblazeb2.com/file/creatomate-c8xg3hsxdu/4c1b10fb-648d-4965-b9e6-b22b853f4e71.mp4",
5  "snapshot_url": "https://f002.backblazeb2.com/file/creatomate-c8xg3hsxdu/4c1b10fb-648d-4965-b9e6-b22b853f4e71-snapshot.jpg",
6  ...
7}
You'll notice the status is set to “planned”, which means Creatomate has accepted your request and will start processing it soon.
It will then transcribe the input video and generate animated captions using the style defined in your template. The time this takes depends on the length of your video. In the next step, I'll tell you how to wait for this process to finish.
6. Retrieve the subtitled video
The video is ready once the status changes to "succeeded".
You can check this by making a GET request to the API to see if the status has been updated. However, a better approach is to set up a webhook, so Creatomate can automatically notify your application as soon as the video is ready.
To keep things simple for now, wait about a minute, then open the URL you received in the API response. If you see a “Not Found” message, the video isn't ready yet – just wait a little longer and try again.
Once the video is ready, the URL will display the finished video:
And that's it! Your video is ready to use however you like.
Tip: You can keep track of all your API activity in the API Log section of your Creatomate dashboard. If a render fails, the log shows detailed error messages and suggests fixes to help you troubleshoot quickly.
What's next for video creation with Python
In this tutorial, we've worked with an existing video to generate subtitles. But you can also create audio files using text-to-speech APIs like ElevenLabs to produce AI-generated voiceovers. Then, you can use Creatomate to add matching animated subtitles.
If you're interested, check out the tutorial below for step-by-step instructions.