How to Automatically Add Subtitles to Videos with Node.js

Learn how to auto-transcribe video and audio files to add animated captions to social media videos using Node.js and Creatomate's video generation API.
Typing captions by hand is slow and frustrating. Thankfully, modern speech-to-text AI can handle the job for you. With a simple Node.js script, we can transcribe any video or audio file and generate animated, word-by-word subtitles that look professional on TikTok, Instagram Reels, or YouTube Shorts.
In this tutorial, we'll build a Node.js project that takes a media file, runs it through Creatomate's subtitle feature, and outputs an MP4 with captions styled exactly the way you want. The entire process is automated end-to-end – no manual review or editing required.
Video courtesy of Ryan Holiday of The Daily Stoic podcast.
Social platforms are full of creative caption styles: highlighted words, bouncing karaoke effects, dynamic colors, and more. Creatomate supports nearly all of them, giving you full control over fonts, animations, and layouts so your captions match your brand perfectly.
💡 AI tip: In this walkthrough, we'll add captions to an existing video. But you're not limited to that – you can just as easily generate an AI voiceover and subtitle it automatically. Curious? Check out this tutorial on combining ElevenLabs voiceovers with Creatomate's auto-transcription.
Prerequisites
Before we begin, make sure you have:
- Node.js 18+ installed. Download it from the official Node.js website if you don't have it already.
- A Creatomate account. Sign up for free if you don't already have one.
- A terminal or editor. Any environment where you can run Node.js scripts will work.
How to generate subtitles using Node.js
We'll start by setting up a simple Node.js project to hold our script. Once that's in place, we'll switch over to Creatomate to create a video template that will serve as the base for all our captioned videos. In the template editor, we can pick a video format and adjust the subtitle style with custom fonts, colors, and animations.
Next, we'll grab the Node.js code snippet for our template and paste it into our project. From there, we'll insert the video or audio file we want to transcribe. Finally, we'll run the script, and once the render finishes, Creatomate will return a URL to our finished video – complete with animated subtitles in the style we designed.
Let's get started!
1. Set up your Node.js project
First, create a new folder:
$ mkdir subtitle_video_project
Then, navigate into it:
$ cd subtitle_video_project
Initialize a new Node.js project with default settings:
$ npm init -y
Now, create a JavaScript file where we'll write our code:
Mac/Linux
$ touch generate_subtitle_video.js
Windows
$ echo. > generate_subtitle_video.js
Note: We'll be using Node.js's built-in Fetch API to communicate with Creatomate. This feature is available in Node.js v18.0.0 and later. To check your current version, run: $ node -v If your version is older than 18, download and install the latest Node.js from the official website.
That's it for the setup. Next, we'll head into Creatomate to create a template that defines the subtitle style and layout for our video.
2. Create a transcription template
Log in to your Creatomate account, or sign up for free if you don't have one yet.
Go to the Templates page and click New to open the template gallery. For this tutorial, select the Highlighted Subtitles template under the Auto-Subtitles category. Then, choose a video size, such as 9:16 Vertical, and click Create Template to open the editor:
This template is already configured to automatically generate captions from an input file, so it's ready to use right away. You don't need to make any changes to get started, but let's quickly walk through the template to see how you could customize it later if you want.
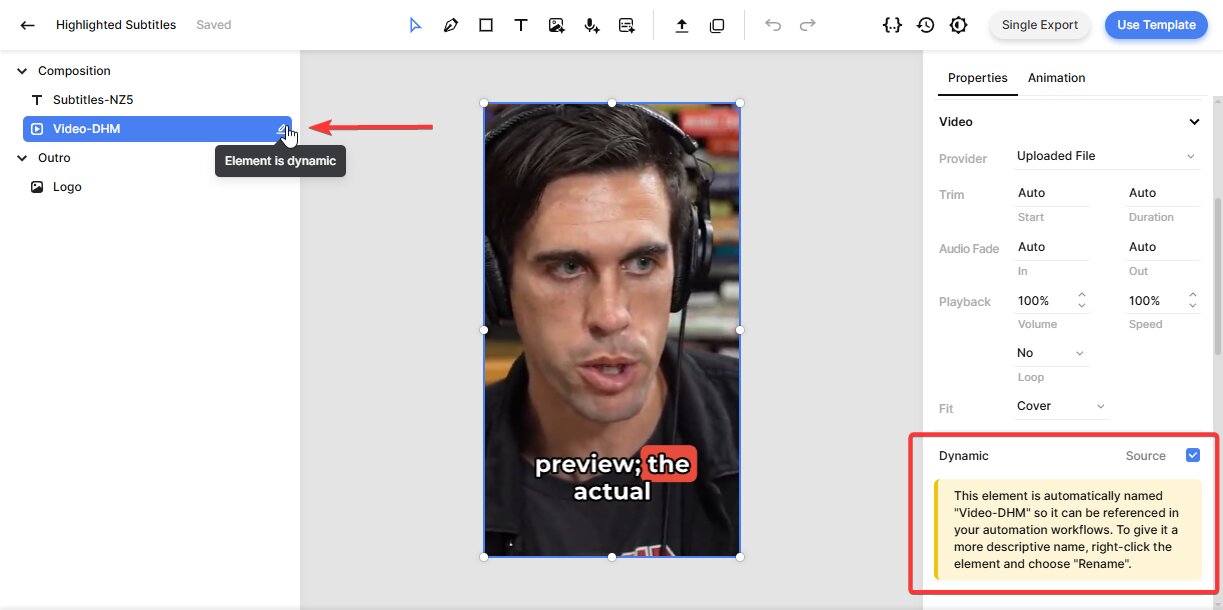
In the left panel, you'll see the elements that make up the template: a subtitle element, a video element, and a logo as the outro.
Note that the video element is marked as dynamic, which means you can easily swap it out for a different input file each time you run your Node.js script.

When you preview the template, you'll notice that the subtitles are just placeholders. The actual captions will only appear after you provide a video or audio file via your Node.js script.
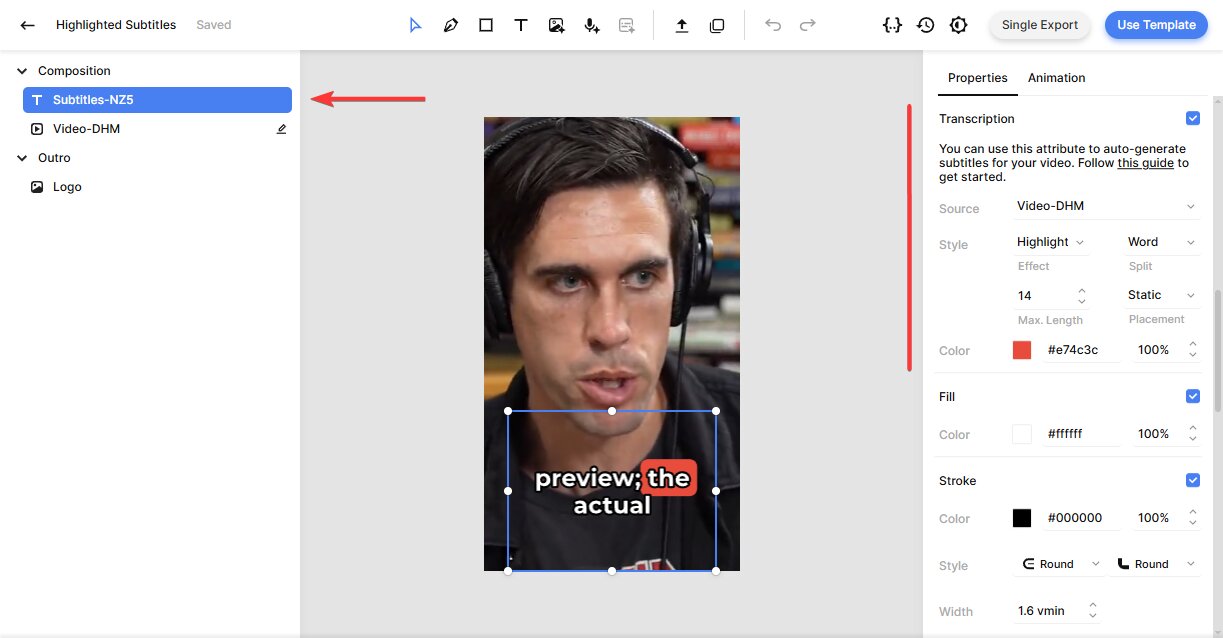
If you'd like, you can customize the subtitles' style and animation. Select the Subtitles element and find the Transcription property on the right. The Source should be set to the video element - this tells Creatomate to transcribe that file automatically.
You can tweak the style, color, fill, and stroke settings to create subtitles in any style you want. As an example, to display one word at a time (popular on TikTok, Instagram, and YouTube Shorts), set Max. Length to 1. The editor updates in real time, so you can preview your changes instantly.

The template is fully customizable. You can swap logos, change colors, fonts, and animations to match your brand. For simplicity, we'll use the default template in this tutorial. But you can find more information here if you'd like to explore the editor further.
With your template ready, we're now prepared to move on to the Node.js script that will insert your video and generate subtitles automatically.
3. Create a Node.js script
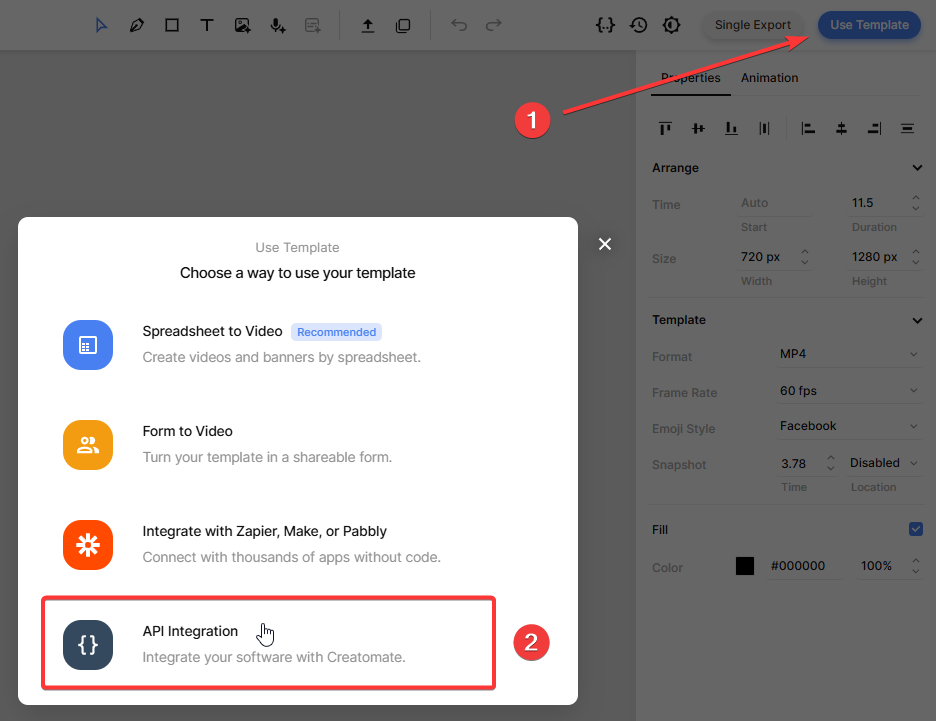
In the top-right corner of the template editor, click Use Template, then choose API Integration:

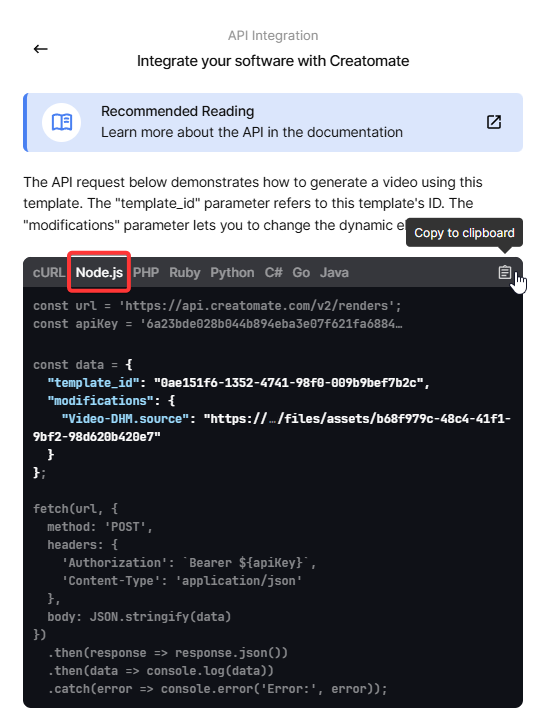
Creatomate will show you ready-made code snippets in several programming languages. Select Node.js and copy the snippet:

Paste the code into your generate_subtitle_video.js file.
In the next step, we'll insert the video or audio file that we want to transcribe.
4. Add a video or audio file
The “modifications” parameter lets us swap out the input video or audio file for each render. In a real-world app, this might come from a database, an API, or user input. But to keep things simple, we'll hardcode a demo video for this tutorial.
Add the following to your script:
const data = {

  "template_id": "your_template_id",

  "modifications": {

    "Video-DHM.source": "https://cdn.creatomate.com/demo/the-daily-stoic-podcast.mp4"

  }

};
Don't forget to replace "your_template_id" with your own template ID. This tells Creatomate which template to use when generating the video. You can find your template ID on the API Integration page from the previous step.
5. Run the script to render the video
Now that our script is set up, let's run it:
$ node generate_subtitle_video.js
After making the API call, Creatomate will respond with a JSON object confirming the request was accepted:
1
2  {
3    "id": "87804f35-3163-4d9b-ab9f-aba33dd71158",
4    "status": "planned",
5    "url": "https://f002.backblazeb2.com/file/creatomate-c8xg3hsxdu/87804f35-3163-4d9b-ab9f-aba33dd71158.mp4",
6    "snapshot_url": "https://f002.backblazeb2.com/file/creatomate-c8xg3hsxdu/87804f35-3163-4d9b-ab9f-aba33dd71158-snapshot.jpg",
7    ...
8  }
9
Notice that the status is "planned". This means Creatomate has queued your render and will start processing it soon.
Behind the scenes, it will transcribe your input video and generate animated subtitles using the style defined in your template. The time this takes depends on the length of the video.
In the next step, we'll see how to check if the video has finished processing.
6. Retrieve the subtitled video
Your video is ready once the status changes to "succeeded".
There are two ways to check this:
- Make a GET request to the API and poll the render status until it updates.
- Use a webhook – the recommended method. With a webhook, Creatomate will automatically notify our app as soon as the video is ready.
To keep things simple in this tutorial, we'll just wait about a minute and then open the URL from the API response.
If you see a “Not Found” message, the video is still processing. Wait a little longer and refresh the link.
Once the render is complete, that URL will show your fully captioned video:
And that's it! Your video is now ready to use however you like.
Tip: You can keep track of all your API activity in the API Log section of your Creatomate dashboard. If a render fails, the log will show detailed error messages and suggest fixes to help you troubleshoot quickly.
What's next for video creation with Node.js
In this tutorial, we added subtitles to an existing video. But that's just the beginning. You can also use text-to-speech APIs like ElevenLabs to generate AI voiceovers, and then let Creatomate automatically create perfectly synced animated captions.
If you'd like to try it out, check out this step-by-step guide: