Auto-Generate Subtitles Using Node.js and AWS Transcribe

In this tutorial, you'll learn how to use Node.js and AWS Transcribe to automatically generate word-by-word captions for videos to use with TikTok, Instagram, Twitter, Facebook, etc.
September 2023 update: It is now possible to generate subtitles using Creatomate's API. While you can still use AWS Transcribe, a much simpler approach is to use our built-in auto-transcription using a single API request.
The majority of social media users watch videos on mute. This number has been reported to be as high as 85% for Facebook. In other words, if you post a video without captions, most people won't watch it.
It seems that posting social media videos without subtitles does not make a lot of sense. Fortunately there are many apps that can automatically generate subtitles using speech-to-text. What's the trick behind these apps? And how would you go about automatically generating captions in Node.js?
The answer is AWS Transcribe. It is capable of generating captions for any media file with incredible accuracy. This tutorial shows you how to use AWS Transcribe's Node.js library to parse subtitles into animated captions for social media videos. By the end of this tutorial, you'll be able to generate captions for any video or audio file, and create videos like this – all using Node.js:
Input video courtesy of Shane Parrish of The Knowledge Project.
TLDR: The source of this project can be found in this GitHub repository. Happy hacking!
How to add subtitles to videos using Node.js and AWS Transcribe?
Step 1 – Create a new Node.js project
We'll start by creating a new Node.js project and installing the required dependencies. Let's make a directory for our project first:
$ mkdir aws-transcribe
Navigate to the directory:
$ cd aws-transcribe
To create a new Node.js project, run npm init:
1$ npm init -ySince we'll use AWS Transcribe to generate subtitles, we'll need the @aws-sdk/client-transcribe and @aws-sdk/client-s3 packages. We'll use the Creatomate API for rendering the video with animated captions, so we need the creatomate package as well. Additionally, we install the promise-retry and srtparsejs packages to assist us:
$ npm i @aws-sdk/client-transcribe @aws-sdk/client-s3 creatomate promise-retry srtparsejs
Step 2 – Set up AWS on your device
The next step is to connect our device to AWS so we can access AWS Transcribe.
This step is only required to test the Node.js application locally. Once you deploy the app to your server, you can provide the AWS credentials using the AWS_ACCESS_KEY_ID and AWS_SECRET_ACCESS_KEY environment variables, which are automatically detected by the AWS SDK.
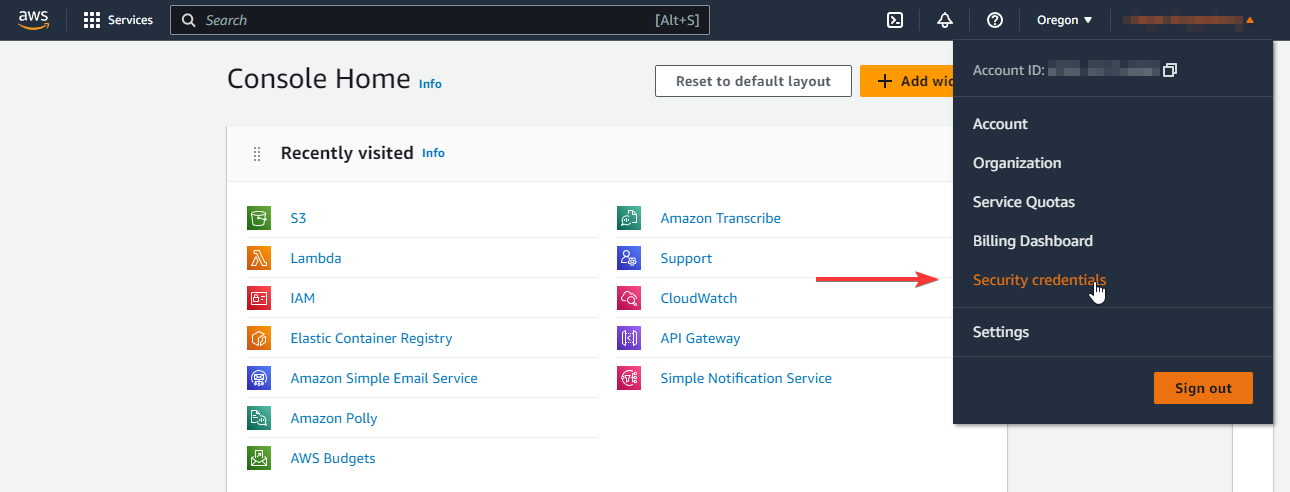
Create an Amazon Web Services account if you don't already have one. Once you're logged in, go to Security credentials:
Scroll down until you reach the Access keys section. Click on Create access key:
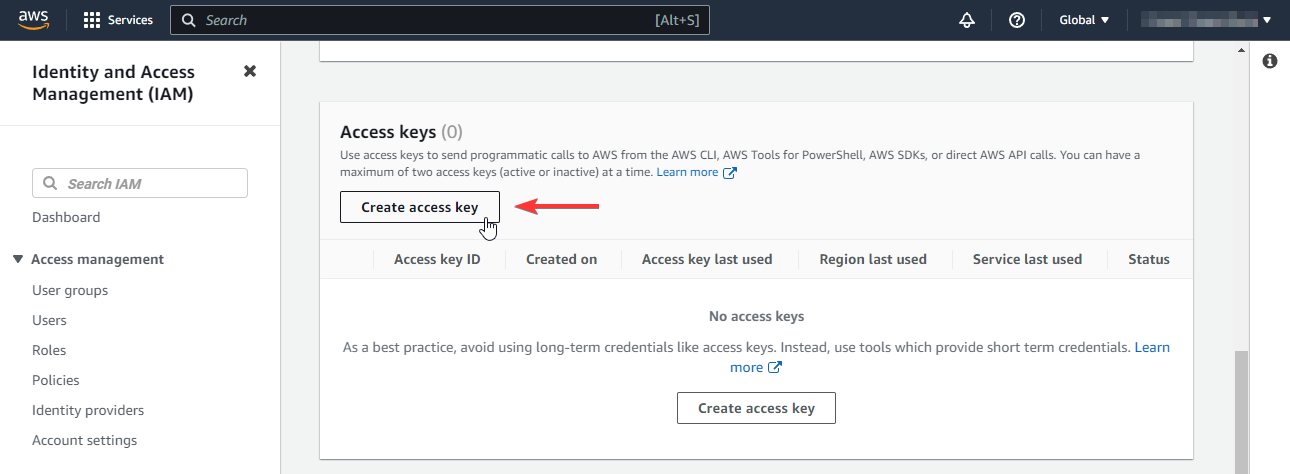
When logged in as root, you will see a warning that advises against creating access keys for root users. The reason is that these keys give you full programmatic access to your AWS account. A better way to do it would be to create a new user who has limited access, then create an access key for that user. You can do this in the IAM section. If you're going that route, make sure that the user has AmazonTranscribeFullAccess and AmazonS3FullAccess permission policies. To keep this example simple, we will create an access key for the root user; however, I encourage you to read more about AWS's best security practices.
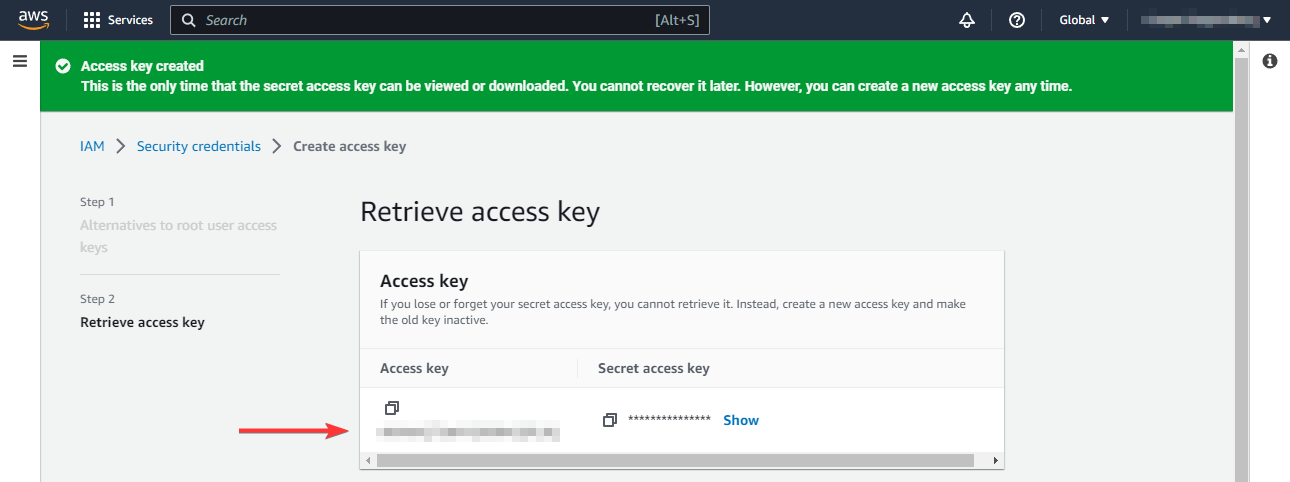
Your access key can be found under Retrieve access key. The access key will only be displayed once, so make sure you store it somewhere safe:
Next, if you have not done so already, install the AWS CLI on your local machine. Run the following command to connect your AWS account. It will ask you for the ID and access key we just created in our AWS account. When asked for the default region, select the nearest AWS data center to your location. If in doubt, provide us-west-1. You'll have to specify this region again later in Node.js, so remember what region you specify. You can leave the output format blank if asked:
1$ aws configureThe AWS CLI is now installed and configured on your device, and we can start building our Node.js script now that it has access to our AWS account.
Should you run into trouble, check out the AWS CLI configuration guide.
Step 3 – Create a S3 bucket
For AWS Transcribe to generate subtitles for our video, it needs a place to store them. So the last step before moving on to Node.js is to set up an S3 bucket for temporarily storing transcripts. Since we just installed the AWS CLI, we can create a S3 bucket with the following command. Make sure you provide the same AWS region as you did when you configured AWS CLI:
$ aws s3api create-bucket --bucket aws-transcribe-s3 --region us-west-1 --create-bucket-configuration LocationConstraint=us-west-1
For more information about S3 buckets, refer to this page.
Step 4 – Generate subtitles using AWS Transcribe
Let's break our code up into multiple files to keep everything organized. We'll start by looking at the code that auto-generates subtitles from our input video. For that, we'll create a new file called transcribe.js. Simply copy and paste the following code and we will explain what it does next:
1const {
2  GetTranscriptionJobCommand,
3  StartTranscriptionJobCommand,
4  TranscribeClient,
5} = require('@aws-sdk/client-transcribe');
6const promiseRetry = require('promise-retry');
7
8async function transcribe(jobName, mediaUri, awsRegion, bucketName, bucketKey) {
9
10  const transcribeClient = new TranscribeClient({ region: awsRegion });
11
12  // Start to transcribe the audio from the media file
13  // https://docs.aws.amazon.com/transcribe/latest/APIReference/API_StartTranscriptionJob.html
14  await transcribeClient.send(
15    new StartTranscriptionJobCommand({
16      TranscriptionJobName: jobName,
17      LanguageCode: 'en-US',
18      MediaFormat: 'mp4',
19      Media: { MediaFileUri: mediaUri },
20      OutputBucketName: bucketName,
21      OutputKey: bucketKey,
22      Subtitles: {
23        Formats: ['srt'],
24      },
25    }),
26  );
27
28  // Gets the status of a current transcription job
29  // https://docs.aws.amazon.com/transcribe/latest/APIReference/API_TranscriptionJob.html
30  const command = new GetTranscriptionJobCommand({ TranscriptionJobName: jobName });
31
32  // Poll the status of the job, and return the transcription job is complete
33  return promiseRetry(async (retry) => {
34
35    const response = await transcribeClient.send(command);
36
37    if (response.TranscriptionJob?.TranscriptionJobStatus !== 'COMPLETED') {
38      // Not completed – retry in 2 seconds
39      return retry(null);
40    }
41
42    // Completed
43    return response.TranscriptionJob;
44
45  }, { minTimeout: 2000, forever: true });
46}
47
48module.exports = transcribe;
49
To invoke AWS Transcribe, we use the @aws-sdk/client-transcribe package. First, we'll set up a TranscribeClient. It is important to specify the AWS region here, as AWS Transcribe requires that it be invoked in the same region as the S3 bucket. So if we specify us-west-1, the S3 bucket that we created in the previous step must also be located in us-west-1. You'll get this error if these regions aren't the same:
"The specified S3 bucket isn't in the same region. Make sure the bucket is in the us-west-1 region and try your request again."
As you can see in the code above, we send the StartTranscriptionJobCommand to start the transcription job. Here are the parameters we specify:
- TranscriptionJobName: A job name. Later on, we can check the status of this job using this name. The name can be generated by us, provided that it is unique.
- LanguageCode: A language code that represents the language spoken in the input media file, such as en-US, de-DE, zh-CN, etc.
- MediaFormat: The format of the input media file, such as mp3, mp4, wav, etc.
- Media: The location of the input media file. This can be a URL.
- OutputBucketName: The name of the S3 bucket where we want to store the transcription output.
- OutputKey: The output location where the transcript gets stored in our S3 bucket.
- Subtitles: The format in which we want to receive the subtitles. In this case, we want to receive the subtitles in SubRip (*.srt) format.
Once the StartTranscriptionJobCommand is sent, we can poll the status of the job using GetTranscriptionJobCommand. Here's where we specify the job name. We keep polling the status every 2 seconds until it reports COMPLETED using the promise-retry package.
There will be two files produced by AWS Transcribe in our S3 bucket: a transcript in JSON and subtitles in SubRip (*.srt) format. By combining these two files, we can generate the animated captions which will be explained in a later step.
For the sake of simplicity, we do not check for errors in this example, so make sure that you catch a failed job in your own code. For more information, refer to TranscriptionJobStatus and FailureReason.
Step 5 – Retrieve and parse the transcript results
Once the AWS Transcribe job is complete, we will need a way to retrieve and parse the results into a format that can be used in our Node.js application. Let's create a new file fetchTranscript.js for that:
1const downloadS3File = require('./downloadS3File');
2
3async function fetchTranscript(awsRegion, bucketName, bucketKey) {
4
5  const words = [];
6
7  // Download the AWS transcript result from S3
8  const transcript = JSON.parse(await downloadS3File(awsRegion, bucketName, bucketKey));
9
10  // Iterate through each transcription item, which can be a word, phrase, or punctuation mark
11  // https://docs.aws.amazon.com/transcribe/latest/APIReference/API_streaming_Item.html
12  for (const item of transcript.results.items) {
13
14    // The word or punctuation that was transcribed
15    const content = item.alternatives[0].content;
16
17    if (item.type === 'punctuation') {
18
19      // Append punctuations to the last word
20      const lastWord = words[words.length - 1];
21      if (lastWord) {
22        lastWord.content += content;
23      }
24
25    } else {
26
27      // Add the spoken word to the transcript, parsing the start and end time
28      words.push({
29        startTime: parseFloat(item.start_time),
30        endTime: parseFloat(item.end_time),
31        content,
32      });
33    }
34  }
35
36  return words;
37}
38
39module.exports = fetchTranscript;
40
Here's how it works. First, we use the downloadS3File function to retrieve the transcript file from our S3 bucket. Due to brevity, I did not include that file in this article, but you can find it in the GitHub repository. It simply retrieves the provided file from S3 and returns its content as a string.
The transcript result is in JSON format, so first we parse it with JSON.parse. We can then iterate through the transcript Items, which contain each spoken word, phrase or punctuation mark. AWS Transcribe provides us with the content of each word, as well as the moment it was spoken using startTime and endTime. These are in seconds.
As mentioned, an item can also be of type punctuation. This is the interpunction between words and sentences in spoken text, such as points and commas. These don't have a startTime and endTime, as they're not actually spoken but merely aid in reading the text. However, we'd like to include them in the final subtitles. To do that, we check each item to see if it's a punctuation, and if so, we append it to the last spoken word.
As a final result, the function returns an array of words along with their timestamp.
Step 6 – Generate animated captions
Here's the helper function that generates the animated captions we showed in the video at the beginning of the article. To do this, we're going to combine the transcript results with the SubRip subtitles, both generated in the AWS Transcribe process of step 4.
Remember that the transcription process left us with two files? In the previous step, we used the transcript JSON file, but it only gave us information about words, not how they're put together to form sentences. Fortunately, we can extract sentences from the SubRip (SRT) file, then combine them with the transcript to figure out how to group the words together. That's what generateSubtitles.js does:
1const Creatomate = require('creatomate');
2const srtparsejs = require('srtparsejs');
3const downloadS3File = require('./downloadS3File');
4const fetchTranscript = require('./fetchTranscript');
5const timestampToSeconds = require('./timestampToSeconds');
6
7async function generateSubtitles(awsRegion, bucketName, bucketKey) {
8
9  const keyframes = [];
10
11  // Fetch the SRT file generated by AWS Transcribe
12  const subtitles = await downloadS3File(awsRegion, bucketName, bucketKey + '.srt');
13
14  // Fetch the transcript result
15  const transcript = await fetchTranscript(awsRegion, bucketName, bucketKey);
16
17  // Iterate through each sentence in the SRT file
18  for (const sentence of srtparsejs.parse(subtitles)) {
19
20    // Convert each timestamp in the SRT to seconds
21    const startTime = timestampToSeconds(sentence.startTime);
22    const endTime = timestampToSeconds(sentence.endTime);
23
24    // Get the words that correspond to this sentence
25    const words = transcript.filter((word) => (
26      word.startTime >= startTime && word.startTime < endTime
27    ));
28
29    // Iterate through each word
30    for (let i = 0; i < words.length; i++) {
31      const word = words[i];
32
33      let text = '';
34
35      // Encapsulate each spoken word with an RGBA color tag, to make it slightly transparent
36      const spokenWords = words.slice(0, i);
37      if (spokenWords.length > 0) {
38        text += `[color rgba(255,255,255,0.4)]${
39          spokenWords.map((word) => word.content).join(' ')}[/color] `;
40      }
41
42      // Encapsulate the current spoken word with a color tag to make it fully white
43      text += `[color #fff]${word.content}[/color]`;
44
45      // Add the words that have not yet been spoken. As the default 'fillColor' is null,
46      // the text will be invisible, but reserve its space in the text element
47      const unspokenWords = words.slice(i + 1);
48      if (unspokenWords.length) {
49        text += ` ${unspokenWords.map((word) => word.content).join(' ')}`;
50      }
51
52      // Create a keyframe for each spoken word
53      keyframes.push(new Creatomate.Keyframe(text, word.startTime));
54    }
55  }
56
57  return keyframes;
58}
59
60module.exports = generateSubtitles;
61
This is where we're using Creatomate's keyframes and styling tags to generate the animated subtitles. Each word spoken out gets its own text keyframe. And as we mentioned before, we are able to group the words based on the time range of the sentences from the SubRip (SRT) file.
For this example, we are displaying the currently spoken word as full white and the previously spoken words as 40% opacity using rgba(255,255,255,0.4). The remainder of the sentence will not be enclosed in a style tag, resulting in the default style being used. And due to this default style being set to transparent, the text that is yet to be spoken is effectively hidden. We'll see this in the next step.
For more text styling examples, check out the text-styles example on GitHub.
Now that all helper functions have been implemented, it is time to put everything together.
Step 7 – Putting it all together
As a reminder, you can find the full source code for this project in this GitHub repository.
Having created all the helper functions, let's create the final source file index.js:
1const Creatomate = require('creatomate');
2const transcribe = require('./transcribe');
3const generateSubtitles = require('./generateSubtitles');
4
5const client = new Creatomate.Client('Your API key');
6
7// Note: Provide these AWS settings
8const awsRegion = 'us-west-1';
9const bucketName = 'insert-your-bucket-name';
10const bucketKey = `my-folder/subtitle-${new Date().getTime()}`;
11const transcribeJobName = `example-${new Date().getTime()}`;
12
13// Note: Provide a URL to a video file
14const mediaUri = 'https://creatomate-static.s3.amazonaws.com/demo/tkp-720p-square.mp4';
15
16async function run() {
17
18  console.log('Transcribing video using AWS Transcribe...');
19
20  // Invoke AWS Transcribe to automatically generate the subtitles from the video
21  await transcribe(transcribeJobName, mediaUri, awsRegion, bucketName, bucketKey);
22
23  // Create subtitle keyframes
24  const subtitleKeyframes = await generateSubtitles(awsRegion, bucketName, bucketKey);
25
26  console.log('Creating video with Creatomate...');
27
28  // Create the video. Note that we don't provide an output width and height,
29  // as the Creatomate API detects these automatically based on the first found video element
30  const source = new Creatomate.Source({
31    outputFormat: 'mp4',
32
33    elements: [
34
35      // The video file. Since we do not specify a duration, the length of the video element
36      // is determined by the video file provided
37      new Creatomate.Video({
38        source: mediaUri,
39      }),
40
41      // The subtitles
42      new Creatomate.Text({
43
44        // Make the subtitle container as large as the screen with some padding
45        width: '100%',
46        height: '100%',
47        xPadding: '3 vmin',
48        yPadding: '8 vmin',
49
50        // Align text to bottom center
51        xAlignment: '50%',
52        yAlignment: '100%',
53
54        // Text style – note that the default fill color is null (transparent)
55        fontWeight: '800',
56        fontSize: '8.48 vh',
57        fillColor: null,
58        shadowColor: 'rgba(0,0,0,0.65)',
59        shadowBlur: '1.6 vmin',
60
61        text: subtitleKeyframes,
62      }),
63
64      // Progress bar
65      new Creatomate.Rectangle({
66        x: '0%',
67        y: '0%',
68        width: '100%',
69        height: '3%',
70        xAnchor: '0%',
71        yAnchor: '0%',
72        fillColor: '#fff',
73        animations: [
74          new Creatomate.Wipe({
75            xAnchor: '0%',
76            fade: false,
77            easing: 'linear',
78          }),
79        ],
80      }),
81
82    ],
83  });
84
85  // Render the video
86  const renders = await client.render({ source });
87  console.log('Completed:', renders);
88}
89
90run()
91  .catch(error => console.error(error));
92
Let's take a closer look at what is happening here. To begin with, we create an instance of Creatomate.Client. This gives us a convenient way to access the Creatomate API via Node.js. Creatomate is a video editing API that creates MP4 videos based on a component-based model. Those familiar with React or Flutter will notice the similarities. The same way you can construct your app's UI in React using HTML components, you can compose your video using Text, Video, Image, or Shape elements.
The documentation explains this format in detail. For now, we just have to understand that our final video has three elements; the input video file, a text element displaying the auto-generated captions, and a rectangle element that indicates the progress of the video.
Find out more about this format by reading this article: Using Node.js to Generate Instagram, YouTube, or TikTok Videos
Be sure to provide your Creatomate API key, AWS region, S3 bucket name, and S3 bucket key at the top of the file. You can create a free account with Creatomate in one minute, and once you're in your dashboard, you'll find your API key under project settings. The AWS region is the one we specified when configuring the CLI, like us-west-1. Choose a bucket name and key that works for you, but if you want to make sure we don't accidentally overwrite another subtitle file, append a unique value to the file name:
1// ...
2
3const client = new Creatomate.Client('Your API key');
4
5// Note: Provide these AWS settings
6const awsRegion = 'us-west-1';
7const bucketName = 'insert-your-bucket-name';
8const bucketKey = `my-folder/subtitle-${new Date().getTime()}`;
9const transcribeJobName = `example-${new Date().getTime()}`;
10
11// Note: Provide a URL to a video file
12const mediaUri = 'https://creatomate-static.s3.amazonaws.com/demo/tkp-720p-square.mp4';
13
14// ...
15
Step 8 – Run the code
Now that we have discussed the inner workings of the code, it is time to run it. Ensure that all source files have been saved, then run the following command:
$ node index.js
The video may take a few moments to render. Once the video is done, you'll get an array of renders. We're only rendering one video at a time so the output looks like this:
1[
2  {
3    "id": "6ee14322-6681-4af4-9065-7b2f1bab573d",
4    "status": "succeeded",
5    "url": "https://cdn.creatomate.com/renders/6ee14322-6681-4af4-9065-7b2f1bab573d.mp4",
6    "outputFormat": "mp4",
7    "renderScale": 1,
8    "width": 1080,
9    "height": 1080,
10    "frameRate": 29.97,
11    "duration": 33.80,
12    "fileSize": 3744930
13  }
14]
15
16
You can see the transcribed video has been generated and is hosted at the provided URL.
Wrapping up
As you can see, Node.js makes it easy to generate animated captions for any kind of video. Though, we've barely scratched the surface of what's possible. Especially with the rapid advancements of AI that utilize language models, this can be taken to a whole new level. For example, you could use AI to automatically highlight the important words in the captions, as seen in TikTok videos.
Or perhaps you can use AWS Transcribe along with a language model to automatically extract the relevant parts from a lengthy video and create a summary video for social media. And perhaps you could create an API around that, so that anyone can make use of it.
I hope you enjoyed this article. If you do, be sure to also check out the articles below that are also related to Node.js video generation!
You might also like these tutorials


Start automating today
Start with a full-featured trial with 50 credits, no credit card required.
Get started for free →