Generate Text-to-Speech Video using Node.js and AWS Polly

May 2024 update: We've added support for voiceovers and subtitles without having to integrate with AWS Polly. It produces much better speech and captions than the approach in this tutorial, which is why we recommend it for new projects.
Here's how to get started.
This tutorial shows you how to automatically generate voice over videos for YouTube, Instagram, TikTok, or any other platform. We're going to use AWS Polly for synthesizing the speech, and the Creatomate Node.js SDK for generating the video.
There has been a tremendous increase in video usage in recent years, particularly through short videos on YouTube (Shorts), Instagram (Stories), Facebook (Reels), TikTok, and email personalization. And it makes sense. These short, under-one-minute videos are a powerful way to connect with an audience, whether they are followers, customers, or prospects, in a manner that is easily digestible.
It is already possible to automate short video using no-code solutions. What if these are too limited for our needs? The goal of this guide is to show you how you can automate the creation of short videos programmatically. Although we will be using Node.js and AWS Polly throughout this tutorial, the process is quite similar regardless of the programming language or text-to-speech provider. Let's get started!
How to create text-to-speech videos with Node.js and AWS Polly?
Step 1 – Create a new Node.js project
Let's begin by creating a new Node.js project and installing the necessary dependencies. The first thing we need to do is create the project directory:
$ mkdir text-to-speech
Then navigate to the directory:
$ cd text-to-speech
Run npm init to create a new Node.js project.
1$ npm init -yBecause we will use AWS for text-to-speech synthesizing, we need to install the aws-sdk Node.js package. We are going to use the Creatomate API to render the video, so we need the creatomate package as well. Additionally, we install the uuid package for creating GUIDs for the text-to-speech process:
$ npm i aws-sdk creatomate uuid
Step 2 – Set up AWS on your device
The next step is to connect our device to AWS so we can access AWS Polly.
Connecting our device to AWS makes local testing easier, but is not necessary for running the code on a server. Once you deploy your Node.js app, you can provide the AWS credentials using the AWS_ACCESS_KEY_ID and AWS_SECRET_ACCESS_KEY environment variables. These will automatically detected by the aws-sdk Node.js package.
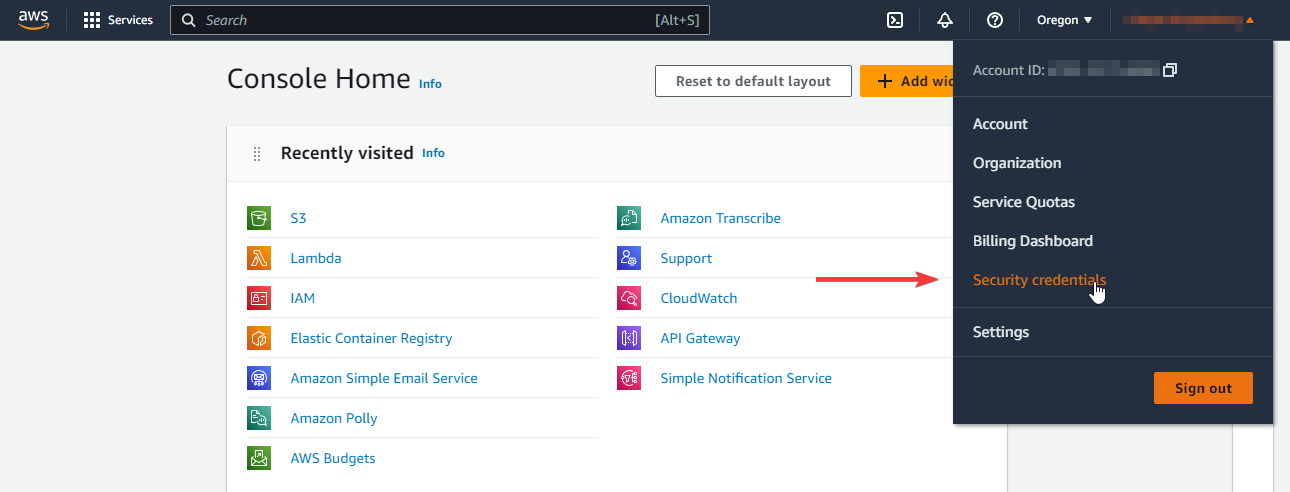
Create an Amazon Web Services account if you don't already have one. Once you're logged in, go to Security credentials:
Then scroll down until you reach the Access keys section. Click on Create access key:
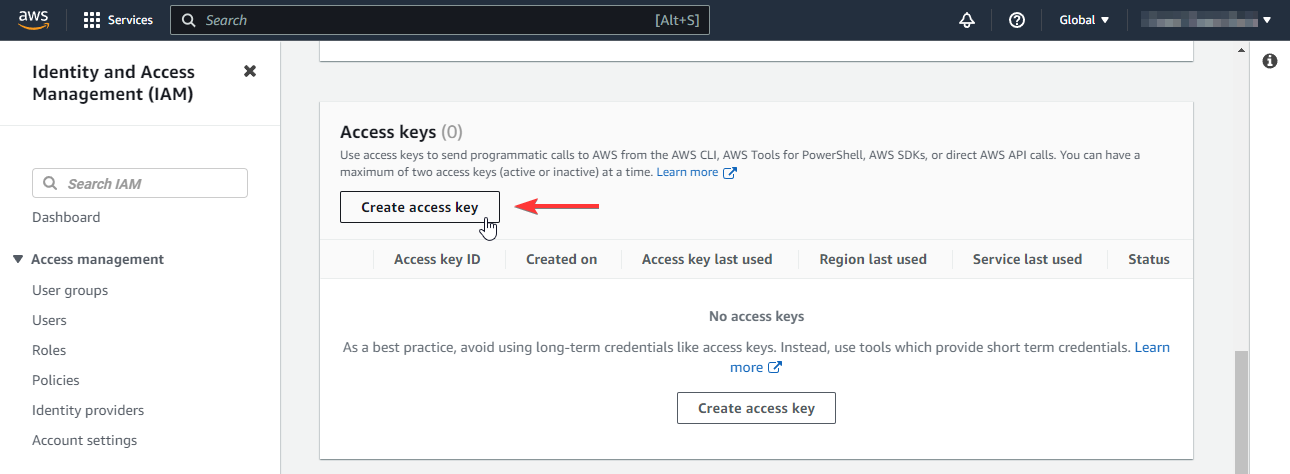
If you're logged in as root, you'll see a warning that says it's not recommended to create access keys for root users. This is because these access keys give full programmatic access to your AWS account. A better practice would be to create a new user who has limiting access and then create an access key for that user. This can be done in the IAM section. If you choose that approach, make sure that the user has AmazonPolyFullAccess and AmazonS3FullAccess permission policies. To keep this example simple, we will create an access key for the root user, but please read more about AWS's best security practices.
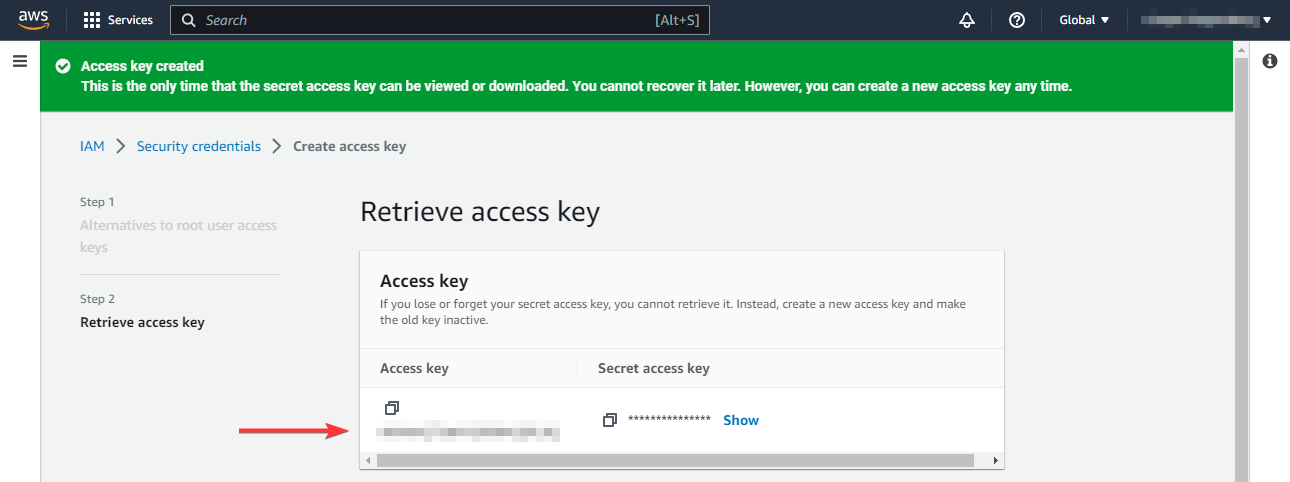
You'll find your access key under Retrieve access key. Since this is the only time that the access key will be displayed, make sure to store it in a safe place:
In case you run into trouble, check out the AWS CLI configuration guide.
Now install the AWS CLI to set up this connection on your local device. After you've done that, run the following command to configure AWS. Provide the ID and access key that we just created in our AWS account. Once you're asked for the default region, select the closest AWS data center to your location. When in doubt, enter us-west-1. We'll have to specify this region later in our Node.js script. If asked for an output format, you can leave it blank.
1$ aws configureYou now have the AWS CLI installed on your device and connected to your account, so our Node.js scripts can access AWS Polly and S3.
Step 3 – Create a S3 bucket to store the audio files
Before we dive into our Node.js script, we have to set up one more thing. When AWS Polly synthesizes a text, it requires an output location to store the resulting audio file. And since we will be using these audio files with Creatomate, it must be stored in a location that Creatomate can access. For this reason, we're creating a public S3 bucket.
Since we have full access to S3 via our AWS CLI, we can use the following command to create a new bucket. Make sure the region you provide matches the one you provided when you configured AWS:
$ aws s3api create-bucket --bucket text-to-speech-s3 --acl public-read --region us-west-1 --create-bucket-configuration LocationConstraint=us-west-1
For more information about S3 buckets, refer to this page.
Step 3 – Synthesize our first sentence with AWS Polly
Create a new source file index.js and open it in your code editor. Paste the following code into the file:
1const { Polly, S3 } = require('aws-sdk');
2const uuid = require('uuid');
3
4const polly = new Polly({ region: 'us-west-1' });
5const s3 = new S3();
6
7console.log('Converting text to speech using Polly...');
8
9// https://docs.aws.amazon.com/AWSJavaScriptSDK/latest/AWS/Polly.html#synthesizeSpeech-property
10polly.synthesizeSpeech({
11  OutputFormat: 'mp3',
12  Text: 'Hello, this text was synthesized using AWS Polly.',
13  VoiceId: 'Joanna',
14}, (err, data) => {
15
16  if (err) {
17    console.error(err.toString());
18    return;
19  }
20
21  console.log('Uploading audio file to S3...');
22
23  // https://docs.aws.amazon.com/AWSJavaScriptSDK/latest/AWS/S3.html#upload-property
24  s3.upload({
25    Body: data.AudioStream,
26    Bucket: 'text-to-speech-s3',
27    Key: `${uuid.v4()}.mp3`,
28    ContentType: 'audio/mpeg',
29    ACL: 'public-read',
30  }, (err, data) => {
31
32    if (err) {
33      console.error(err.toString());
34      return;
35    }
36
37    console.log(`Done! Your audio file can be found here: ${data.Location}`);
38  });
39});
40
Let's examine what is going on. We begin by creating an instance of Polly and the S3 API of the AWS SDK. Polly requires us to specify the AWS data center region where our text will be processed. Next, we call synthesizeSpeech to start the synthesizing process, asking Polly to output the audio in MP3 format with Joanna's voice. Once that has been completed, we call upload to store the audio file in our S3 bucket.
Here is how we run the code and its result:
$ node index.js
Step 4 – Generate speech marks
We now have the ability to generate audio clips from any arbitrary text string, but we're missing something. As we'll be animating the text word-by-word, we'll need to know exactly when each word is spoken, but we've only received an audio clip from Polly. Fortunately, this can be accomplished by sending another request to AWS Polly. Replace the code in index.js with the following:
1const { Polly } = require('aws-sdk');
2
3const polly = new Polly({ region: 'us-west-1' });
4
5console.log('Generating speech marks using Polly...');
6
7// https://docs.aws.amazon.com/AWSJavaScriptSDK/latest/AWS/Polly.html#synthesizeSpeech-property
8polly.synthesizeSpeech({
9  OutputFormat: 'json',
10  SpeechMarkTypes: ['word'],
11  Text: 'Hello, this text was synthesized using AWS Polly.',
12  VoiceId: 'Joanna',
13}, (err, data) => {
14
15  if (err) {
16    console.error(err.toString());
17    return;
18  }
19
20  const speechMarks = data.AudioStream.toString('utf8');
21  console.log(speechMarks);
22});
23
As you can see, we're doing another Polly request with synthesizeSpeech, but this time we're requesting json and SpeechMarkTypes: ['word']. Here's what we'll get if we run the code:
1$ node index.js
2Generating speech marks using Polly...
3{"time":6,"type":"word","start":0,"end":5,"value":"Hello"}
4{"time":706,"type":"word","start":7,"end":11,"value":"this"}
5{"time":932,"type":"word","start":12,"end":16,"value":"text"}
6{"time":1268,"type":"word","start":17,"end":20,"value":"was"}
7{"time":1418,"type":"word","start":21,"end":32,"value":"synthesized"}
8{"time":2176,"type":"word","start":33,"end":38,"value":"using"}
9{"time":2548,"type":"word","start":39,"end":42,"value":"AWS"}
10{"time":3288,"type":"word","start":43,"end":48,"value":"Polly"}
11
As you can see, Polly returned the timestamp of every word in the form of a JSON object. Let's continue!
Step 5 – Generate a video with animated captions
We'll start by creating a video using Creatomate using the speech marks we generated above, and then we'll put it all together. Once again, delete everything in your index.js file and paste the following code in its place. Don't forget to insert your API key into the highlighted line.
1const Creatomate = require('creatomate');
2
3const text = 'Hello, this text was synthesized using AWS Polly.';
4
5const speechMarks = [
6  { 'time': 6, 'type': 'word', 'start': 0, 'end': 5, 'value': 'Hello' },
7  { 'time': 706, 'type': 'word', 'start': 7, 'end': 11, 'value': 'this' },
8  { 'time': 932, 'type': 'word', 'start': 12, 'end': 16, 'value': 'text' },
9  { 'time': 1268, 'type': 'word', 'start': 17, 'end': 20, 'value': 'was' },
10  { 'time': 1418, 'type': 'word', 'start': 21, 'end': 32, 'value': 'synthesized' },
11  { 'time': 2176, 'type': 'word', 'start': 33, 'end': 38, 'value': 'using' },
12  { 'time': 2548, 'type': 'word', 'start': 39, 'end': 42, 'value': 'AWS' },
13  { 'time': 3288, 'type': 'word', 'start': 43, 'end': 48, 'value': 'Polly' },
14];
15
16const client = new Creatomate.Client('Insert Your Creatomate API Key Here');
17
18const source = new Creatomate.Source({
19
20  // Create a video of 720 by 720
21  outputFormat: 'mp4',
22  width: 720,
23  height: 720,
24
25  // Use a hardcoded duration for now (not required in the final code)
26  duration: 4,
27
28  elements: [
29
30    // Create a text element that is aligned at the bottom of the video
31    new Creatomate.Text({
32
33      // Use the full viewport for displaying the captions
34      width: '100%',
35      height: '100%',
36
37      // Add some padding between the borders of the video and the text
38      xPadding: '5 vw',
39      yPadding: '11.5 vh',
40
41      // Set the font to auto-size to the space available, but don't make the
42      // text larger than 9.1 vmin, in other words 9.1% of Math.min(width, height)
43      fontFamily: 'Open Sans',
44      fontWeight: 700,
45      fontSizeMaximum: '9.1 vmin',
46
47      // Text background color
48      backgroundColor: '#ffffff',
49      backgroundAlignThreshold: '5%',
50
51      // Align text content at the bottom of the text container
52      yAlignment: '100%',
53
54      // Generate keyframes on the text property to make the words appear word-by-word
55      // This is based on speech marks timestamps received by AWS Polly
56      text: speechMarks.map((mark) => {
57
58        // Part of the sentence that has been spoken
59        const spoken = text.substring(0, mark.start);
60
61        // The word being spoken right now
62        const word = text.substring(mark.start, mark.end);
63
64        // Create a styled text using color tags
65        const highlightedText = `[color rgba(0,0,0,0.4)]${spoken}[/color]`
66          + `[color #000]${word}[/color]`;
67
68        return new Creatomate.Keyframe(highlightedText, mark.time / 1000);
69      }),
70    }),
71  ],
72});
73
74// Render the video
75client.render({ source })
76  .then((renders) => {
77    console.log('Your video has been completed:', renders);
78  });
79
Let's figure out what's going on. Creatomate is a JSON-to-video API that lets us create any video by describing it in JSON-structured data. We first generate the source of the video in our Node.js script, and then send it out to Creatomate for rendering. In the source we are generating, we instruct Creatomate to produce a video that is 720 by 720 with a duration of four seconds. With the elements property, we instruct Creatomate to add a single element to our video, namely a text element. Our text element is given a number of properties, such as padding, font style, and alignment. Because we don't specify a font size, Creatomate automatically scales the text for us.
In Creatomate, almost any property can be animated using keyframes. In order to animate our captions word-by-word, we create keyframes for every spoken word using the speech mark timestamps we got from AWS Polly.
Finally, we're sending the source of the video to Creatomate to turn it into an actual video file. Here's what we get when we run this code and visit the URL after Creatomate finishes rendering:
Now that we've got that working, let's get started on adding video clips, the synthesized audio, and the background music.
Step 6 – Add background video clips
In our final video, we'll use a different video clip for each spoken line. This step will demonstrate how to add these video clips and make them play sequentially. As before, let's test it separately before putting it all together at the end.
We can control how elements play relative to each other by using track numbers. Perhaps you've used a video editor like Premiere before where clips are arranged on a timeline composed of tracks. You would place elements on the same track in order of playback. This also applies to Creatomate; by assigning the same track number to multiple elements, they're automatically arranged in a sequential order.
1const Creatomate = require('creatomate');
2
3const client = new Creatomate.Client('Insert Your Creatomate API Key Here');
4
5const source = new Creatomate.Source({
6  outputFormat: 'mp4',
7  width: 720,
8  height: 720,
9  elements: [
10    // Create three video elements on the same track to play them after each other.
11    // No need to specify a duration, Creatomate does that automatically for us.
12    new Creatomate.Video({
13      track: 1,
14      source: 'https://creatomate-static.s3.amazonaws.com/demo/video1.mp4',
15    }),
16    new Creatomate.Video({
17      track: 1,
18      source: 'https://creatomate-static.s3.amazonaws.com/demo/video2.mp4',
19    }),
20    new Creatomate.Video({
21      track: 1,
22      source: 'https://creatomate-static.s3.amazonaws.com/demo/video3.mp4',
23    }),
24  ],
25});
26
27// Render the video
28client.render({ source })
29  .then((renders) => {
30    console.log('Your video has been completed:', renders);
31  });
32
Running the code will produce the video below. Just like expected, all video clips are played in sequence. And as we'll see in a minute, this not only works for video clips, but for compositions (groups of elements) as well.
Step 7 – Compose a single slide
Next, we're going to group text, audio, and video elements into a single element to form a slide.
1const source = new Creatomate.Source({
2  outputFormat: 'mp4',
3  width: 720,
4  height: 720,
5  elements: [
6
7    new Creatomate.Composition({
8      elements: [
9        // TTS audio clip of AWS Polly
10        new Creatomate.Audio({
11          source: 'https://creatomate-static.s3.amazonaws.com/demo/aws-polly.mp3',
12        }),
13        // Background video
14        new Creatomate.Video({
15          source: 'https://creatomate-static.s3.amazonaws.com/demo/video1.mp4',
16          // By default, a video element is made as long as its content.
17          // In this case, want to make it as long as the composition it is in.
18          // This can be done by setting the duration to null.
19          duration: null,
20          // Loop the video when it is shorter than the composition
21          loop: true,
22        }),
23        // Create a text element that is aligned at the bottom of the video
24        new Creatomate.Text({
25          // ... Omitted for the sake of brevity, as it is the same as in step 5
26        }),
27      ],
28    }),
29
30  ],
31});
32
Here's where we use Creatomate's composition element. Basically, a composition is just a group of elements combined together that behave as if they were a single element. As a composition is an element itself, you can animate its position, effects, and styling just like any other element.
In this case, we are utilizing an important feature of the composition - it automatically stretches to the length of its nested elements. In order for a composition to determine its length, it requires a nested element that provides this information, such as a nested video or audio element. For us, that's the text-to-speech audio clip, given that we want every slide to be the same length as the spoken text.
Now that the composition stretches automatically to match the duration of the spoken text, we want the background video to follow suit. Therefore, we explicitly set the video element's duration to null to stretch it to the length of the composition. But what if the video is shorter than the spoken text? We can fix this by setting the loop property to true.
This is what we get after running the code. Take note of the background video looping in the background.
Step 8 – Putting it all together
Now that all the pieces have been working separately, it is time to bring them together. Although I have reorganized the code a little, you should be able to see clearly what steps we have taken so far. The code for AWS Polly has been moved to its own file, textToSpeech.js. We're also using Promises, which makes our code asynchronous and easier to understand.
Here it is. Check out the GitHub repository (or run it in your browser using StackBlitz), then run it in your terminal with:
$ node index.js YOUR_API_KEY
1const Creatomate = require('creatomate');
2const { textToSpeech } = require('./textToSpeech');
3
4// Get the Creatomate API key as passed to this script, as follows: node index.js YOUR_API_KEY
5const apiKey = process.argv[2];
6if (!apiKey) {
7  // Your API key can be found under project settings: https://creatomate.com/docs/api/reference/where-can-i-find-my-api-key
8  console.error('\n\n⚠️  To run this example, please specify your API key as follows: node index.js YOUR_API_KEY');
9  process.exit(1);
10}
11
12// Create an instance of the Creatomate SDK
13const client = new Creatomate.Client(apiKey);
14
15async function run() {
16
17  // Define four slides with corresponding background videos
18  const fragments = [
19    {
20      text: 'Here\'s a video that was completely generated by code.',
21      videoUrl: 'https://creatomate-static.s3.amazonaws.com/demo/video1.mp4',
22    },
23    {
24      text: 'This demo shows how dynamic text can be mixed with video, resulting in data-driven video ' +
25        'of any resolution or format that can be generated automatically.',
26      videoUrl: 'https://creatomate-static.s3.amazonaws.com/demo/video2.mp4',
27    },
28    {
29      text: 'An example of a typical use case would be auto-generated explainer videos that are tailored to ' +
30        'a particular audience or language.',
31      videoUrl: 'https://creatomate-static.s3.amazonaws.com/demo/video3.mp4',
32    },
33    {
34      text: 'As can be seen from the source, there is a great deal of flexibility in what is possible. ' +
35        'For instance, it\'s easy to replace AWS Polly with any other TTS service. And how about combining this with AI?',
36      videoUrl: 'https://creatomate-static.s3.amazonaws.com/demo/video4.mp4',
37    },
38    {
39      text: 'Hopefully you\'ve been inspired by this example of what automated video can do. Thanks for watching!',
40      videoUrl: 'https://creatomate-static.s3.amazonaws.com/demo/video5.mp4',
41    },
42  ];
43
44  console.log('Converting text to speech using AWS Polly...');
45
46  // Synthesize each sentence using AWS Polly
47  const spokenTexts = await Promise.all(fragments.map(async (fragment) => {
48    return {
49      ...fragment,
50      ...await textToSpeech(fragment.text),
51    };
52  }));
53
54  console.log('Creating video with Creatomate...');
55
56  // Create a video using Creatomate
57  const source = new Creatomate.Source({
58
59    // Generate a MP4
60    outputFormat: 'mp4',
61
62    // Generate a 9:16 video, perfect for Instagram, TikTok or YouTube Shorts
63    width: 720,
64    height: 1280,
65
66    elements: [
67
68      // For each slide, generate a composition that groups together a background video,
69      // audio clip, and animated captions
70      ...spokenTexts.map(({ text, videoUrl, uploadLocation, speechMarks }) => (
71
72        new Creatomate.Composition({
73
74          // By putting all compositions on the same track, they're played one after the other
75          track: 1,
76
77          elements: [
78
79            // Audio clip that we created using AWS Polly
80            new Creatomate.Audio({
81              source: uploadLocation,
82            }),
83
84            // Background video
85            new Creatomate.Video({
86              source: videoUrl,
87              // By default, video elements are as long as their content.
88              // But in this case, we want it to be as long as the composition it is in.
89              // We can do this by setting the duration to null.
90              duration: null,
91              // Loop the video if it's shorter than the composition
92              loop: true,
93            }),
94
95            // Create a text element that is aligned at the bottom of the video
96            new Creatomate.Text({
97
98              // Use the full viewport for displaying the captions
99              width: '100%',
100              height: '100%',
101
102              // Add some padding between the borders of the video and the text
103              xPadding: '5 vw',
104              yPadding: '11.5 vh',
105
106              // Set the font to auto-size to the space available, but don't make the
107              // text larger than 9.1 vmin, in other words 9.1% of Math.min(width, height)
108              fontFamily: 'Open Sans',
109              fontWeight: 700,
110              fontSizeMaximum: '9.1 vmin',
111
112              // Text background color
113              backgroundColor: '#ffffff',
114              backgroundAlignThreshold: '5%',
115
116              // Align text content at the bottom of the text container
117              yAlignment: '100%',
118
119              // Generate keyframes on the text property to make the words appear word-by-word
120              // This is based on speech marks timestamps received by AWS Polly
121              text: speechMarks.map((mark) => {
122
123                // Part of the sentence that has been spoken
124                const spoken = text.substring(0, mark.start);
125
126                // The word being spoken right now
127                const word = text.substring(mark.start, mark.end);
128
129                // Create a styled text using color tags
130                const highlightedText = `[color rgba(0,0,0,0.4)]${spoken}[/color]`
131                  + `[color #000]${word}[/color]`;
132
133                return new Creatomate.Keyframe(highlightedText, mark.time / 1000);
134              }),
135            }),
136
137          ],
138        })
139      )),
140
141      // Background music
142      new Creatomate.Audio({
143        source: 'https://creatomate-static.s3.amazonaws.com/demo/music3.mp3',
144        // Make the audio as long as the rest
145        duration: null,
146        // Two seconds from the end, fade out the audio
147        audioFadeOut: 2,
148      }),
149
150      // Progress bar
151      new Creatomate.Rectangle({
152        // Place the progress bar at the top of the video
153        x: '50%',
154        y: '1.5%',
155        width: '100%',
156        height: '3%',
157        // Color of the progress bar
158        fillColor: 'rgba(0,0,0,0.75)',
159        // Apply a 'Wipe' animation to make it animate from left to right
160        animations: [
161          new Creatomate.Wipe({
162            xAnchor: '0%',
163            fade: false,
164            easing: 'linear',
165          }),
166        ],
167      }),
168    ],
169  });
170
171  // Render the video
172  const renders = await client.render({ source });
173
174  console.log('Completed:', renders);
175}
176
177run()
178  .catch(error => console.error(error));
179
Wrapping up
You can see this really just scratches the surface of what video automation can do. And when combined with the latest breakthroughs in AI, there are even more opportunities to explore. Hopefully this article gave you some ideas and provided a starting point for automating videos with JavaScript and Node.js.
Stay tuned for more of these articles on our blog, and don't forget to subscribe to Creatomate so you'll get them right in your inbox!
You might also like these tutorials


Start automating today
Start with a full-featured trial with 50 credits, no credit card required.
Get started for free →