How to Make a GIF from a Video using FFmpeg

TL;DR
Here's how to convert a 5-second segment of a video to GIF, starting at the 3-second mark.
$ ffmpeg -ss 3 -to 8 -i input.mp4 -filter_complex "fps=10,scale=360:-1[s]; [s]split[a][b]; [a]palettegen[palette]; [b][palette]paletteuse" output.gif
Prerequisites
FFmpeg is a free and open-source video editing tool capable of trimming, cropping, concatenating, muxing, and transcoding almost any type of media file you throw at it.
It's also a very robust solution for implementing video automation, as we use it extensively in our own video editing API. For this tutorial we'll use FFmpeg 5.1.2, but any recent version will do.
Making a GIF
Here's how you make a GIF from a video:
$ ffmpeg -i input.mp4 output.gif
Although this is the fastest and easiest method, there are better options available for making the GIF look better and much smaller in size. Let's explore some methods for creating the optimal GIF.
The resulting GIF.
Improving GIF quality
The number of colors that can be used in a GIF image is limited to 256. To make most of this limited color palette, the GIF encoder uses color dithering – a clever way to prevent color banding and to make it appear that there are more colors than there actually are. One of the biggest downsides to using dithering is that it can be quite noticeable, as can be observed in the GIF in the form of noise.
Fortunately, there is room for improvement. Although we can't circumvent the GIF's limitation of 256 colors, we can generate a custom color palette with all of our picture's most significant colors. FFmpeg has an operation for this called palettegen, which analyzes the video to generate the best color palette for our GIF.
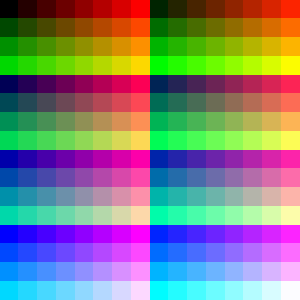
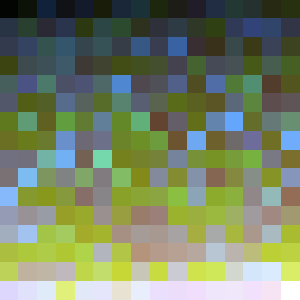
The default 256-color palette is shown on the left.
The optimal color palette generated from our video can be seen on the right.
The following command creates a GIF with an optimized color palette:
$ ffmpeg -i input.mp4 -filter_complex "[0]split[a][b]; [a]palettegen[palette]; [b][palette]paletteuse" output.gif
The [0]split[a][b] filter splits the input video into two streams, called a and b. We then feed our first stream a into palettegen, to generate a custom color palette that outputs into a new stream called palette, using [a]palettegen[palette]. Finally, we feed the second stream b and palette into paletteuse to create our GIF with the customized color palette, using [b][palette]paletteuse.
The previous GIF on the left.
The new GIF with optimized color palette on the right.
Reducing the file size
You might have noticed that the GIFs grow extremely large in file size – just a simple GIF can be dozens of megabytes. That's because GIF is a very simple format without many compression techniques, unlike modern video formats such as H.264. To avoid significant load times, it's best to reduce the resolution and frame rate of the GIFs to a maximum of a few megabytes. You can do this in the following way:
$ ffmpeg -ss 3 -to 8 -i input.mp4 -filter_complex "fps=10, scale=360:-1" output.gif
- The -ss 3 -to 8 arguments instruct FFmpeg to trim the video beginning at the 3-second mark and ending at the 8-second mark. If your input video is very long, this will help you cut only the part of the video you want to convert to GIF. I recommend making GIFs no longer than 5 seconds to maintain a manageable file size.
- The fps=10 sets the GIF frame rate to 10 fps (frames per second). Your input video will usually have a frame rate of 25 fps or more, which is too high for a GIF.
- Finally, scale=360:-1 resizes the video to 360 pixels wide, making the GIF file much smaller.
For a GIF that is both high-quality and reasonable in size, we can combine the above commands:
$ ffmpeg -ss 3 -to 8 -i input.mp4 -filter_complex "fps=10,scale=360:-1[s]; [s]split[a][b]; [a]palettegen[palette]; [b][palette]paletteuse" output.gif
FFmpeg vs. Gifski for creating GIFs
It is possible to create even better GIFs with Gifski. Gifski is a command-line tool like FFmpeg, but specialized in creating the highest-quality GIFs using cross-frame palettes and temporal dithering. Even though Gifski is open-source, it is important to note that Gifski requires a commercial license to be used in closed-source projects. First, let's see the differences compared to FFmpeg's output, so you can decide whether it's worth the extra effort:
FFmpeg on the left (2.15 MB) and Gifski on the right (1.69 MB).
Note the artifacts in the FFmpeg GIF caused by dithering, most noticeable at the rocks in the background.
As Giski can't work directly with video files, we must first extract its frames using FFmpeg:
$ ffmpeg -i input.mp4 -vf "fps=10, scale=360:-1" frame%04d.png
- The -vf "fps=10, scale=360:-1" argument instructs FFmpeg to extract the frames at a frame rate of 10 and a width of 360 pixels.
- By specifying frame%04d.png as the output file, FFmpeg extracts all frames using the pattern frame0001.png, frame0002.png, and so on.
These frames can then be combined into a GIF using Gifski:
$ gifski --fps 10 -o output.gif frame*.png
Reducing the file size of an existing GIF
Gifsicle is another commandline tool that comes in handy when working with GIFs. The feature I want to highlight here is the ability to optimize an existing GIF. First, let's look at the differences:
Gifski on the left (1.69 MB) and Gifski+Gifsicle on the right (1.13 MB).
Clearly, the second GIF looks worse, but it is also significantly smaller compared to the output of Gifski (1.69 MB → 1.13 MB) and much smaller than the output of FFmpeg (2.15 MB → 1.13 MB). Here's how to shrink a gif with Gifsicle:
$ gifsicle --optimize=3 --lossy=100 -o output.gif input.gif
- The --optimize=3 argument specifies the level of optimization, which can be 1, 2 or 3. A higher number will produce better results, but will take more time to process.
- The --lossy=100 argument specifies how many artifacts should be allowed; higher values lead to smaller files, but will produce more artifacts.
You might also like these tutorials


Start automating today
Start with a full-featured trial with 50 credits, no credit card required.
Get started for free →