How to Automatically Add Subtitles to Videos using Zapier

In this tutorial, you'll learn how to auto-transcribe video and audio files to add animated word-by-word captions to your social media videos using Zapier and Creatomate.
There are quite a few reasons as to why subtitles are a must-have when uploading videos to social media. The main reason is that most people scroll their feed with their audio muted. Secondly, transcribed videos tend to do better because animated subtitles attract attention. Without captions, viewers are likely to skip right over your video.
As such, it is a good idea to always add subtitles to your social media videos, or they might not perform as well. But if you've ever had to transcribe a video, you know how time-consuming it can be, especially if you post regularly. Fortunately, speech-to-text AI has become really good at helping us with this task, allowing us to fully automate the process of captioning videos.
In this tutorial, I'll show you how to set up an automation workflow for creating subtitles for your video clips. As a bonus, we'll automatically post the transcribed videos on social media as well. To do this, we'll use Creatomate to auto-transcribe the video, and Zapier to automate the whole process. Given that Zapier works with over 7,000 apps, it's a great platform for automating workflows across many different purposes – especially for social media marketing.
Video courtesy of Ryan Holiday of The Daily Stoic podcast.
The video above shows the auto-transcribed video we'll produce through the automated Zapier workflow. Here you can see that it is remarkably accurate at identifying the correct words. This is an important aspect of auto-transcription, as we don't want to spend time correcting words afterward – that would defeat the purpose.
When you look at typical captions on social media, you will see a wide range of styles. This is why we're going to use Creatomate to automate our video captions, so that we can customize the animation and styling exactly as we need. The tool supports pretty much any subtitle style. Plus, Creatomate lets us do a lot more than just generate captions – we can add outros, overlays, combine clips, and much more.
In order to keep things simple, we will only auto-transcribe the video, without any other automated video editing. However, Creatomate's online video editor lets you create custom templates to automate all your marketing videos. Don't forget to put it to the test after you've finished this tutorial.
💡 AI tip: You can also use a text-to-speech tool, like ElevenLabs, to generate AI voice overs. Creatomate's auto-transcription feature can then create animated subtitles for these audio files. Here's a tutorial with step-by-step instructions.
Prerequisites
The plan is to set up a Zapier workflow that runs automatically when a new video file comes in. As an example, we'll use a Zapier Table to provide the workflow with a list of video clips to transcribe. You can, however, replace this trigger with any of the thousands of supported app integrations, to totally customize your workflow. Perhaps you want to get the workflow triggered whenever a video is uploaded in Google Drive, and post it to Instagram instead – whatever works for you!
For this tutorial, I'll use the following tools:
- Creatomate: to create a video template and auto-generate the subtitles. Sign up for free.
- Zapier: to set up an automated workflow.
- (Optional) Zapier Tables: or any other app to import videos from.
- (Optional) YouTube: or any other app for further use of the videos.
How to generate subtitles using Zapier?
Let's take a look at the process in detail. First, we'll create a template in Creatomate where we'll set up the subtitles and choose a style. Next, we'll create a Zapier Table to input a list of video clips. We'll then set up a Zap to run every time a video clip is added to the table. In this Zap, we will use Creatomate to generate a transcribed video that will be posted as a YouTube Short once it has been completed. Here's what our Zap will look like:

Let's get started by creating a template.
1. Create a transcription template
Log in to your Creatomate account, go to the Templates page, and click + New. For the purpose of this tutorial, we'll use the Highlighted Subtitles template from the Auto-Subtitles category. Select a size, like 9:16 Vertical and click Create Template to open it in the editor:
This template is already set up to automatically generate captions based on an input video. The template consists of a placeholder video (Video-1), a text element (Subtitles-1), and an outro image (Logo). You can see that the subtitles haven't been generated yet, just placeholder captions. The actual captions will only be generated once the video is created.
The example template is organized into two compositions; one for the video with subtitles, and one for the outro. Now, double-click the Subtitles-1 element in the left-side navigation panel. With the text element selected, you can adjust its position, size, and style. On the right-hand properties panel, scroll down until you find the Transcription settings:
As you can see in the transcription settings, the Source property is set to Video-1. As a result, Creatomate will generate captions based on that video element. Play around with the Style properties to further customize the captions' styling and animation. As an example, to display one word at a time, a style popular on TikTok and Instagram, set the "Max. Length" property to 1.
That's it for the video template. In the next steps, we'll set up a Zapier workflow to process videos based on this template. Within that workflow, we'll replace the Video-1 element with a different video clip, which in turn will automatically generate subtitles for the Subtitles-1 element.
Creatomate can do much more than just adding subtitles to a video, but for now, let's stick with the current template and move on to the next step, where we'll automate it using Zapier. If you'd like to customize your template, take a look at this quick guide for more details on how the editor works.
2. Set up a Zapier Table (optional)
In this example, we'll create a list of videos to feed into the automated workflow using a Zapier Table. However, if you're already familiar with Zapier, you may skip this step and use your own trigger to pass data into the Zap workflow.
Log in to your Zapier account and head over to the Tables page. Click the Start blank button, enter a name, like Auto-Subtitle Videos, and then click Create table:

In the table editor, let's set up the following fields:
- A link field: Input Video
- A text field: Title
- And a long text field: Description
Now, let's create a sample record that we'll use to set up the rest of our automation. You can use the following data to populate the first record:
- Input Video -> https://cdn.creatomate.com/demo/the-daily-stoic-podcast.mp4
- Title -> More of What Matters, Less of What Doesn't 💡✨
- Description -> Finding balance is about focusing on the things that truly matter! It's not just about adding more to your life—it's also about cutting out the things that don’t serve you. 🧘♀️ #MoreJoy #LessStress #LifeBalance
It should look like this (click on the screenshot to open it full screen):

3. Trigger the automated workflow
With your table ready, go back to your Zapier dashboard. Click the Create button and select Zaps:

Note: You can connect any trigger app that suits your needs.
Click the Trigger block, search for the Zapier Tables app, and select the New Record trigger event. Proceed by clicking Continue.
To configure the trigger, select your Auto-Subtitle Videos table in the Table ID field:

Then, click Continue.
Click Test trigger to make sure Zapier can find our sample record. Once the test is successful, click Continue with selected record, and move on to the next step:

4. Create an auto-transcribed video
Search for the Creatomate app and select the Create Single Render action event. Then, choose your account or create a connection using your project's API key, which you can find under Project Settings in your Creatomate dashboard:

When done, click Continue.
To configure the action, select the Highlighted Subtitles template in the Template field first. Then, we can map the input video from the trigger to the template by choosing Zapier Tables -> URL in the Video-1 field:

Then, click Continue.
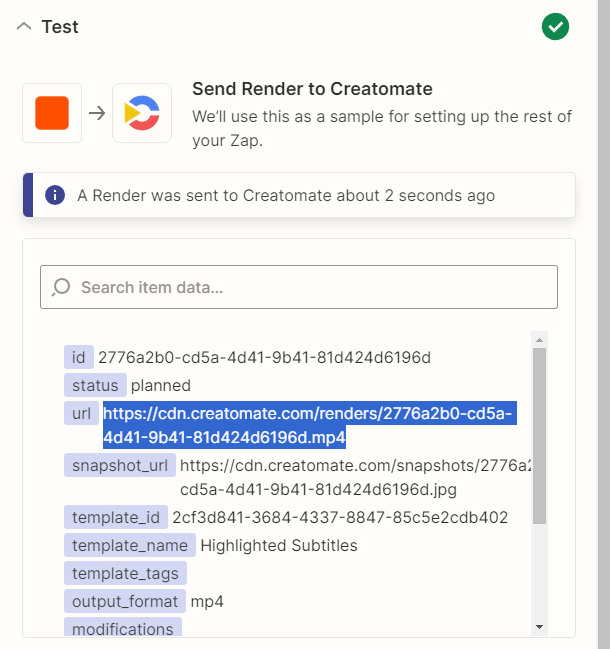
Click Test step to make sure it works. Creatomate will now take the input video, insert it into the template, and produce the transcribed video. This process can take a few minutes. So, before visiting the provided URL, wait a while or you may encounter a "Not Found" page, which means that the video is not yet ready. This only applies if you are testing the Zap, because once the workflow is published, it will automatically wait for the video to finish before continuing.
5. Post the video on social media
At this point, the subtitles have been successfully generated, and we now have a transcribed MP4 video ready for use. To complete this example, I’ll show you how to upload the video as a YouTube Short, but you can easily customize the workflow to fit your needs. For instance, here’s how to post it on Instagram, TikTok, or Facebook.
Click + to add a step to your Zap:

Search for the YouTube app, and select the Upload Video action event. Then, choose your account or sign in if needed:

Then, click Continue.
To configure the action, map at least the required fields:
- Set Title to Zapier Tables -> Title
- Set Description to Zapier Tables -> Description
- Set Video to Creatomate -> Url

Feel free to adjust the other settings as needed. After making your changes, click Continue to proceed. Then, click Test step to make sure Zapier is passing the right data. Because this is just a test, no video will be uploaded to your YouTube channel.
Now that the Zap is set up, all that needs to be done is to click Publish to activate the workflow.
What's next for automated subtitle videos?
It used to be necessary to manually type and synchronize captions for each video, but nowadays AI allows this task to be completely automated. With tools such as Zapier and Creatomate, setting this up has never been easier.
Having learned how auto-transcription works, I'd recommend reading some of our other step-by-step tutorials for getting the most out of social media automation. The flexibility of Creatomate templates combined with the almost limitless automation capabilities of Zapier allow for a wide variety of productive workflows to be explored.
If you're interested in exploring generative AI further, try auto-creating faceless shorts for YouTube, TikTok, or Instagram, complete with voiceovers, subtitles, and background images. Here's how it works: ChatGPT will generate a script based on your chosen topic and create image prompts for DALL·E. Then, text-to-speech AI will narrate the story, while Creatomate’s auto-transcription feature adds animated subtitles. It may seem a bit complex, but it's easier than it sounds. I've laid out all the steps in this tutorial.


