Get Started with Creatomate's Video Generation API

This tutorial will provide you with a hands-on introduction to generate video with your preferred programming language.
Creatomate provides a simple REST API that you can use with any programming language. Check the table of contents and/or click the button below to jump to the relevant instructions, but before you do, read the prerequisites to run the provided examples.
Prerequisite 1 of 2 – Get your API key
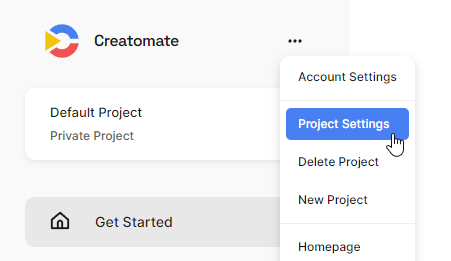
You will need to provide an API key in order to authenticate with Creatomate. Each project in your account has its own API key, allowing you to create separate environments for different clients, customers, or applications. It can be found in your dashboard under Project Settings.
Prerequisite 2 of 2 – Create a template
You can render a video from scratch or based on a template. As we're going to make videos based on a template, we need to create one first. Navigate to Templates in your dashboard, then click + New. After that, choose the Quick Promo template under the Featured category:
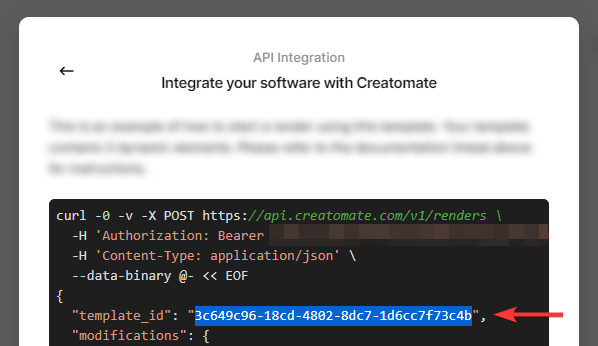
As soon as you click Create Template, the template will be copied to your project and opened in the video editor. Once you're there, click the blue Use Template button in the upper right corner. Then choose API Integration. Here's where you can find the template ID we need for the examples that follow.
Now we've got everything we need to run the examples below. Take a look at the table of contents to find instructions for your programming language.
Node.js instructions
Node.js users can access Creatomate's API via its official creatomate NPM package.
Node.js – Setup
Install the NPM package with npm i creatomate, then require it or import it based on whether you're using CommonJS or ES6. While the package is written in TypeScript, it works in any JavaScript setup. You can use it in the browser too, but this is not recommended because you have to authenticate with an API key, which you should keep private.
$ npm i creatomate
Node.js – Quick example
The following example shows how to render a template from your account. Replace YOUR_API_KEY and YOUR_TEMPLATE_ID with the API key and template ID as mentioned in the prerequisites.
1const Creatomate = require('creatomate');
2const client = new Creatomate.Client('YOUR_API_KEY');
3
4const options = {
5  // The ID of the template that you created in the template editor
6  templateId: 'YOUR_TEMPLATE_ID',
7
8  // Modifications that you want to apply to the template
9  modifications: {
10    'Text-1': 'Hi! 👋 Thanks for trying out Creatomate!',
11    'Text-2': 'Change this text to anything you want. ✨🦖',
12    'Video': 'https://creatomate-static.s3.amazonaws.com/demo/video5.mp4',
13  },
14};
15
16console.log('Please wait while your video is being rendered...');
17
18client.render(options)
19  .then((renders) => {
20    console.log('Completed:', renders);
21  })
22  .catch((error) => console.error(error));
23
Creating a video is as easy as calling render. Here we specify the template ID and optional modifications to be applied to the template before it is rendered.
The render method is asynchronous, so we can wait for it to complete using then and catch. As we specify a template ID, we can expect a single render. You can also render multiple renders at once using the tag option. Check out the API documentation to see what options are available.
Node.js – Further reading
It's also possible to make videos without using a template. The Creatomate SDK for Node.js lets you render video (as well as GIFs and images) in a JSON-structured format entirely from scratch, providing you with complete control over the output. It is recommended to use the JSON format for simple video editing operations such as stitching two dynamic videos together, since it provides greater flexibility and is easier to use in these instances. The template editor has a source view to get you started with the JSON format.
Also check out the Node.js examples repository, which has more than 50 examples showing how to use Creatomate's Node.js library for the most common operations.
PHP instructions
PHP users can access Creatomate's API via its official creatomate/creatomate package distributed through Packagist.
PHP – Setup
Install the package using Composer:
$ composer require creatomate/creatomate
PHP – Quick example
The following example shows how to render a template from your account. Replace YOUR_API_KEY and YOUR_TEMPLATE_ID with the API key and template ID as mentioned in the prerequisites.
1<?php
2
3require __DIR__ . '/../vendor/autoload.php';
4
5$client = new Creatomate\Client('YOUR_API_KEY');
6
7$options = [
8
9  // The ID of the template that you created in the template editor
10  'template_id' => 'YOUR_TEMPLATE_ID',
11
12  // Modifications that you want to apply to the template
13  'modifications' => [
14    'Text-1' => 'Hi! 👋 Thanks for trying out Creatomate!',
15    'Text-2' => 'Change this text to anything you want. ✨🦖',
16    'Video' => 'https://creatomate-static.s3.amazonaws.com/demo/video5.mp4',
17  ],
18];
19
20echo 'Please wait while your video is being rendered...' . PHP_EOL;
21
22try {
23  $renders = $client->render($options);
24
25  echo 'Completed: '
26    . json_encode($renders, JSON_PRETTY_PRINT | JSON_UNESCAPED_SLASHES)
27    . PHP_EOL;
28
29} catch (Exception $ex) {
30  echo 'Error: ' . $ex->getMessage();
31}
32
Creating a video is as easy as calling render. Here we specify the template ID and optional modifications to be applied to the template before it is rendered.
The render method is blocking and waits for the renders to finish. As we specify a template ID, we can expect a single render. You can also render multiple renders at once using the tag option. Check out the API documentation to see what options are available.
We can use startRender for non-blocking operations. This function can be used in conjunction with fetchRender to get the render status. Check out the Creatomate PHP SDK source code to see what it does.
PHP – Further reading
It's also possible to make videos without using a template. The Creatomate SDK for PHP lets you render video (as well as GIFs and images) in a JSON-structured format entirely from scratch, providing you with complete control over the output. It is recommended to use the JSON format for simple video editing operations such as stitching two dynamic videos together, since it provides greater flexibility and is easier to use in these instances. The template editor has a source view to get you started with the JSON format.
Also check out the PHP examples repository, which has more than 50 examples showing how to use Creatomate's PHP library for the most common operations.
Ruby instructions
Ruby users can access Creatomate's API using httparty or any HTTP package they already know.
Ruby – Setup
Install the httparty gem:
$ gem install httparty
Ruby – Quick example
The following example shows how to render a template from your account. Replace YOUR_API_KEY and YOUR_TEMPLATE_ID with the API key and template ID as mentioned in the prerequisites.
1require "httparty"
2
3options = {
4  # The ID of the template that you created in the template editor
5  template_id: "YOUR_TEMPLATE_ID",
6
7  # Modifications that you want to apply to the template
8  modifications: {
9    'Text-1': "Hi! 👋 Thanks for trying out Creatomate!",
10    'Text-2': "Change this text to anything you want. ✨🦖",
11    'Video': "https://creatomate-static.s3.amazonaws.com/demo/video5.mp4",
12  },
13}
14
15response = HTTParty.post(
16  "https://api.creatomate.com/v1/renders",
17  headers: {
18    "Authorization": "Bearer YOUR_API_KEY",
19    "Content-Type": "application/json",
20  },
21  body: options.to_json,
22)
23
24puts response.body
25
Creating a video is as easy as calling the POST /v1/renders REST endpoint. Here we specify the template ID and optional modifications to be applied to the template before it is rendered.
When we successfully call this REST endpoint, we'll get an array of Renders. The render status can be retrieved using the GET /v1/renders endpoint.
Ruby – Further reading
It's also possible to make videos without using a template. The Creatomate API lets you render video (as well as GIFs and images) in a JSON-structured format entirely from scratch, providing you with complete control over the output. It is recommended to use the JSON format for simple video editing operations such as stitching two dynamic videos together, since it provides greater flexibility and is easier to use in these instances. The template editor has a source view to get you started with the JSON format.
Python instructions
Python users can access Creatomate's API using requests or any HTTP package they already know.
Python – Setup
Install the requests package:
$ pip install requests
Python – Quick example
The following example shows how to render a template from your account. Replace YOUR_API_KEY and YOUR_TEMPLATE_ID with the API key and template ID as mentioned in the prerequisites.
1import requests
2
3options = {
4  # The ID of the template that you created in the template editor
5  'template_id': 'YOUR_TEMPLATE_ID',
6
7  # Modifications that you want to apply to the template
8  'modifications': {
9    'Text-1': "Hi! 👋 Thanks for trying out Creatomate!",
10    'Text-2': "Change this text to anything you want. ✨🦖",
11    'Video': "https://creatomate-static.s3.amazonaws.com/demo/video5.mp4",
12  },
13}
14
15response = requests.post(
16  'https://api.creatomate.com/v1/renders',
17  headers={
18    'Authorization': 'Bearer YOUR_API_KEY',
19    'Content-Type': 'application/json',
20  },
21  json=options
22)
23
24print(response.content)
25
Creating a video is as easy as calling the POST /v1/renders REST endpoint. Here we specify the template ID and optional modifications to be applied to the template before it is rendered.
When we successfully call this REST endpoint, we'll get an array of Renders. The render status can be retrieved using the GET /v1/renders endpoint.
Python – Further reading
It's also possible to make videos without using a template. The Creatomate API lets you render video (as well as GIFs and images) in a JSON-structured format entirely from scratch, providing you with complete control over the output. It is recommended to use the JSON format for simple video editing operations such as stitching two dynamic videos together, since it provides greater flexibility and is easier to use in these instances. The template editor has a source view to get you started with the JSON format.
Other language
Our API uses a simple RESTful interface, so you can use it in whatever programming language works for you. You can get a sense of how the API works by following the Ruby instructions above. Regardless, check out the API documentation for a quick start.


