How to Automatically Merge Videos using Zapier

In this no-code tutorial, you'll learn how to combine multiple video clips into one by stitching them together using Zapier, Airtable, and Creatomate.
If you're creating video content on a regular basis (like slideshows, compilations, YouTube videos, training videos, etc.), it's pretty likely that you'll also spend some time combining multiple clips together. Once you've shot and edited the videos, merging them can be a daunting task.
Luckily, video automation can help. No matter how long each individual video clip is, a final video will be automatically generated using a responsive template. This tutorial shows you how to set up an automated Zapier workflow that takes three videos from Airtable, merges them into one using Creatomate, and puts the final video back in Airtable.
As an example, we'll create the following video. However, you can also add transitions between clips, watermarks, intros, and outros by designing your own templates in the editor.
Prerequisites
These are the tools we'll use:
- Zapier: to set up the automated workflow.
- Creatomate: to merge the three videos into one final video. Sign up for free.
- Airtable: to provide the input videos and place the merged video back.
Note: In this tutorial, I'll use Airtable to show you how it works. Feel free to replace the Airtable trigger and action with the apps you already use.
How to merge videos with Zapier?
The first thing we'll do is create a video template in Creatomate. We'll use a ready-made template from the gallery. This is a responsive video compilation with three video clips that adapt to the input videos' length. Additionally, you can customize this template or design your own.
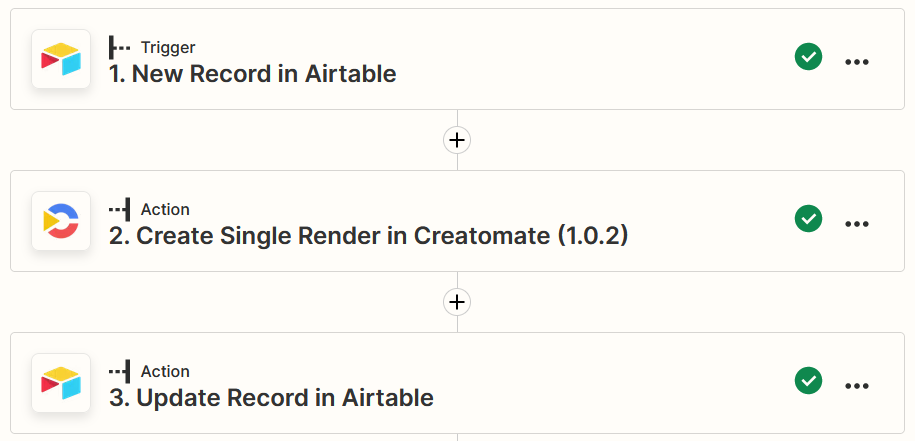
We'll then set up an automated Zapier workflow that gets the input videos from a new Airtable record, merges them using Creatomate, and updates the record with the final video. Here's how the Zap will look:
1. Create a video template in Creatomate
Log in to your account. Go to the Templates page and click the + New button. From the Fundamentals category, we'll use the Video Compilation (3 videos) template. Let's go with the 16:9 Landscape size and click Create Template:
The template is already set up to merge three videos of variable length into one. So the final video will be as long as all three input videos combined. We don't have to make any changes to our template, but if you want you can add transitions, logos, text, etc.
Next, let's create our Zap.
2. Add trigger: New Record in Airtable
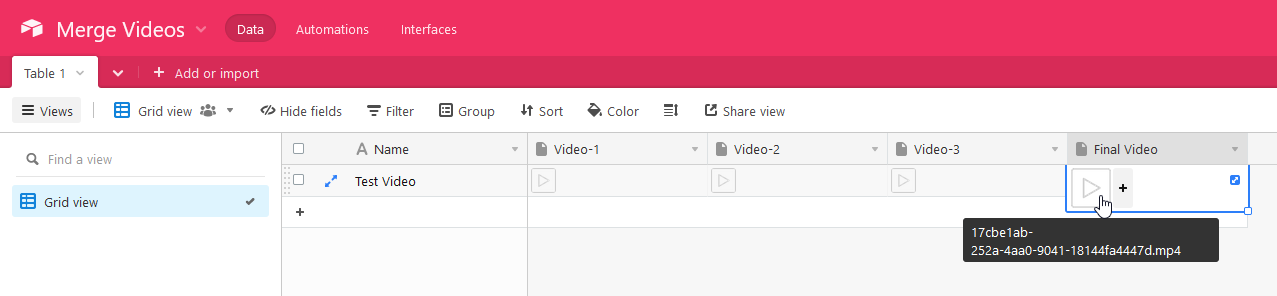
We're going to use Airtable to upload the input videos we want to merge. I've created this simple table for demonstration:

There are three columns for input videos. The fourth is for uploading the final video back. That's optional, you can also connect other apps like Gmail or YouTube in step 4.
Note: You can use any trigger app you want instead of Airtable.
Log in to your Zapier account and click + Create Zap. Search for the Airtable app and select the New Record event. Continue by selecting your account or sign in first.
To set up the trigger, select your Base and Table. Then, click Continue:

Click Test Trigger on the last screen to ensure that Zapier is able to find a record in Airtable. When the test was successful, click Continue.
3. Add action: Create Single Render in Creatomate
Search for the Creatomate app and select the Create Single Render event. Continue by selecting your account from the list or sign in with your project's API key first.
On the set up action screen, we'll select our Video Compilation (3 videos) template in the Template field first. Let's map the input videos to the template as follows:
- Set Video-1 to Airtable -> Video 1 Url
- Set Video-2 to Airtable -> Video 2 Url
- Set Video-3 to Airtable -> Video 3 Url
When done, click Continue:

Then, click Test step on the last screen to make sure that Creatomate can combine our three input videos into one. We can check out the final video by visiting the URL. It takes some time to render the video, so if you get a Not Found page, wait 30 seconds and refresh the page. This is just while testing; once your Zap is published, the next action waits for the video to finish:

4. Add action: Update Record in Airtable
We'll upload the video back to Airtable in this step. But you can use another app that works for you. So, for instance, the video can be uploaded to YouTube or sent by mail using Gmail or Email by Zapier.
Click + to add another action to your Zap. Search for the Airtable app and select the Update Record event. Continue by selecting your Airtable account (the same as the trigger).
To set up the action, select the same Base and Table as with the trigger app. To update the same record as where the input videos came from, we'll select Airtable -> ID from the Custom tab in the Record field:

To update the record with the merged video, let's select Creatomate -> Url in the Final Video field. Click Continue:

Click Test step on the last screen to make sure Zapier is able to upload the merged video to Airtable. Checking my Airtable, I see that the final video has been added to the right column. Once the test was successful and you're happy with your workflow, click Publish Zap to enable it. Now, whenever you want to combine multiple video clips, simply upload them to Airtable and it will automatically make a merged video:
Wrapping up
That's all it takes! We now have an automated no-code workflow for merging video clips from Airtable. Just adapt this workflow to your own situation and you'll never need to manually merge videos again.


